This article is written by Toru Hoshino, a jazz bassist and instructor based in Japan who teaches online lessons to students worldwide.
Today I want to share the top 3 most-watched videos from my channel this year, picked out by viewers like you.
This year again, I posted a new video every single Friday at 9pm, without missing a week. I’ve been doing this for about six years now, and somewhere along the way the channel passed 13,000 subscribers! To everyone who watches regularly — thank you so much.
Today I’m sharing the top 3 most-watched videos of the year. These covered topics a lot of people were interested in, so if you missed any of them, or you’re curious, take a look.
#3 — How to Build a Bass Line When the Same Chord Lasts Two Bars
When the same chord repeats for two bars or more, like:
C7 / C7
Dm7 / Dm7
…I get asked all the time how to build a bass line through it.
This video walks through the thinking behind it, with concrete, usable phrases for that exact situation.
#2 — What Changed About My 4-String Playing After Switching to 5-String Bass
After playing a 5-string bass for several years, this video looks at how it ended up affecting my playing on 4-string bass, from a few different angles.
The conclusion: picking up the 5-string had a lot of positive effects on my 4-string playing. If you’re thinking about trying a 5-string, this one’s worth a watch.
This one got a ton of comments along the lines of “this warmed my heart” — a review and taste-test of a bakery called “Chet Bakery” that plays jazz all day.
Not too beginner-focused, not too advanced either. Not overloaded with theory or jargon, but still has to feel like “me.” That’s the balance I’m always wrestling with when I’m trying to figure out what to make next — and I put real care into every single video.
I plan to keep posting every week without a break through the rest of this year too. Thanks for sticking with me, and I hope you’ll keep watching!
Want Personalized Feedback on Your Playing?
This is exactly the kind of thing that’s hard to fix alone — and where having a teacher makes all the difference.
At Line on Bass, I offer an online lesson service where you send me a video of your playing, and I give you specific, detailed feedback — every single day if you want.
Students from around the world are using this to fix exactly these kinds of issues and steadily improve their jazz bass skills.
This article is written by Toru Hoshino, a jazz bassist and instructor based in Japan who teaches online lessons to students worldwide.
For these three things, it’s not repetition that fixes them — it’s awareness, about 90% of the time.
In lessons, I often get questions like:
“My left hand flails around too much — is there a good way to practice that?”
or
“I can’t get my muting right — is there a good way to practice that?”
Repetition practice is, of course, important. But what tends to work even better is pointing out specifically where the left hand is flailing, or where the muting is going wrong, and saying something like:
“Next time, focus on muting cleanly through beats 3 and 4 of bar 9.”
When I give that kind of specific feedback, things often improve noticeably right away.
Of course, how quickly someone improves varies depending on how long they’ve played the instrument. But in general, I find that the key is simply this:
Recognize for yourself exactly what’s not working, and consciously play to avoid it next time.
That’s basically it. Pretty unglamorous, I know.
It’s natural to want to look for “the right method,” but in particular, for things like:
・Left hand flailing
・Even note duration
・Muting
…mindless repetition often isn’t what fixes these. Simple awareness, like I described above, tends to do the job.
That said, it’s hard to notice these things on your own when you’re self-taught. Recording yourself playing and watching it back with an objective eye is a great way to catch what you’re missing.
I hope this gives you a useful way to think about it next time you hit a rough patch in a phrase or bass line.
Want Personalized Feedback on Your Playing?
This is exactly the kind of thing that’s hard to fix alone — and where having a teacher makes all the difference.
At Line on Bass, I offer an online lesson service where you send me a video of your playing, and I give you specific, detailed feedback — every single day if you want.
Students from around the world are using this to fix exactly these kinds of issues and steadily improve their jazz bass skills.
This article is written by Toru Hoshino, a jazz bassist and instructor based in Japan who teaches online lessons to students worldwide.
“My pinky just doesn’t reach the string on bass.”
If that’s you, here’s a simple tip that can make a big difference. The key is your elbow.
Bring Your Elbow Forward
If you have small hands or short fingers and your pinky won’t reach, here’s a hint: tuck your elbow in and push it slightly forward. Your pinky will naturally land on the string. It doesn’t affect your form’s appearance either, so if you’re struggling with fingering, it’s worth a try.
Just a Little Push Forward
I have a student whose pinky is quite short, yet she uses it freely and confidently — she’s just a regular high school student, nothing special about her hands.
I asked her how she manages to use her pinky so well, since my fingers have always been naturally long and I’d never had to deal with short-finger struggles.
She told me: “When I use my pinky, I tuck my elbow in toward my body as much as possible.”
Here’s roughly what that looks like.
↓ This is the typical posture:
↓ This is what my student does:
Push your elbow forward, just a little bit, in a firm motion. Doing that brings your pinky naturally onto the string.
If Your Pinky Is Short, Try Pushing Your Elbow Forward
There’s only so much you can do about the physical length of your pinky finger. When that’s the case, just try bringing your left elbow forward a bit.
It won’t affect how your form looks, either.
A 3-Minute Daily Pinky Exercise for Bassists
With all that in mind, here’s a video you can use to put it into practice. Just three minutes a day, and you’ll gradually find your left hand stops flailing around, helping you lock in a smoother, more controlled form.
More on Bass Playing Form
Building the right form for your body will speed up your progress. The article below covers right hand, left hand, strap length, angle, and more — worth a look as well.
This is exactly the kind of thing that’s hard to fix alone — and where having a teacher makes all the difference.
At Line on Bass, I offer an online lesson service where you send me a video of your playing, and I give you specific, detailed feedback — every single day if you want.
Students from around the world are using this to fix exactly these kinds of issues and steadily improve their jazz bass skills.
This article is written by Toru Hoshino, a jazz and upright bassist and instructor based in Tokyo.
I built a walking bass line over the chord changes to the jazz standard “Fly Me to the Moon,” and this article breaks it down note by note, explaining the reasoning behind every single note.
It’s a very long, detailed breakdown, so feel free to bookmark this page and come back to it whenever you have time to read through it properly.
A Video with Notation for a Walking Bass Line You Can Use Over “Fly Me to the Moon”
Here’s a performance of the line first.
Characteristics of This Bass Line
For this bass line, I avoided things like ghost notes or high-position playing, and kept it to simple quarter notes.
I aimed for a flow that’s easy to use both for backing the melody and for backing improvisation, without getting in the way of the beautiful melody of “Fly Me to the Moon.”
I’ll walk through the A section note by note.
The chord changes are based mostly on the Jazz Standard Bible (a well-known Japanese fake book), with a few small adjustments to fit the line’s movement.
A Section (Bars 1–8)
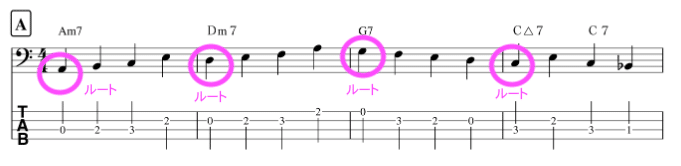
Let’s start by going through the notes used in the A section (bars 1–8).
Bar 1
Over Am7:
Note 1: A (the root of Am7)
Note 2: B (the 2nd of Am7)
Note 3: C (the minor 3rd of Am7)
Note 4: E (the 5th of Am7)
Bar 2
Over Dm7:
Note 1: D (the root of Dm7)
Note 2: E (the 2nd of Dm7)
Note 3: F (the minor 3rd of Dm7)
Note 4: A (the 5th of Dm7)
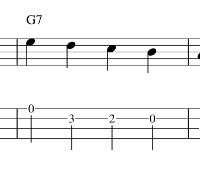
Bar 3
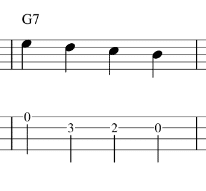
Over G7:
Note 1: G (the root of G7)
Note 2: F (the minor 7th of G7)
Note 3: E (the 6th of G7)
Note 4: D (the 5th of G7)
Bar 4
Over CΔ7, then C7:
Note 1: C (the root of CΔ7)
Note 2: E (the major 3rd of CΔ7)
Note 3: C (the root of C7)
Note 4: B♭ (the minor 7th of C7)
The Basic Rule: Start on the Root
Looking at the line so far, you’ll notice that, just like in pop or rock, the first note of each chord is generally the root.
When I first started learning jazz walking bass by ear, I honestly couldn’t tell at all which notes the bassist was playing on the recordings I was copying.
But the basic approach, most of the time, is to move with the root on the first beat of the bar.
By placing the root on the first note and using chord tones or scale tones for the rest, you create a line that sits naturally with the harmony — one that just sounds “right” to the ear.
If you’re not sure what “the root” means, I’d recommend reading this article first. It’s a concept you can’t avoid when building bass lines in any genre, so make sure it’s solid.
Bar 5
Over FΔ7:
Note 1: F (the root of FΔ7)
Note 2: E (the major 7th of FΔ7)
Note 3: D (the major 6th of FΔ7)
Note 4: C (the 5th of FΔ7)
This one also falls nicely under the fingers.
Bar 6
Over Bm7(♭5):
Note 1: B (the root of Bm7(♭5))
Note 2: C (the minor 2nd of Bm7(♭5))
Note 3: D (the minor 3rd of Bm7(♭5))
Note 4: F (the ♭5 of Bm7(♭5))
Bar 7
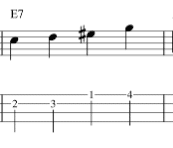
Over E7:
Note 1: E (the root of E7)
Note 2: F (the minor 2nd of E7)
Note 3: G♯ (the major 3rd of E7)
Note 4: B (the 5th of E7)
None of these notes are hard to play, but this particular movement can still feel a little unfamiliar at first.
The key note is the third one, G♯ — the major 3rd of E7. It has a very distinctive sound.
When you play this bass line, make a point of really bringing out that G♯ in bar 7’s E7 — it’s an important color tone for “Fly Me to the Moon.”
Bar 8
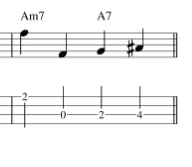
Over Am7, then A7:
Note 1: A (the root of Am7)
Note 2: C (the minor 3rd of Am7)
Note 3: A (the root of A7)
Note 4: C♯ (the major 3rd of A7)
That covers the full 8-bar A section.
B Section (Bars 9–16)
Next is the B section bass line.
The progression Dm7 → G7 → CΔ7 — a classic “two-five-one” — shows up twice here.
This Dm7 → G7 → CΔ7 movement, and ii–V–I progressions in general, come up constantly in jazz, so it’s worth being able to handle them smoothly.
Bar 1
Over Dm7:
Note 1: D (the root of Dm7)
Note 2: E (the 2nd of Dm7)
Note 3: F (the minor 3rd of Dm7)
Note 4: A (the 5th of Dm7)
An easy one to finger.
Bar 2
Over G7:
Note 1: G (the root of G7)
Note 2: F (the minor 7th of G7)
Note 3: E (the 6th of G7)
Note 4: D (the 5th of G7)
Bar 3
Over CΔ7:
Note 1: C (the root of CΔ7)
Note 2: B (the major 7th of CΔ7)
Note 3: A (the 6th of CΔ7)
Note 4: G (the 5th of CΔ7)
A smooth, gently descending line, moving in whole and half steps.
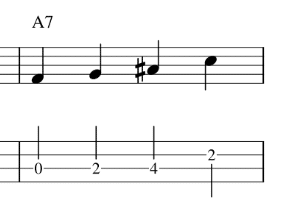
Bar 4
Over A7:
Note 1: A (the root of A7)
Note 2: B (the 2nd of A7)
Note 3: C♯ (the major 3rd of A7)
Note 4: E (the 5th of A7)
A7 here is a non-diatonic chord, so just like bar 8 of the A section, I made sure to use C♯.
Bars 5–7
I used the same notes here as in bars 1–3 of this section, so I won’t go through them again in detail.
As mentioned above, ii–V–I progressions like this Dm7 → G7 → CΔ7 come up constantly in jazz, so it really pays off to have a few go-to walking bass patterns for ii–V–I in your pocket — you can reuse them just like this.
Bar 8
Over Bm7♭5, then E7:
Note 1: B (the root of Bm7♭5)
Note 2: E (the root of E7)
Note 3: E (the minor 2nd of E7)
Note 4: G♯ (the 3rd of E7)
This one’s a bit unusual: only the first note follows Bm7♭5, and everything from the second note on follows E7.
That wraps up the B section.
A′ Section (Bars 17–24)
The A′ section uses exactly the same notes as the A section, so I’ll skip the detailed breakdown.
As I’ve mentioned in other song breakdowns, I sometimes get asked, “Is it really okay to repeat the same bass line pattern over and over?”
When you’re starting out, I think that’s completely fine.
In fact, if a beginner tries to force a different pattern every single time, you often can’t keep up — your picking falls behind the time and the rhythm starts to slip.
The point of this article is to give people who find it hard to build a line on the fly, just by looking at the changes, something they can simply play as written, so they can start developing a feel for “okay, so this is what a walking bass line is like.”
So until you have enough freedom to improvise your line by reading the chords, don’t worry too much about repeating patterns. Instead, focus on keeping a steady, consistent rhythm — a bass line the other musicians can lock into and play comfortably over — even if it’s simple or repetitive.
C Section (Bars 25–32)
This is the final 8 bars. Most of it is similar to what we’ve already covered, but bars 1–3 stand out for using a passing diminished chord — that’s the key point here.
The Passing Diminished Chord
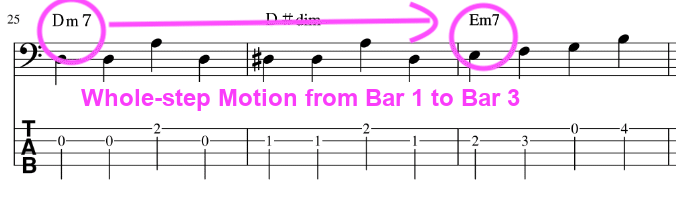
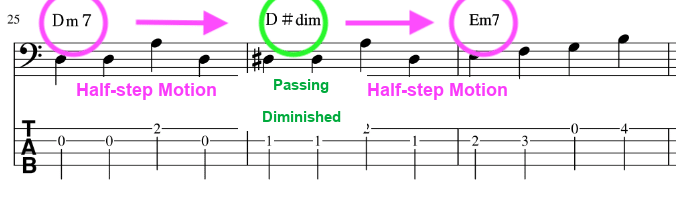
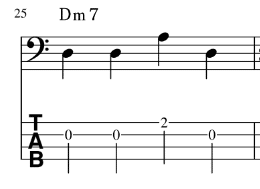
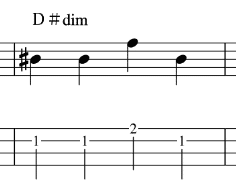
The progression here is Dm7 → D♯dim → Em7. Looking only at the roots:
D → D♯ → E
… moves in half steps.
You can think of this as a whole-step move from Dm7 in bar 1 to Em7 in bar 3 (see below):
To smooth out that whole-step movement, there’s a chord sitting right in the middle — a half step above Dm7 and a half step below Em7 — and that’s D♯dim (see below):
That’s the idea behind it.
A diminished chord that sits between two chords of a larger whole-step (or whole-tone) progression like this is called a “passing diminished” chord.
A diminished chord is built from the root, minor 3rd, ♭5, and 6th — which gives it a slightly eerie, unsettled sound on its own. But used as a passing diminished like this, it blends beautifully into the harmony.
Let’s build the bass line with all of this in mind.
Bar 1
In bar 1, over Dm7, I only used:
The root (D)
The 5th (A)
Up to now, every quarter note in a 4-beat walking line used a different note. Here, I deliberately built the line with just these two notes instead.
The reason has to do with bar 2.
Bar 2
In bar 2, over D♯dim, it’s the same idea:
The root (D♯)
The ♭5 (A)
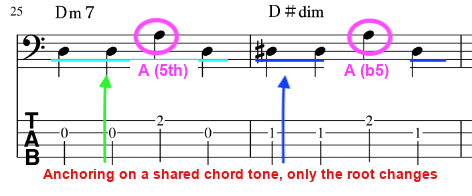
On its own that looks simple, but look at what happens when you combine bars 1 and 2:
The A circled in the diagram is a chord tone (the 5th) shared by both chords. Here, across these two bars, the trick is to keep that shared note (A) fixed while only the root moves underneath it.
There’s nothing wrong with simply playing four different quarter notes through these two bars — but instead, I deliberately repeated the same note two or three times in a row like this. It’s a different kind of approach, and sometimes it just feels better musically.
That covers bars 1–2 of the C section.
Bars 3–8 of the C section reuse and build on ideas we’ve already covered, so I’ll leave those as an exercise — and that wraps up the note-by-note breakdown of this one chorus of “Fly Me to the Moon.”
This turned into a pretty long breakdown — thanks for reading all the way through.
I hope it helps with building your own bass lines going forward.
Want Personalized Feedback on Your Playing?
This is exactly the kind of thing that’s hard to fix alone — and where having a teacher makes all the difference.
At Line on Bass, I offer an online lesson service where you send me a video of your playing, and I give you specific, detailed feedback — every single day if you want.
Students from around the world are using this to fix exactly these kinds of issues and steadily improve their jazz bass skills.
This article is written by Toru Hoshino, a jazz and upright bassist and instructor based in Tokyo, and covers the form and habits I keep in mind when playing walking bass on electric bass.
Form varies from person to person depending on body type, gender, genre, and more, so none of this is a “you must do it this way” rule — but I hope it’s useful as a reference.
Bass Position
I wear my bass pretty high.
I use a COMFORT strap set to its shortest length, and I make a point of keeping the body of the bass in the same position whether I’m standing or sitting.
Funk and jazz players tend to wear the strap short, while rock players tend to wear it longer.
I used to wear mine super long back in my punk rock days, too — but for anyone playing with a long strap, I’d recommend practicing standing up, even at home, so your form carries over to how you’ll actually play live.
Look at the Fretboard with Your Eyes Only
To check my fingering, I look at my left hand.
When I do this, tilting my head way down to stare at the fretboard makes the playing look amateurish.
It’s hard to play without looking at the fretboard at all, but where I can, I try to keep my head straight and check the fretboard with just my eyes.
↑ This is looking way too much. My mouth’s even hanging open.
↑ This is checking the fretboard subtly, with just my eyes.
Keep Your Left Hand from Flapping Around
Opening and closing your left hand like you’re throwing rock-paper-scissors doesn’t look great, and it isn’t very efficient either.
The less you open and close your left hand, the more easily you can adapt to whatever phrase comes next.
Right Elbow Position
I rest my elbow just slightly forward of where it naturally falls on top of the body of the bass.
The angle you see in the photo below is what feels the most relaxed for my own style.
Left Hand Position
I keep my elbow tucked slightly inward. My thumb isn’t there to pinch the neck — it’s just resting against it for support.
I also try to keep my hand curled as much as possible, so I’m always ready to fret the next note right away.
Want Personalized Feedback on Your Playing?
This is exactly the kind of thing that’s hard to fix alone — and where having a teacher makes all the difference.
At Line on Bass, I offer an online lesson service where you send me a video of your playing, and I give you specific, detailed feedback — every single day if you want.
Students from around the world are using this to fix exactly these kinds of issues and steadily improve their jazz bass skills.
This is part of an ongoing series on bass solos and improvisation.
This time, I want to share a small but handy trick you can use in your bass solos: the ♭9 (flat ninth).
What This Article Covers
This article is written by Toru Hoshino — a jazz bassist and instructor based in Tokyo who has played bass on an estimated 1,000+ jam sessions around the city and continues to perform and teach today. It’s for anyone who:
· Isn’t sure how to put together an improvised solo · Wants to add some new ideas to their solo vocabulary · Feels like their phrases never quite sound “jazzy” enough
This time, I’ll explain the ♭9th — a note that comes in incredibly handy over dominant chords in a ii–V–I progression.
First, give it a listen.
A Few Phrases That Use the ♭9th
Example 1
Without the ♭9th
With the ♭9th
Don’t those feel pretty different, even though only one note changed? The first one isn’t bad at all — but the second has a bit more “character” to it.
Let’s look at one more example.
Example 2
Without the ♭9th
With the ♭9th
Just like in Example 1, only one note is different — but again, that distinctive flavor shows up in the second version.
That’s because both of these examples use the ♭9 note.
Put simply, the ♭9th is “the 2nd degree, flatted.” Even more simply: it’s the note right next to the chord’s root on the fretboard.
In Example 1, that’s A♭ against G:
In Example 2, that’s B against B♭:
Point: Adding the ♭9th over a dominant chord is an easy way to bring a real jazz flavor into your sound — and it’s conveniently easy to reach on the bass fretboard too.
Tension Notes and Dominant Motion
In jazz, when a seventh chord resolves through dominant motion, players often reach for tension notes like the ♭9th.
Let’s go over what “tension notes” and “dominant motion” actually mean.
Tension Notes and the ♭9th
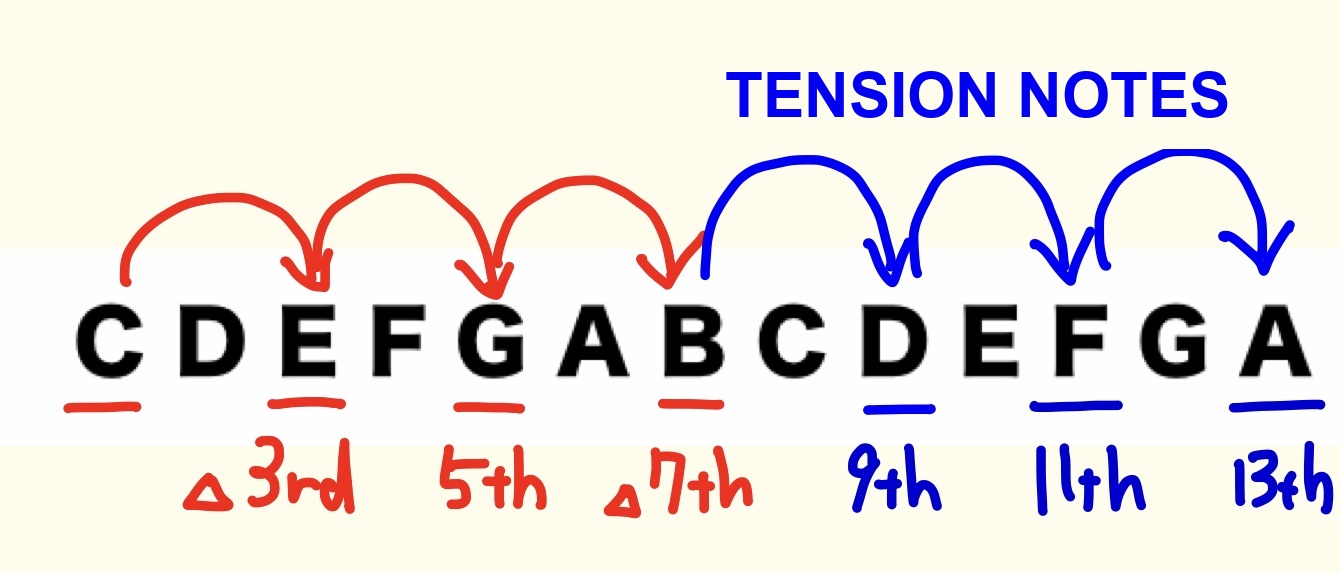
A chord is built by stacking notes from a scale every other note. Sometimes that stacking goes beyond one octave — those extra notes are called tension notes.
The 9th note here (the D) gets flatted to become the ♭9th.
In this example, against a C, the note D♭ is the ♭9th.
Reading it out like that every time is a bit much, though, so it’s common to just refer to the note right next to the root on the fretboard as the “♭9th” — in other words, the flatted 2nd.
To put it another way — yes, that’s basically it.
What Is Dominant Motion?
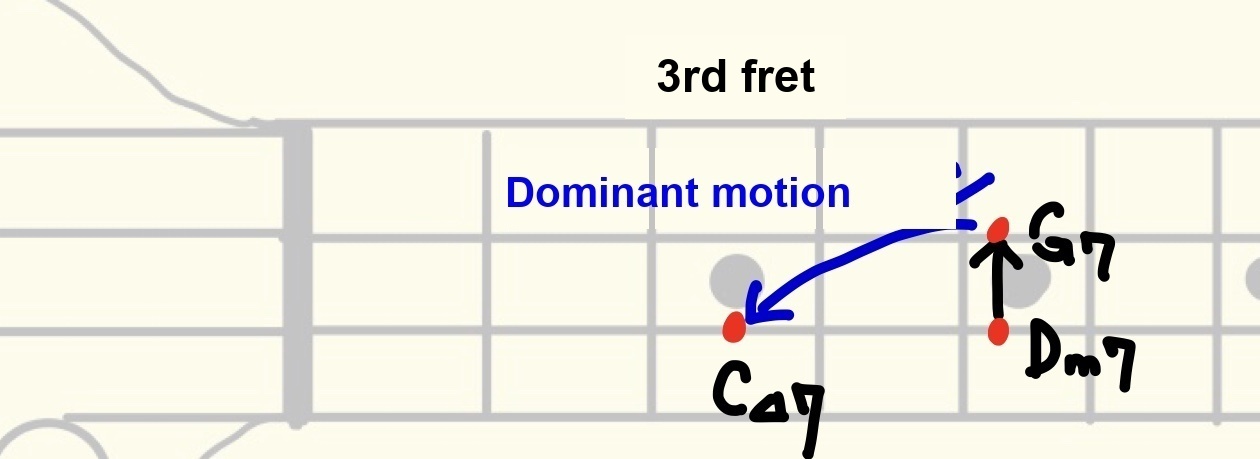
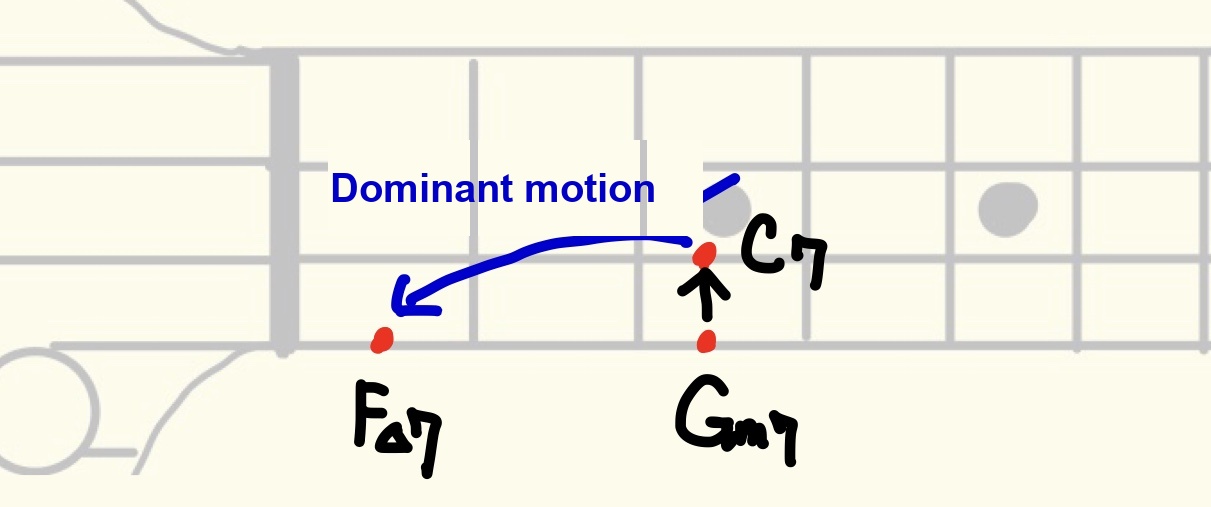
In a ii–V–I progression, the move from the dominant chord to the tonic is called “dominant motion.”
G7 to CΔ7, as dominant motion:
C7 to FΔ7, as dominant motion:
In jazz, this is often where players add real tension to the sound, and tension notes are a common way to do that.
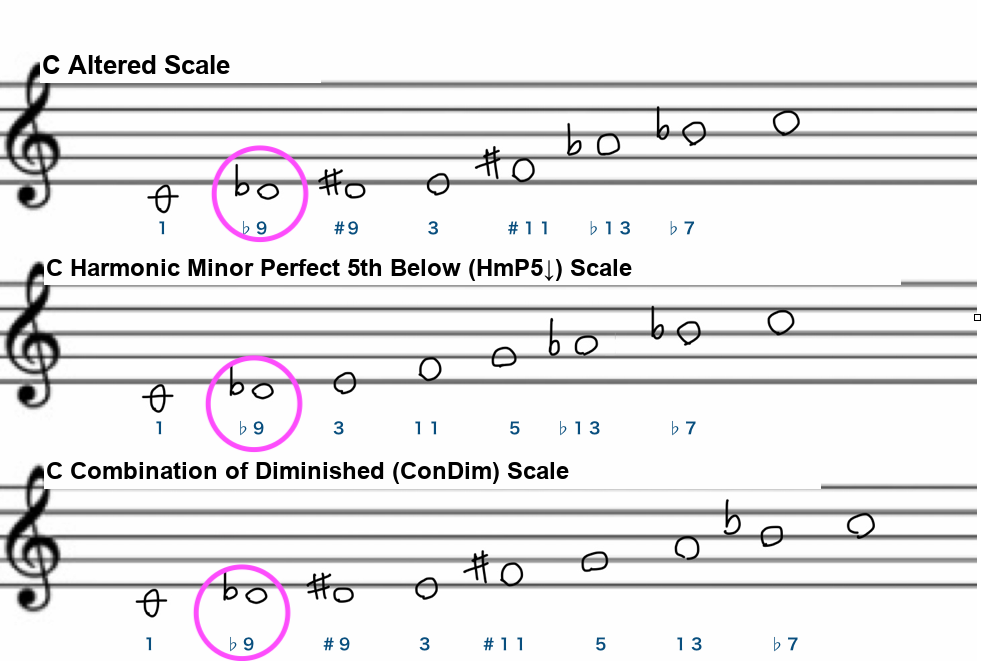
Some of the scales where tension notes show up most are:
Altered Scale
Harmonic Minor Perfect 5th Below Scale
Combination of Diminished (ConDim) Scale
…and the ♭9th shows up in every one of them.
I get it — jumping straight into using these scales fluently can feel like a tall order.
That’s exactly why I’d recommend starting with just the ♭9th — marked in pink in the diagrams above — over dominant seventh chords. It’s far more approachable on the fretboard, and a great first step.
Tips for Using the ♭9th in Your Solos
To really make the ♭9th part of your improvising vocabulary, it helps to build it into muscle memory.
A good way to do that is to start using it outside of your solos too — specifically, while you’re playing walking bass behind someone else.
Used this way, the ♭9th fits naturally into walking bass lines over dominant progressions too. The more your ear gets used to hearing it, the better — so give it a try.
That’s it for this small but handy trick you can use in your bass solos: the ♭9 (flat ninth).
Want Personalized Feedback on Your Playing?
This is exactly the kind of thing that’s hard to fix alone — and where having a teacher makes all the difference.
At Line on Bass, I offer an online lesson service where you send me a video of your playing, and I give you specific, detailed feedback — every single day if you want.
Students from around the world are using this to fix exactly these kinds of issues and steadily improve their jazz bass skills.
This article walks through a training method that will help you improvise walking bass lines, instead of relying on lines you’ve memorized ahead of time.
For this one, we’ll use a chord progression from a famous jazz standard: “Autumn Leaves.”
This ended up being a pretty long article, so I’d recommend bookmarking it and working through it when you have some time to really dig in.
Want to Be Able to Improvise Walking Bass Lines?
Being able to improvise a walking bass line on the spot, instead of relying on a line you wrote out ahead of time, is a great feeling.
But it’s not easy, and a lot of players end up searching YouTube over and over trying to figure out how to get there.
In this article, we’ll take the first 8 bars of the “Autumn Leaves” chord progression
Cm7 → F7 → B♭Δ7 → E♭Δ7
→ Am7♭5 → D7♭13 → Gm6 → Gm6
and break down how to build a walking bass line over it that you can improvise in real time.
Step 1: Play Roots
Start by getting comfortable playing the roots, then gradually add more notes.
I covered roots in detail in another article — if you’re already comfortable playing bass lines from the root, feel free to skip ahead.
The chords go Cm7 in bar 1, F7 in bar 2, B♭Δ7 in bar 3, and E♭Δ7 in bar 4.
Start at a slow tempo and play the root on beat 1 of each bar.
Once that’s solid, try playing the root four times per bar as quarter notes.
Once you can play the whole progression on quarter-note roots at around 100–120 bpm, move on to the next step.
Step 2: Play Root and 5th
Now we add the 5th to the root.
Compared to roots only, doesn’t this already feel like it’s moving a lot more?
About the 5th
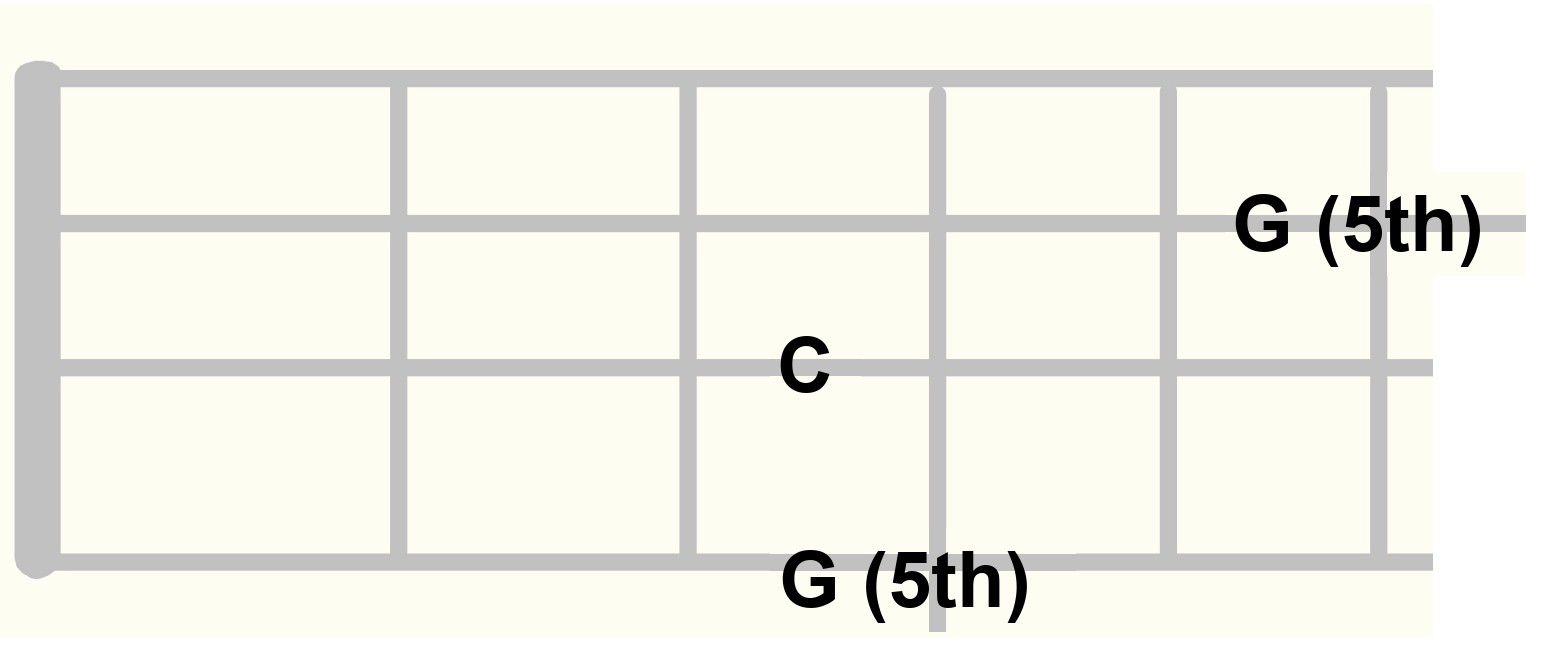
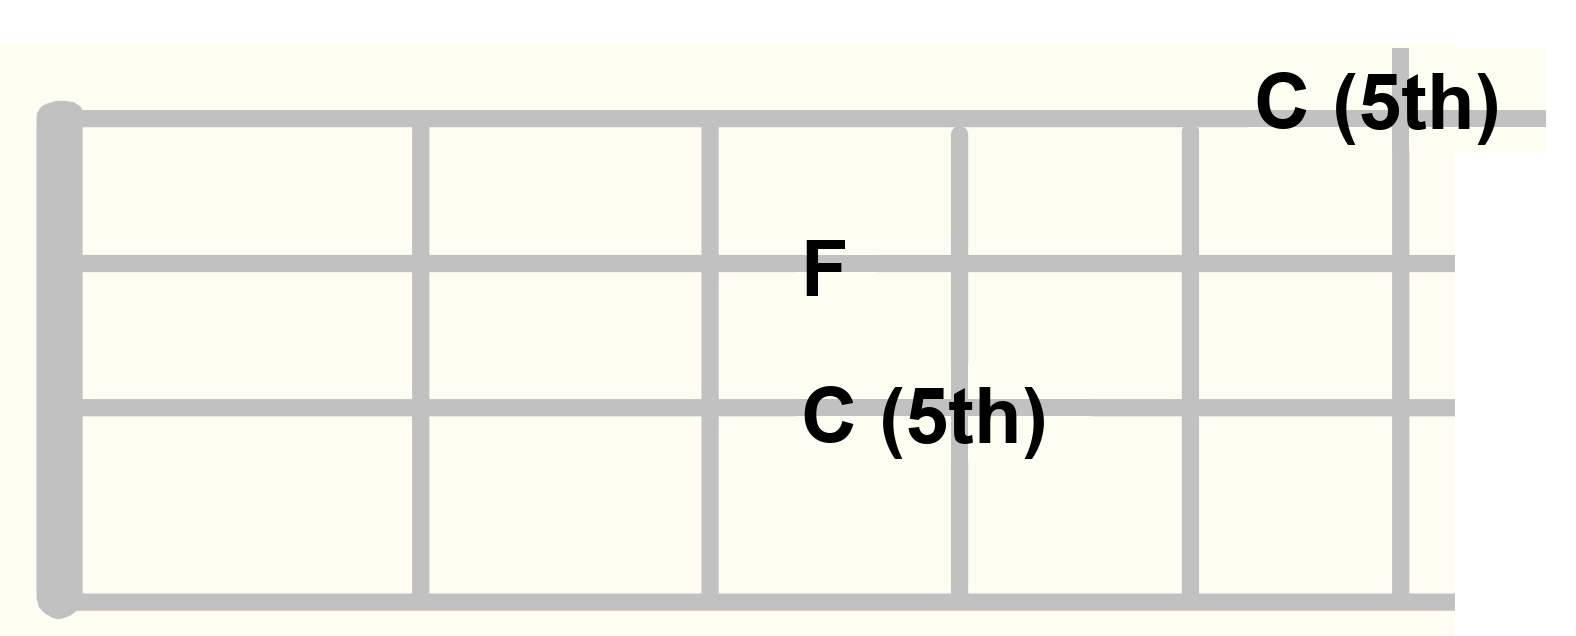
If the root of Cm7 is C (3rd string, 3rd fret), the 5th is located here:
If the root of F7 is F (2nd string, 3rd fret), the 5th is located here:
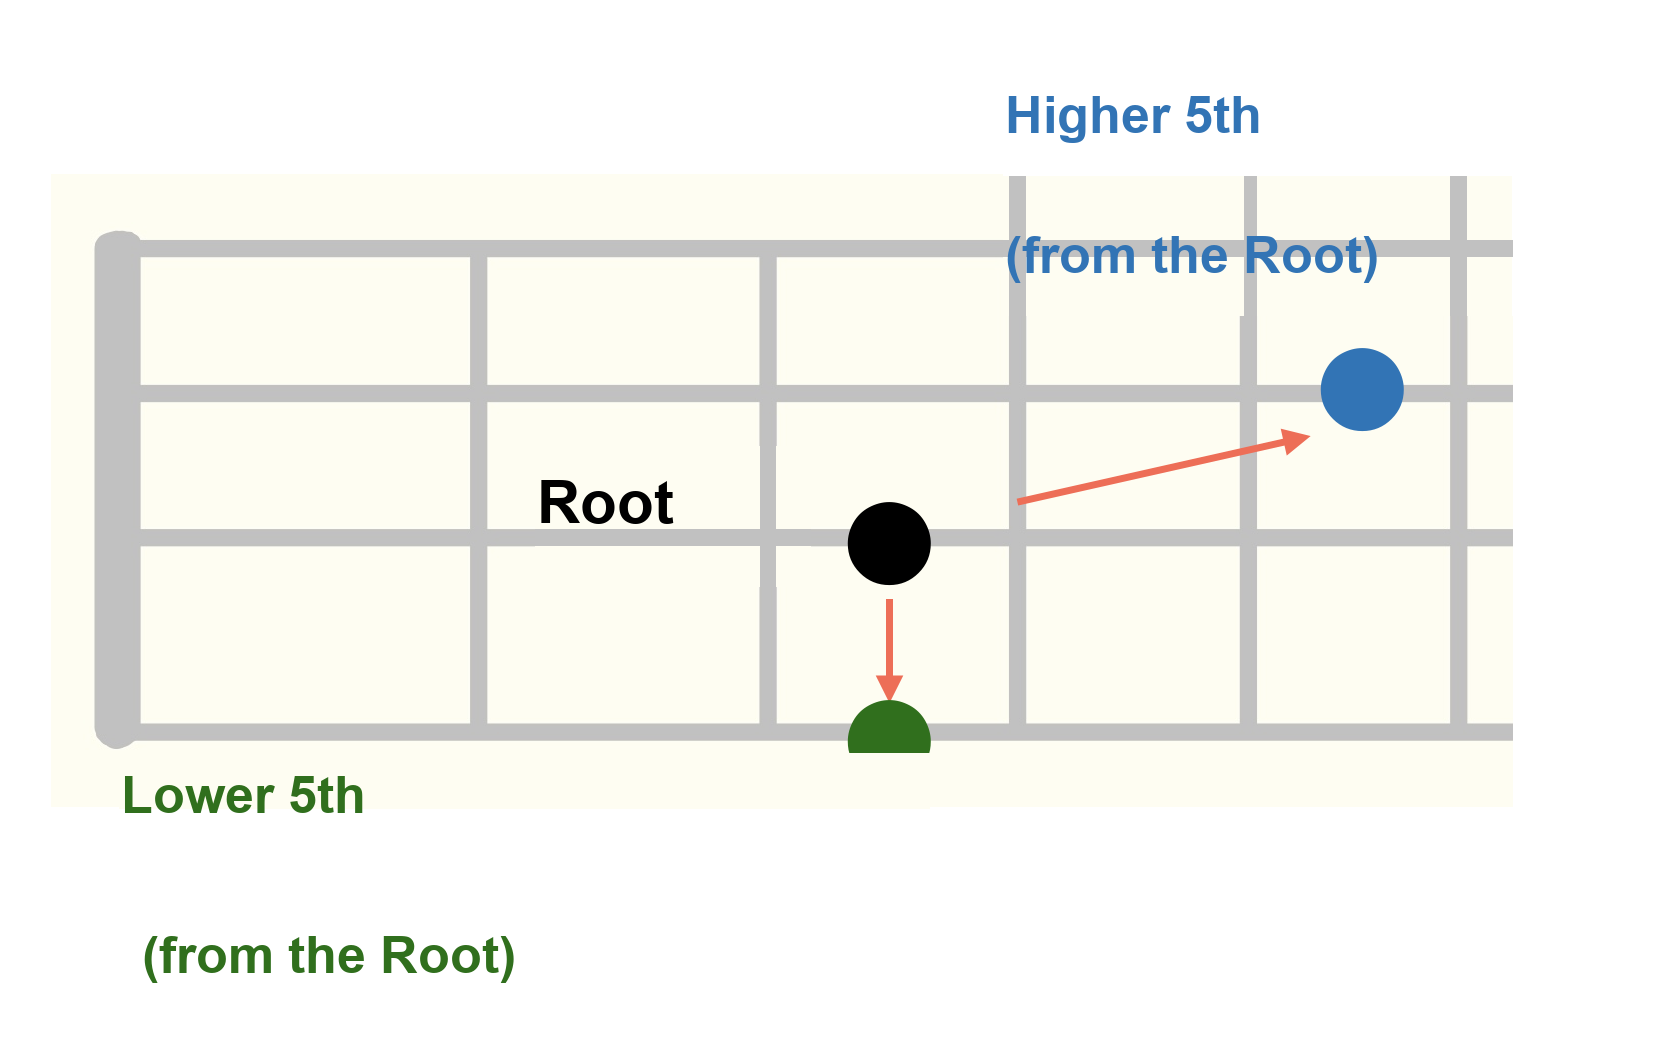
Across the whole neck, this is how the 5th sits relative to the root:
If I had to put the idea of the 5th into simple terms, it would be this:
When you’re building a moving bass line and wondering what note besides the root you can safely use, the 5th is a reliable choice.
That’s really all you need to know for now.
Step 3: Play Root and 3rd
I used a different pattern for the first half and the second half here.
About the 3rd
The note you can use for the 3rd is different for major chords versus minor chords.
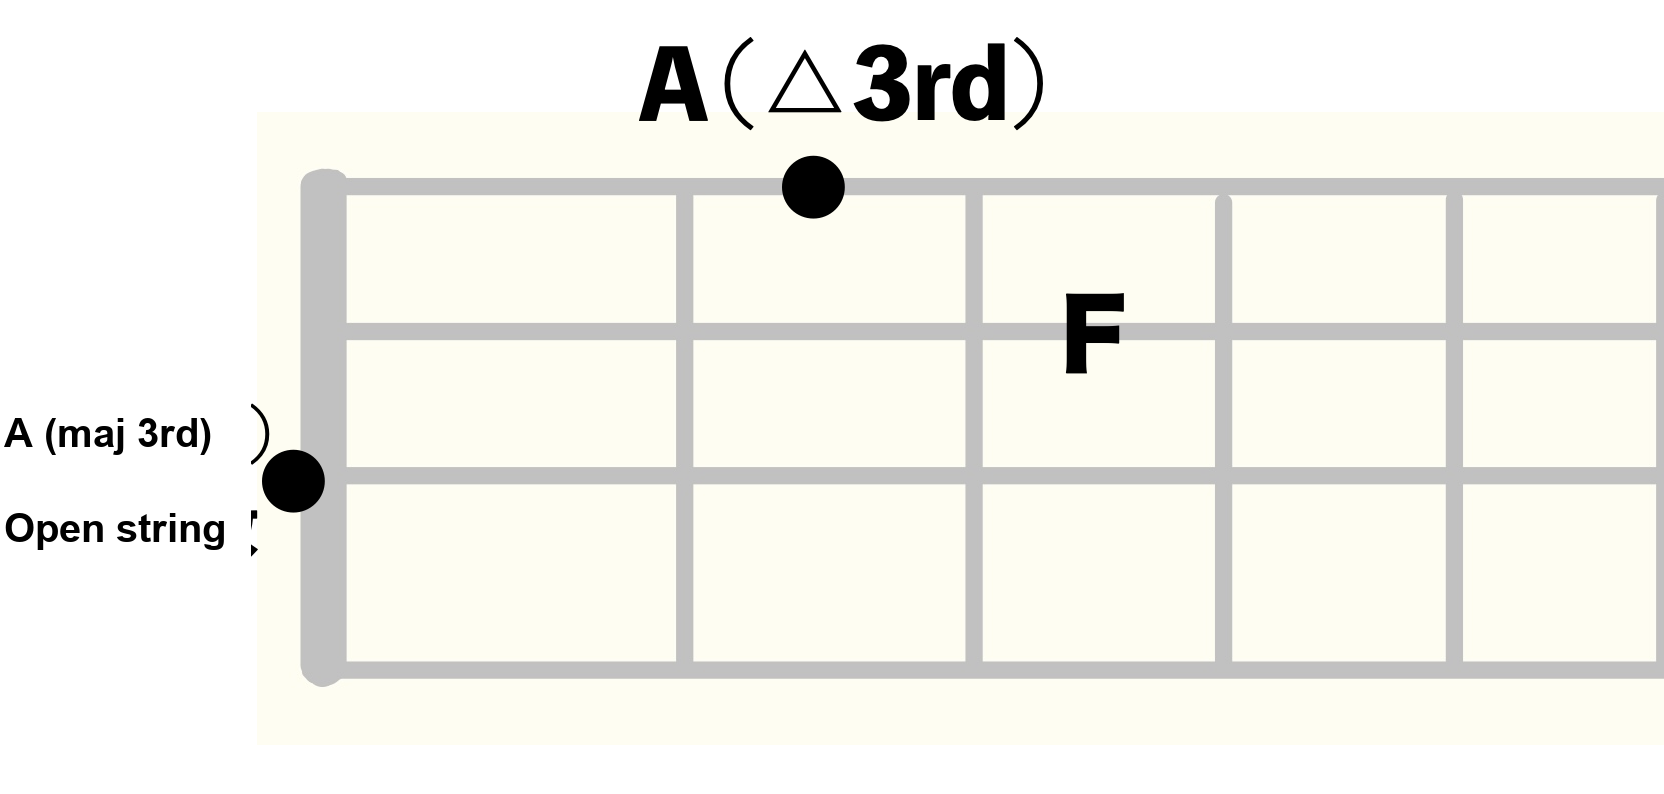
If the root of Cm7 is C (3rd string, 3rd fret), the 3rd is located here:
If the root of F7 is F (2nd string, 3rd fret), the 3rd is located here:
The 3rd works differently for major versus minor chords, and going into that fully here would make this article way too long, so I’ve covered it in detail in a separate article.
If you’re not clear on how the 3rd works, check out this article:
The goal isn’t to drill a line into muscle memory — what matters is staying aware of exactly where you are in the chord while you practice.
Try placing the 3rds and 5ths we’ve covered at different points within the bar.
Example 1 — bars 1–2: the 5th moved to beat 2
Example 2 — bars 3–4: sometimes using the 5th twice, sometimes only once
Example 3 — bars 5–6: adding movement with the 3rd
Once you’re comfortable with this, let’s move on.
Step 4: Play Root, 3rd, and 5th Together
Now let’s put the 3rd and the 5th into the same bar.
Here’s one example:
I didn’t put a 3rd or a 5th in every single bar — I also factored in how easy it is to finger — but doesn’t adding the 3rd and 5th make the line feel a lot more alive?
The root, 3rd, and 5th together are what’s called the “chord tones.”
Chord tones are essential when you’re building a walking bass line.
Just like in the practice approach above, try placing the 3rd and 5th at different points in the bar again here, checking the fingering, the sound, and how playable each option feels as you go.
Example 1
Example 2
In both examples, I moved around every note used within the bar. Here’s how that sounds:
Last, let’s add passing tones.
How to Add Passing Tones
For a straight quarter-note four-feel, the passing tone is most often the note a half step above or below the root of the next bar’s chord, placed on beat 4.
That’s a bit hard to picture from words alone, so here’s an example.
If you build a bass line over the first 8 bars using just the root and passing tones, it looks like this:
I marked the passing tones with “P.” In bars 2 and 3, the passing tone happens to land on the 3rd of that bar’s chord; in bars 4 and 5, it lands on the 5th.
That already sounds decent on its own, but let’s add the 5th.
In a few spots the 5th and the passing tone land on the same note, but here we’re treating beat 4 as a passing tone regardless.
Now let’s add the 3rd as well.
And that’s what it ends up sounding like.
Get Comfortable Using Root + 3rd + 5th + Passing Tones
It’s not the case that every recorded bassist’s line over “Autumn Leaves” is built entirely from root, 3rd, 5th, and passing tones —
that would never actually happen.
But once you can control the movement between root, 3rd, 5th, and passing tones, you’ll gradually be able to handle a much wider range of musical situations.
I’ll say it again: this isn’t about memorizing a line by rote — it’s practice that’s meant to get you improvising.
Try things, think them through, and let yourself fail — that’s what matters.
Try placing notes in different spots, and at a slow tempo, check in on the fingering, the sound, and how playable each choice feels as you practice.
I’d recommend doing this kind of practice when you’re not too tired and can really focus.
Want Personalized Feedback on Your Playing?
This is exactly the kind of thing that’s hard to fix alone — and where having a teacher makes all the difference.
At Line on Bass, I offer an online lesson service where you send me a video of your playing, and I give you specific, detailed feedback — every single day if you want.
Students from around the world are using this to fix exactly these kinds of issues and steadily improve their jazz bass skills.
Hi, I’m Toru Hoshino, a bass teacher and performer based in Tokyo, playing both upright and electric bass.
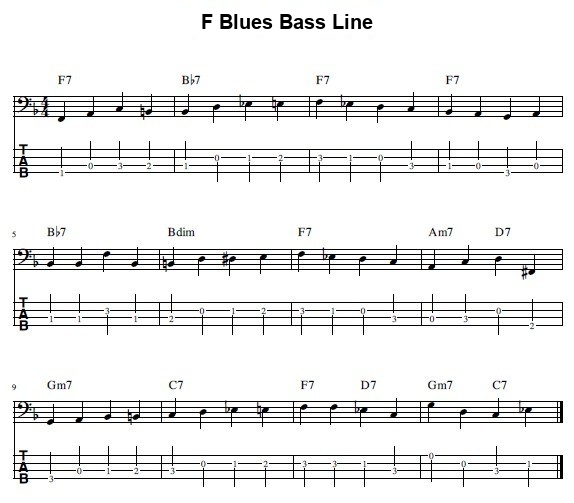
In this article, I built a walking bass line over an F blues progression and went through it note by note, explaining the role of every single note.
This ended up being a pretty long, in-depth breakdown, going through every note one at a time — so feel free to bookmark it and come back when you have time to read through it properly.
An F Blues Walking Bass Line, Analyzed One Note at a Time
Here’s a breakdown of every note used in this line.
The First 4 Bars
Bar 1
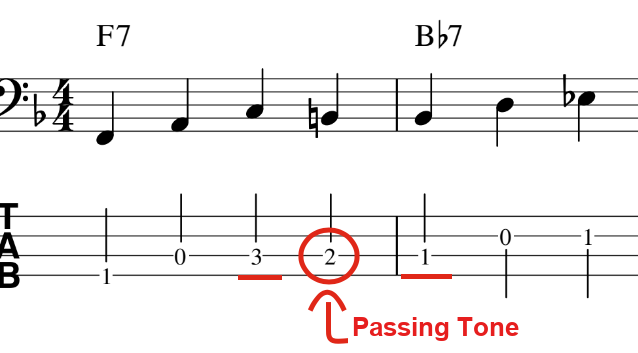
Note 1: F (the root of F7) Note 2: A (the major 3rd of F7) Note 3: C (the 5th of F7) Note 4: B (a chromatic passing tone connecting note 3, C, to the first note of the next chord, B♭)
Through note 3, we’re using chord tones — root, 3rd, 5th.
Note 4 is a chromatic passing tone, which is what gives the line that jazz-flavored sound.
I go into passing tones in a lot more detail in this article:
Note 1: B♭ (the root of B♭7) Note 2: D (the major 3rd of B♭7) Note 3: E♭ (the 4th of B♭7) Note 4: E (a chromatic passing tone connecting note 3, E♭, to the first note of the next chord, F)
Bar 2 also uses a chromatic passing tone.
Bar 3
Note 1: F (the root of F7) Note 2: E♭ (the b7th of F7) Note 3: D (the 6th of F7) Note 4: C (the 5th of F7)
Bar 4
Note 1: B♭ (the 4th of F7) Note 2: A (the major 3rd of F7) Note 3: G (the 2nd of F7) Note 4: A (the major 3rd of F7)
Bar 4 is also F7, but I treated bars 3 and 4 as one combined unit over F7, so I didn’t use the root again as the first note of bar 4.
A lot of people get stuck on how to build a bass line when the same chord lasts two bars in a row, so I wrote a dedicated article on that. Worth a look if that’s something you run into:
Note 1: B♭ (the root of B♭7) Note 2: B♭ (the root of B♭7) Note 3: F (the 5th of B♭7) Note 4: B♭ (the root of B♭7)
Bar 6
※ “Bdim7” is read as “B diminished seventh.”
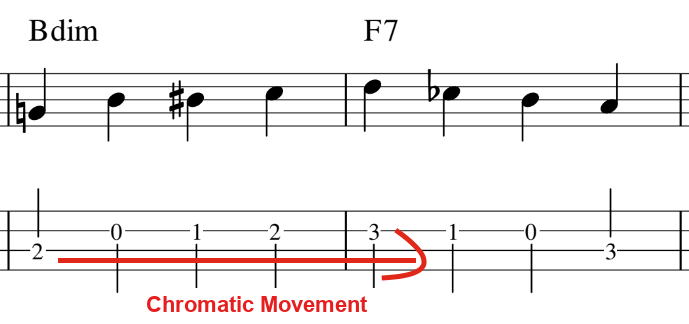
Note 1: B (the root of Bdim7) Note 2: D (the minor 3rd of Bdim7) Note 3: E♭ (the major 3rd of Bdim7) Note 4: E (a chromatic passing tone leading from note 3, E♭, to the first note of the next chord, F)
For note 2, I used D, the major 3rd. That note technically isn’t part of the standard diminished scale, but…
From note 2 of bar 6 (D) all the way to note 1 of bar 7 (F), every note moves chromatically, one half step at a time.
That’s the idea — keeping the line smooth and connected.
Bar 7
Note 1: F (the root of F7) Note 2: E♭ (the b7th of F7) Note 3: D (the 6th of F7) Note 4: C (the 5th of F7)
Same as bar 3.
Bar 8
Note 1: A (the root of Am7) Note 2: C (the minor 3rd of Am7) Note 3: D (the root of D7) Note 4: F♯ (the major 3rd of D7)
Bars 9–12
Bar 9
Note 1: G (the root of Gm7) Note 2: A (the 2nd of Gm7) Note 3: B♭ (the minor 3rd of Gm7) Note 4: B (a chromatic passing tone leading from note 3, B♭, to the first note of the next chord, C)
This is the same passing-tone approach used in the line going from bar 1 into bar 2.
Bar 10
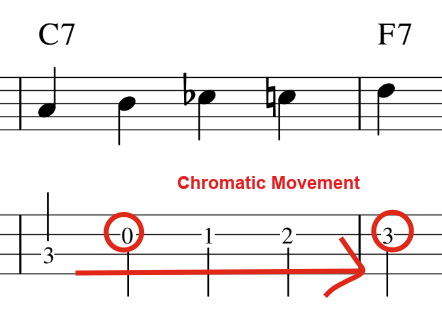
Note 1: C (the root of C7) Note 2: D (the 2nd of C7) Note 3: E♭ (the minor 3rd of C7) Note 4: E (the major 3rd of C7)
C7 is a major-type chord, but I used the same idea here as the move from bar 6 into bar 7:
connecting note 2 of bar 10 (D) to note 1 of bar 11 chromatically
to keep the line smooth.
Bar 11
Note 1: F (the root of F7) Note 2: F (the root of F7) Note 3: E♭ (the b7th of F7) Note 4: C (the 5th of F7)
Bar 12
Note 1: G (the root of Gm7) Note 2: D (the 5th of Gm7) Note 3: C (the root of C7) Note 4: E♭ (the minor 3rd of C7)
And that’s every note in this line, explained in full.
I hope this is useful for your practice! ☺
Once You’ve Played It a Few Times, Try Improvising Your Own!
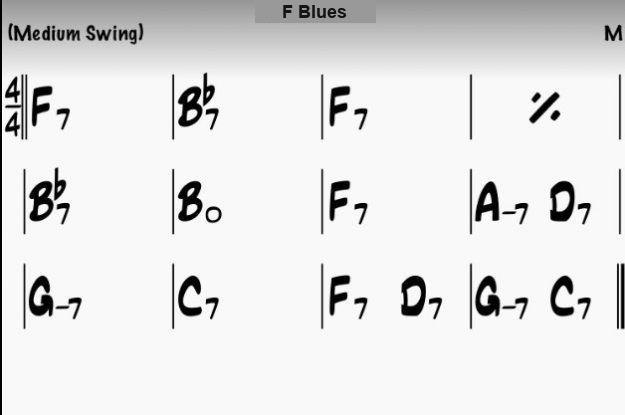
Once you’ve played through this a few times and gotten a feel for it, I’d really encourage you to take a chord chart like the one below and try building your own walking bass line over it on the fly.
It’s not always obvious how to approach that at first, but breaking it down chord by chord — root, chord tones, and the occasional chromatic passing tone — like we did above is a great place to start.
Thanks so much for reading all the way through!
Want Personalized Feedback on Your Playing?
This is exactly the kind of thing that’s hard to fix alone — and where having a teacher makes all the difference.
At Line on Bass, I offer an online lesson service where you send me a video of your playing, and I give you specific, detailed feedback — every single day if you want.
Students from around the world are using this to fix exactly these kinds of issues and steadily improve their jazz bass skills.
A phrase you can play using only the half position — a great pick for upright bass beginners.
The upright bass isn’t the easiest instrument to handle — there’s a lot to keep in mind with your posture and form — but you still want to actually play songs on it, right?
So today I want to share one phrase from a real, well-known tune that’s actually played on upright bass — one that doesn’t require much position-shifting, so even beginners can manage it with a bit of effort.
A Phrase You Can Play Using Only the Half Position
Here’s the phrase. It’s the part from 0:00–1:00 in the track below.
It’s a phrase from the jazz standard “Autumn Leaves.”
Here’s the notation — this phrase repeats throughout the section.
The key point is that the phrase is built entirely within what’s called the “half position” — roughly equivalent to frets 1–3 on electric bass — so there isn’t much position-shifting involved.
Once your fundamentals are solid, give it a try playing along with the track.
I hope this gives you some ideas for your daily practice!
Want Personalized Feedback on Your Playing?
This is exactly the kind of thing that’s hard to fix alone — and where having a teacher makes all the difference.
At Line on Bass, I offer an online lesson service where you send me a video of your playing, and I give you specific, detailed feedback — every single day if you want.
Students from around the world are using this to fix exactly these kinds of issues and steadily improve their jazz bass skills.
Once you open the program, here’s the general flow:
① Go to File → New to bring up the New Score wizard.
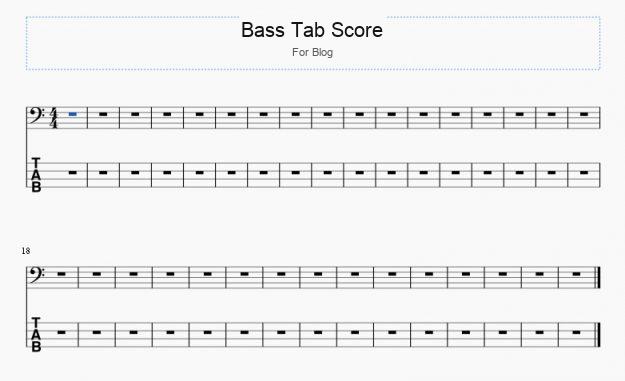
② Enter whatever title and subtitle you like (in my example I used the title “Bass Tab Score” and the subtitle “For Blog”).
③ Click Next.
Choose a blank score template, then on the instrument selection screen, search for “Bass Guitar” under Plucked Strings and add it.
With the new staff selected, click Add Linked Staff, which adds a second, linked staff under the bass clef staff. Set that second staff’s type to “TAB (4-string, full).”
Click Finish in the bottom right, and you’ll end up with a score like this:
You can enter notes either on the bass clef staff or directly on the TAB staff — both work.
A Useful Trick for Editing TAB
For example, on bass, the note D can be played as the open 2nd string or as the 3rd string, 5th fret.
If you enter a D normally, MuseScore will default to notating it as the open 2nd string (fret 0), like this:
If you want that D notated as the 3rd string, 5th fret instead, first turn off note-input mode (the “N” icon in the top left), then click on the note in the TAB staff and press Ctrl + Down Arrow (Cmd + Down Arrow on Mac). That moves the note to the next string down, giving you the alternate fingering.
Want Personalized Feedback on Your Playing?
This is exactly the kind of thing that’s hard to fix alone — and where having a teacher makes all the difference.
At Line on Bass, I offer an online lesson service where you send me a video of your playing, and I give you specific, detailed feedback — every single day if you want.
Students from around the world are using this to fix exactly these kinds of issues and steadily improve their jazz bass skills.