Posted on Leave a comment

How to Build a Walking Bass Line You Can Improvise (Using “Autumn Leaves”)

Hi, I’m Toru Hoshino (@jazzbassisttoru), a jazz bass teacher.

This article walks through a training method that will help you improvise walking bass lines, instead of relying on lines you’ve memorized ahead of time.

For this one, we’ll use a chord progression from a famous jazz standard: “Autumn Leaves.”

This ended up being a pretty long article, so I’d recommend bookmarking it and working through it when you have some time to really dig in.

Want to Be Able to Improvise Walking Bass Lines?

Being able to improvise a walking bass line on the spot, instead of relying on a line you wrote out ahead of time, is a great feeling.

But it’s not easy, and a lot of players end up searching YouTube over and over trying to figure out how to get there.

In this article, we’ll take the first 8 bars of the “Autumn Leaves” chord progression

Cm7 → F7 → B♭Δ7 → E♭Δ7

→ Am7♭5 → D7♭13 → Gm6 → Gm6

and break down how to build a walking bass line over it that you can improvise in real time.

Step 1: Play Roots

Start by getting comfortable playing the roots, then gradually add more notes.

I covered roots in detail in another article — if you’re already comfortable playing bass lines from the root, feel free to skip ahead.

What Is the “Root” Note on Bass?read the article here

The chords go Cm7 in bar 1, F7 in bar 2, B♭Δ7 in bar 3, and E♭Δ7 in bar 4.

Start at a slow tempo and play the root on beat 1 of each bar.

Once that’s solid, try playing the root four times per bar as quarter notes.

Once you can play the whole progression on quarter-note roots at around 100–120 bpm, move on to the next step.

Step 2: Play Root and 5th

Now we add the 5th to the root.

Compared to roots only, doesn’t this already feel like it’s moving a lot more?

About the 5th

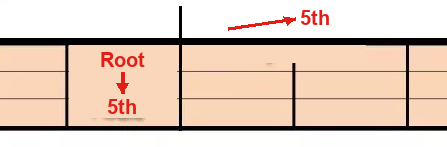
If the root of Cm7 is C (3rd string, 3rd fret), the 5th is located here:
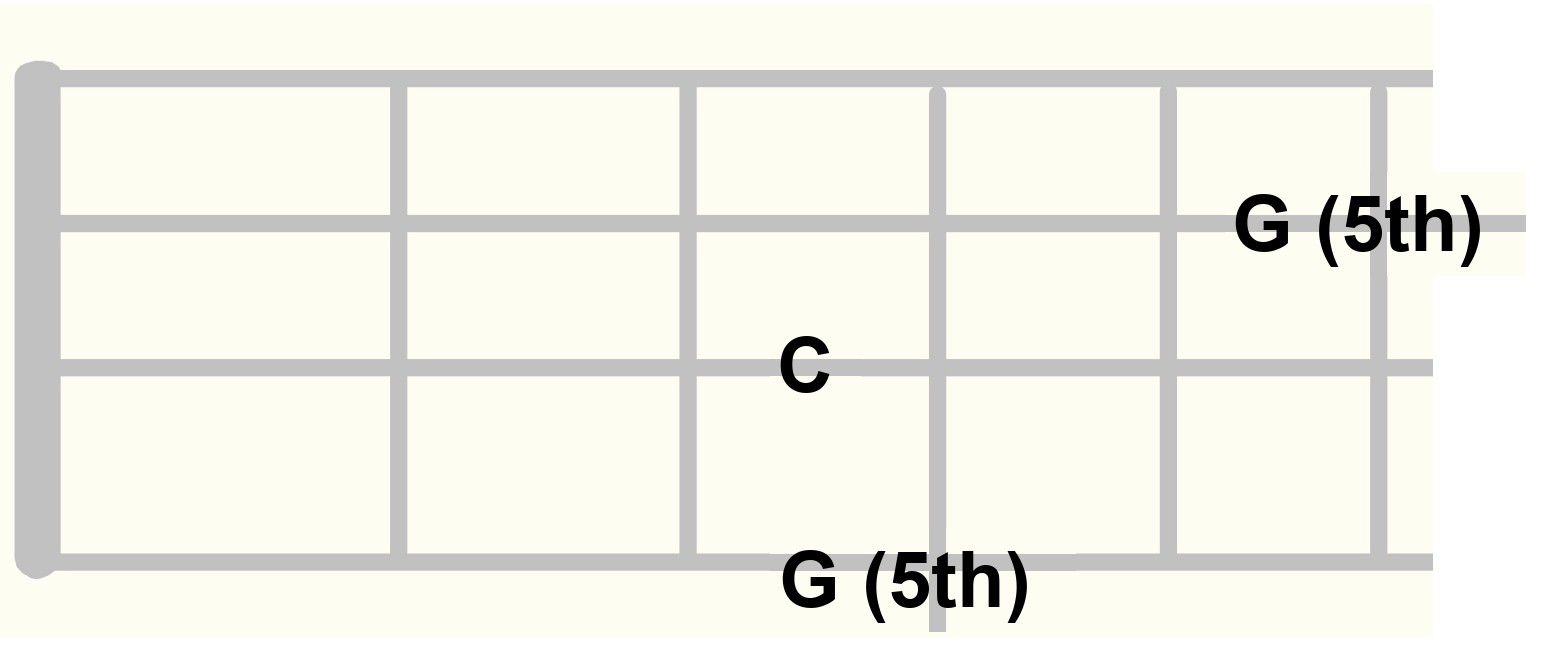
If the root of F7 is F (2nd string, 3rd fret), the 5th is located here:
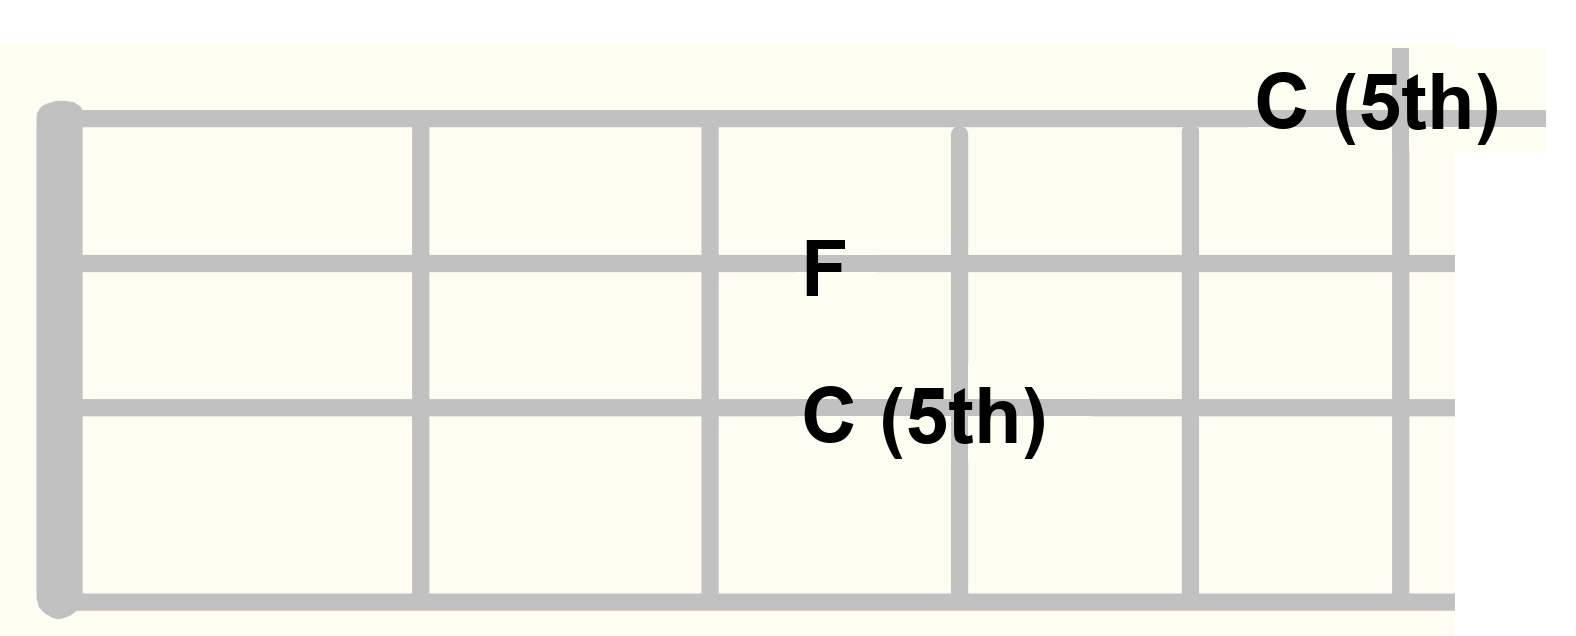
Across the whole neck, this is how the 5th sits relative to the root:
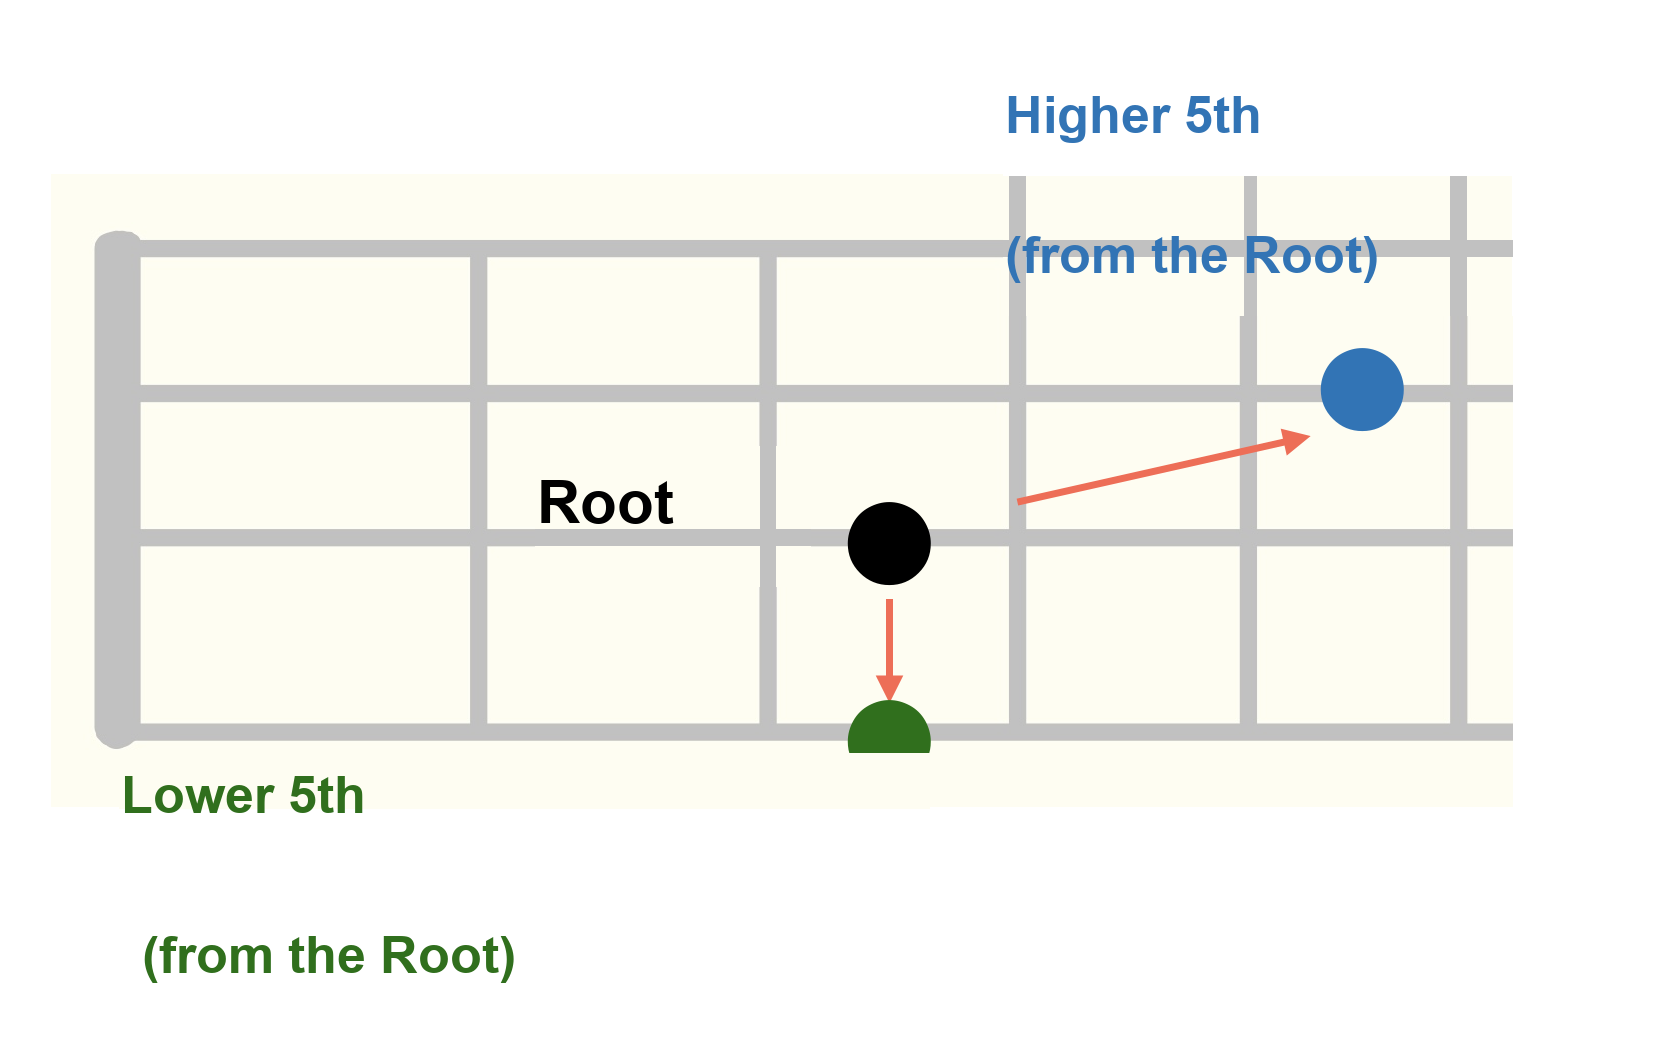
If I had to put the idea of the 5th into simple terms, it would be this:

When you’re building a moving bass line and wondering what note besides the root you can safely use, the 5th is a reliable choice.

That’s really all you need to know for now.

Step 3: Play Root and 3rd

I used a different pattern for the first half and the second half here.

About the 3rd

The note you can use for the 3rd is different for major chords versus minor chords.

If the root of Cm7 is C (3rd string, 3rd fret), the 3rd is located here:

If the root of F7 is F (2nd string, 3rd fret), the 3rd is located here:
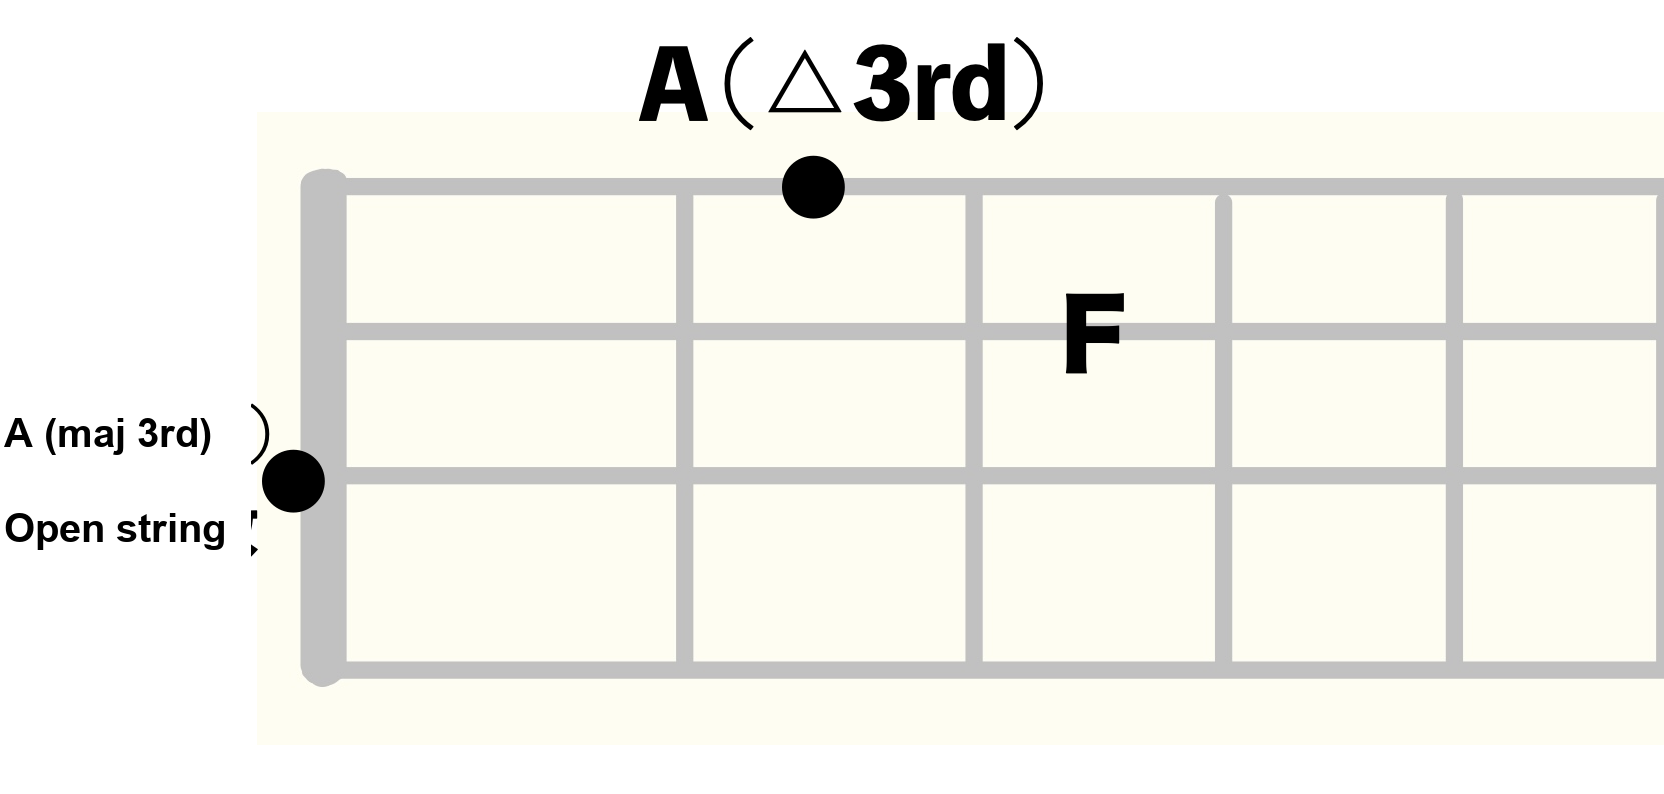
The 3rd works differently for major versus minor chords, and going into that fully here would make this article way too long, so I’ve covered it in detail in a separate article.

If you’re not clear on how the 3rd works, check out this article:

How to Practice What We’ve Covered So Far

The goal isn’t to drill a line into muscle memory — what matters is staying aware of exactly where you are in the chord while you practice.

Try placing the 3rds and 5ths we’ve covered at different points within the bar.

Example 1 — bars 1–2: the 5th moved to beat 2

Example 2 — bars 3–4: sometimes using the 5th twice, sometimes only once

Example 3 — bars 5–6: adding movement with the 3rd

Once you’re comfortable with this, let’s move on.

Step 4: Play Root, 3rd, and 5th Together

Now let’s put the 3rd and the 5th into the same bar.

Here’s one example:

I didn’t put a 3rd or a 5th in every single bar — I also factored in how easy it is to finger — but doesn’t adding the 3rd and 5th make the line feel a lot more alive?

The root, 3rd, and 5th together are what’s called the “chord tones.”

Chord tones are essential when you’re building a walking bass line.

Just like in the practice approach above, try placing the 3rd and 5th at different points in the bar again here, checking the fingering, the sound, and how playable each option feels as you go.

Example 1

Example 2

In both examples, I moved around every note used within the bar. Here’s how that sounds:

Last, let’s add passing tones.

How to Add Passing Tones

For a straight quarter-note four-feel, the passing tone is most often the note a half step above or below the root of the next bar’s chord, placed on beat 4.

That’s a bit hard to picture from words alone, so here’s an example.

If you build a bass line over the first 8 bars using just the root and passing tones, it looks like this:

I marked the passing tones with “P.” In bars 2 and 3, the passing tone happens to land on the 3rd of that bar’s chord; in bars 4 and 5, it lands on the 5th.

That already sounds decent on its own, but let’s add the 5th.

In a few spots the 5th and the passing tone land on the same note, but here we’re treating beat 4 as a passing tone regardless.

Now let’s add the 3rd as well.

And that’s what it ends up sounding like.

Get Comfortable Using Root + 3rd + 5th + Passing Tones

It’s not the case that every recorded bassist’s line over “Autumn Leaves” is built entirely from root, 3rd, 5th, and passing tones —

that would never actually happen.

But once you can control the movement between root, 3rd, 5th, and passing tones, you’ll gradually be able to handle a much wider range of musical situations.

I’ll say it again: this isn’t about memorizing a line by rote — it’s practice that’s meant to get you improvising.

Try things, think them through, and let yourself fail — that’s what matters.

Try placing notes in different spots, and at a slow tempo, check in on the fingering, the sound, and how playable each choice feels as you practice.

I’d recommend doing this kind of practice when you’re not too tired and can really focus.

Want Personalized Feedback on Your Playing?

This is exactly the kind of thing that’s hard to fix alone — and where having a teacher makes all the difference.

At Line on Bass, I offer an online lesson service where you send me a video of your playing, and I give you specific, detailed feedback — every single day if you want.

Students from around the world are using this to fix exactly these kinds of issues and steadily improve their jazz bass skills.
Check Out the Lesson Service →

Posted on Leave a comment

An F Blues Walking Bass Line, Analyzed Note by Note

Hi, I’m Toru Hoshino, a bass teacher and performer based in Tokyo, playing both upright and electric bass.

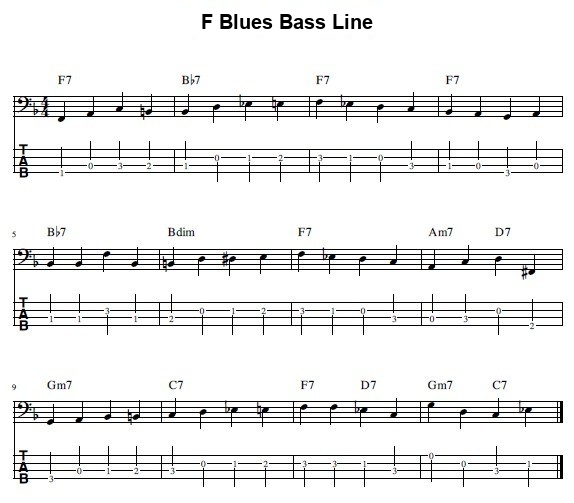
In this article, I built a walking bass line over an F blues progression and went through it note by note, explaining the role of every single note.

This ended up being a pretty long, in-depth breakdown, going through every note one at a time — so feel free to bookmark it and come back when you have time to read through it properly.

An F Blues Walking Bass Line, Analyzed One Note at a Time

Here’s a breakdown of every note used in this line.

The First 4 Bars

Bar 1

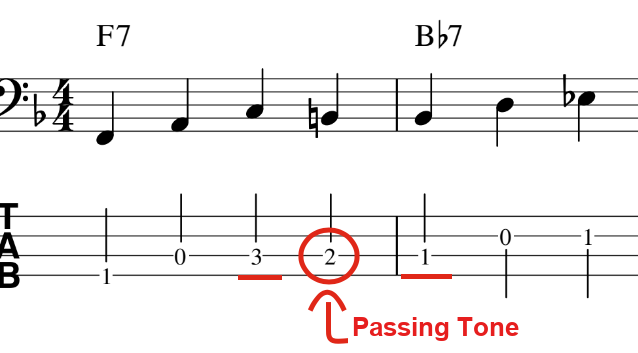
Note 1: F (the root of F7)
Note 2: A (the major 3rd of F7)
Note 3: C (the 5th of F7)
Note 4: B (a chromatic passing tone connecting note 3, C, to the first note of the next chord, B♭)

Through note 3, we’re using chord tones — root, 3rd, 5th.

Note 4 is a chromatic passing tone, which is what gives the line that jazz-flavored sound.

I go into passing tones in a lot more detail in this article:

Passing Tones: A Key Building Block for Jazz Bass Lines

Bar 2

Note 1: B♭ (the root of B♭7)
Note 2: D (the major 3rd of B♭7)
Note 3: E♭ (the 4th of B♭7)
Note 4: E (a chromatic passing tone connecting note 3, E♭, to the first note of the next chord, F)

Bar 2 also uses a chromatic passing tone.

Bar 3

Note 1: F (the root of F7)
Note 2: E♭ (the b7th of F7)
Note 3: D (the 6th of F7)
Note 4: C (the 5th of F7)

Bar 4

Note 1: B♭ (the 4th of F7)
Note 2: A (the major 3rd of F7)
Note 3: G (the 2nd of F7)
Note 4: A (the major 3rd of F7)

Bar 4 is also F7, but I treated bars 3 and 4 as one combined unit over F7, so I didn’t use the root again as the first note of bar 4.

A lot of people get stuck on how to build a bass line when the same chord lasts two bars in a row, so I wrote a dedicated article on that. Worth a look if that’s something you run into:

Walking Bass Lines When One Chord Lasts Two Bars (With 3 Real Examples)

Bars 5–8

Bar 5

Note 1: B♭ (the root of B♭7)
Note 2: B♭ (the root of B♭7)
Note 3: F (the 5th of B♭7)
Note 4: B♭ (the root of B♭7)

Bar 6

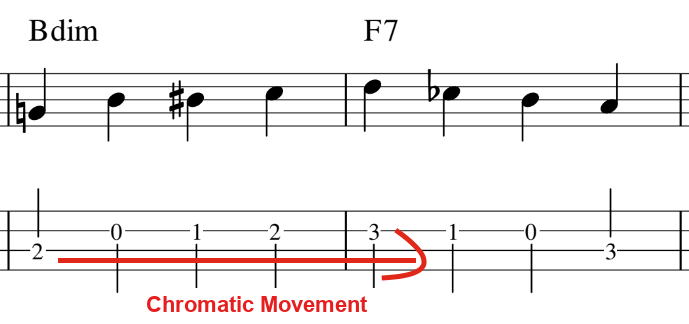
※ “Bdim7” is read as “B diminished seventh.”

Note 1: B (the root of Bdim7)
Note 2: D (the minor 3rd of Bdim7)
Note 3: E♭ (the major 3rd of Bdim7)
Note 4: E (a chromatic passing tone leading from note 3, E♭, to the first note of the next chord, F)

For note 2, I used D, the major 3rd. That note technically isn’t part of the standard diminished scale, but…

From note 2 of bar 6 (D) all the way to note 1 of bar 7 (F), every note moves chromatically, one half step at a time.

That’s the idea — keeping the line smooth and connected.

Bar 7

Note 1: F (the root of F7)
Note 2: E♭ (the b7th of F7)
Note 3: D (the 6th of F7)
Note 4: C (the 5th of F7)

Same as bar 3.

Bar 8

Note 1: A (the root of Am7)
Note 2: C (the minor 3rd of Am7)
Note 3: D (the root of D7)
Note 4: F♯ (the major 3rd of D7)

Bars 9–12

Bar 9

Note 1: G (the root of Gm7)
Note 2: A (the 2nd of Gm7)
Note 3: B♭ (the minor 3rd of Gm7)
Note 4: B (a chromatic passing tone leading from note 3, B♭, to the first note of the next chord, C)

This is the same passing-tone approach used in the line going from bar 1 into bar 2.

Bar 10

Note 1: C (the root of C7)
Note 2: D (the 2nd of C7)
Note 3: E♭ (the minor 3rd of C7)
Note 4: E (the major 3rd of C7)

C7 is a major-type chord, but I used the same idea here as the move from bar 6 into bar 7:

connecting note 2 of bar 10 (D) to note 1 of bar 11 chromatically

to keep the line smooth.

Bar 11

Note 1: F (the root of F7)
Note 2: F (the root of F7)
Note 3: E♭ (the b7th of F7)
Note 4: C (the 5th of F7)

Bar 12

Note 1: G (the root of Gm7)
Note 2: D (the 5th of Gm7)
Note 3: C (the root of C7)
Note 4: E♭ (the minor 3rd of C7)

And that’s every note in this line, explained in full.

I hope this is useful for your practice! ☺

Once You’ve Played It a Few Times, Try Improvising Your Own!

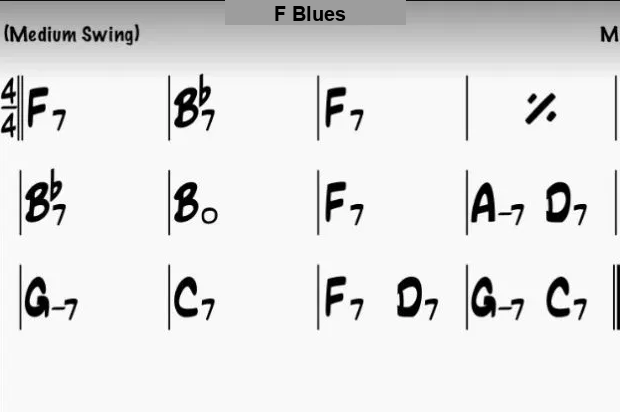
Once you’ve played through this a few times and gotten a feel for it, I’d really encourage you to take a chord chart like the one below and try building your own walking bass line over it on the fly.

It’s not always obvious how to approach that at first, but breaking it down chord by chord — root, chord tones, and the occasional chromatic passing tone — like we did above is a great place to start.

Thanks so much for reading all the way through!

Want Personalized Feedback on Your Playing?

This is exactly the kind of thing that’s hard to fix alone — and where having a teacher makes all the difference.

At Line on Bass, I offer an online lesson service where you send me a video of your playing, and I give you specific, detailed feedback — every single day if you want.

Students from around the world are using this to fix exactly these kinds of issues and steadily improve their jazz bass skills.

Check Out the Lesson Service →

Posted on Leave a comment

What Is “Walking Bass,” Anyway?

This site is dedicated to helping bass players improve, with a focus on walking bass, jazz bass, and improvisation.

This article is written for bass players who:

· Want to learn how to play walking bass

· Want to write stylish bass lines

· Want to play jazz-flavored bass lines

What Is “Walking Bass”?

“This is what walking bass sounds like.”

“Walking bass has to be played exactly like this.”

There’s no strict definition like that, but in this article I’ll explain what’s generally referred to as “walking bass.”

What Walking Bass Sounds Like

Here’s a short video of a simple walking bass line.

This is a video of me playing a bass line over the chord changes to the jazz standard “Fly Me to the Moon.”

Features of a Walking Bass Line

Toru: Like this, you play four quarter notes per bar, and instead of just hammering the root the way you might in rock, you use a variety of different notes. That’s generally what’s meant by a “walking bass line.”

It’s commonly used in jazz, blues, and shuffle-feel music.

It also works great on upright bass. ^^

How to Build a Walking Bass Line

Student: It sounds really difficult — like I’d need to know some complicated music theory just to get started.

A lot of people feel that way, but once you grasp the basic idea, anyone can build a walking bass line easily.

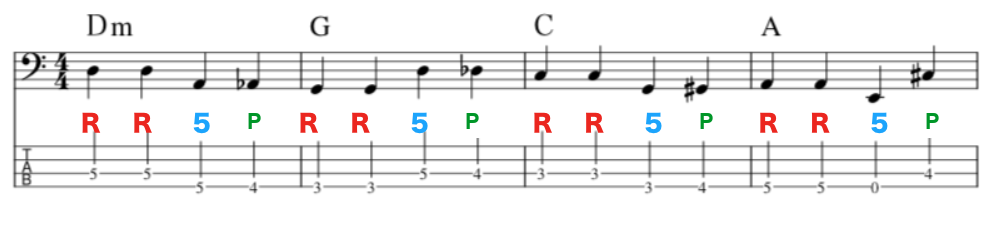
Today I’ll walk you through how to build a walking bass line over this simple chord progression.

Notes 1 and 2: The Root

You’ll place four quarter notes in each bar.

First, make the 1st and 2nd notes the root note of the chord.

Note 3: The 5th

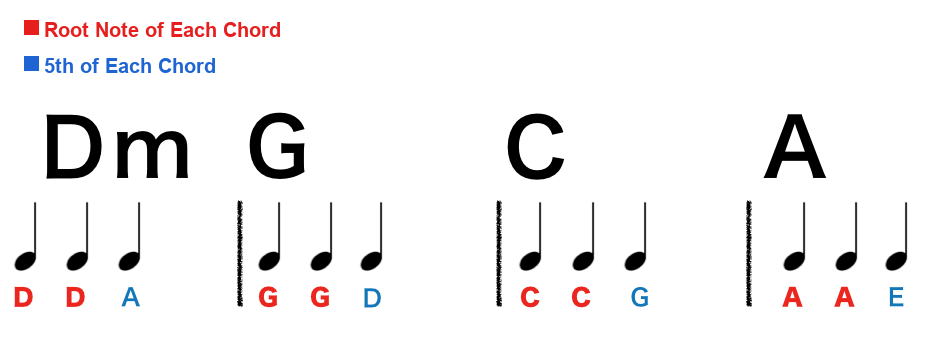
For the 3rd note, use the 5th of the chord.

Simply put, the 5th is the note found at this position relative to the root.

If you’ve played rock or pop bass before, the first three notes probably feel familiar already — but the 4th note is where it gets interesting.

Note 4: The Passing Tone

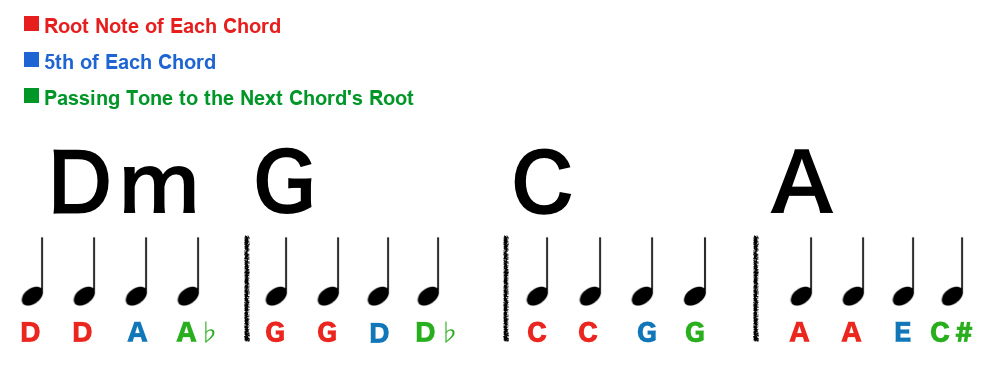
For the 4th note, it doesn’t matter much whether it’s a chord tone or not — approaching the next root from a half step above or below sounds great.

Toru: This is called a “passing tone,” and it’s a great tool whenever you want a jazzier sound.

For example:

When approaching G, the root of the G7 chord in bar 2,

you can approach from Ab (a half step above) or Gb (a half step below).

When approaching C, the root of the CΔ7 chord in bar 3,

you can approach from Db (a half step above) or B (a half step below).

This kind of approach gives you that jazzy taste pretty easily.

This time, I built it like this with playability (fingering) in mind:

Here’s how it sounds against the actual track:

What did you think?

A convincing jazz bass line might sound like it requires a lot, but you can get surprisingly far using just the root, the 5th, and a passing tone.

I hope this gives you some ideas for building your own bass lines going forward.

Want Personalized Feedback on Your Playing?

This is exactly the kind of thing that’s hard to fix alone — and where having a teacher makes all the difference.

At Line on Bass, I offer an online lesson service where you send me a video of your playing, and I give you specific, detailed feedback — every single day if you want.

Students from around the world are using this to fix exactly these kinds of issues and steadily improve their jazz bass skills.
Check Out the Lesson Service →

Posted on Leave a comment

Walking Bass Lines Over “Take the A Train”: A Breakdown

Hi there, I’m Toru Hoshino (@jazzbassisttoru), a bass instructor.

This article breaks down a walking bass line approach over the chord changes to the jazz standard “Take the A Train.”

It’s a popular tune that comes up often at jam sessions, so it’s well worth having in your back pocket.

A Walking Bass Line Over “Take the A Train”

The line is built mostly around the low frets (roughly frets 1–7), centered on one chorus in C major. It’s a catchy line overall, but with a few deliberate twists thrown in along the way to keep things varied. Let’s look at a few of those ideas.

Using a Minor Approach Over a Major Chord

Student: “Wait — isn’t that a minor 3rd over a major chord?”

Toru: Good catch!

A C6 chord is a major chord — the same family as C or C△7 — so you’d expect the major 3rd, E, to be the “correct” note here. But in this line, I actually used the minor 3rd, E♭.

An approach like “C E E A” below would have worked just fine too:

But by deliberately landing on E♭ — a note outside the scale — for the second note, you get a brief flash of “something’s off here” tension. Then, on the third note, the line resolves down to the chord tone E:

Tension → resolution — that’s the effect this creates.

Toru: It has a bit of a bluesy flavor to it, and it works well any time you’ve got the same chord lasting two bars in a row, like here.

Using the Whole-Tone Scale Over D7

This shows up over bars 3–4, and again over bars 10–11:

Student: That’s a lot of sharps…

Toru: This is the whole-tone scale — every interval in it is a whole step.

For a D whole-tone scale, the notes are:

D  E  F#  G#  A#  C

It’s a go-to approach over this particular bar of this particular tune — worth filing away for future reference.

What to Do When the Same Chord Lasts Several Bars

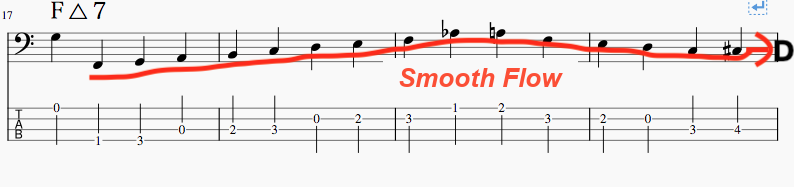
Section B of this tune (where the same chord lasts for several bars in a row) trips a lot of people up. A common but not-so-great approach looks like this:

Resetting to the root note at the start of every bar like this can make the line feel stuck and choppy.

Student: But doesn’t the first note of a bar have to be the root?

Toru: It depends — there are plenty of cases where it doesn’t have to be.

In this case, over the F△7 progression, I built a smooth line with a strong sense of forward motion, aiming to land cleanly on D — the first note of bar 5 of section B:

When the same chord lasts two or more bars, the first note of each bar doesn’t always have to be the root.

That’s a useful idea to keep in your back pocket.

That wraps up this breakdown.

Want Personalized Feedback on Your Playing?

This is exactly the kind of thing that’s hard to fix alone — and where having a teacher makes all the difference.

At Line on Bass, I offer an online lesson service where you send me a video of your playing, and I give you specific, detailed feedback — every single day if you want.

Students from around the world are using this to fix exactly these kinds of issues and steadily improve their jazz bass skills.

Check Out the Lesson Service →

Posted on Leave a comment

How to Build a 16-Feel Bassline: Playing the Bassline for “Feel Like Makin’ Love”

This article walks through a performance video of the bassline for “Feel Like Makin’ Love” — a classic 16-feel tune — along with an explanation of how to build a 16-feel bassline.

The Bassline for “Feel Like Makin’ Love”

Key Points for Building a 16-Feel Bassline

When you’re starting out, it’s hard to know how to put together a tight, funky 16-feel bassline.

The foundation is something like sixteen notes (sixteenth notes) packed into a single bar, as shown below.

That said, this is too busy on its own, so let’s try dropping in a couple of rests.

Still feels a bit busy.

So I added a few more rests.

I figured I could push the rests even further, so I went ahead and turned the back half of the bar into a half rest.

This is the kind of thing to think about when placing rests in a 16-feel bassline.

At first it’s hard to know where a rest will land naturally, so use the video above as a reference.

A Classic 16-Feel Tune: “Feel Like Makin’ Love”

This is a funk tune that comes up a lot at jam sessions.

Basslines that demand this kind of sharp, punchy articulation present a different kind of challenge than jazz walking basslines.

Here’s the track I was told is essential listening if you’re going to play this tune.

It’s often performed as a vocal tune, and a female vocal pairs especially well with its soul feel.

Hopefully this gives you something useful for your daily practice.

Want Personalized Feedback on Your Playing?

This is exactly the kind of thing that’s hard to fix alone — and where having a teacher makes all the difference.

At Line on Bass, I offer an online lesson service where you send me a video of your playing, and I give you specific, detailed feedback — every single day if you want.

Students from around the world are using this to fix exactly these kinds of issues and steadily improve their jazz bass skills.

Check Out the Lesson Service →

Posted on Leave a comment

Play a Full F Blues Walking Bassline From Memory (With Score & Tab)

“What’s a good way to practice walking bass?”

“I want to learn walking bass, but I don’t know where to start.”

This article is for exactly that — and the answer is, start by copying a full chorus note-for-note!

So here’s a full walkthrough with a free tab transcription included.

Full F Blues Transcription

Here’s a full chorus transcription over an F blues.

If you’re into jazz, it’s easy to get caught up thinking everything has to be about improvisation and theory.

But if you genuinely don’t know where to start, just being able to play something that sounds the part is valuable in itself.

It’s a short 12-bar form, so it shouldn’t take long to memorize.

For now, just look at the score and play through it a few times until you can get through the whole thing.

Once You’ve Got the Transcription Down

Once you’ve memorized the transcription, try playing it along with an actual tune.

As for which tune to use,

“Bags’ Groove” is a great choice. (There are plenty of blues tunes out there, but this one’s relatively easy to play along with.)

If you listen closely to the bass, you’ll notice it’s moving around quite a bit, and it doesn’t stick to the transcription above at all. As you’ll hear, the track runs over 12 minutes.

That said, since it’s an F blues, you can loop the transcription above as many times as you like and it’ll still basically work.

You can keep playing the same bassline through the improvised solo sections after the head, too — give it a try along with the recording.

Don’t Have the CD? Looking for a Good App?

If you don’t have the recording, or you’re looking for a good app for this —

there is one.

You can start using it right now if you have a smartphone.

It’s called iReal Pro, a backing-track app that gives you drum and piano accompaniment while letting you freely adjust the tempo as you practice.

Here’s what the backing sounds like. Playing bass over this lets you practice in something close to a real ensemble setting.

Tempo 80

Tempo 100

Tempo 120

It’s incredibly useful, and I use it for my own daily practice too.

The video at the top of this article was also recorded over this app’s backing track.

Once You’ve Played Through It a Few Times, Try Real Improvisation!

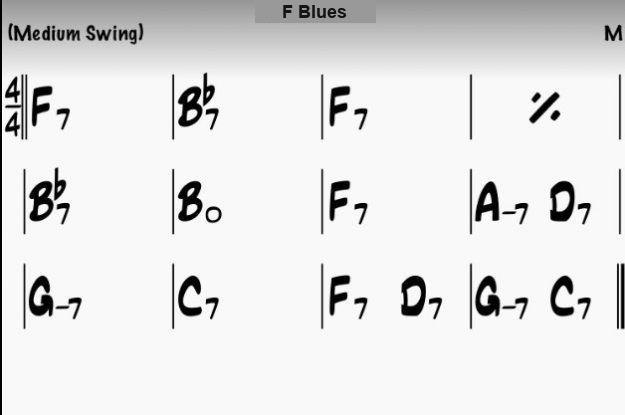
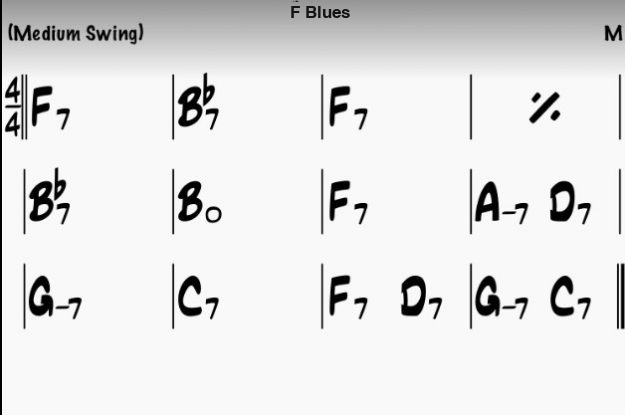
Once you’ve played through the transcription enough times to get a feel for it, I’d love for you to try building your own walking bassline by ear from a chord chart like the one below.

F Blues

It’s not always obvious how to actually approach that at first, but it’s a skill you can build step by step with the right practice routine.

Thanks for reading today!

Want Personalized Feedback on Your Playing?

This is exactly the kind of thing that’s hard to fix alone — and where having a teacher makes all the difference.

At Line on Bass, I offer an online lesson service where you send me a video of your playing, and I give you specific, detailed feedback — every single day if you want.

Students from around the world are using this to fix exactly these kinds of issues and steadily improve their jazz bass skills.

Check Out the Lesson Service →

Posted on Leave a comment

What’s the Difference Between C△7 and C7? A Common Mistake with Seventh Chords in Bass Lines

This article is written for bassists who play walking bass lines without being fully clear on the difference between a dominant seventh chord and a major seventh chord — by Toru Hoshino, a Tokyo-based jazz bassist and instructor (@jazzbassisttoru).

Here’s a mistake that comes up often in walking bass lines when a chord has a “7” attached to it.

Bass Lines That Mistakenly Use a Major Seventh Note Over a Dominant Seventh Chord

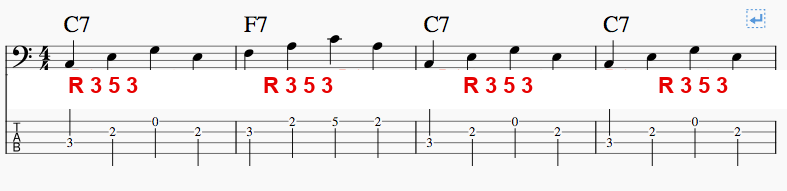
Example 1

The first two bars of a progression often used in tunes like “Autumn Leaves”:

What do you think? Depending on how you listen to it, it might not sound wrong, but…

This version sounds more natural, I think. (The note marked in red has been corrected.)

Example 2

The first four bars of an F blues:

What do you think? Depending on how you listen to it, it might not sound wrong, but…

This version sounds more natural, I think. (The note marked in red has been corrected.)

Here’s the Key Point!

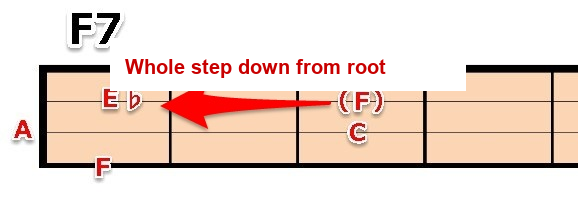
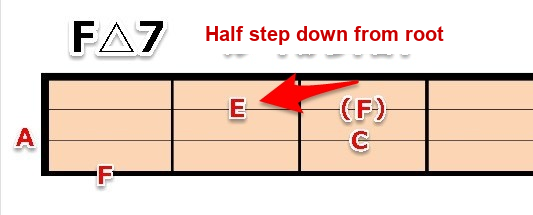
A dominant seventh chord (“◯7”) and a major seventh chord (“◯△7”) are different.

On a dominant seventh chord, the 7th is a whole step below the root.

On a major seventh chord, the 7th is a half step below the root.

Going back to the progression at the start of the article: if you want to use the note E as the second note of the second bar, then theoretically it’s more accurate to write it as F△7.

That said, a Cm7 → F△7 progression isn’t something you see very often.

From the root, it’s only the difference of a half step versus a whole step, but small details like this can change the nuance quite a bit.

This is a point beginners often get wrong, so it’s worth paying attention to.

Want Personalized Feedback on Your Playing?

This is exactly the kind of thing that’s hard to fix alone — and where having a teacher makes all the difference.

At Line on Bass, I offer an online lesson service where you send me a video of your playing, and I give you specific, detailed feedback — every single day if you want.

Students from around the world are using this to fix exactly these kinds of issues and steadily improve their jazz bass skills.

Check Out the Lesson Service →

Posted on Leave a comment

A Bass Line Over a C Blues Chord Progression

This article is written by Toru Hoshino, a jazz bassist and instructor based in Japan who teaches online lessons to students worldwide. In this article, he breaks down a bass line approach over the chord progression to a C blues.

This comes up a lot at jam sessions, so it’s well worth having in your back pocket.

A Bass Line Over a C Blues Progression

I built this out as three choruses (12 bars × 3 times through), centered mostly around the low frets.

The theme I was going for was “don’t let it sound like rock” — I built it with an overall emphasis on a smooth, connected flow. Let me walk through a few of the choices I made.

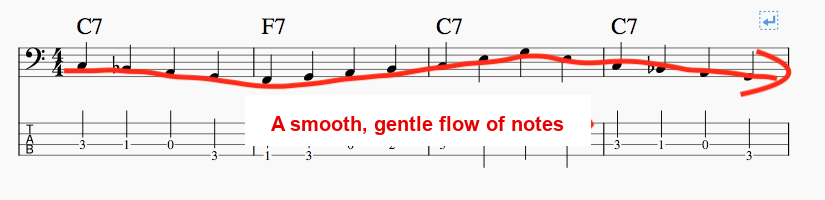
A Smooth, Flowing Bass Line That Avoids a Rock Feel

If you’re new to walking bass, this is the kind of approach you tend to gravitate toward:

It uses solid chord tones, and it’s not bad exactly, but it has a somewhat one-note feel to it — honestly, an eighth-note rock groove would probably suit this approach better.

This time, I built the bass line around a more relaxed, flowing sense of note movement instead, like this:

This kind of approach fits a jazz four-feel much more naturally.

How to Approach a Chord That Holds for Several Bars

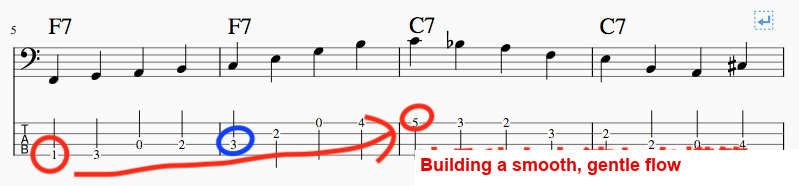
Having the same chord hold for several bars in a row is something that comes up constantly in jazz, and it’s a spot a lot of players aren’t sure how to approach.

The thing to keep in mind here is still “flow.”

Take the section below, starting around 0:07:

The idea is to build a sense of motion from the red circle toward the next red circle.

If you land back on the root at the blue circle’s position, the flow breaks, and it ends up feeling like things have stalled out.

So — and I say this a lot on this blog —

When the same chord holds for two or more bars, you don’t actually need to start every single bar on the root.

Just keep that in the back of your mind.

Leaning Heavily on Chromatic Movement

Take the approach in bars 1–3 of the third and final chorus.

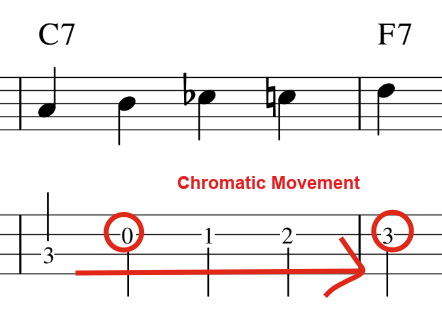
I’m approaching the root of the next chord chromatically pretty much the whole way through.

Here, you might find it a little confusing that, say, over a C7 you’ll see both E♭ (the minor 3rd) and E (the major 3rd), or over an F7 both A♭ (the minor 3rd) and A (the major 3rd), happening within the same bar.

If you’re newer to jazz, this kind of movement might not sit comfortably with your ear at first.

But in a blues like this, it’s a completely valid approach.

Blues, at its core, has this quality of not being clearly major or minor — and deliberately building a line around that same kind of chromatic ambiguity is a very common move.

That covers the breakdown.

A Recommended Recording

The Red Garland Trio’s album “Groovy.”

True to its name, it’s incredibly groovy.

The bass line from this article works over the chord progression to “C Jam Blues” on this album, so once you’re comfortable with it, it’s worth trying to play along.

I hope this gives you something useful for your daily practice — and once you’ve got the concept down, getting feedback on how it actually sounds when you play it is the natural next step.

Want Personalized Feedback on Your Playing?

This is exactly the kind of thing that’s hard to fix alone — and where having a teacher makes all the difference.

At Line on Bass, I offer an online lesson service where you send me a video of your playing, and I give you specific, detailed feedback — every single day if you want.

Students from around the world are using this to fix exactly these kinds of issues and steadily improve their jazz bass skills.

Check Out the Lesson Service →

Posted on Leave a comment

Walking Bass Lines Built on Open Strings + the First Three Frets

This article is written by Toru Hoshino, a jazz bassist and instructor based in Japan who teaches online lessons to students worldwide.

This one’s for anyone who’s noticed:

“My fingering never quite comes together.”

“My bass lines don’t have that light, swinging feel.”

This time, the topic is: building your walking bass lines around open strings plus the first three frets can make your fingering dramatically more efficient.

Efficient Fingering: The Case for Open Strings

Let’s start with something to look at. This is a chord progression you could use over “Autumn Leaves,” and notice that the left hand never shifts position at all.

Because the hand stays completely fixed within this one position, with zero shifting, you’re free to focus on reading the music and listening to what’s happening around you.

And what I’m doing deliberately here is using open strings.

Let’s Try Using Open Strings

Example 1

Here’s the same notes as above, played without using any open strings.

(The pink lines mark spots where I deliberately fretted a note instead of playing it as an open string.)

If you try playing it, you’ll notice it feels pretty cluttered and awkward.

Here’s the version that uses open strings instead.

Example 2

Doesn’t that look a lot easier to play?

For an A, Use the Open A String Instead of the 5th Fret on the E String

One of the things that makes jazz-style walking bass sound so stylish is that it almost never repeats the same pitch on consecutive quarter notes.

Making efficient fingering choices is key to playing that kind of walking line with a light touch.

It depends on the situation, but as one example: if you need to play an A, being able to use the open A string instead of the 5th fret on the E string leads to much more efficient fingering.

Compare the fretted version of bars 5–6 below…

…with the version using an open string for the same bars.

The difference in playability is night and day.

If you’re playing rock, where the root note often holds steady for a long stretch, fretting that A solidly on the E string can actually add more feeling to the note — and that’s a perfectly valid choice in that context.

But when you’re aiming for a light, swinging walking bass line, make a conscious habit of reaching for open strings.

More Reasons to Love Open Strings

They Help With Double Bass Fingering

A lot of players currently on electric bass tell me they’re thinking about eventually picking up the double bass.

If you try playing that earlier example — the one without open strings — on a double bass, nailing the intonation becomes seriously difficult.

On double bass especially, fingering within what’s called the “half position” (roughly equivalent to frets 1–3 on an electric bass) is critical, so if you’re hoping to try double bass down the line, get comfortable using open strings now.

Preventing Your Left Hand From Flailing

Jazz-style walking bass, where you’re often playing a different note on every single quarter note, keeps your left hand constantly busy.

When the fingering gets that busy, your left hand can end up flailing around more than it should.

A flailing left hand makes it much harder to nail fast passages or play with a light, swinging feel.

To avoid that, regularly resetting your busy fretting hand with an open string makes your fingering noticeably more manageable — and that in turn helps you nail those fast, light passages.

So that’s the case for using open strings to make your fingering more efficient. I hope this helps if you’ve been struggling with fingering, or feel like your bass lines are missing that light, swinging quality.

I hope this gives your walking bass lines a noticeably lighter feel — and once your fingering is cleaner, getting feedback on how it actually translates when you play is the natural next step.

Want Personalized Feedback on Your Playing?

This is exactly the kind of thing that’s hard to fix alone — and where having a teacher makes all the difference.

At Line on Bass, I offer an online lesson service where you send me a video of your playing, and I give you specific, detailed feedback — every single day if you want.

Students from around the world are using this to fix exactly these kinds of issues and steadily improve their jazz bass skills.
Check Out the Lesson Service →

Posted on Leave a comment

5 Jazz Standards Every Beginner Bassist Should Practice First

This article is written by Toru Hoshino, a jazz bassist and instructor based in Japan who teaches online lessons to students worldwide. In this article, he shares five jazz standards he practiced constantly as a beginner, coming from a rock background himself.

These five tunes are relatively easy to build a walking bass line over, and they all have catchy, approachable melodies that make them a great entry point.

If you’re just getting started with jazz bass, I hope these are useful to you.

Jazz Standards I Practiced Constantly as a Beginner

Autumn Leaves

Even people who don’t know jazz tend to recognize this one.

It’s easy to build an efficient, comfortable walking bass line over, and the melody has a beautifully melancholy quality to it. It also comes up constantly at jam sessions, so it’s well worth mastering.

Fly Me to the Moon

This is an extremely catchy, singable tune, and it gets covered by vocalists constantly.

Bye Bye Blackbird

Another tune with a catchy melody that sticks in your ear, and one that comes up a lot at sessions.

That said, the first four bars all sit on the same F chord, and I remember being genuinely unsure how to approach that stretch when I was starting out.

The Girl from Ipanema

The defining tune of bossa nova — a genre with a distinctly different rhythmic feel from straight-ahead jazz.

The bass line here is mostly built around the root and the 5th.

I wrote up a full breakdown of the bass line for this tune, with video, in this article.

F Blues

“F Blues” isn’t the title of one specific song — it refers to any tune built on the 12-bar chord progression shown below. Tunes commonly played as F blues include:

Bags’ Groove
Now’s the Time
Billie’s Bounce

Chord chart for a standard F blues progression

I put together a full practice method for improvising a walking bass line over an F blues, with video, in this article.

What Comes After This

I still have students work through these five tunes early on in lessons.

Once those are sounding solid, students move on to new tunes — and beyond these five, I also put together a list of 40 tunes I personally played constantly at sessions around Tokyo. You can check that out in this article.

Once you’re comfortable, it’s common to pick your next tune yourself from a list like that.

The more you listen — bebop, Coltrane-style playing, Bill Evans-style playing, Monk-style playing, bossa and Latin, bluesy stuff — the more your own sense of what kind of jazz you actually love starts to take shape.

There’s a lot to work through either way, so you might as well dive into whatever tunes genuinely grab you or sound cool to your ear.

Hopefully this gives you something useful for your daily practice.

Want Personalized Feedback on Your Playing?

Working through these standards builds a great foundation, but knowing whether your own walking lines over them are actually solid — rhythmically and harmonically — is much easier to judge with a second pair of ears.

This is exactly the kind of thing that’s hard to fix alone — and where having a teacher makes all the difference.

At Line on Bass, I offer an online lesson service where you send me a video of your playing, and I give you specific, detailed feedback — every single day if you want.

Students from around the world are using this to fix exactly these kinds of issues and steadily improve their jazz bass skills.

Check Out the Lesson Service →