This article is written by Toru Hoshino, a jazz bassist and instructor based in Japan who teaches online lessons to students worldwide. In this article, he shares five jazz standards he practiced constantly as a beginner, back when he was coming from a rock background.
These are tunes that make it relatively easy to build a walking bass line, with melodies catchy enough that they’re approachable right from the start.
I hope this is useful if you’re just getting into jazz bass.
Jazz Standards I Practiced Constantly as a Beginner
Autumn Leaves
This is a tune even people who don’t follow jazz tend to recognize.
It’s easy to build an efficient, comfortable walking bass line for, and the melody has that wistful, melancholic quality. It also comes up constantly at jam sessions, so it’s well worth having under your fingers.
Fly Me to the Moon
A catchy, singable tune that gets covered by vocalists constantly.
Bye Bye Blackbird
Another tune with a catchy, memorable melody that comes up often at sessions.
That said, the first four bars all sit on the same F chord, and I remember being genuinely unsure how to approach that stretch when I was starting out.
The Girl from Ipanema
The defining tune of bossa nova — a genre with a feel and rhythmic approach a bit different from straight-ahead jazz.
The bass line here is mostly built around the root and the 5th.
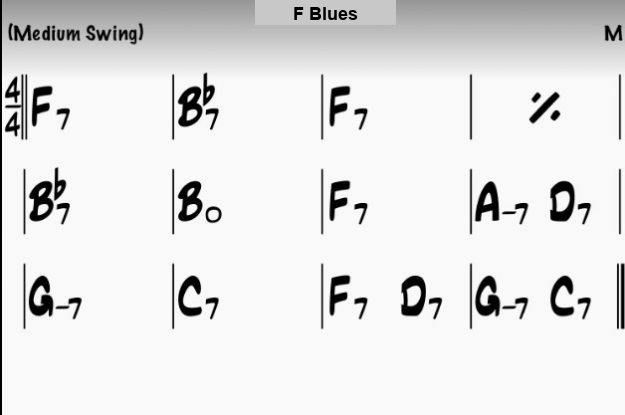
There’s no single tune actually called “F Blues” — it just refers to any tune built on the standard 12-bar blues progression shown below, in the key of F.
Tunes like “Bags’ Groove,” “Now’s the Time,” and “Billie’s Bounce” are all commonly played F blues tunes.
These five tunes are usually what I have students work through first in lessons.
Once those are sounding solid, I have them move on to new tunes — and beyond these five, I also put together a list of 40 tunes I personally played constantly at sessions around Tokyo over the years.
Once you’re comfortable with the basics, I’ll often have students pick their next tune from that list themselves. Listen to plenty of bebop, Coltrane-style playing, Bill Evans, Monk, bossa and Latin tunes, bluesy stuff — and your own sense of what kind of jazz you actually love will start to take shape.
There’s a lot to work through either way, so you might as well dive into whatever tune catches your ear or sounds genuinely cool to you.
I hope this gives you something useful for your day-to-day practice — and once you’ve got a few of these standards under your fingers, getting feedback on how you’re actually playing them is exactly the next step worth taking.
Want Personalized Feedback on Your Playing?
This is exactly the kind of thing that’s hard to fix alone — and where having a teacher makes all the difference.
At Line on Bass, I offer an online lesson service where you send me a video of your playing, and I give you specific, detailed feedback — every single day if you want.
Students from around the world are using this to fix exactly these kinds of issues and steadily improve their jazz bass skills.
This article is written by Toru Hoshino, a jazz bassist and instructor based in Japan who teaches online lessons to students worldwide. In this article, he answers a student’s question: how do you build a walking bass line when the same chord lasts for two bars in a row?
I got this question from a student:
“When the same chord continues for two bars, how should I play over it?”
So I put this article together to answer it.
In jazz standards, you’ll often run into chord progressions where the same chord lasts two bars or more. A lot of people aren’t sure how to approach that, so let’s dig in.
Building a Bass Line When the Same Chord Lasts Two Bars
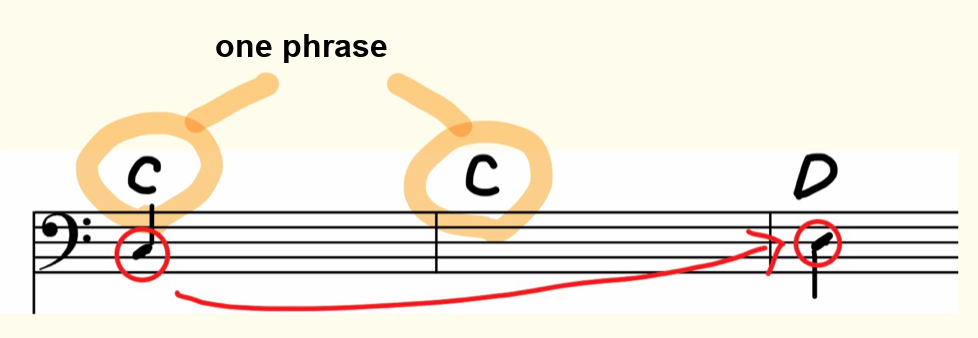
Say you’ve got a progression like C–C–D–D.
As a general rule, you want the first note of each bar to be the root. But if you do that here…
…it ends up sounding like this. And honestly, this doesn’t really show off what makes a walking bass line work.
In a case like this, it helps to think of the first two bars as one unit, and aim for:
connecting the first note of bar 1 to the root of bar 3, using all 8 notes across those two bars as one continuous line.
Thinking of it that way makes it much easier to create a smooth, flowing line.
So at this point you might be thinking: “okay, what about something like this instead?”
And yeah, in theory that’s exactly the idea. That said, running straight up “do-re-mi-fa-so-la-ti-do” like that is a little too plain and predictable, so let’s add a bit more flavor to it.
With that in mind, let’s pull a few real examples from actual jazz standards and see how this plays out in practice.
Three Real Examples of Two-Bar Chord Walking Lines
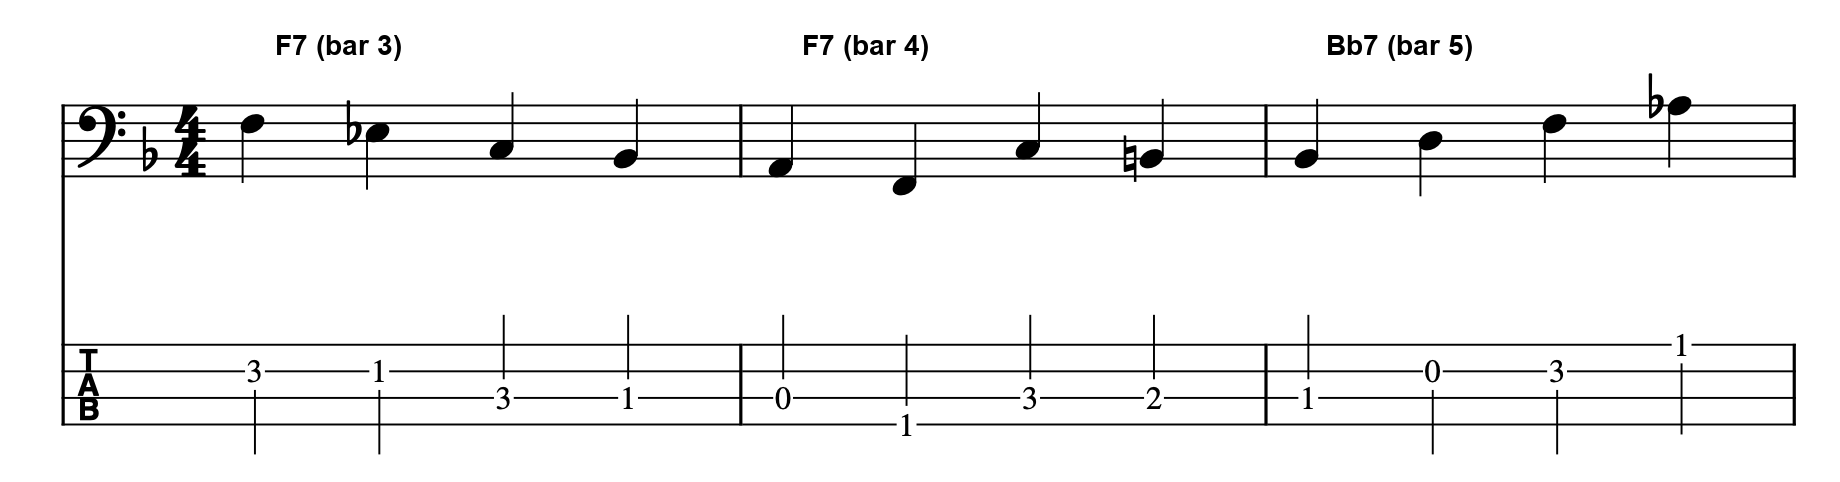
Bars 3–5 of an F Blues
The Key Idea
F7 lasts through both bar 3 and bar 4 here. Rather than starting bar 4 on the root, F, I deliberately started it on the major 3rd, A.
The line is already descending from the F at the start of bar 3, and by not interrupting that descent, the motion carries smoothly straight through into bar 4.
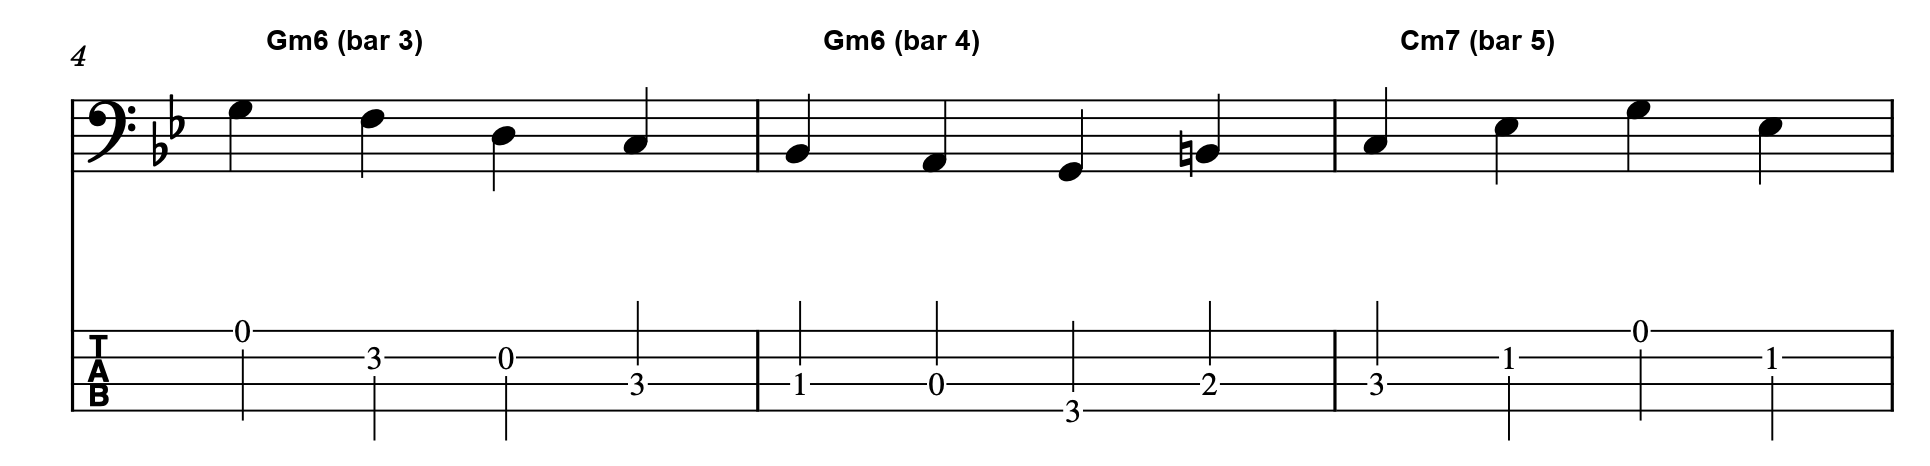
The B Section of Autumn Leaves, Bars 3–5
The Key Idea
Gm6 lasts through bar 3 and bar 4 of the B section here. Instead of starting bar 4 on the root, G, I started it on the minor 3rd, B♭.
The line is descending from the G on the first string in bar 3, and keeping that downward motion going lets it flow smoothly into bar 4 as well.
Bars 1–3 of All of Me
The Key Idea
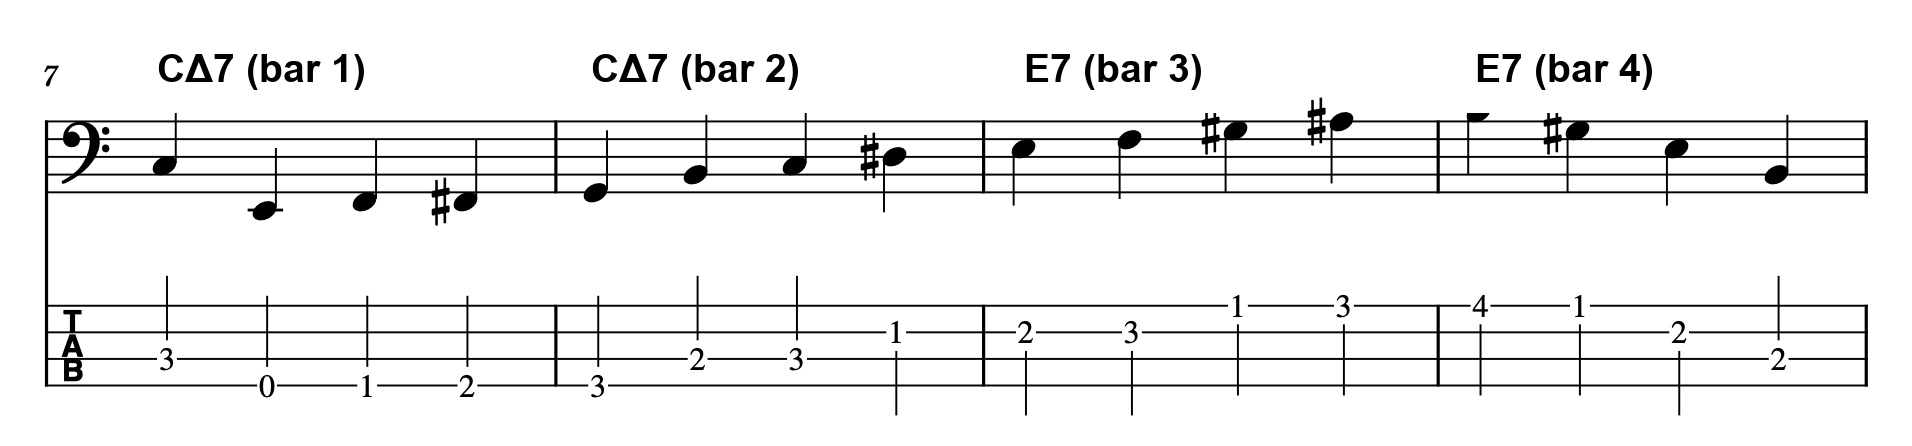
Starting on C at the top of bar 1, I jump down to the open E string on the 4th string as the second note, then climb back up from there into the root, E, at the start of bar 3.
If you’ve ever been unsure how to build a bass line when the same chord sticks around for two bars or more, give this approach a try.
Want Personalized Feedback on Your Playing?
Figuring out which chord tone to land on at the start of a long static chord — and whether your line actually flows smoothly into it — is much easier to judge with a second pair of ears.
This is exactly the kind of thing that’s hard to fix alone — and where having a teacher makes all the difference.
At Line on Bass, I offer an online lesson service where you send me a video of your playing, and I give you specific, detailed feedback — every single day if you want.
Students from around the world are using this to fix exactly these kinds of issues and steadily improve their jazz bass skills.
This article is written by Toru Hoshino, a jazz bassist and instructor based in Japan who teaches online lessons to students worldwide. In this article, he shares why transcribing walking bass lines by ear is one of the most old-school but effective ways to improve, and how to actually do it.
Transcribing Walking Bass Lines by Ear?
Transcribing by ear means listening to a recording or video of an artist playing, and writing out what you hear as notation.
You might be thinking “there’s no way I can do that,” or “I don’t have absolute pitch, so it’s impossible” — but I started out the exact same way, just transcribing by ear.
How to Transcribe a Walking Bass Line by Ear
1. Get a recording you like and your bass ready. (An electric bass is easier to work with for this — plug into an amp if you can.)
2. Listen to the track.
3. You don’t have to start from the beginning of the song — just start from whichever phrase you want to transcribe. Listen closely, note by note, and write down what you hear. (Tab notation works fine too.)
One hour later…
…total defeat.
Yeah, I know. It’s tough to do right away.
Bass sits in a low frequency range, so compared to other instruments it has a weaker attack on the ear, which makes it genuinely harder to pick out.
That said, the notes used on bass are exactly the same as the keys on a piano — 7 white keys and 5 black keys, 12 notes total — and every note in any walking bass line you’re listening to is one of those 12.
So even if you can’t immediately identify a note, you can work through the 12 options one at a time — C, C#, D, D#, E, F… — until you find it.
“Easy for You to Say — the Song Is Just Too Fast!”
Fair enough — a lot of tunes really are too fast to follow note by note at full speed.
It lets you slow a track down to half speed and loop the same section over and over.
Using an app like this makes transcribing by ear a lot more manageable.
Why Transcribing by Ear Is Worth the Trouble
1. It trains your relative pitch.
2. Once you’ve copied a bass line, you can actually play it over the tune right away — so you immediately have something usable.
Beyond that, once you’ve got some lines under your fingers, your own playing can start to fall into the same handful of habits. Listening objectively to how other bassists approach a given chord is a great way to break out of that.
It can lead to moments like, “oh, I never thought of playing it that way.”
Transcribing walking bass lines by ear is genuinely hard work, but what you get out of it is worth just as much. If you’re not sure what to practice next, it’s worth giving a shot.
Want Personalized Feedback on Your Playing?
Transcribing by ear will train your pitch and vocabulary, but it can’t tell you whether what you’re playing back actually holds up rhythmically and stylistically — that’s where outside feedback becomes invaluable.
This is exactly the kind of thing that’s hard to fix alone — and where having a teacher makes all the difference.
At Line on Bass, I offer an online lesson service where you send me a video of your playing, and I give you specific, detailed feedback — every single day if you want.
Students from around the world are using this to fix exactly these kinds of issues and steadily improve their jazz bass skills.
This article is written by Toru Hoshino, a jazz bassist and instructor based in Japan who teaches online lessons to students worldwide. In this article, he lays out a step-by-step practice method for learning to improvise a walking bass line over an F blues, built specifically for players who can read a written bass line off a tab chart just fine, but freeze up the moment they’re given nothing but a chord chart.
You can play it fine if it’s written out in tab —
but hand you a chord chart and you’re completely lost.
If that’s you, this is a full training method for building the skill of improvising a walking bass line on the spot.
Fair warning: this is a genuinely long article. I’d recommend bookmarking it and working through it whenever you have time, rather than trying to get through it all in one sitting.
Step 1: Start With the Root
The first thing you need to be able to do is look at a chord and play that chord’s root. If you’re not confident with roots yet, make sure you’ve got that down first — if you already have, skip ahead.
Let’s actually match roots to a chart. Here’s an F blues:
Start slow, with half notes (two notes per bar):
Once that feels comfortable, move up to quarter notes (four notes per bar):
iReal Pro is a great tool to use while practicing this.
Even when you’re only playing the root, thinking about which position to play it from widens what your bass line can do.
In the chart above, in bar 1 (F7) I’m playing the F on the 1st fret of the low E string, and in bar 2 (B♭7) I’m playing the B♭ on the 1st fret of the A string. But on the low frets alone, the F root is also available in these spots:
And the B♭ root is available here:
For Am7, you’ve also got the 5th fret of the low E string, the open A string, and the 2nd fret of the D string:
If playing only the root feels a little boring, try approaching the root from a different position on the neck. It might open up your bass line more than you’d expect.
Try Changing Up the Octave of the Root
Here’s an example. Every note here is still just the root — but simply changing the octave already shifts the feel quite a bit.
Of course, this alone still doesn’t sound very “jazz” yet — we’ll keep widening the range of approaches from here.
Step 3: Add the 5th
Once you can comfortably play the root alone, and the root moving across octaves, try adding the 5th.
Here’s what that gives you. Just adding one note to the root, but doesn’t it already feel like there’s more motion?
Understanding the 5th, and Where to Find It
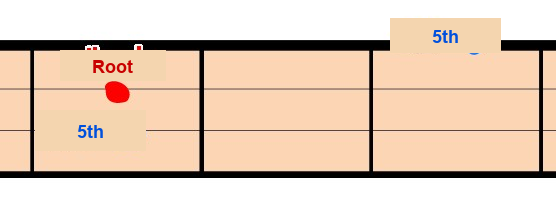
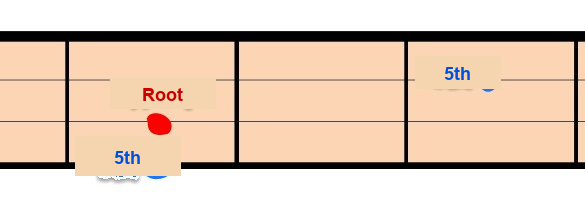
If the root is here, the 5th is the note shown in blue. If the root moves here, the 5th moves here:
The relationship between the two is easy to remember.
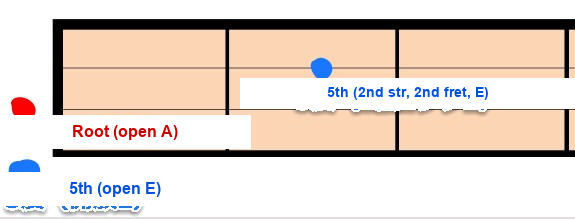
It’s a little less straightforward when open strings are involved, as shown above.
Still, when you just want some basic motion in a bass line without overthinking the theory, the 5th is a note that almost always fits comfortably.
Step 4: Root + 3rd
Here’s what that looks like:
That gives a pretty different impression from the 5th version, right?
Here’s the 3rd, relative to the chord’s root:
Just changing the octave the root sits in (Example 1), or moving where you place the quarter-note 3rd (Example 2), is enough to shift the feel on its own:
Example 1
Example 2
The 3rd Is What Gives a Chord Its Character
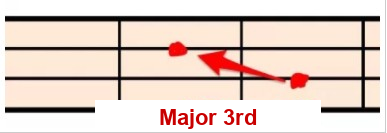
If you see a chord symbol like ●△7 or plain ●7, the 3rd is here — the major 3rd:
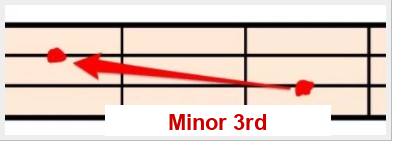
If you see ●m7, ●m7♭5, or ●dim, the 3rd is here instead — the minor 3rd:
Play both of those together with the root and you can really hear the difference in character.
With the 5th, the shape relative to the root stays the same whether the chord is major or minor:
But the 3rd shifts shape, as shown above. Major 3rds are generally described as sounding bright, and minor 3rds as sounding dark — it’s the note that conveys a chord’s emotional character.
When you’re building a walking bass line, you’ll want to be able to move freely between major and minor 3rds without having to think twice about it.
Step 5: Root + 3rd + 5th
That’s what it sounds like.
How to Practice This So Far — Part 1
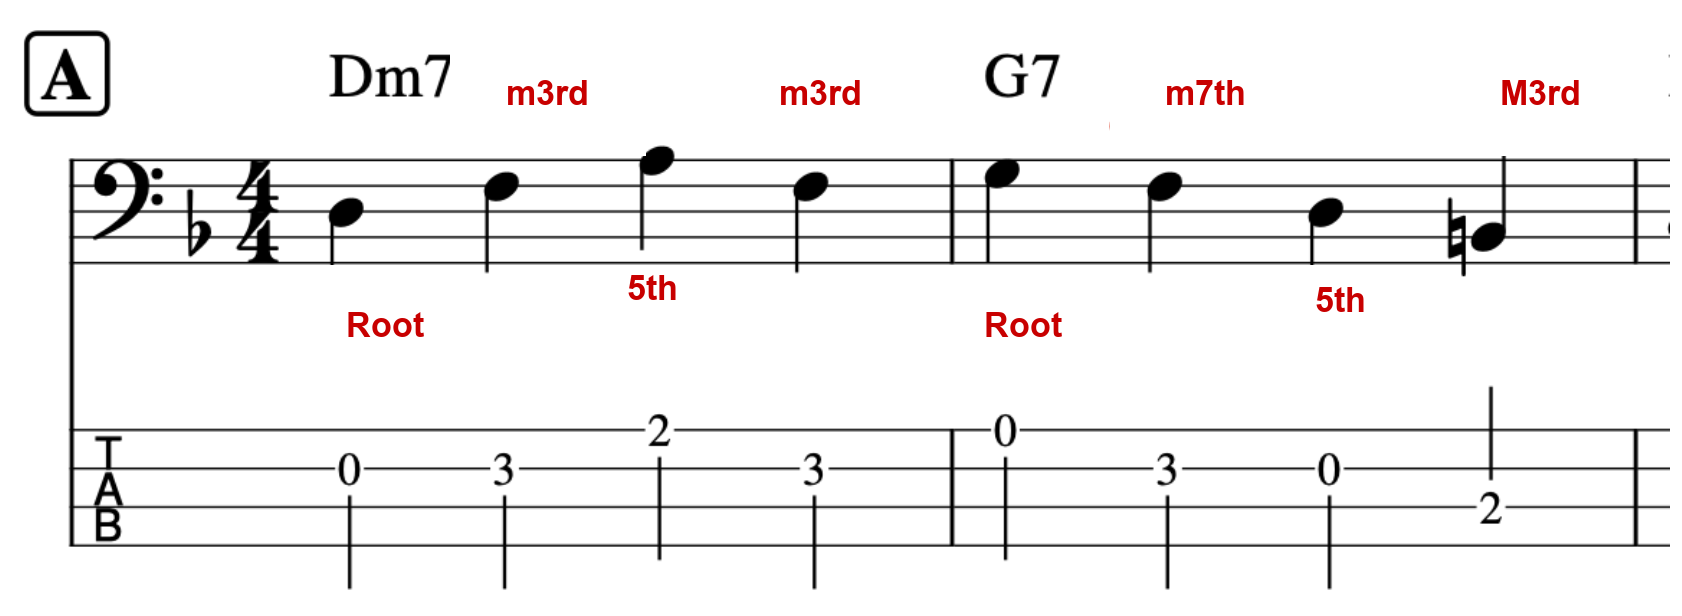
You don’t need to follow this chart exactly — the goal is to use something like iReal Pro and be able to play a bass line built from the root, 3rd, and 5th at a steady tempo, on your own.
Also keep in mind that the 3rd and 5th can each be approached from above or below the root. Try mixing these up and see which combinations feel like they flow smoothly, are easy to play, and sound good to your ear.
Example 1: combining the 3rd approached from above and the 5th from above
Example 2: combining the 3rd approached from below and the 5th from below
Example 3: when a bar has two chords in it, rather than forcing in extra movement, just pick whatever’s easiest to finger
A slow tempo is fine — just experiment with different note choices.
Here are a couple of backing tracks I made for this (with a 4-count intro). Take it slow, and practice working in the octave, the 5th, and the 3rd around the root.
Tempo 60
Tempo 80
A Mindset for This Kind of Practice
This type of practice doesn’t have a clear finish line, the way nailing a transcription does — which makes it easy to lose motivation.
When you’re checking your note choices, do it without a metronome first. Once it starts to feel natural, bring in the metronome or a backing track.
This isn’t about memorizing fixed positions — it’s about training yourself to find these notes on the fly, in real time. That’s why it helps to keep visualizing where the root, 3rd, and 5th are as you play, rather than relying on muscle memory alone.
It takes real concentration, so if you do it properly, you’ll tire out fast. When you’re tired, stop. What matters is doing a little bit of this every single day.
Step 6: Root + Passing Tone
Here’s what that sounds like. Anywhere you see a “P” marked is a passing tone — “P” for “passing.”
What Is a Passing Tone?
Let’s set the 3rd and 5th aside for a moment and bring in passing tones instead. If you already know how passing tones work, feel free to skip ahead.
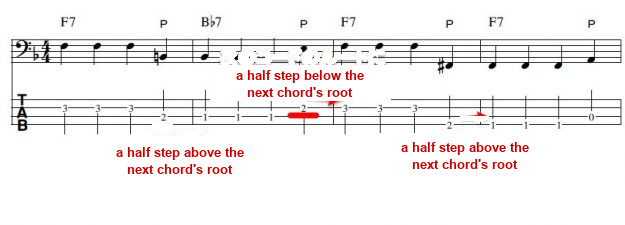
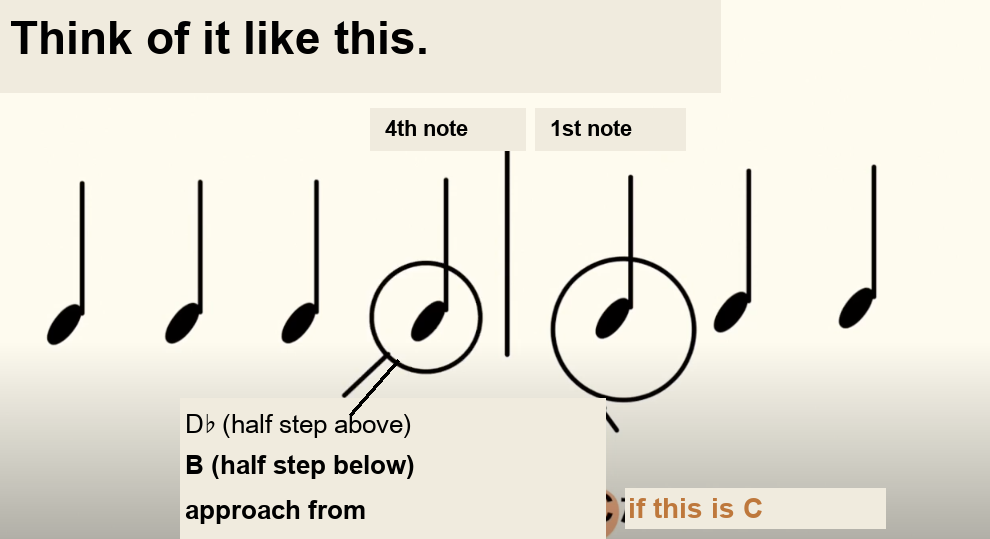
The basic idea: when you’re playing a steady quarter-note, four-beats-per-bar line, you place the last note of a given bar a half step above or below the root of the next bar’s chord. That’s what gives a bass line its smooth, connected feel.
This technique shows up across all kinds of music, but it’s used especially heavily in jazz.
A Passing Tone Isn’t Always a Chord Tone
A passing tone isn’t necessarily a note from that bar’s chord scale, or even a chord tone at all — its job is purely to act as a connector between two notes.
For example, compare this version, which sticks strictly to chord tones —
— to this version. Doesn’t this one feel smoother?
I go into passing tones in a lot more depth in this article:
Step 7: A Walking Bass Line Built From Root + 3rd + 5th + Passing Tones
That’s how it comes together. I think it’s starting to sound a lot more “jazz” at this point.
(Passing tones are marked with a “P” throughout.)
Step 8: A Smoother Walking Bass Line
Building on the previous bass line, here’s a smoother version.
The Trick Behind Making the Line Smoother
I added the 7th into the mix of chord tones, on top of the root, 3rd, and 5th.
I also brought in scale tones beyond the chord tones — the 2nd, 4th, 6th, and so on — wherever they made for easier fingering, which opened things up even more.
Those are the two ideas behind this version.
Notes From the Chord Scale
Root + 3rd + 5th + 7th together are what’s called the chord tones, but thinking in terms of the full scale opens up your options even further.
For example, thinking in scale terms, here’s what you get for the F7 that comes up so often in this progression:
And for B♭, this position works well for a blues:
(Depending on the feel and tempo of the tune, positions without the red dots shown above can sometimes work too, but I won’t get into that here.)
How to Practice This So Far — Part 2
Keep chord tones as your anchor, weave in scale tones wherever they make the fingering easier, and try moving the root around to different positions as you work through the progression.
In the example chart, bars 1–2 start from the 1st fret of the low E string and move like this:
Here’s the same two bars starting instead from the 3rd fret of the A string:
In the example chart, bars 9–10 start from the open D string and move like this:
And here’s that same passage starting instead from the 3rd fret of the low E string.
The goal of this kind of practice isn’t to drill your fingers into memorizing one fixed path — it’s to train yourself to picture the next note in real time, so you can actually improvise.
It’s fine to make mistakes constantly while you practice. When you’re able to focus, work through it slowly while consciously naming each note in your head as you play it.
Step 9: A Walking Bass Line With Varied Rhythms
Once it’s not just a steady stream of quarter notes anymore, triplets and eighth notes start working as nice accents.
An example using a triplet accent:
An example using an eighth-note accent:
An example using a tied-note accent:
How to Practice This So Far — Part 3
You don’t need to follow the chart exactly — just practice deliberately placing accents where you choose.
Example using a triplet accent:
Example using an eighth-note accent:
Example using a tied-note accent:
(This one’s a bit tricky, I’ll admit ^^;)
Overdoing it can get repetitive, but if you don’t drill this in ahead of time, you won’t be able to drop an eighth-note or triplet accent exactly where you want it in the moment. Practice it deliberately, starting at a slow tempo.
Here’s a backing track at tempo 70 — feel free to use it for practice.
How to Think About Accents: Drilling vs. Real Playing
You drill accents on their own like this so they’re in your toolkit, but in actual performance, I don’t use them anywhere near this often.
There’s no fixed rule for how much you should use accents, but when a steady stream of quarter notes suddenly gets punctuated by one well-placed accent at exactly the right moment, that’s what makes a bass line sound genuinely cool.
That turned into a long one — thanks for sticking with it all the way through.
If you’ve read all the way down here, you’re clearly someone who’s genuinely interested in walking bass — and that’s exactly the kind of dedication that’s hard to keep building on without outside feedback.
Want Personalized Feedback on Your Playing?
This is exactly the kind of thing that’s hard to fix alone — and where having a teacher makes all the difference.
At Line on Bass, I offer an online lesson service where you send me a video of your playing, and I give you specific, detailed feedback — every single day if you want.
Students from around the world are using this to fix exactly these kinds of issues and steadily improve their jazz bass skills.
This article is written by Toru Hoshino, a jazz bassist and instructor based in Japan who teaches online lessons to students worldwide. In this article, he breaks down how to build a walking bass line over the chord progression to “Isn’t She Lovely,” a tune that comes up often at jam sessions.
A Walking Bass Line for “Isn’t She Lovely”
Here’s a walking bass line that works well over the “Isn’t She Lovely” chord progression, with a full play-through video.
The tabbed performance starts at 2:14.
There are three things I focused on when building this line.
1. Building Around Chord Tones
This line is built mainly around chord tones — the root (1st), 3rd, 5th, and 7th of each chord.
There are countless ways to choose notes when building a walking bass line, but when you build around the chord tones that anchor each chord, the line locks in naturally with the rest of the backing without ever feeling out of place.
2. Using Chromatic Passing Tones
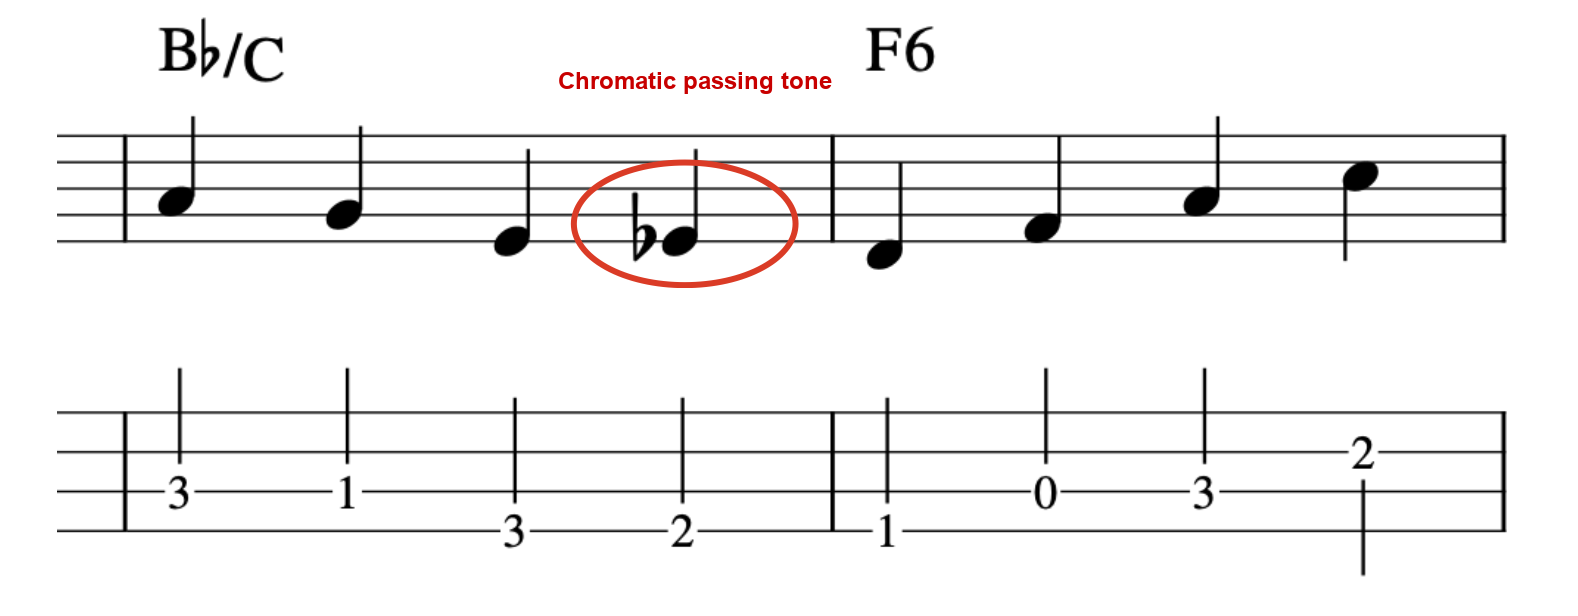
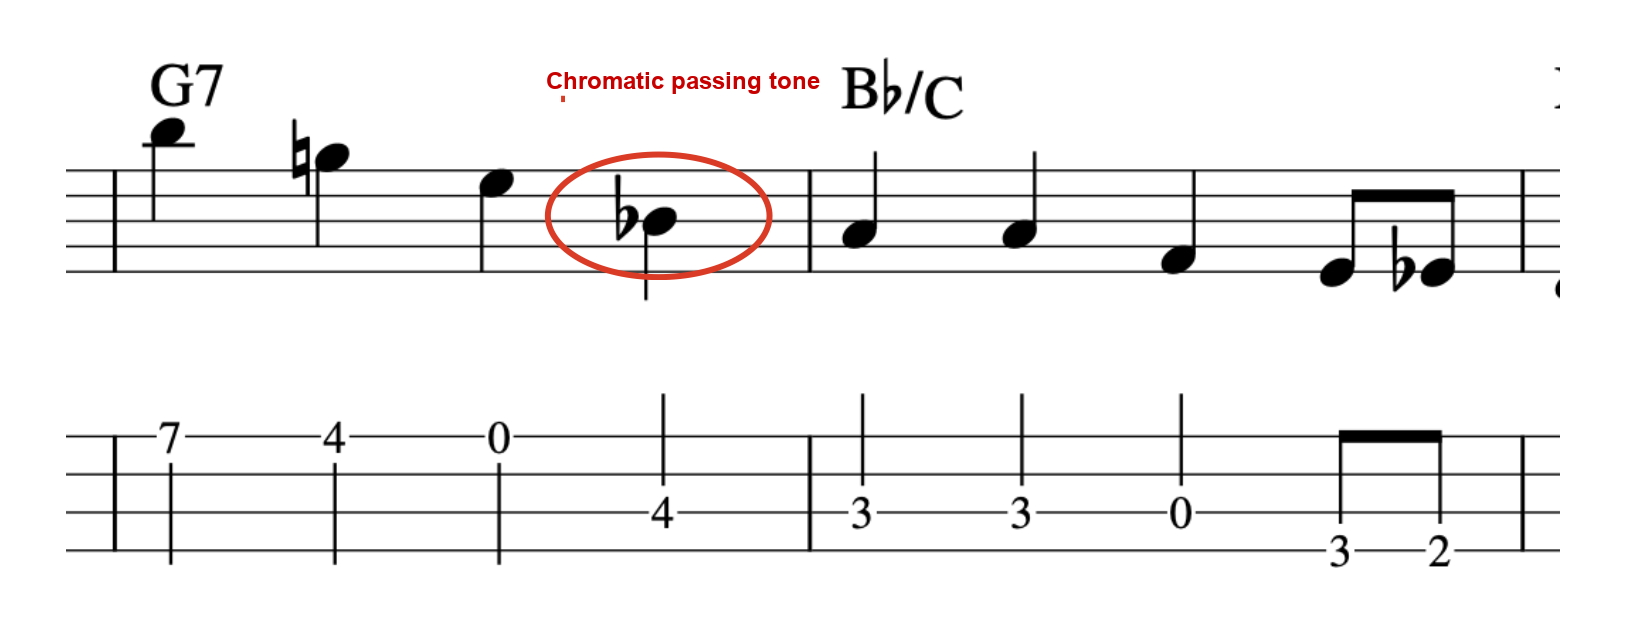
On beat 4, a note a half step below or above the root of the next chord is called a chromatic passing tone.
Example using a chromatic passing tone in bars 3–4
Example using a chromatic passing tone in bars 22–23
This is a very commonly used technique for smoothly connecting one chord to the next in a walking bass line.
3. Using Ghost Notes
I also worked in some ghost notes here and there throughout this line. They’re more often associated with slap playing, but adding ghost notes here and there in a walking bass line gives it a stronger rhythmic feel — a more “percussive” quality.
Example using ghost notes in bars 13–16
Example using ghost notes in bars 29–30
Practicing “Isn’t She Lovely” with iReal Pro
“Isn’t She Lovely” isn’t included in iReal Pro’s “JAZZ 1400” playlist, but you’ll find it inside the app’s “Stevie Wonder 30” song set. From the Forums tab inside the app, go to POP, ROCK, BLUES, then select Stevie Wonder, and tap Stevie Wonder 30 to add the whole set. It also includes “You Are the Sunshine of My Life,” “Overjoyed,” and “Superstition,” among others.
That covers how I approached building a walking bass line over the “Isn’t She Lovely” chord progression. I hope it gives you something useful for your own practice.
If you’ve read this far, building strong walking bass lines is clearly something you care about — and getting feedback on your own lines is exactly the kind of thing that’s hard to fix alone.
Want Personalized Feedback on Your Playing?
This is exactly the kind of thing that’s hard to fix alone — and where having a teacher makes all the difference.
At Line on Bass, I offer an online lesson service where you send me a video of your playing, and I give you specific, detailed feedback — every single day if you want.
Students from around the world are using this to fix exactly these kinds of issues and steadily improve their jazz bass skills.
This article is written by Toru Hoshino, a jazz bassist and instructor based in Japan who teaches online lessons to students worldwide. In this article, he recommends his favorite practice app, iReal Pro, and walks through how to use it for walking bass practice.
I love this app so much that I switched from a basic flip phone to a smartphone just so I could use it: iReal Pro.
What Is iReal Pro?
Used by everyone from total beginners to working professionals, this app is great for walking bass line practice, and just as useful if you’re into jazz, blues, improvising, or composing.
Here’s an example of practicing a bass line over an iReal Pro backing track — it generates remarkably realistic drum and piano accompaniment.
It’s the ideal app for practicing bass lines you’ve written yourself.
What Makes iReal Pro So Powerful
A Huge Song Library
Over 1,300 jazz standards alone.
On top of that, you can install Latin and Brazilian standards, well-known pop and rock tunes, Stevie Wonder songs, and more, all for free (installation steps below).
Transposing on the Fly
You can transpose into any of the 12 keys.
If you’re playing with a vocalist, the default key in a songbook or chart doesn’t always work for their range. iReal Pro lets you change keys instantly and apply that directly to your practice.
Tempo Control
Any tune can be played anywhere from tempo 40 to 360.
Organizing Songs Into Folders
I keep my songs organized into folders like:
· Tunes I didn’t know at a session
· Fundamentals practice tunes
· Jazz standards worth memorizing
· Set list for an upcoming gig
· Demo songs for my next lesson
Keeping everything organized like this means I never have to wonder what to practice next.
Changing Rhythm Patterns
You can switch between swing, Latin, bossa nova, funk, rock, 3/4 time, and more — a huge range of rhythmic feels. That means you can match your practice to whatever style the tune you’re working on, or your current band, actually calls for.
How to Install It
Here’s a quick rundown of how to get set up:
1. Get the app from the App Store — it’s around $5, and genuinely worth it for years of use.
2. Open the app and tap “Import Playlist from Forum.”
3. Tap “JAZZ.”
4. Tap “JAZZ 1400 STANDARDS.”
5. Tap the blue link next to “Click on Link to import.”
6. Tap “Import Playlist.”
7. Confirm “JAZZ 1400” now appears on your main screen.
8. Open it up — you’ll find well-known standards like “Autumn Leaves” right there in the list. Tap any song title to bring up its chord chart, then hit the play button to start the backing track.
iReal Pro is a genuinely incredible training tool for the price — make it part of your daily practice routine.
An app like this is great for solo practice — but knowing whether your bass line is actually landing well against the chords in real time is exactly where a teacher’s ear matters.
Want Personalized Feedback on Your Playing?
This is exactly the kind of thing that’s hard to fix alone — and where having a teacher makes all the difference.
At Line on Bass, I offer an online lesson service where you send me a video of your playing, and I give you specific, detailed feedback — every single day if you want.
Students from around the world are using this to fix exactly these kinds of issues and steadily improve their jazz bass skills.
This article is written by Toru Hoshino, a jazz bassist and instructor based in Japan who teaches online lessons to students worldwide. In this article, he breaks down the bass line approach for “The Girl from Ipanema” and other bossa nova tunes commonly played at sessions.
This is a tune that comes up constantly at sessions, so it’s well worth having in your back pocket.
“The Girl from Ipanema” — Bass Line
Here’s a run-through.
Characteristics of the Bass Line
Mostly Root and 5th
Unlike a walking bass line, bossa nova bass lines don’t lean much on passing tones or tensions. The foundation is mostly just the root and the 5th.
The Bossa Nova Rhythm
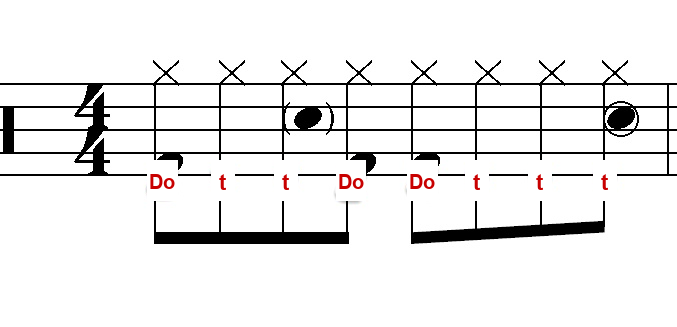
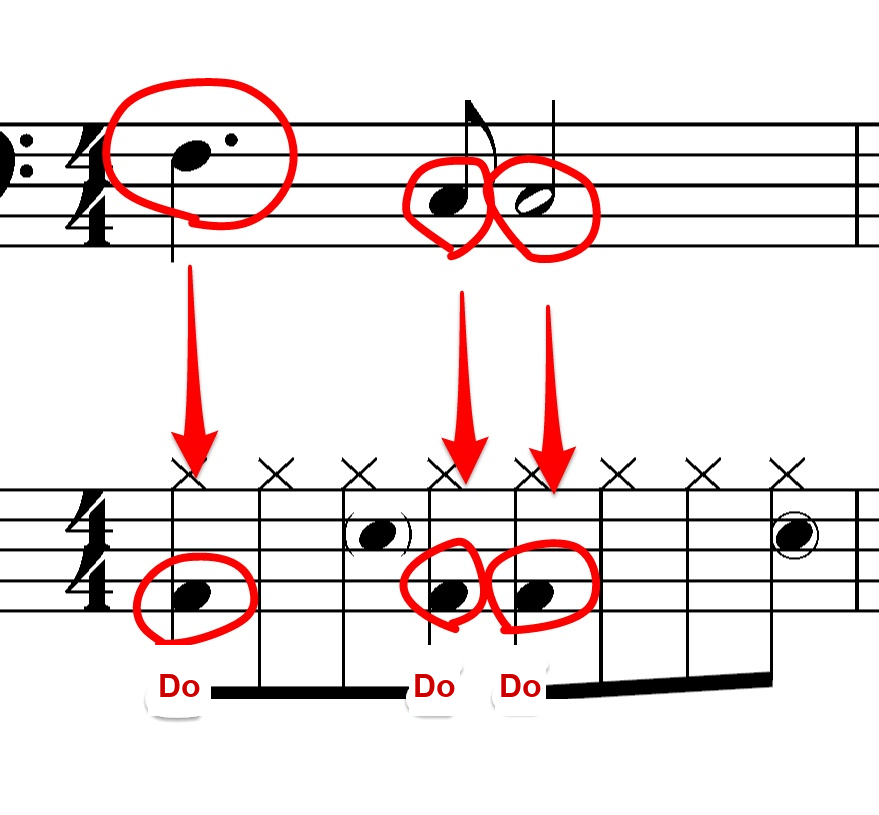
The drum rhythm looks like this:
“Do-t-t-Do / Do-t-t-t” per bar — a steady, repeating rhythm that the bass locks into.
That’s the feel you’re going for. Start by being able to sing the rhythm out loud before you try playing it.
Be Conscious of the Difference Between Swing and Bossa Nova Rhythm
Bossa nova tunes come up a lot at sessions. The chord changes tend to be just as improv-friendly as straight-ahead jazz, and plenty of these tunes work great with a sax or piano out front.
That said, the way you play bass — and the rhythmic feel you should be locking into — is genuinely different between jazz and bossa nova.
The Rhythmic Difference Between Jazz and Bossa Nova Drums
Here’s a “jazz-style swing” feel.
Now with a swing-style bass line laid on top:
And here’s a tight, “bossa nova-style” rhythm.
Now laying a similar line on top of that:
How does that sound? Not exactly wrong, but…
Compared to the jazz feel, it has a noticeably tighter, more locked-in character. Something more like this tends to fit better:
Playing the attacks at consistent, even intervals like this makes up for the absence of drums and helps lock in the time feel.
Simple Is Best — Focus on Locking the Rhythm In
A bass line built from just root and 5th might feel almost too simple, but the simpler a bass line is, the harder it actually is to play it with zero unevenness.
I was often told myself: “before you go adding flashy little fills, make sure you’re nailing the root and holding the time down.”
Even with simple note choices, when the bass and drums are genuinely locked together, it feels great for everyone else in the band to play over.
Start by getting comfortable with a simple line built from just the root and the 5th.
Bossa Nova Tunes I’ve Played a Lot at Sessions This Past Year
Blue Bossa
Black Orpheus
The Girl from Ipanema
Fly Me to the Moon
Here’s That Rainy Day
How Insensitive
One Note Samba
The Shadow of Your Smile
Wave
Corcovado
Água de Beber
O Grande Amor
Desafinado
I’ve also played tunes like these as bossa nova arrangements:
Candy
Come Rain or Come Shine
Days of Wine and Roses
I Remember You
What a Difference a Day Made
Over the Rainbow
What Is Bossa Nova?
It’s a genre distinct from jazz, with a smooth, stylish sound that you’ll hear constantly in cafés. Here’s some background, summarized from Wikipedia:
In Portuguese, “Nova” means “new,” and “Bossa” roughly means “knack” or “bump.” (…) It emerged in the late 1950s among middle-class students and musicians living in beachside neighborhoods of Rio de Janeiro like Copacabana and Ipanema. The genre’s breakthrough hit in Brazil was the 1958 single “Chega de Saudade,” written by Antônio Carlos Jobim with lyrics by Vinícius de Moraes, sung and played by João Gilberto on guitar. (…)
Pinning down exactly when your attack lands against the rhythm is something you really need a second set of ears for — that’s exactly where a teacher’s feedback makes the biggest difference.
Want Personalized Feedback on Your Playing?
This is exactly the kind of thing that’s hard to fix alone — and where having a teacher makes all the difference.
At Line on Bass, I offer an online lesson service where you send me a video of your playing, and I give you specific, detailed feedback — every single day if you want.
Students from around the world are using this to fix exactly these kinds of issues and steadily improve their jazz bass skills.
This article is written by Toru Hoshino, a jazz bassist and instructor based in Japan who teaches online lessons to students worldwide. In this article, he explains passing tones — one of the most common approaches used in jazz walking bass lines.
Who this is for
・Anyone interested in jazz bass lines ・Anyone who wants to build smoother, more stylish bass lines ・Anyone who wants to try walking bass ・Anyone who wants to bring jazzy flavor into their band’s bass lines
Passing tones smooth out the flow between notes, and they show up constantly in blues and jazz — definitely worth mastering.
Adding Passing Tones to a Bass Line
Here’s an F blues progression with passing tones added in.
Listen to the comparison below.
Bass line without passing tones:
Bass line with passing tones:
What do you think? Doesn’t the version with passing tones feel a lot smoother?
Where the Passing Tones Are Used
The passing tones are at the spots marked in red below.
There’s no hard rule for exactly what counts as a passing tone, but most often, it’s a note a half step or whole step above or below the root of the chord that’s coming up next.
For example: if the root of the next chord is B♭, you’d approach it with a passing tone a half step above — B (bars 1–2).
In bar 5, the note C is used (approaching B from a half step above) (bars 5–6).
And here’s an approach to C from a half step below, using B (bars 9–10).
Thinking in note names can get a little overwhelming, so it helps to picture it more simply, like this:
This is a genuinely beginner-friendly approach, so if you want to bring some jazzy flavor into your everyday playing, give it a try.
Knowing the theory behind passing tones is one thing — hearing in real time whether your specific choice of approach note actually worked is exactly where a teacher’s ear helps.
Want Personalized Feedback on Your Playing?
This is exactly the kind of thing that’s hard to fix alone — and where having a teacher makes all the difference.
At Line on Bass, I offer an online lesson service where you send me a video of your playing, and I give you specific, detailed feedback — every single day if you want.
Students from around the world are using this to fix exactly these kinds of issues and steadily improve their jazz bass skills.
This article is written by Toru Hoshino, a jazz bassist and instructor based in Japan who teaches online lessons to students worldwide. In this article, he recommends a method book that breaks down the walking bass lines of jazz legend Paul Chambers.
The Method Book: “The Music of Paul Chambers”
This is a book that analyzes the walking bass lines played by jazz bassist Paul Chambers — one of the most influential upright bassists in jazz history, best known for his work in Miles Davis’s classic quintet.
It covers 7 real tunes, including:
“So What”
“If I Were a Bell”
“My Funny Valentine”
a 12-bar blues
For each tune, it breaks down exactly how Chambers approached the walking line in detail — plus genuinely deep-dive analysis, like the percentage of each bass line that starts from the root, the 3rd, the 5th, or a tension note.
It also includes a list of albums Chambers recorded on, along with background on his life and career.
One heads-up: it’s entirely in English, and there’s no tab notation — standard notation only.
So it’s a bit of an advanced pick, but if you’re a fan of Paul Chambers’ lines, or want to get a feel for the bass sound underneath Miles Davis’s “Kind of Blue” or “Relaxin’,” this book is well worth tracking down.
A book like this gives you the analysis — but actually absorbing that vocabulary into your own playing in real time is exactly the kind of thing a teacher can help speed up.
Want Personalized Feedback on Your Playing?
This is exactly the kind of thing that’s hard to fix alone — and where having a teacher makes all the difference.
At Line on Bass, I offer an online lesson service where you send me a video of your playing, and I give you specific, detailed feedback — every single day if you want.
Students from around the world are using this to fix exactly these kinds of issues and steadily improve their jazz bass skills.
This article is written by Toru Hoshino, a jazz bassist and instructor based in Japan who teaches online lessons to students worldwide. In this article, he shares a rhythm drill for tightening up the precision of a bossa nova bass line.
This drill is a little involved, but it’s genuinely effective for training non-swung, straight-eighth-note feels — bossa nova, eighth-note-driven rock, pop, and similar styles. (There’s also a video walkthrough linked near the bottom if you’d rather watch than read.)
A Slightly Tricky Rhythm Drill
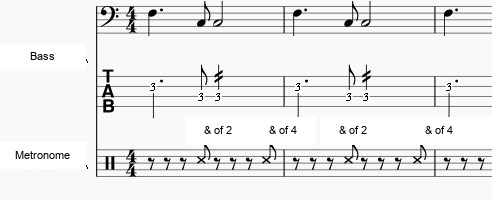
This is a drill I come back to myself on a regular basis. Set your metronome to click only on the “&” of beat 2 and the “&” of beat 4, using F and C as your two notes. Set the tempo to around 60 bpm, and try playing exactly that.
…and you’ll probably find it’s genuinely hard to lock in.
If You Can’t Quite Land It
First, get a feel for what “the & of beat 2 and the & of beat 4” actually means. Here’s the idea:
Even once you understand the mechanics, actually keeping up with it in real time is still genuinely difficult. When you’re struggling to lock in, try singing it out loud first to get a feel for it.
Use these syllables: sing “da” on beat 1, “da” again on the “&” of beat 1, “dee” on beat 2, and then “DIT” exactly where the metronome clicks, on the “&” of beat 2 — then repeat the same “da-da-dee-DIT” pattern for beats 3 and 4, landing the second “DIT” on the “&” of beat 4 where the metronome clicks again.
Once You’ve Got That, Try Playing It
Using just F and C, try this:
1st note attacks on “da” (dotted quarter note)
held through “da”
held through “dee”
2nd note attacks on “DIT” (eighth note — this is where the metronome clicks)
1st note attacks on “da” (half note)
held through “da”
held through “dee”
held through “DIT” (this is where the metronome clicks)
Give that a try.
What This Drill Trains
By deliberately attacking notes in the silent gaps between clicks and making the metronome “catch up to you” instead of the other way around, your rhythmic precision gets a real workout. It’s especially effective for sharpening eighth-note accuracy, which makes it great practice for eighth-note rock, pop, and bossa nova alike.
How to Practice It
Start with just two notes, as shown above. Early on, you genuinely won’t be able to lock in without singing it first — if you can’t sing it, that’s a sign you haven’t internalized it yet, and you won’t be able to translate it to your hands either.
Once you can hold that for a stretch, move on to phrases that actually show up in real tunes. In “The Girl from Ipanema,” for example, a bass line like this comes up often. Once you can play a line like that cleanly for 3 or 4 choruses, starting from nothing, your sense of rhythm will have genuinely sharpened.
Hopefully this is a useful addition to your practice routine.
Getting these off-beat attacks to actually lock in takes real-time feedback that’s hard to give yourself — a teacher can tell immediately whether you’re really landing the click or just close to it.
Want Personalized Feedback on Your Playing?
This is exactly the kind of thing that’s hard to fix alone — and where having a teacher makes all the difference.
At Line on Bass, I offer an online lesson service where you send me a video of your playing, and I give you specific, detailed feedback — every single day if you want.
Students from around the world are using this to fix exactly these kinds of issues and steadily improve their jazz bass skills.