Posted on Leave a comment

Introduction to Electric Bass #1: What Is a Bass, What You Need, and How Sound Works

Welcome to Lesson 1 of the Introduction to Electric Bass series.

This first session covers what a bass is, what gear you need to get started, the names of its parts, and how sound is actually produced — everything a complete beginner needs before picking up the instrument for the first time.

What Does a Bass Sound Like?

Before anything else, have a listen. A bass works best through headphones or speakers — the low frequencies don’t come through well on a phone speaker alone.

Guitar, Bass, and Drums together:
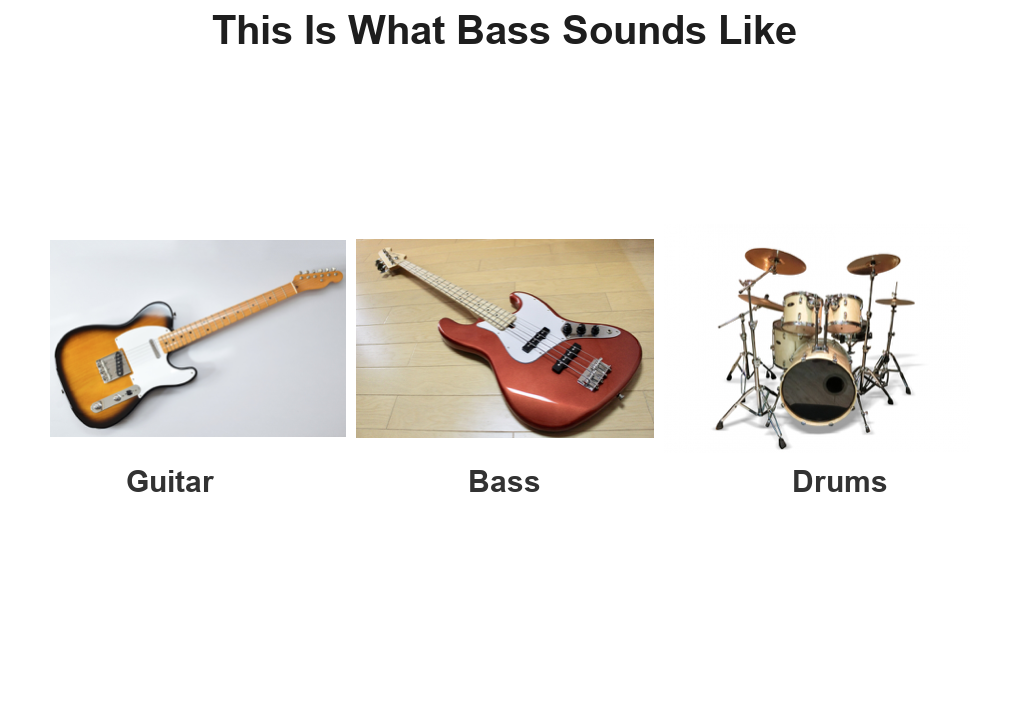
Guitar, Bass, and Drums — this is what bass sounds like

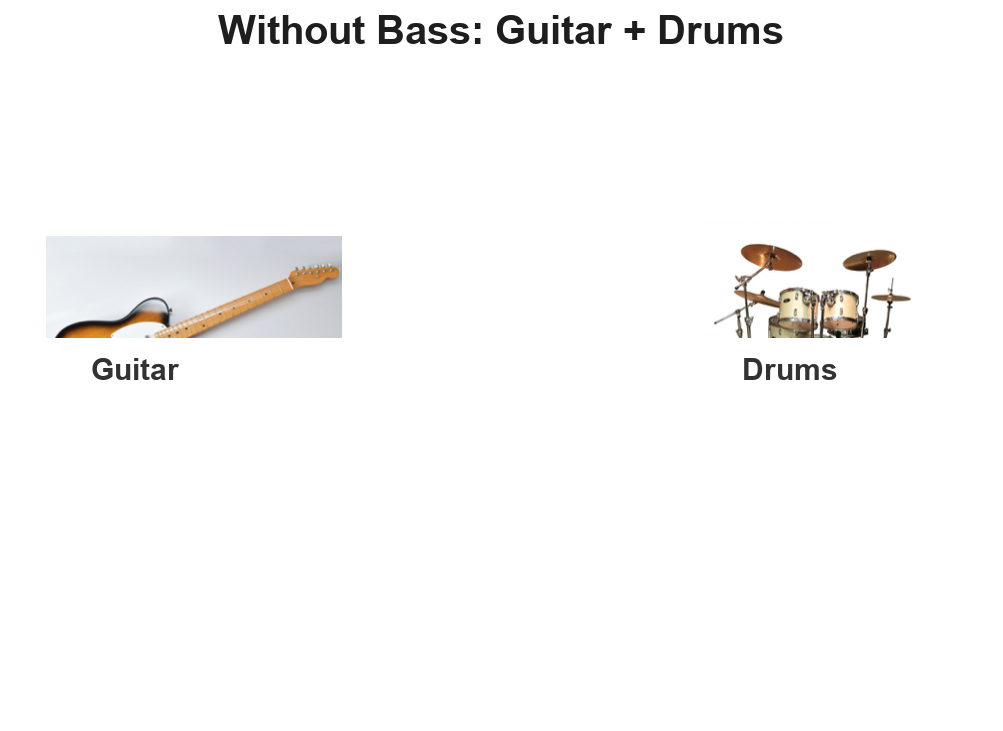
Guitar and Drums only — no bass:

Without Bass: Guitar and Drums only

The second version sounds thin, right? Bass is easy to overlook — it doesn’t carry the melody or headline the song — but it holds the entire ensemble together. Take it away and everything feels hollow.

What You Need to Get Started

Bass Guitar

The main instrument itself. Everything starts here.
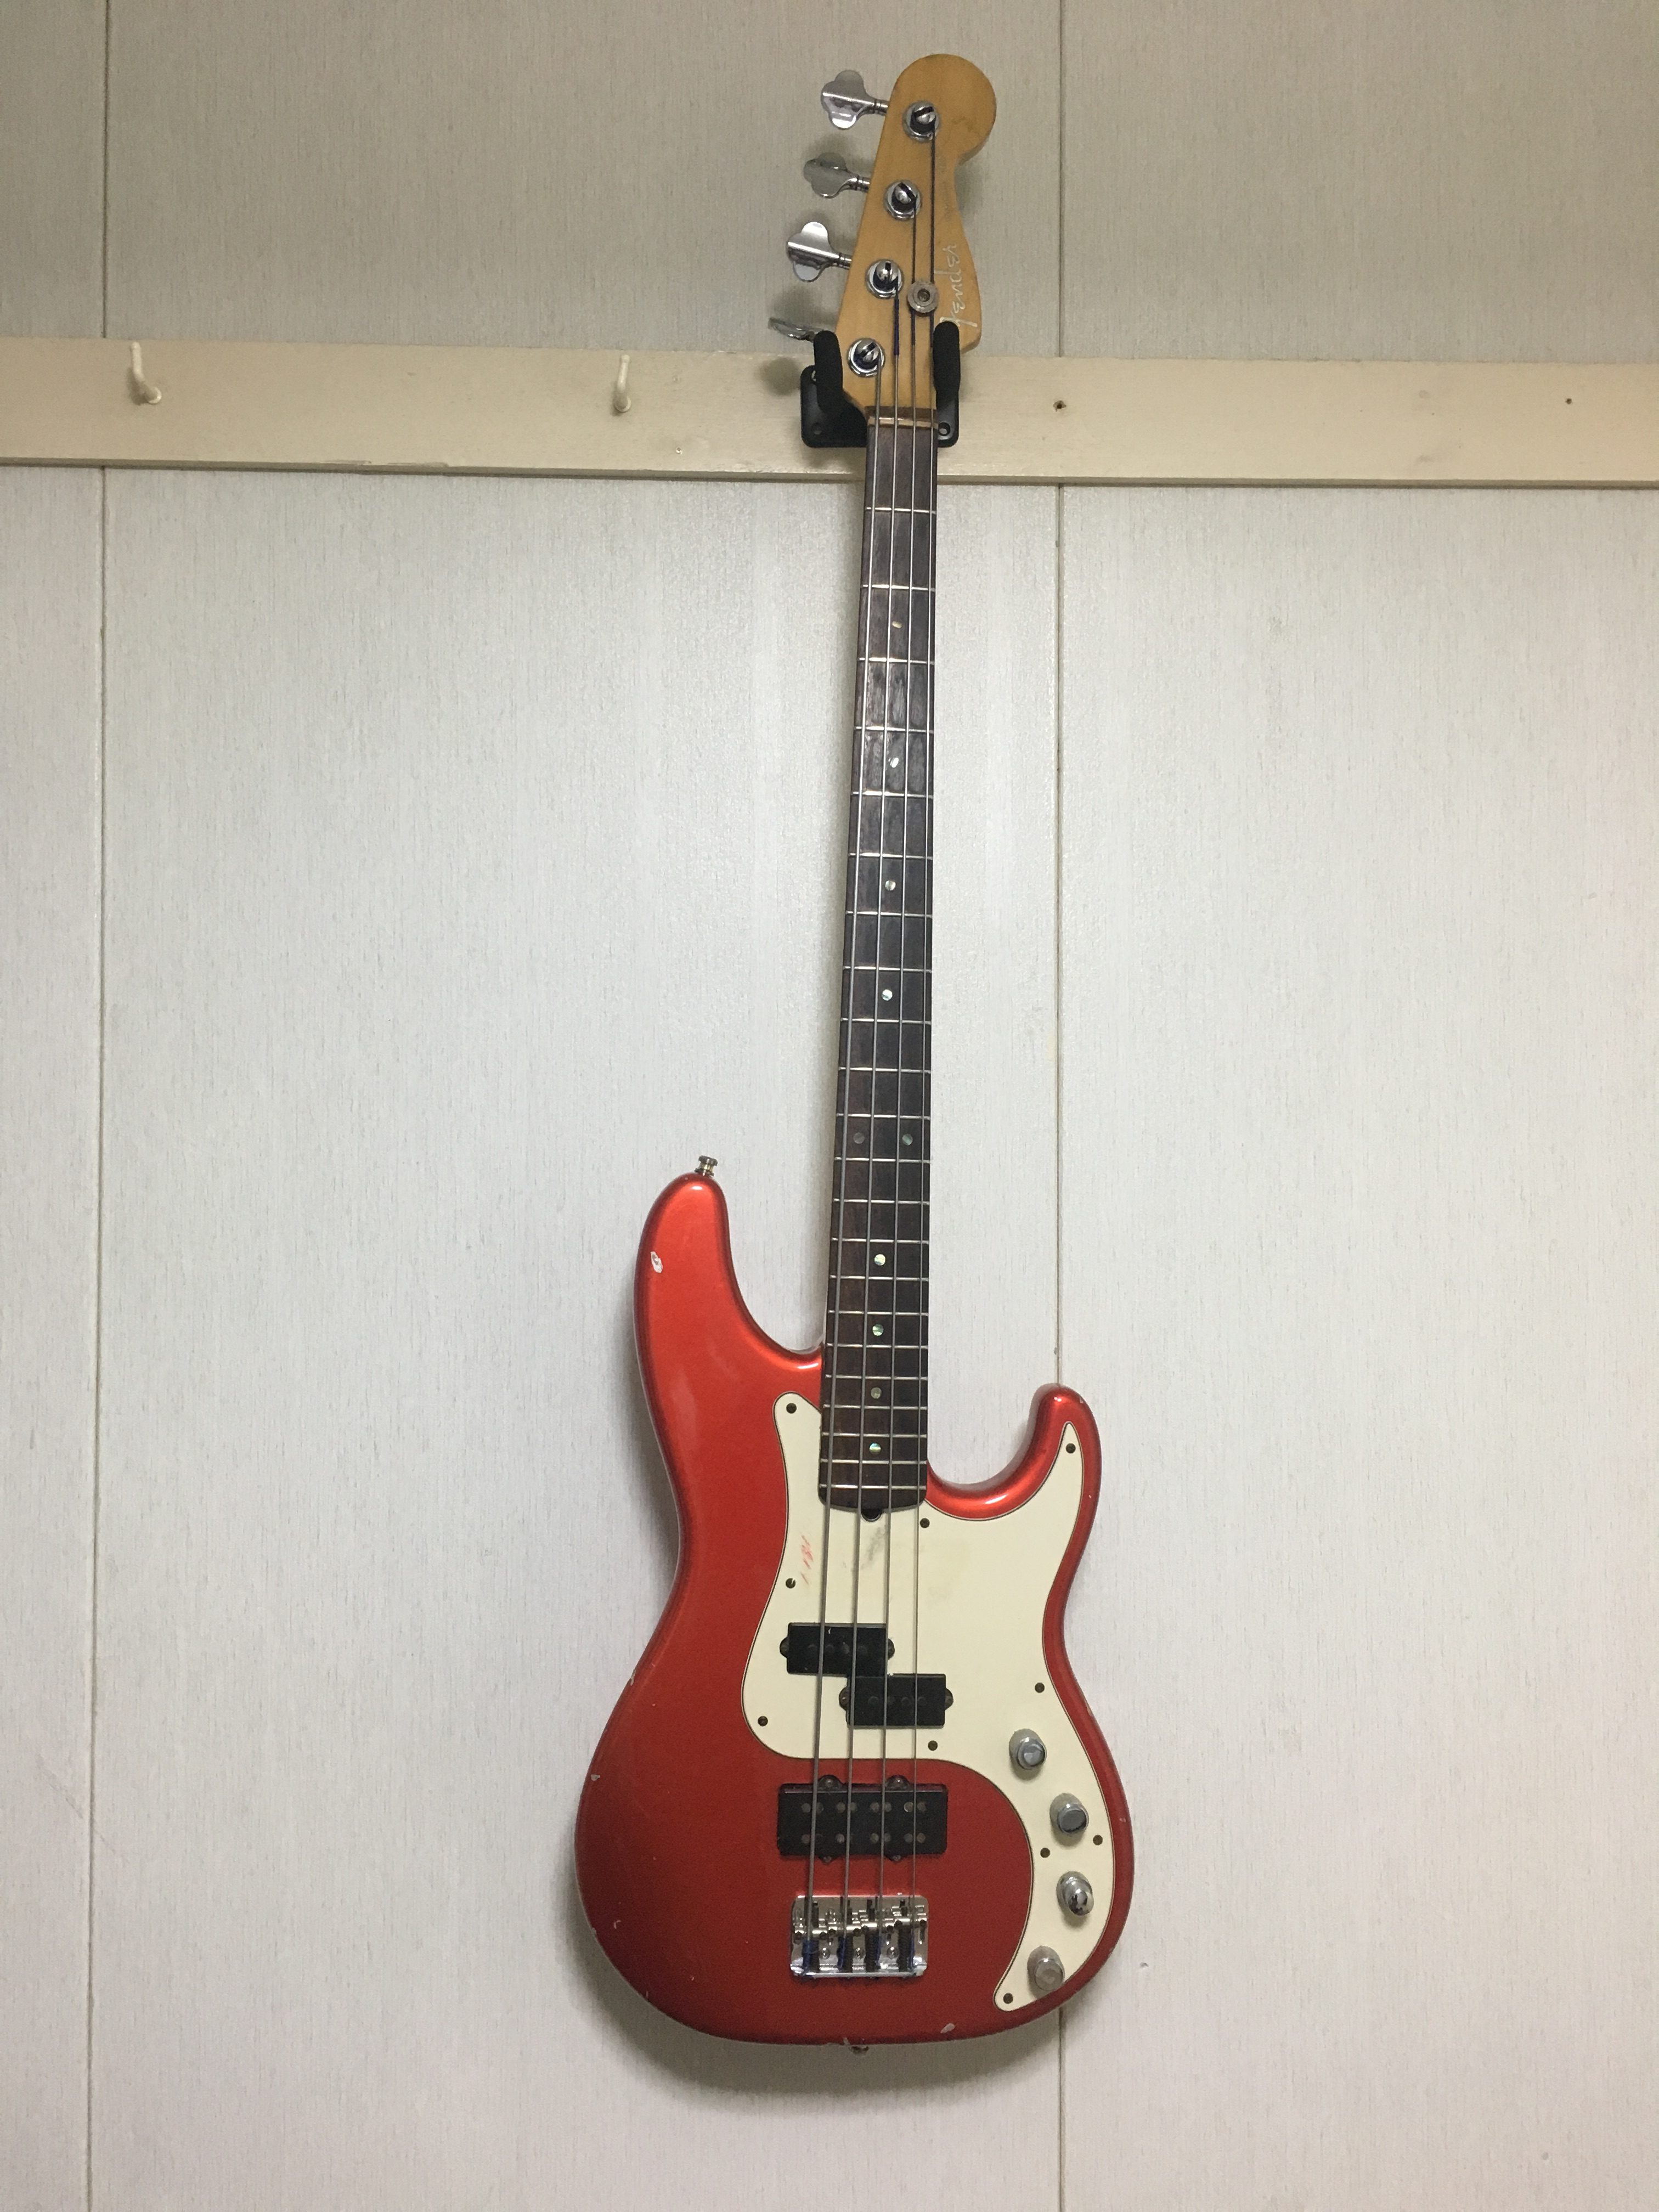
Electric bass guitar

Amplifier

The amp outputs the sound from your bass. Without one, you won’t hear much at practice volume.
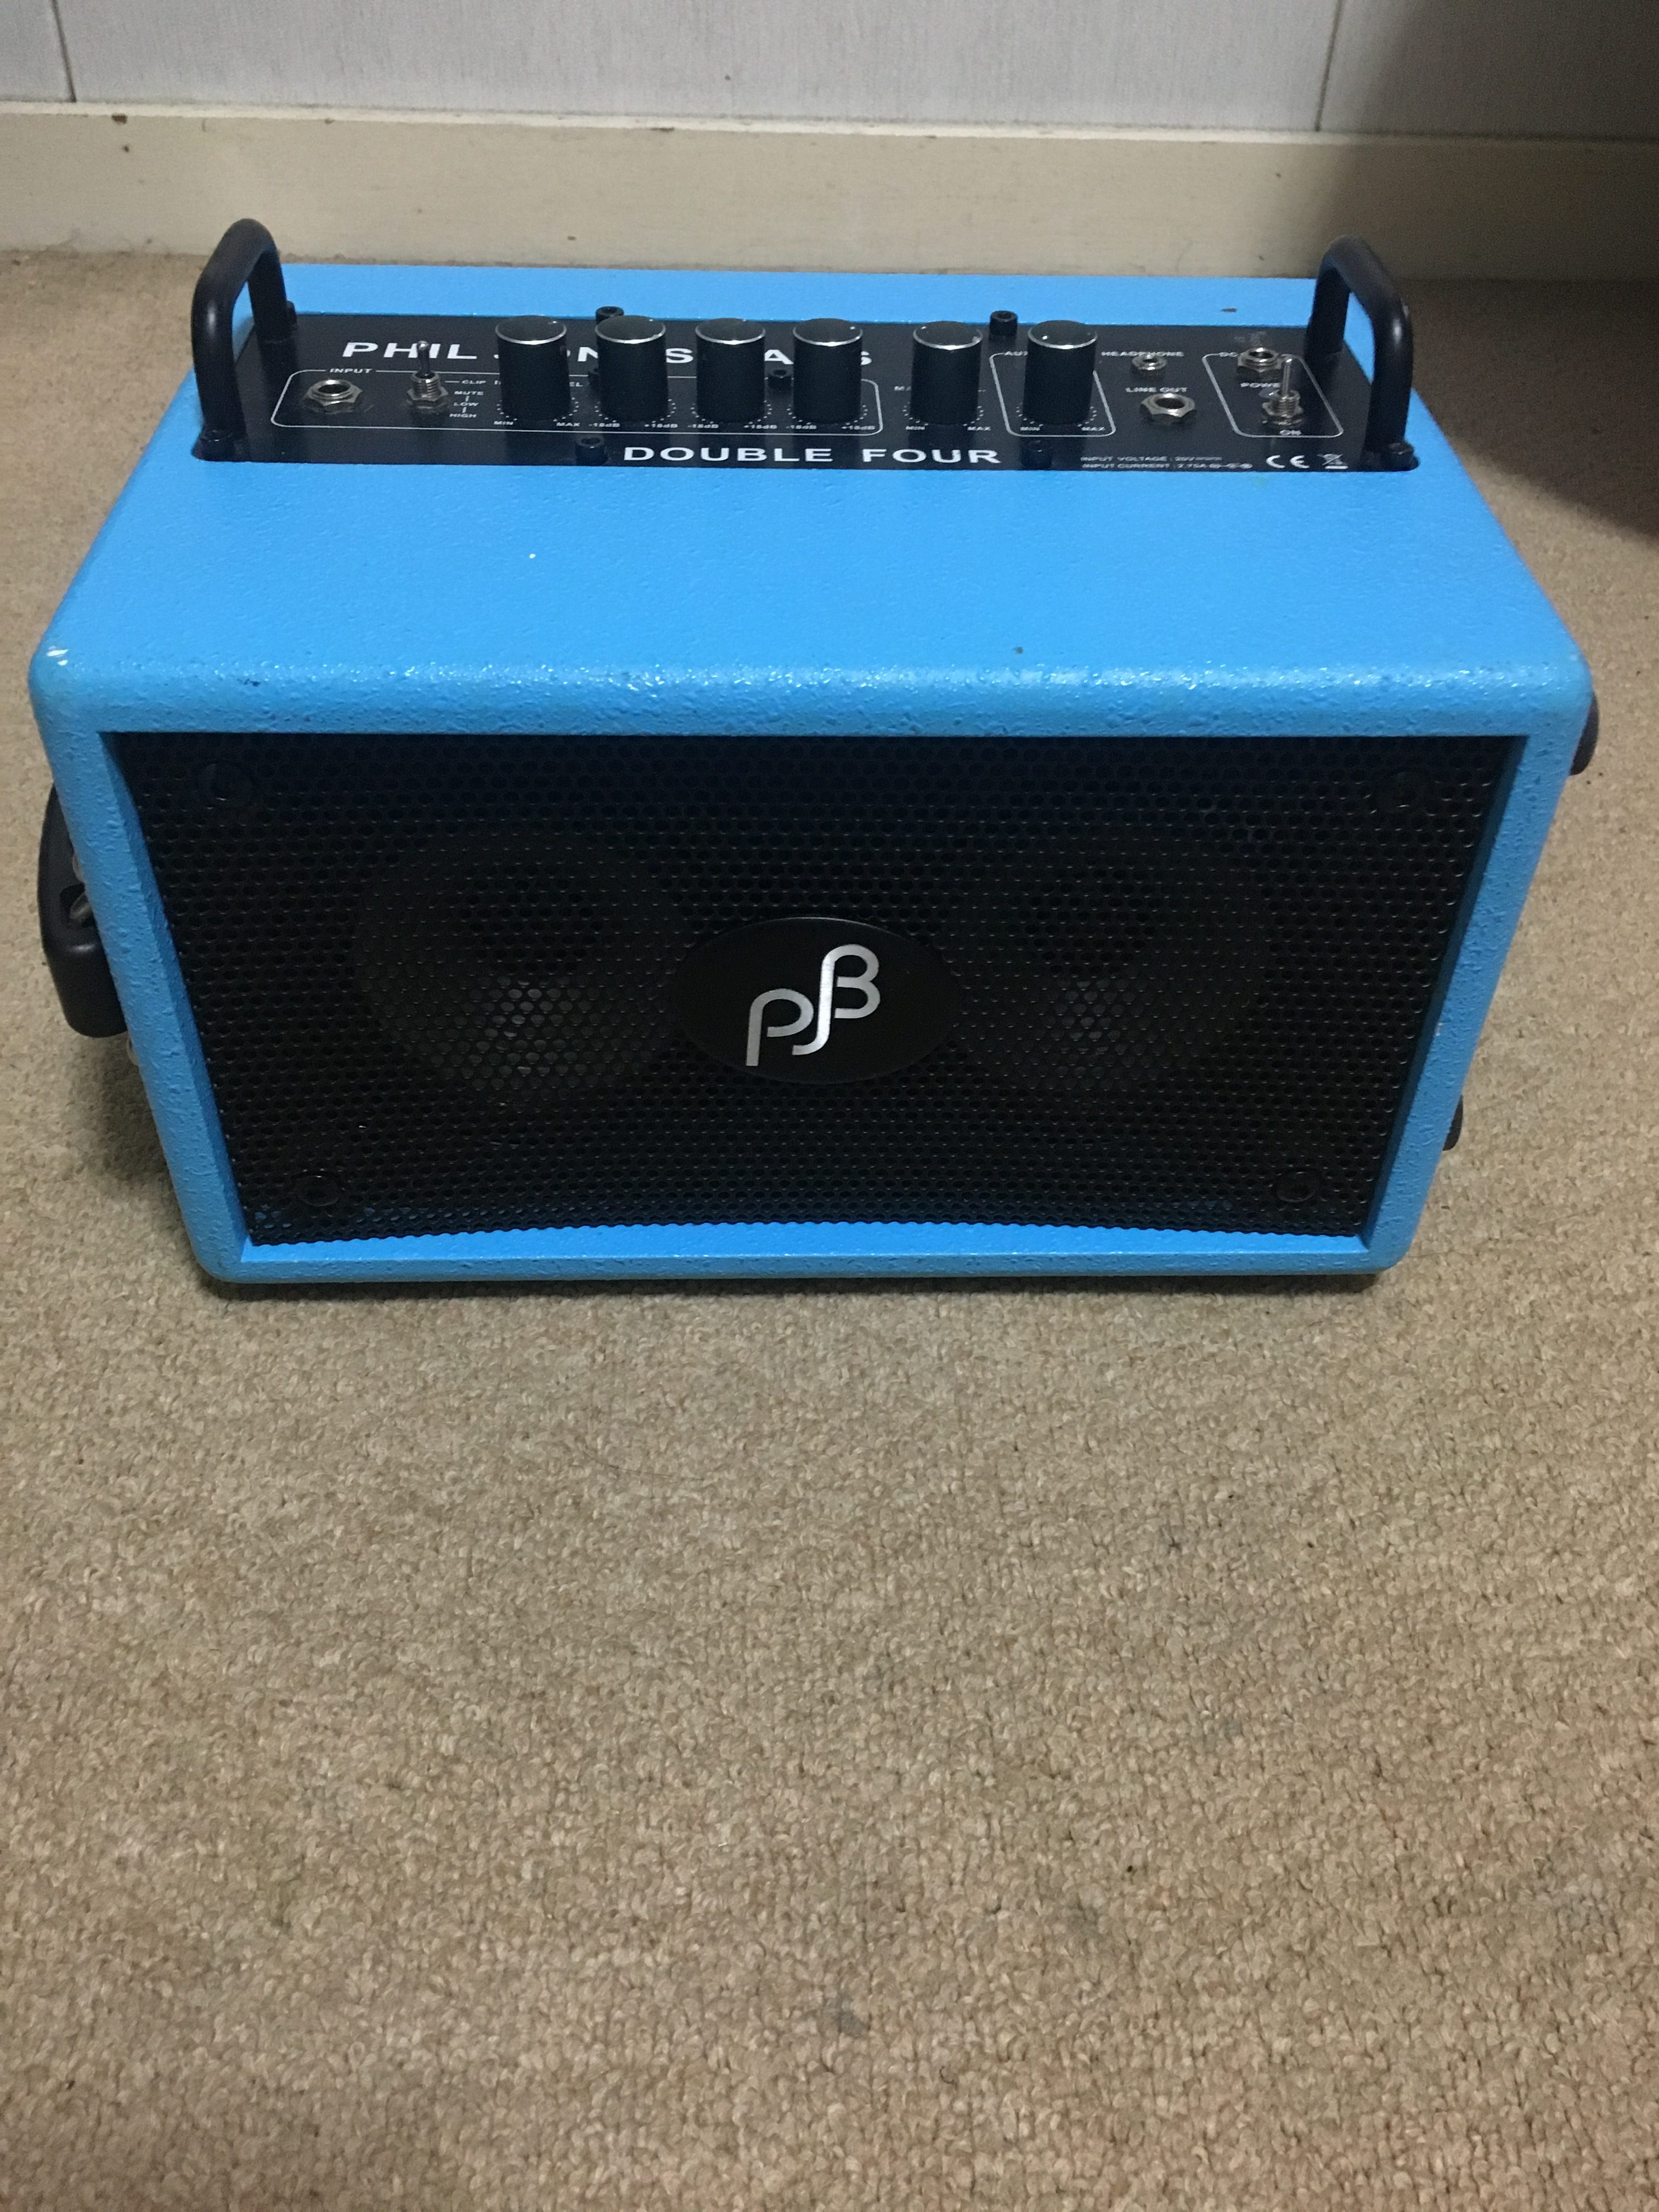
Bass amplifier

Instrument Cable (TS Cable)

The cable that connects your bass to the amp. Without it, no signal gets through.
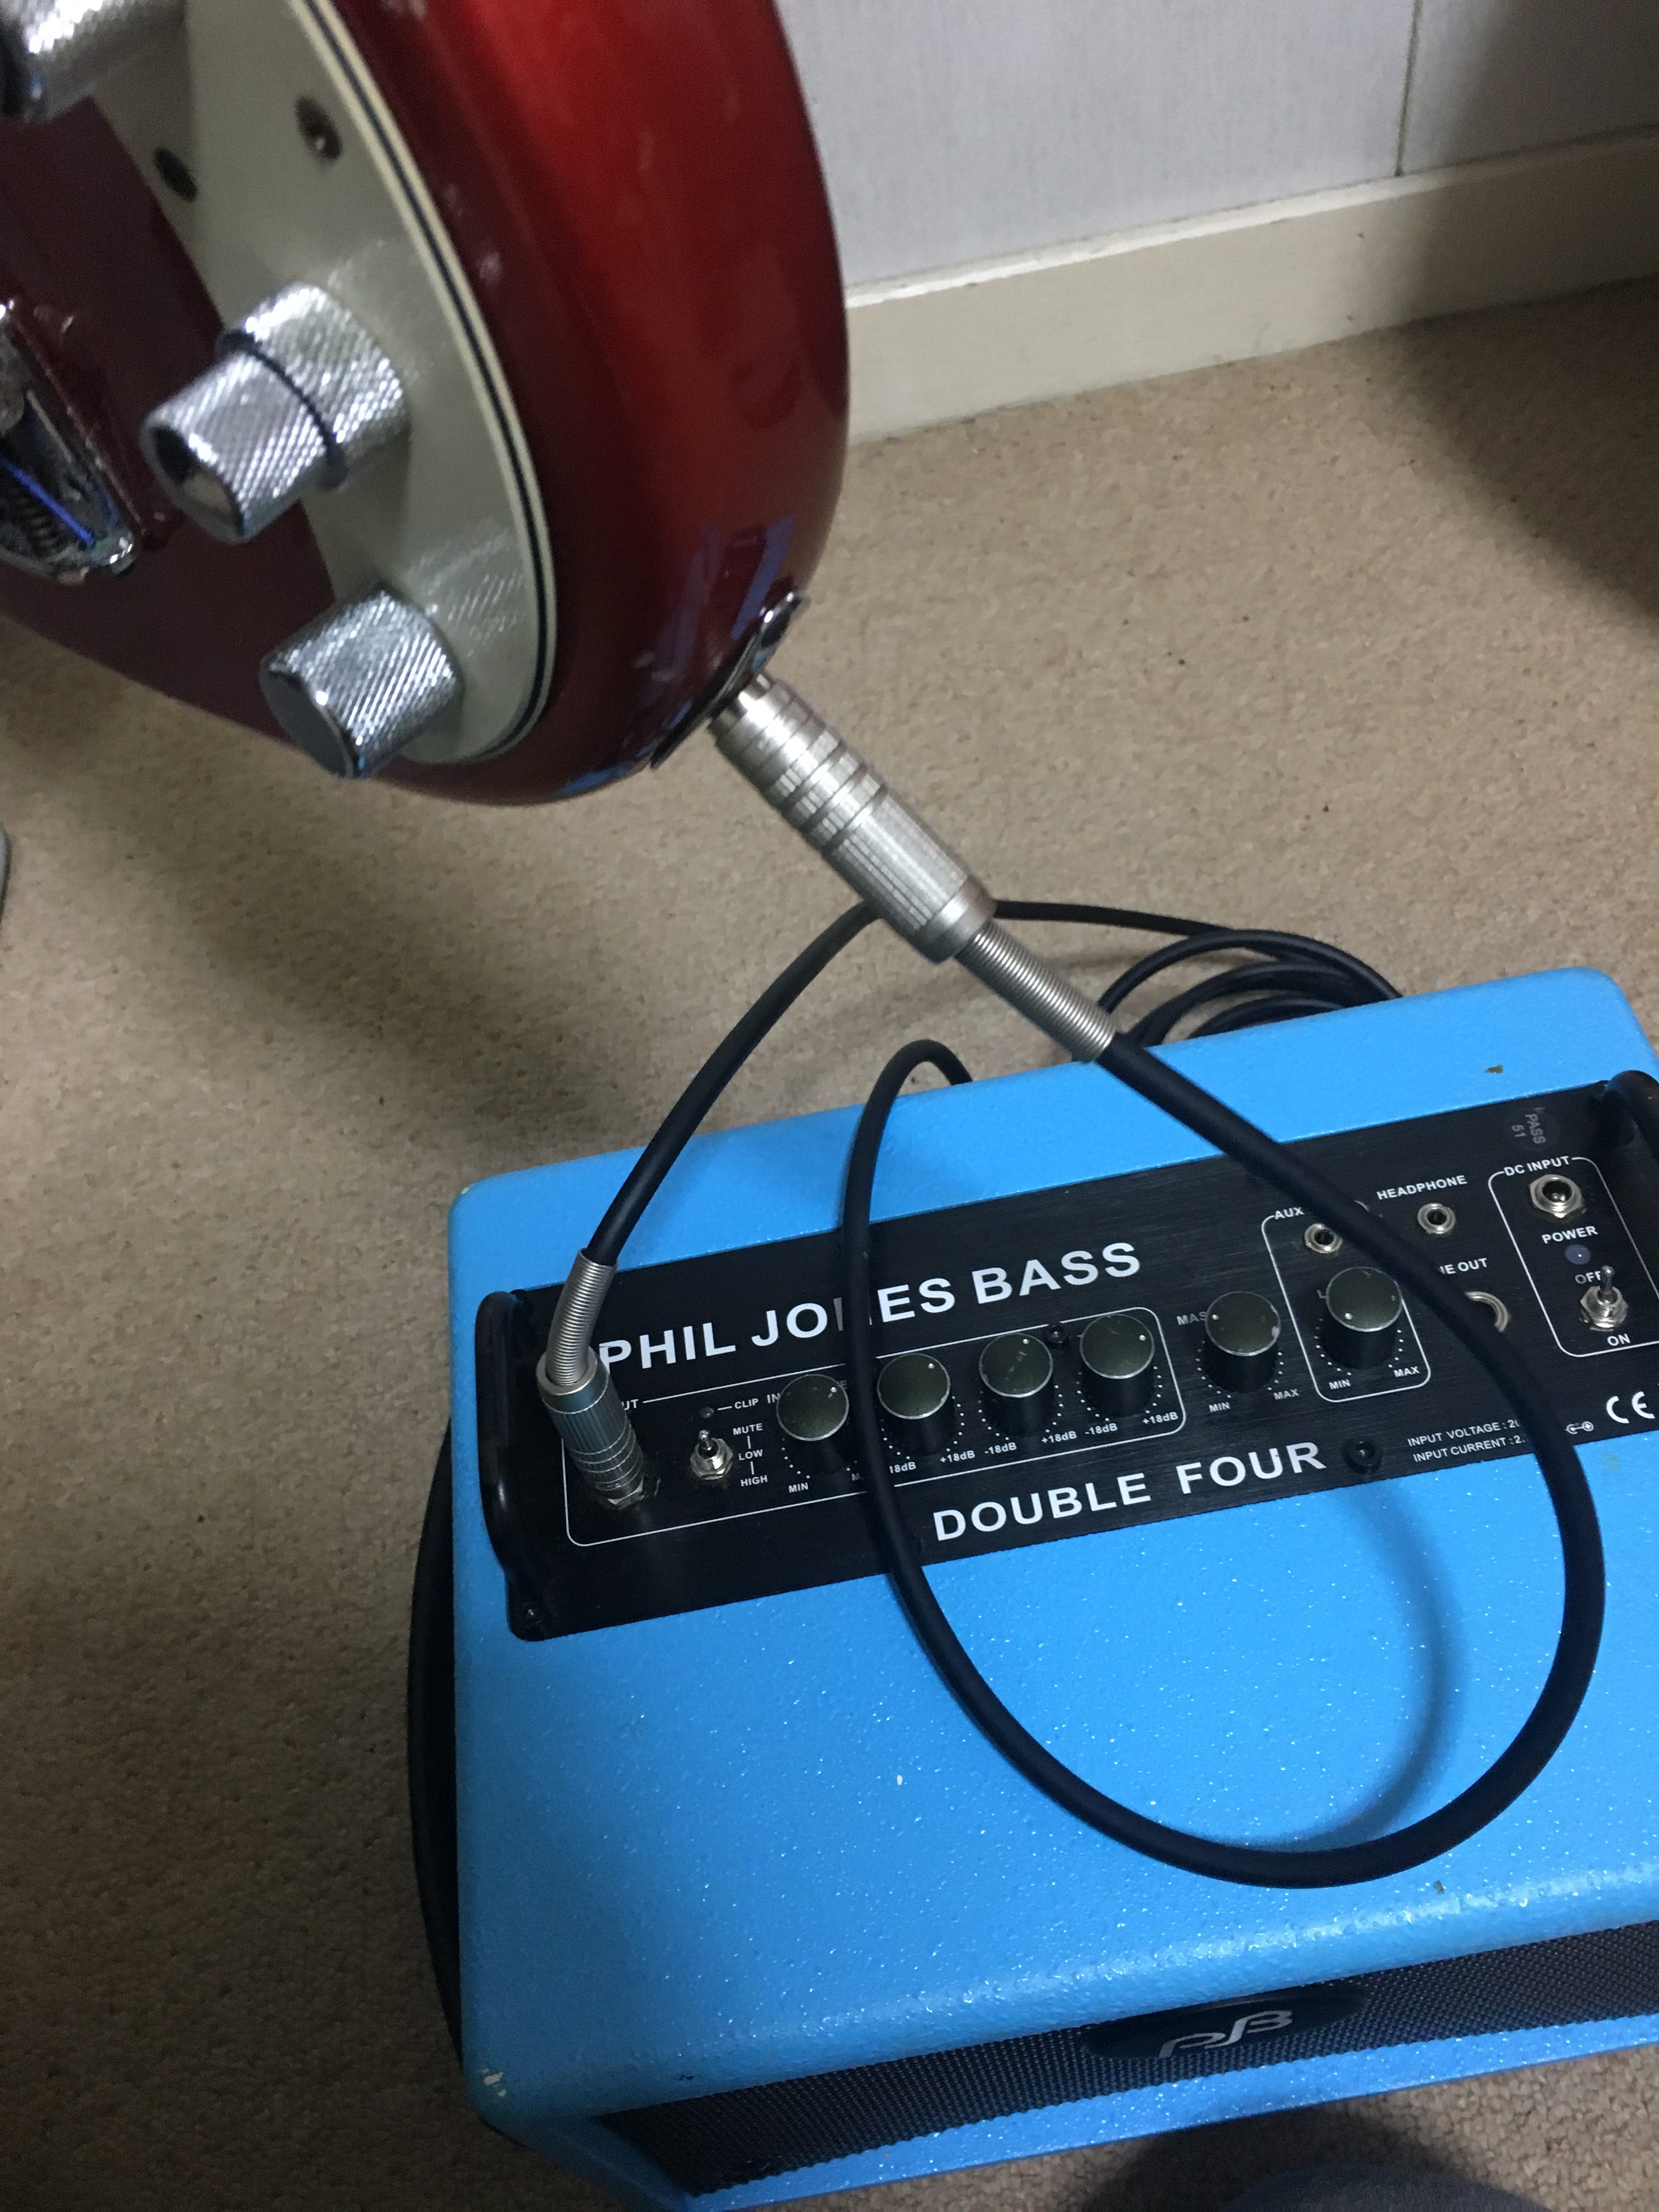
Instrument cable for bass

Strap

Lets you hang the bass from your shoulder and play standing up.
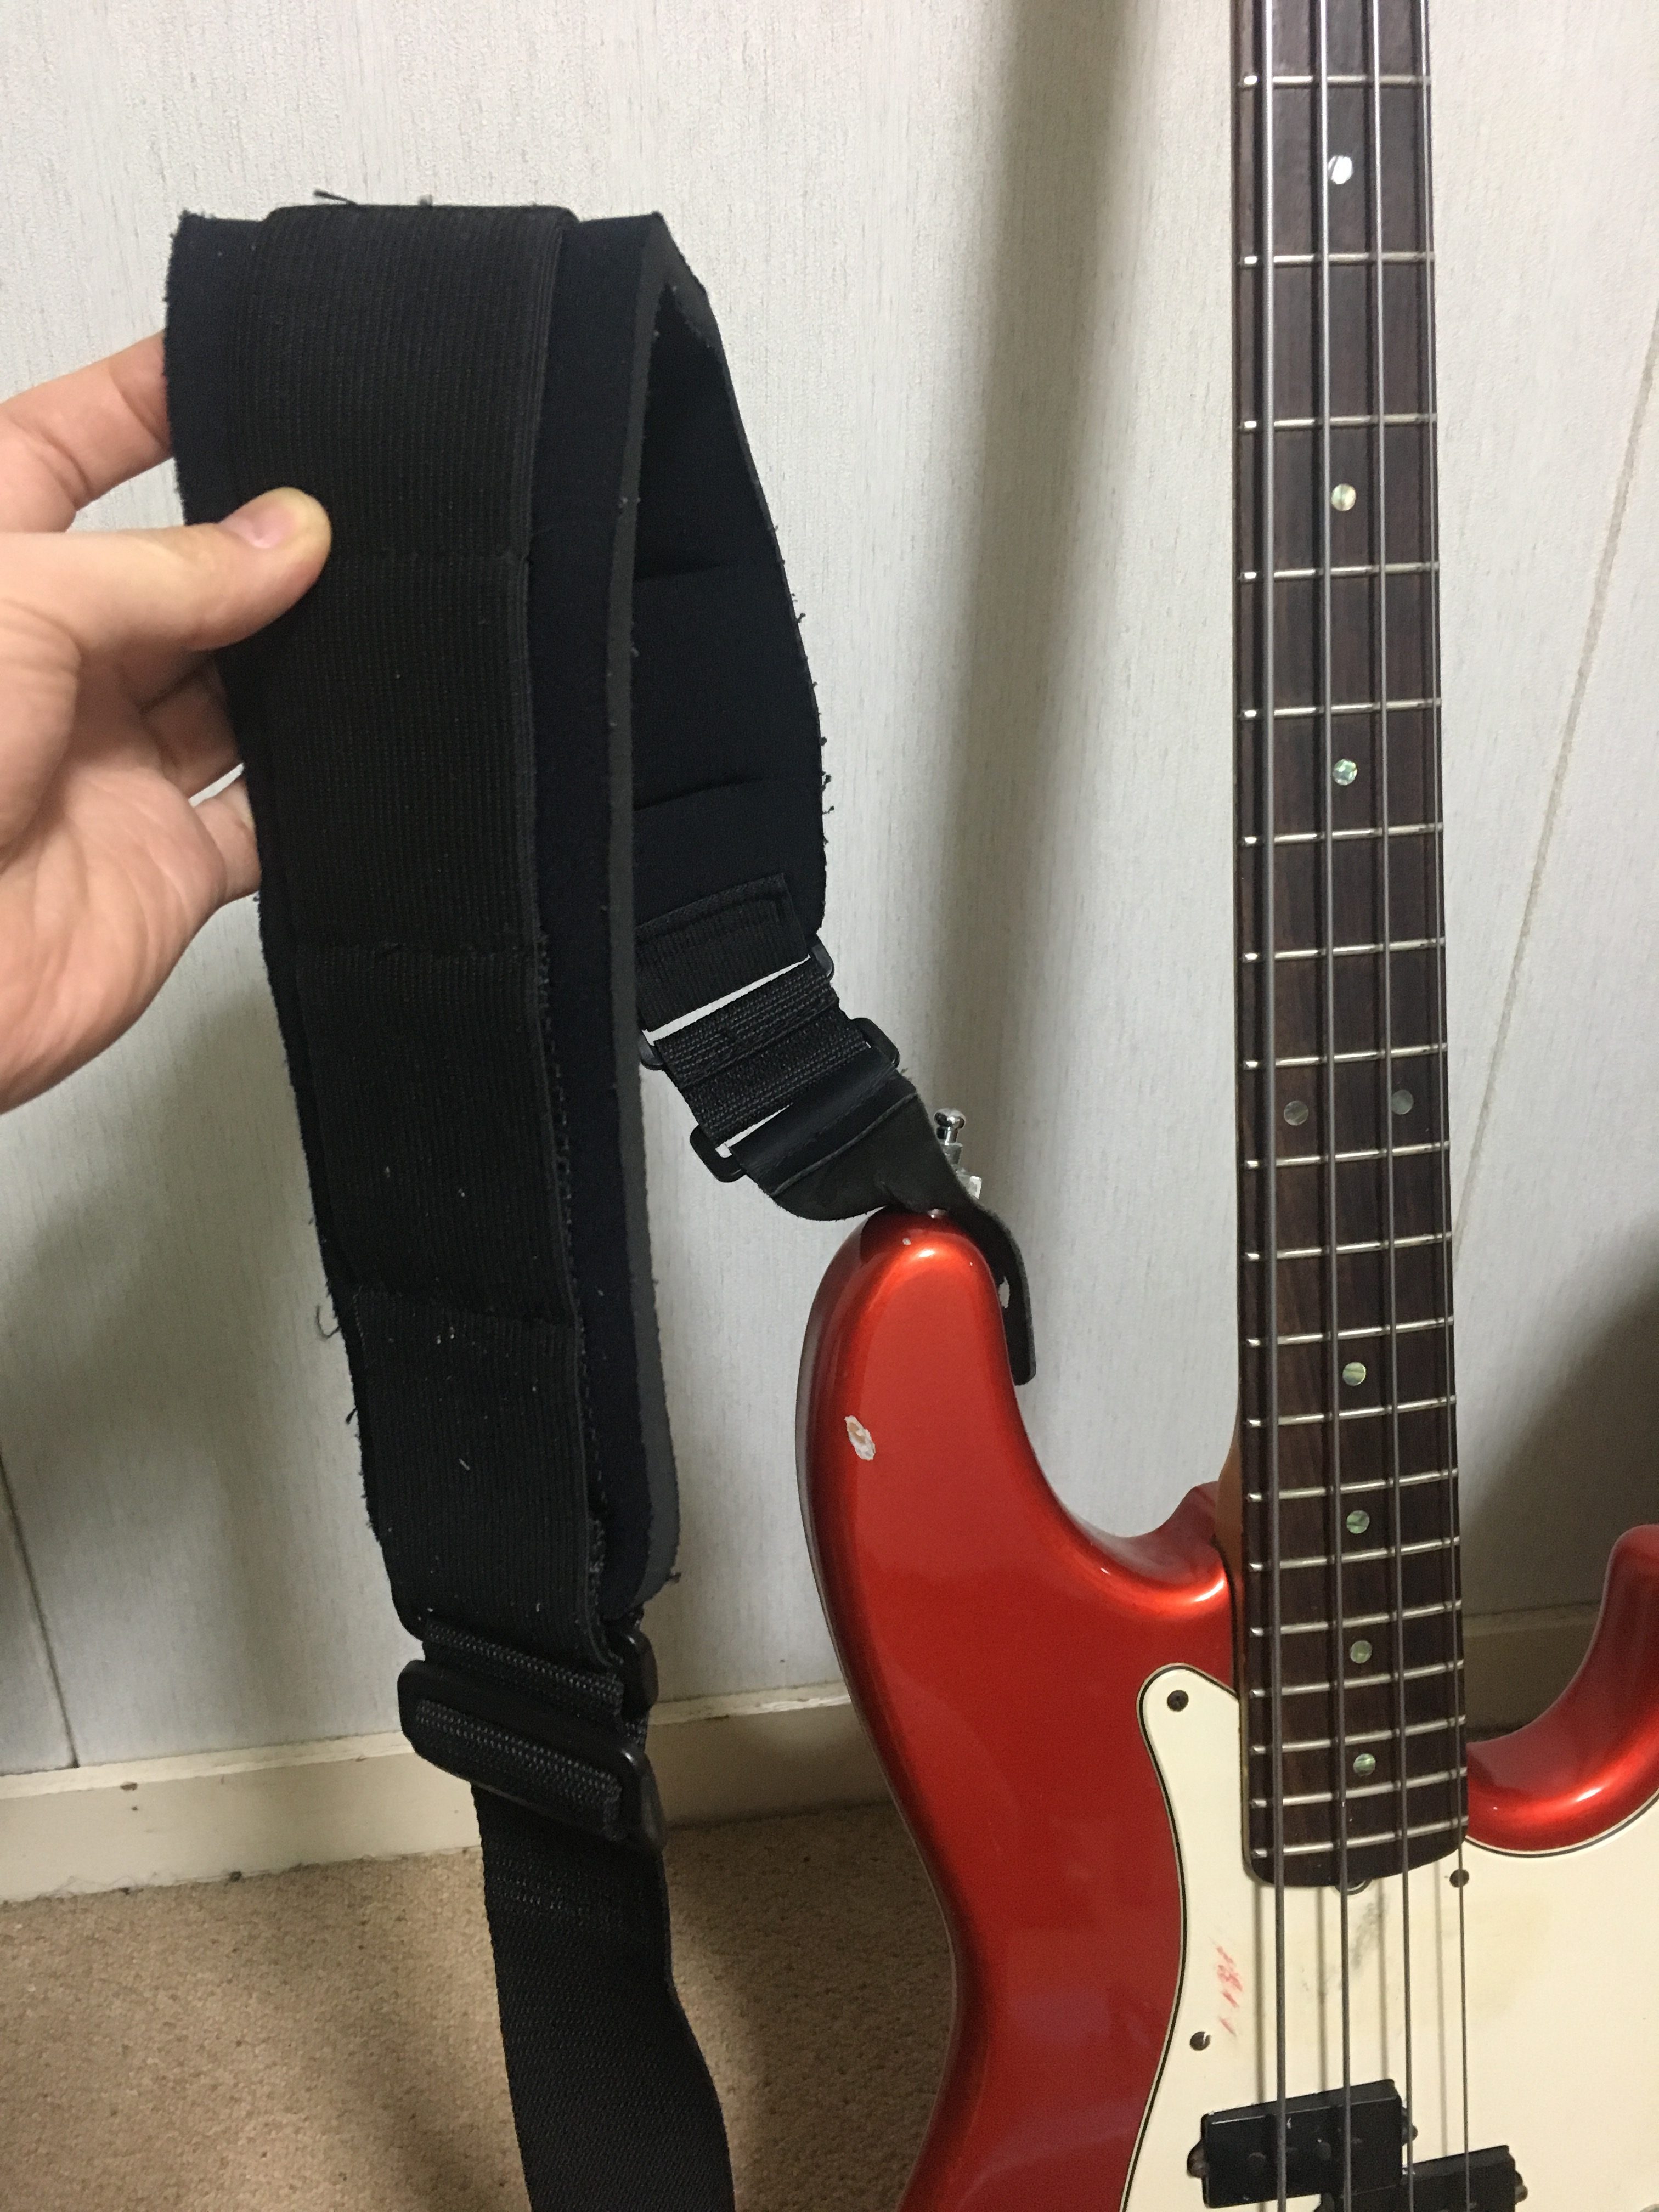
Bass strapBass strap example

Tuner

For tuning the strings. Most beginners use a clip-on tuner that attaches to the headstock.
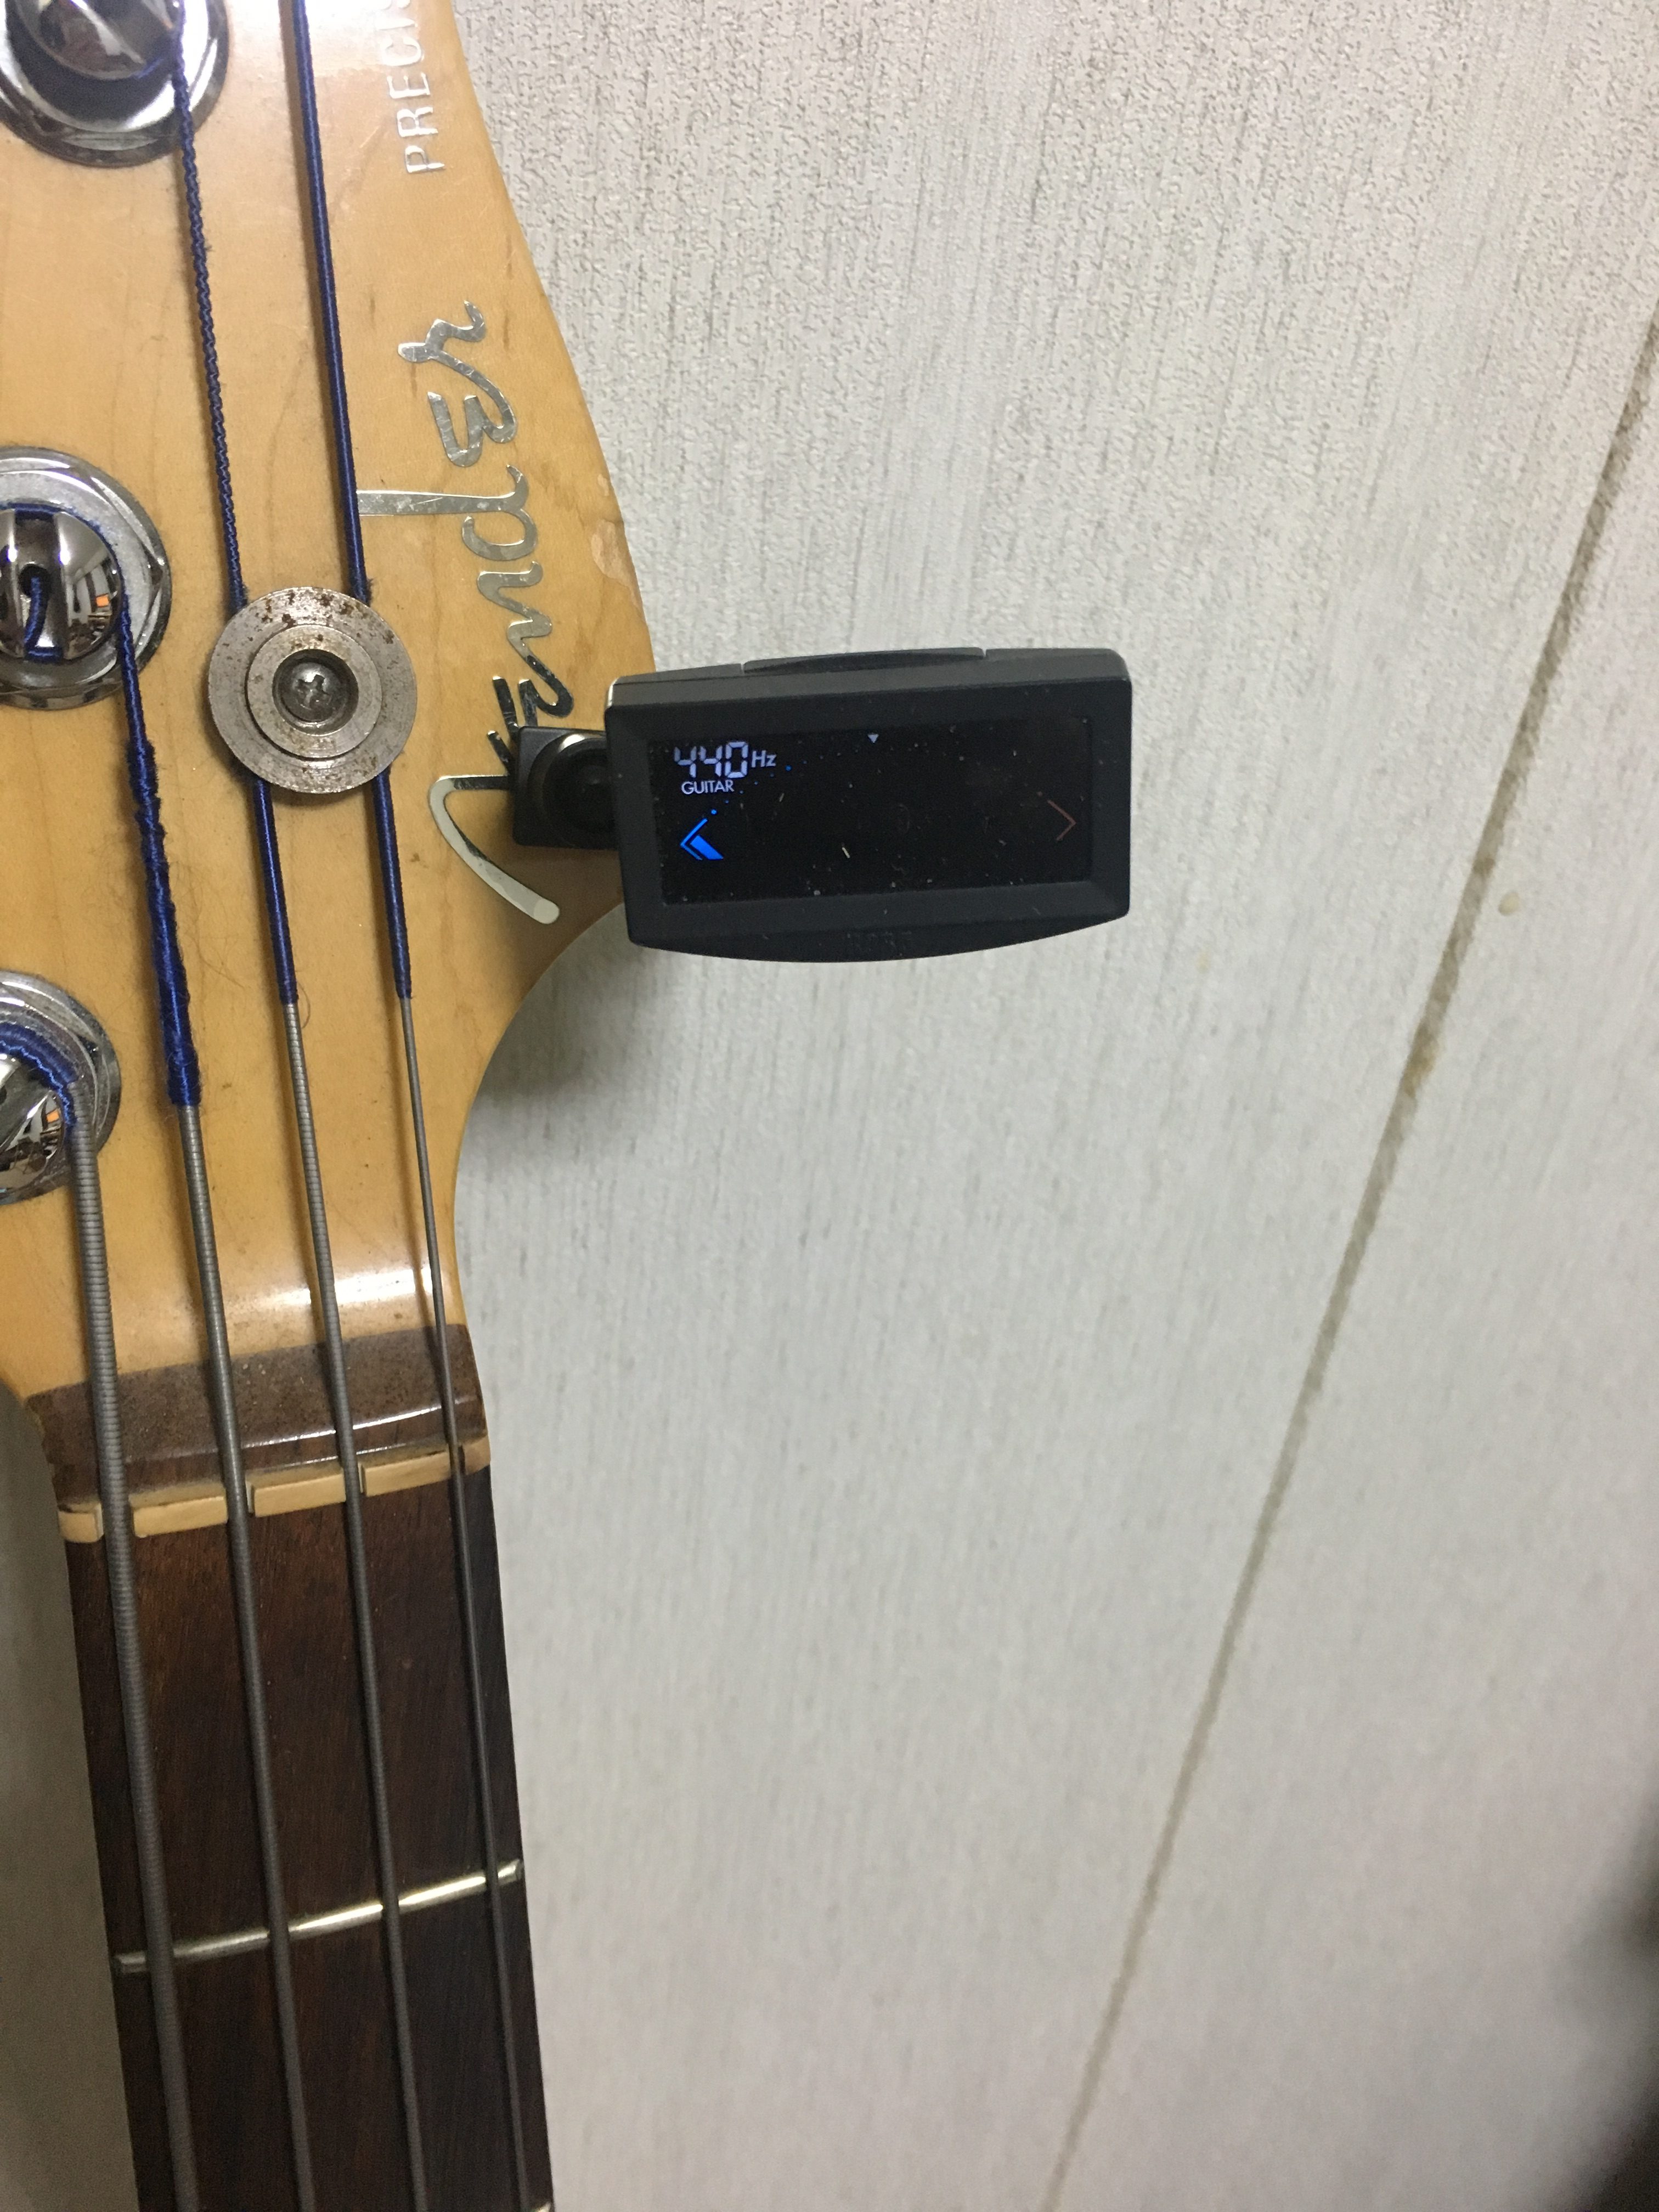
Bass tuner

The strings themselves usually come pre-installed when you buy the bass. With these five items, you can make sound. Starter packs that bundle all of them together are a convenient option if you’re buying everything at once.

Parts of the Bass

You don’t need to memorize all of these right away, but they’ll come up as you progress:

  • Headstock — the wide section at the top end of the neck
  • Tuning pegs — the knobs on the headstock used to tune each string
  • Nut — the small notched piece between the headstock and neck that holds the strings in place
  • Neck — the long piece you grip with your left hand
  • Frets — the metal strips across the neck; pressing a string behind one changes its pitch
  • Strings — typically 4, tuned E–A–D–G (low to high)
  • Body — the large, curved wooden section you rest against your body
  • Pickup — the magnetic sensor(s) on the body that detect string vibrations and convert them to an electrical signal
  • Controls — knobs for adjusting volume and tone
  • Bridge — anchors the strings at the body end
  • Strap button — the pin where you attach your strap

How Bass Produces Sound

Plucking a string causes it to vibrate. The pickup — essentially a microphone built into the body — detects that vibration and converts it into an electrical signal. That signal travels through your instrument cable to the amplifier, which boosts it and sends it out as sound.
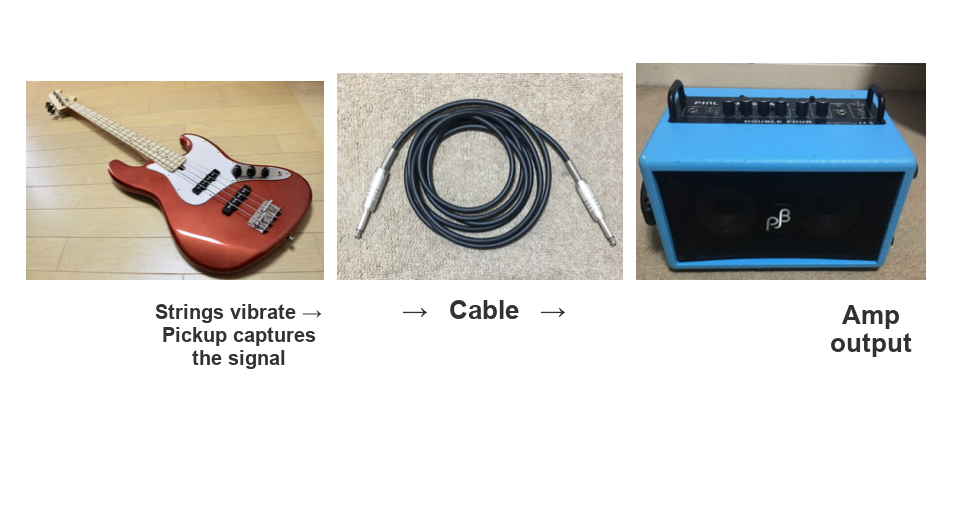
Bass signal chain: strings → pickup → cable → amp

In order:

  1. String vibrates
  2. Pickup captures the signal
  3. Signal travels through the instrument cable
  4. Amplifier outputs the sound

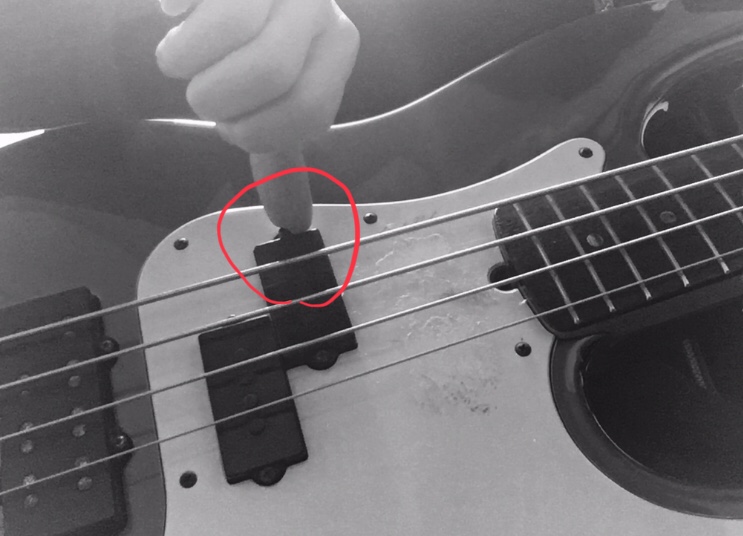
Here’s a close-up of the pickup — the dark rectangular component circled in red:
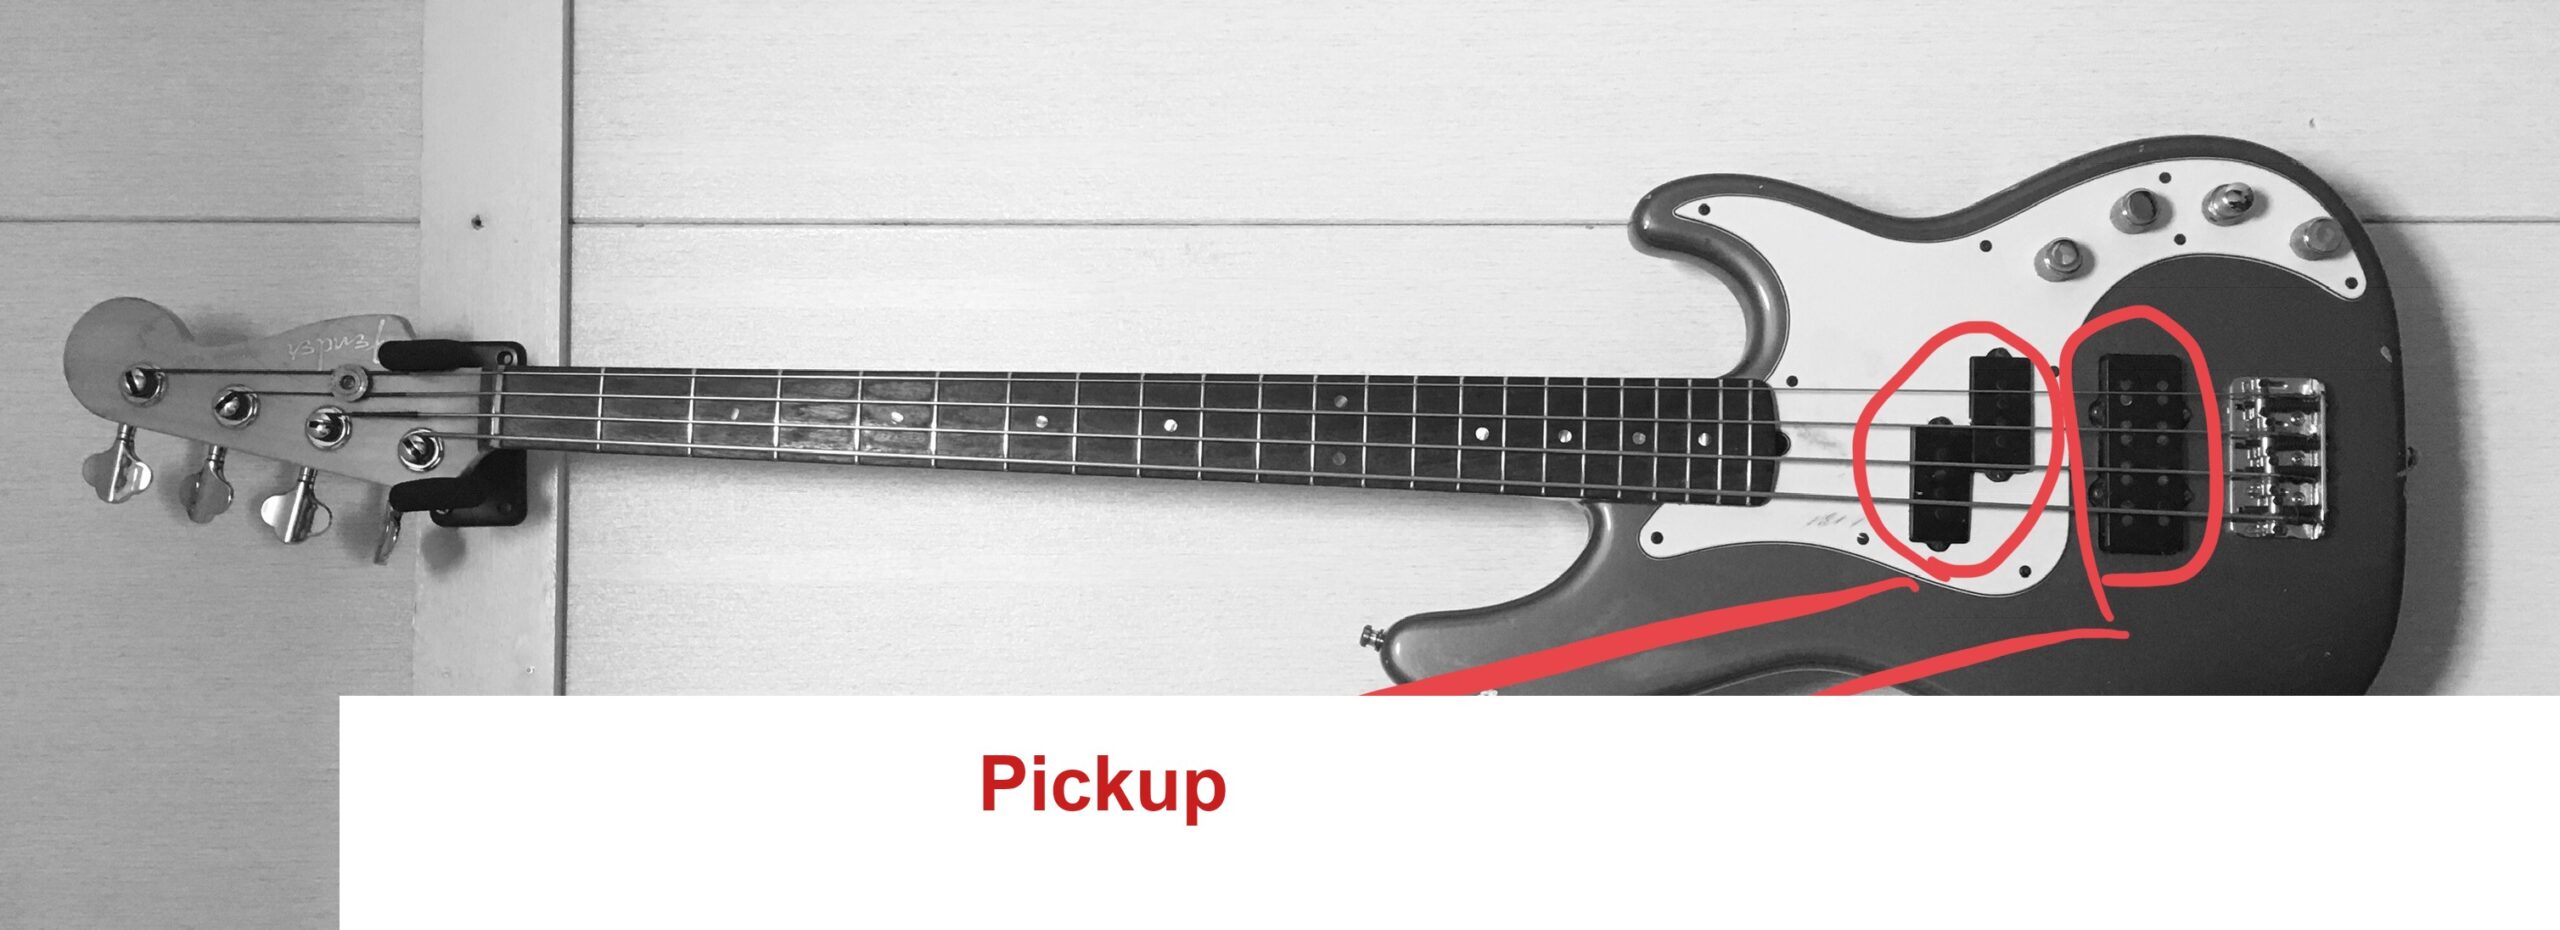
Pickup location on bass body, circled in red

Try Plucking an Open String

Before worrying about notes or chords, just pluck a string with nothing fretted on your left hand. It should sound something like this:

How you pluck the strings and how to use your left hand for fretting will be covered in the next lessons.

Want Personalized Feedback on Your Playing?

This is exactly the kind of thing that’s hard to fix alone — and where having a teacher makes all the difference.

At Line on Bass, I offer an online lesson service where you send me a video of your playing, and I give you specific, detailed feedback — every single day if you want.

Students from around the world are using this to fix exactly these kinds of issues and steadily improve their jazz bass skills.
Check Out the Lesson Service →

Posted on Leave a comment

Introduction to Electric Bass #3: Left-Hand Form and Chromatic Exercises

Welcome to Session 3 of the Introduction to Electric Bass series.

This lesson covers left-hand form and chromatic exercises — one of the first things I have new students work on.

The Chromatic Exercise

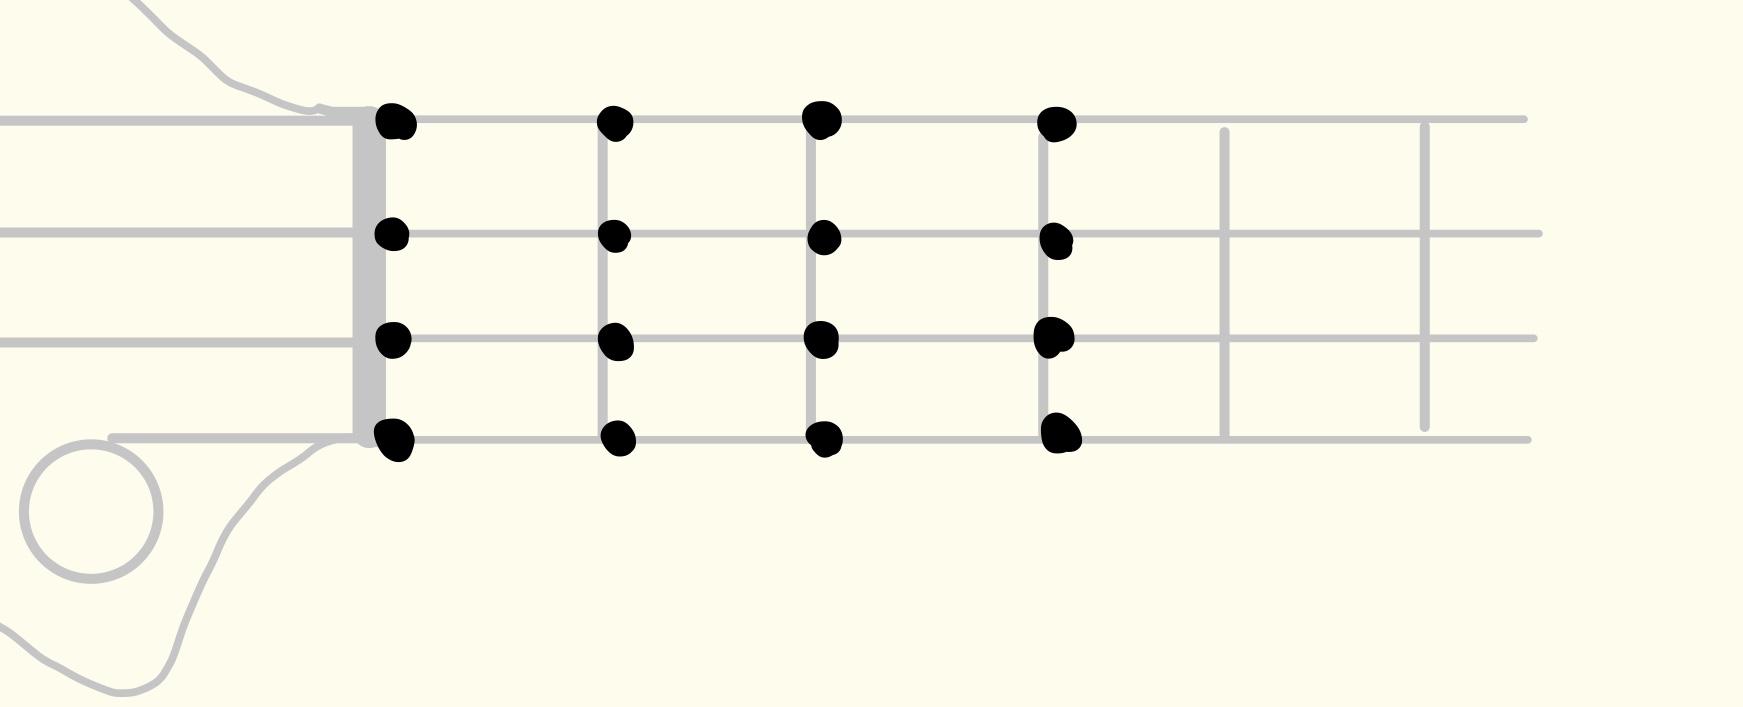
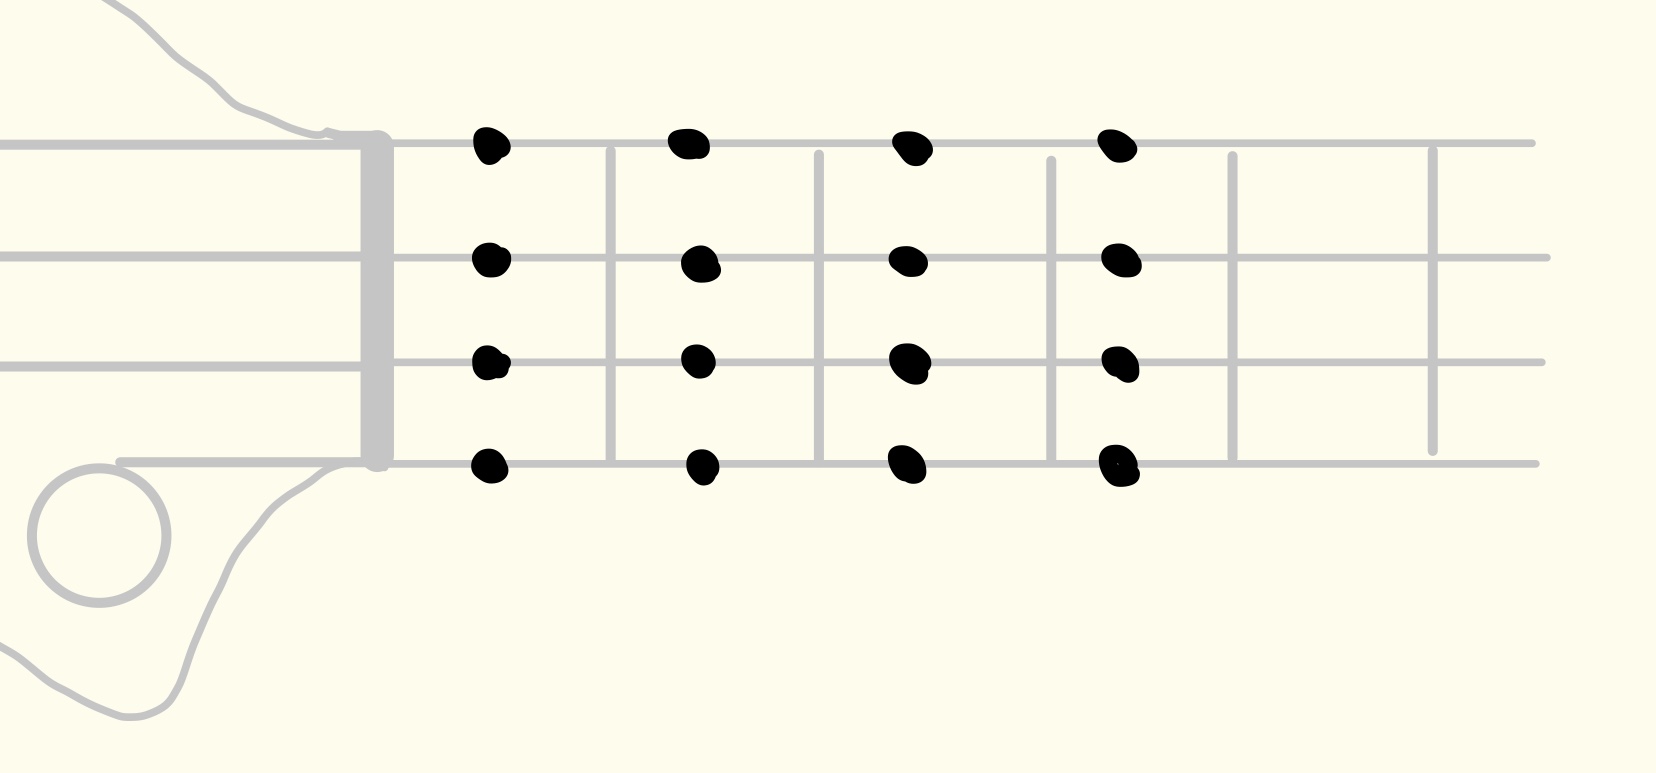
The goal is simple: place each finger on consecutive frets, one at a time, and move across all four strings. It looks easy, but it’s a surprisingly effective drill for several reasons.

Why This Exercise Works

1. It gets you comfortable with the fretboard.
When you’re just starting out, even moving your fingers around the neck feels unfamiliar. The chromatic exercise forces you to walk your fingers across the frets repeatedly, and that repetition builds familiarity faster than almost anything else.

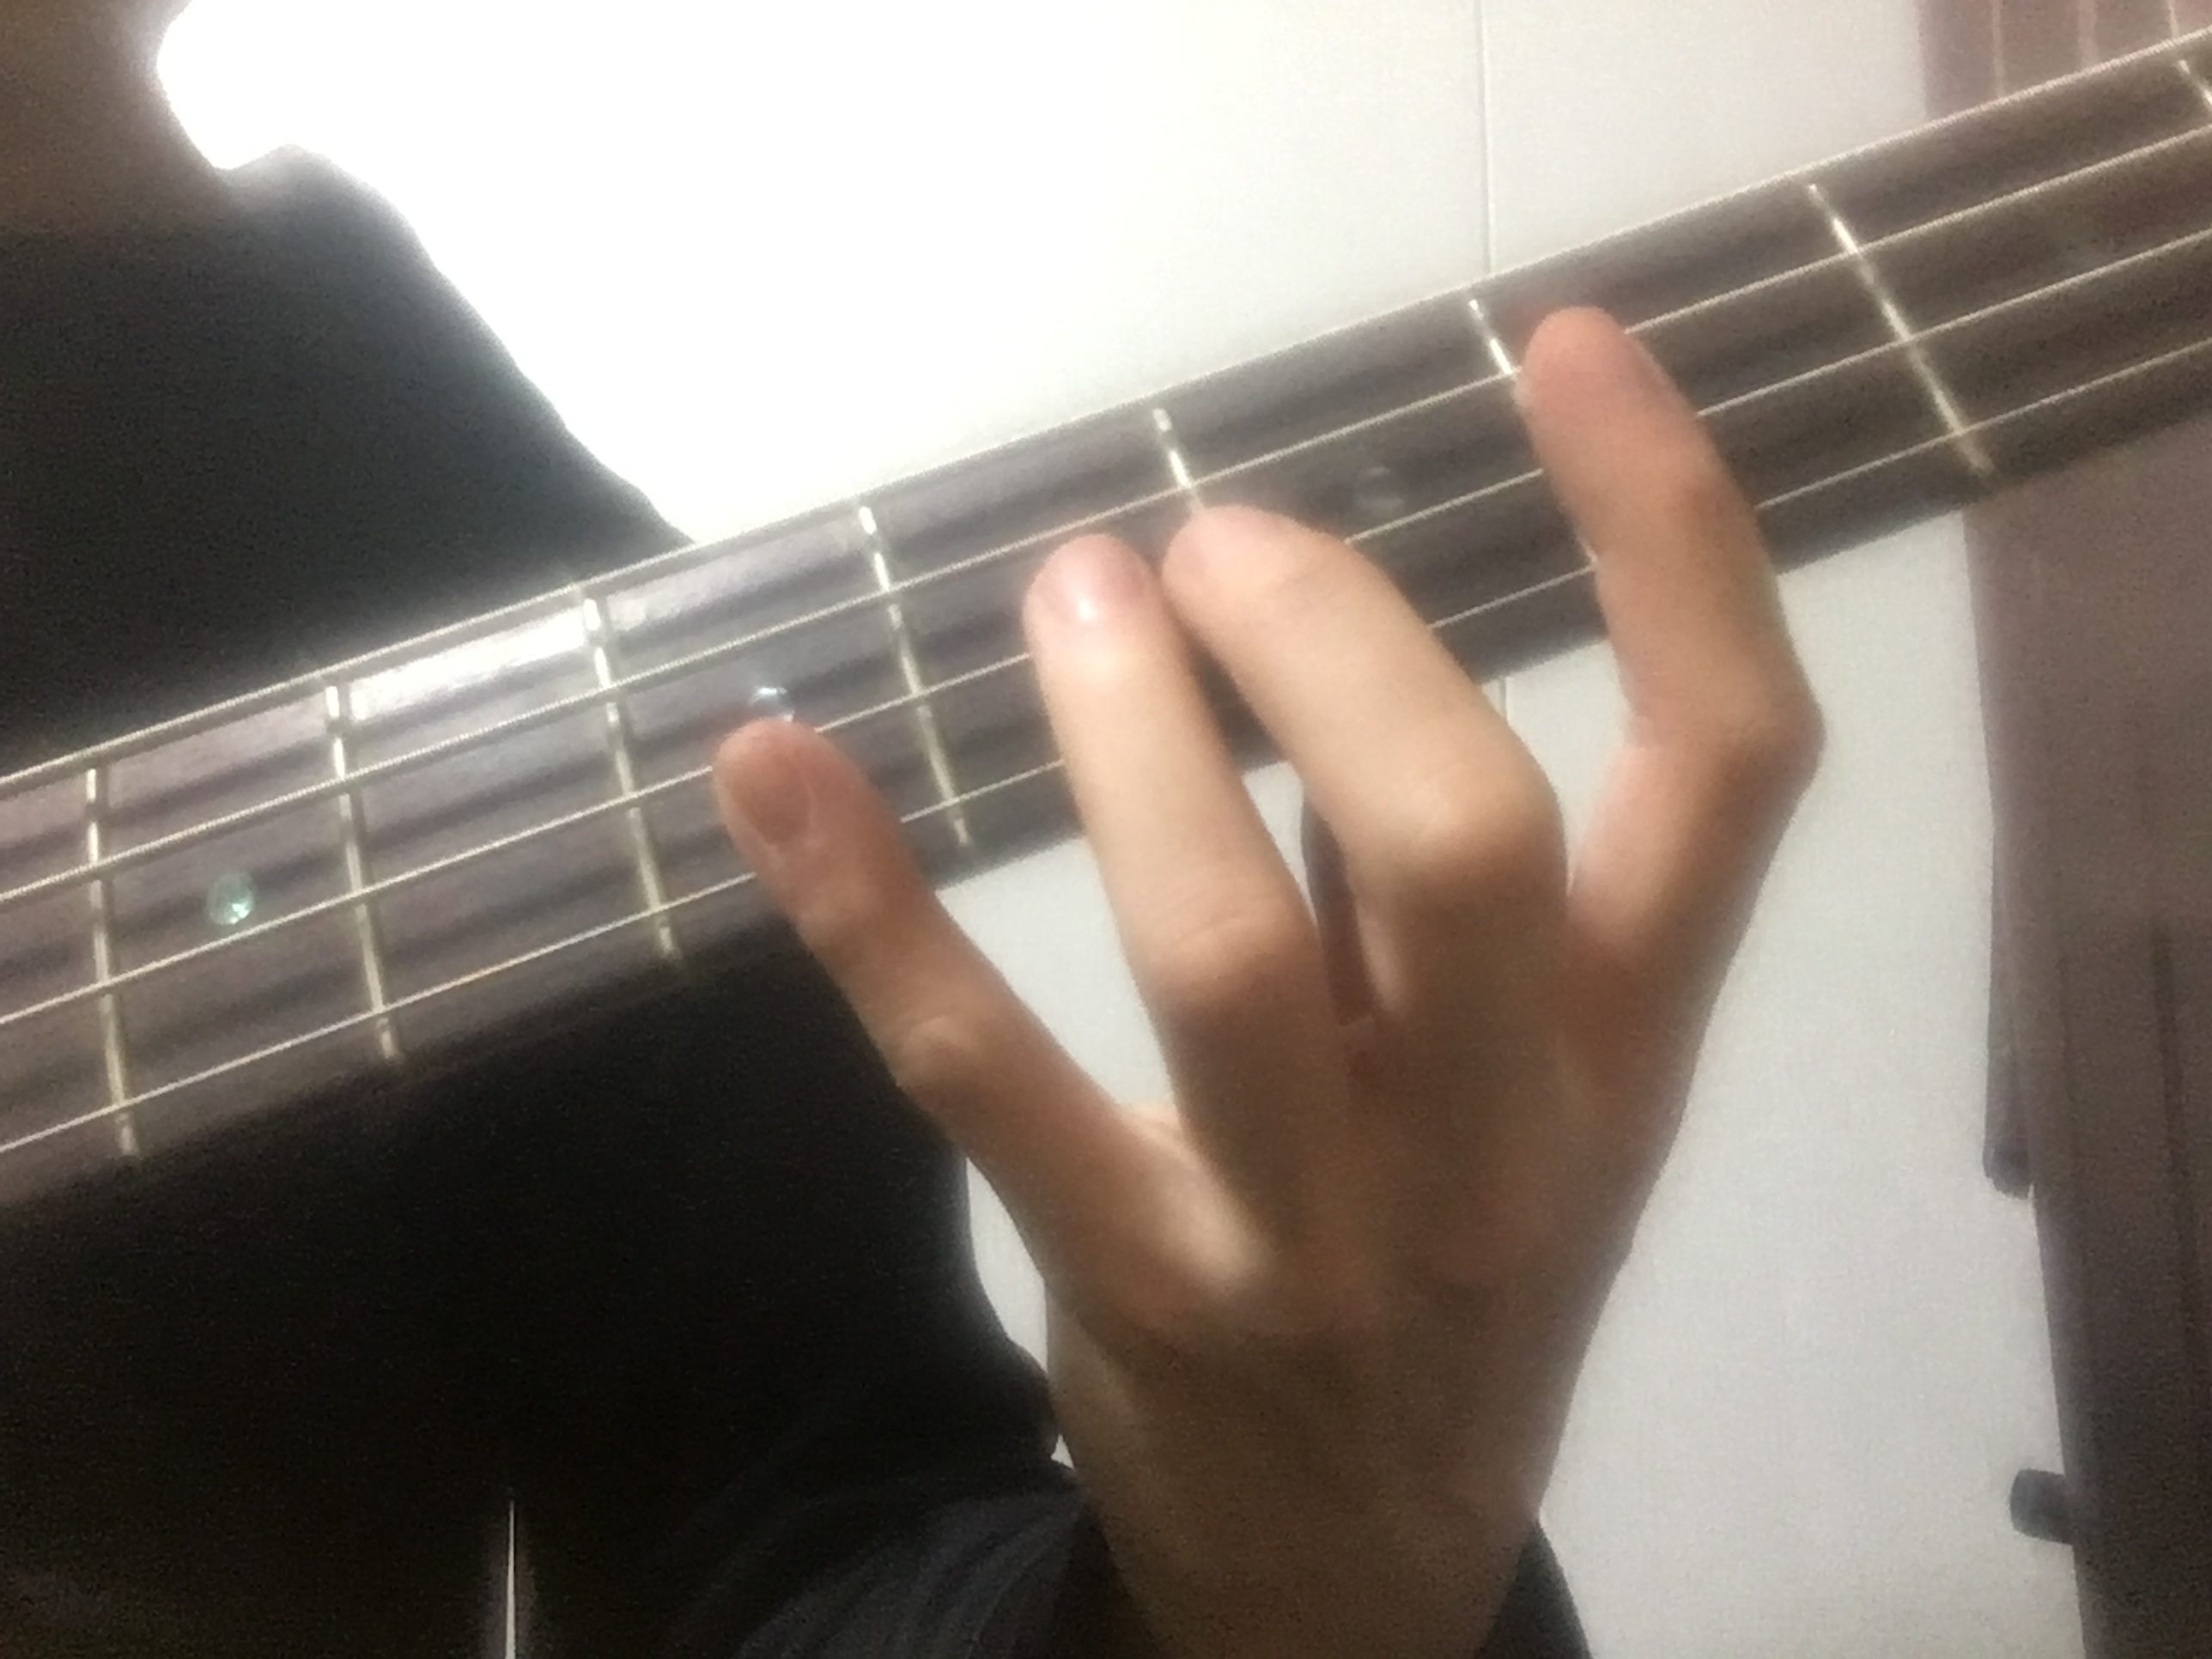
Fingers moving across the fretboard

2. It stretches your hand.
In the beginning, your hand probably won’t spread easily across four frets — especially the gap between your ring finger and pinky, which gets very little use in daily life. This exercise targets exactly that.

Hand stretch on bass neck

3. It trains you to fret close to the fret wire.
Where you place your finger matters. Too far back, and the note buzzes. Right behind the fret wire is where you want to be.

Not here:

Finger placed too far from fret — bad position

Not here either:

Finger placed slightly off fret — still bad position

Here — just behind the fret wire — is where you get a clean note with minimal pressure:

Finger placed correctly just behind the fret wire

From your playing perspective, it looks like this:

First-person view of correct finger placement

4. It trains your rhythm.
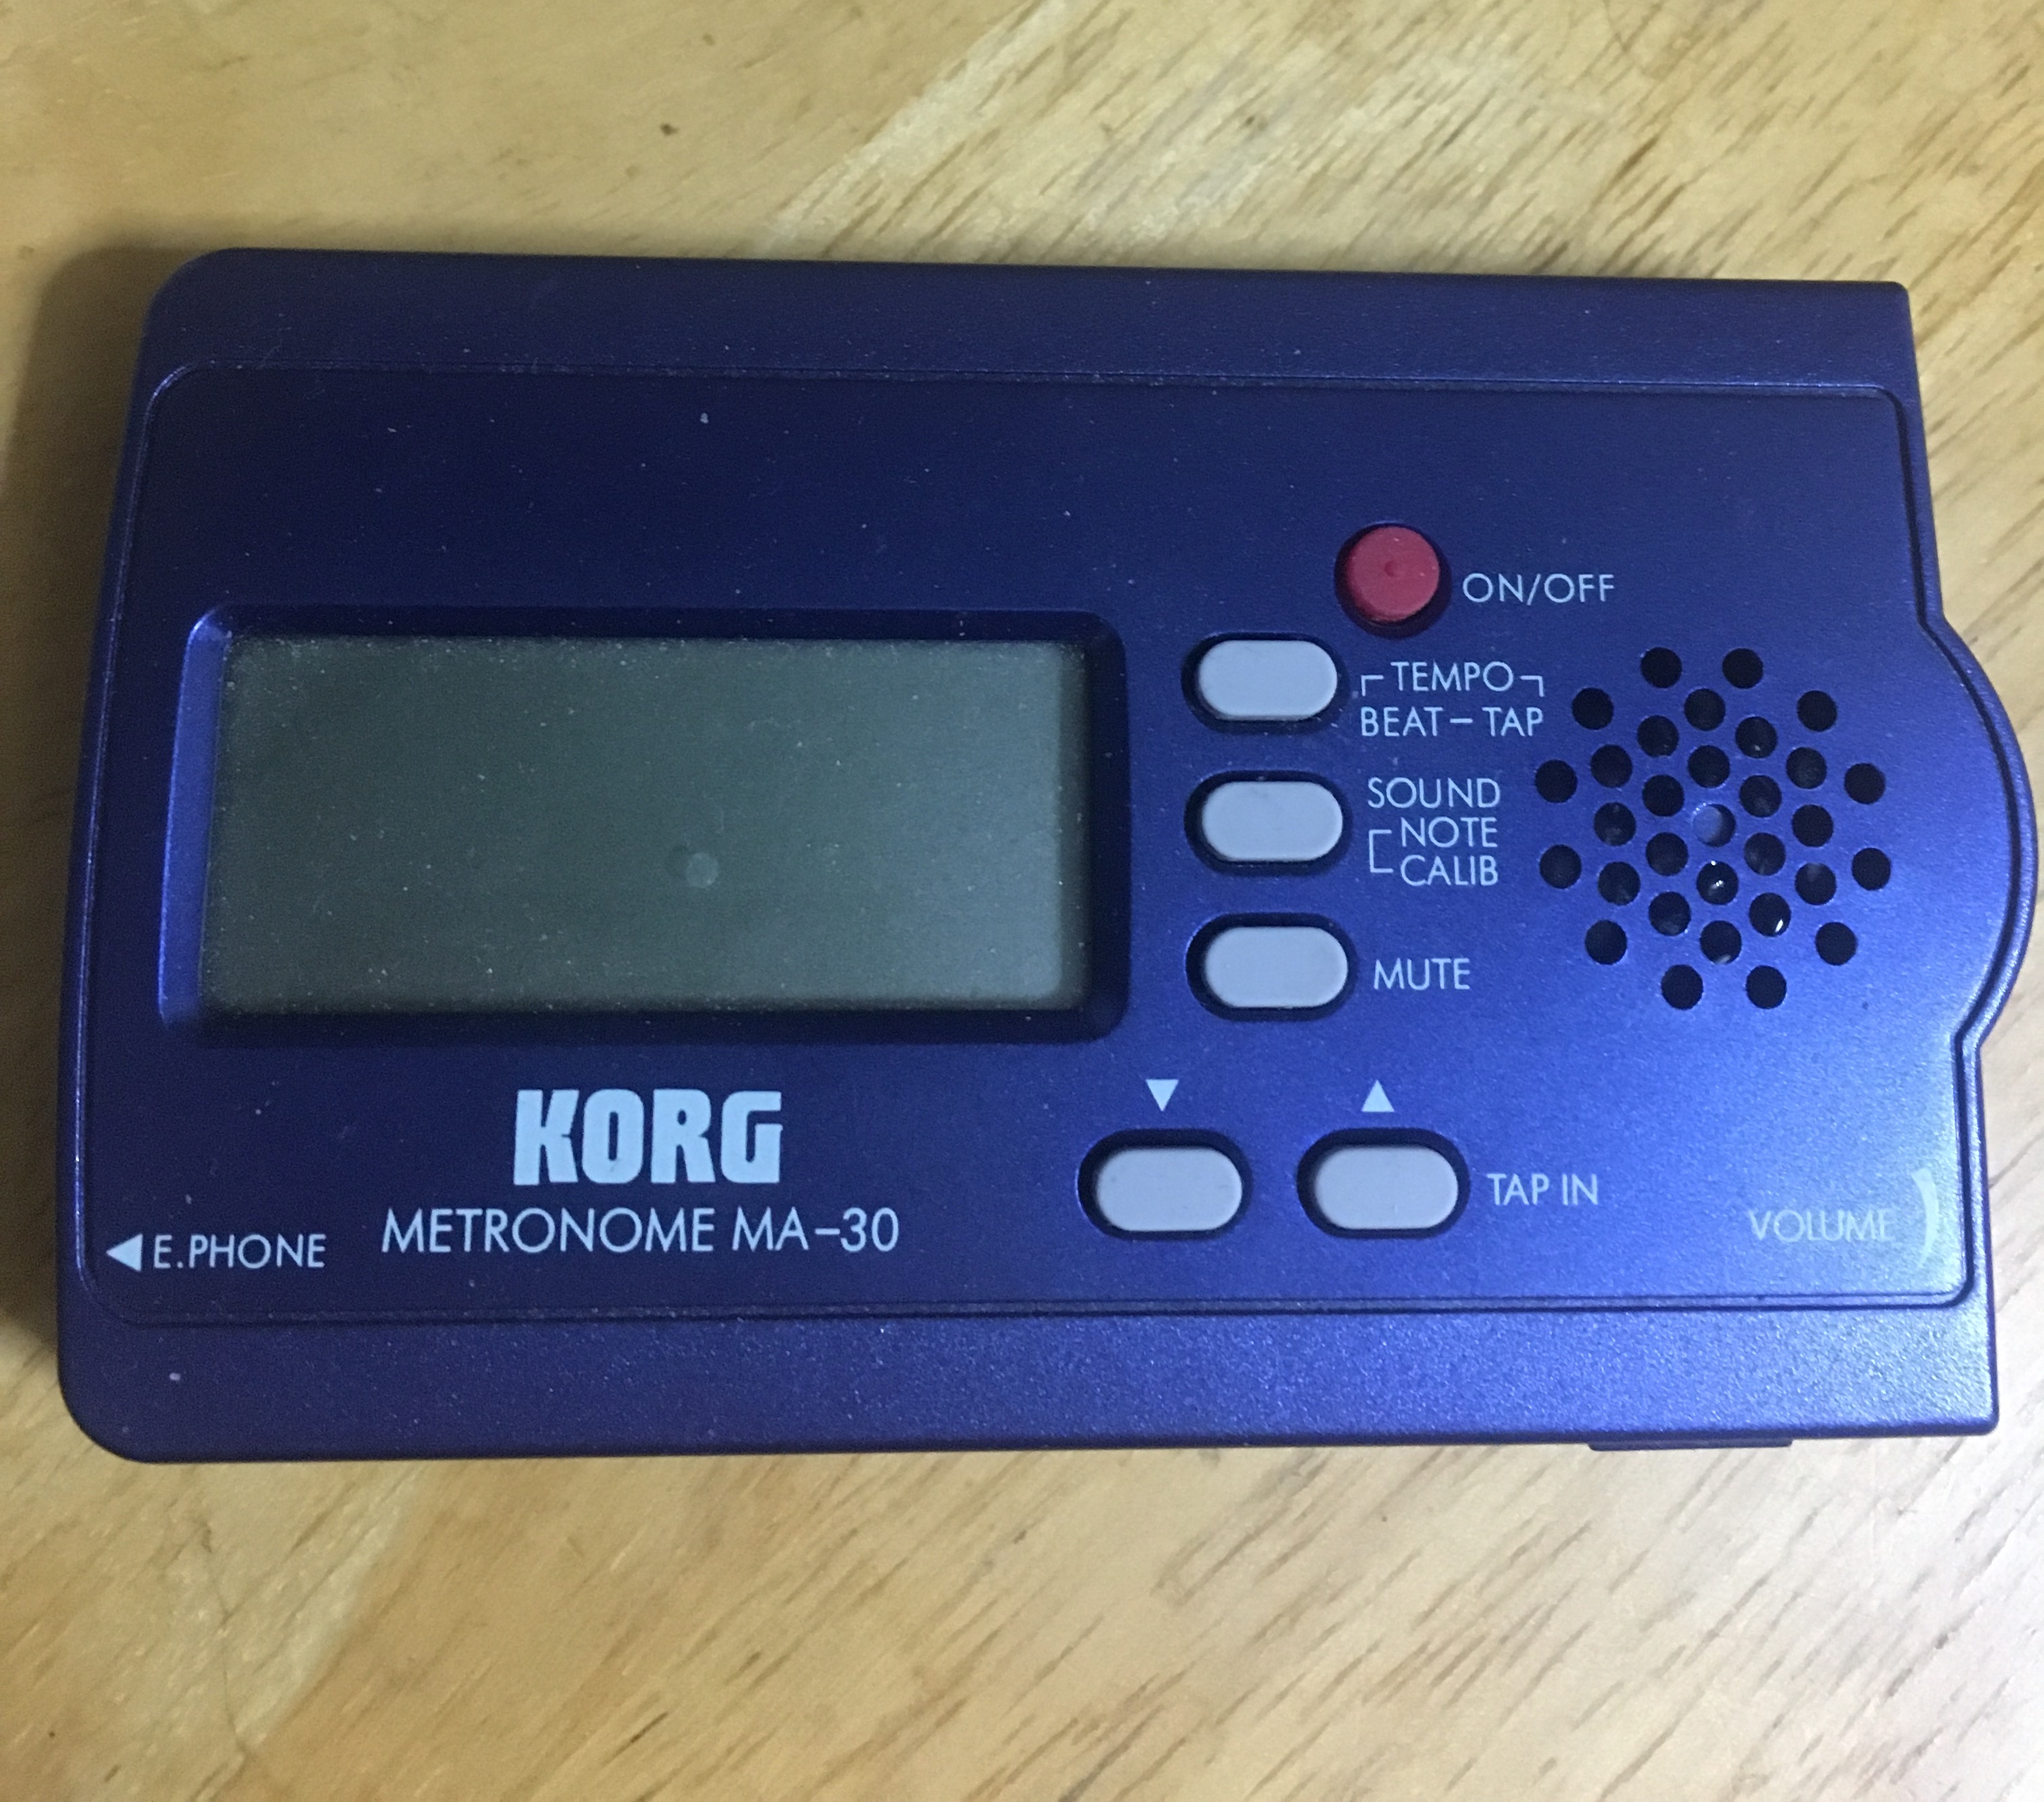
Once you can do the exercise cleanly, use a metronome. Even slow tempo with a click builds the internal pulse that everything else in your playing depends on.

Metronome for rhythm practice

5. It works as a warm-up.
Just like an athlete stretches before a game, your hands need to warm up before you play. A few minutes of chromatics at the start of any practice session gets your fingers ready.

It’s Harder Than It Looks

I want to be upfront: this exercise looks simple in videos, but beginners often can’t get clean notes right away. That’s completely normal. Here’s how to approach it:

Start Without a Metronome

Don’t try to match a tempo from day one. Go as slowly as you need to — just focus on getting each note to ring clearly. Watch your hand, check your finger placement, and move deliberately.

When You’re Ready, Try One Note Per Two Clicks

Once you can move through the exercise cleanly at a slow pace, turn on a metronome and play one note per two beats. This gives you plenty of time between notes to set your finger properly.

Don’t Try to Cover All Four Frets With One Hand Position

This is the most common mistake, especially for people with smaller hands. You don’t need to stretch your entire hand across four frets all at once.

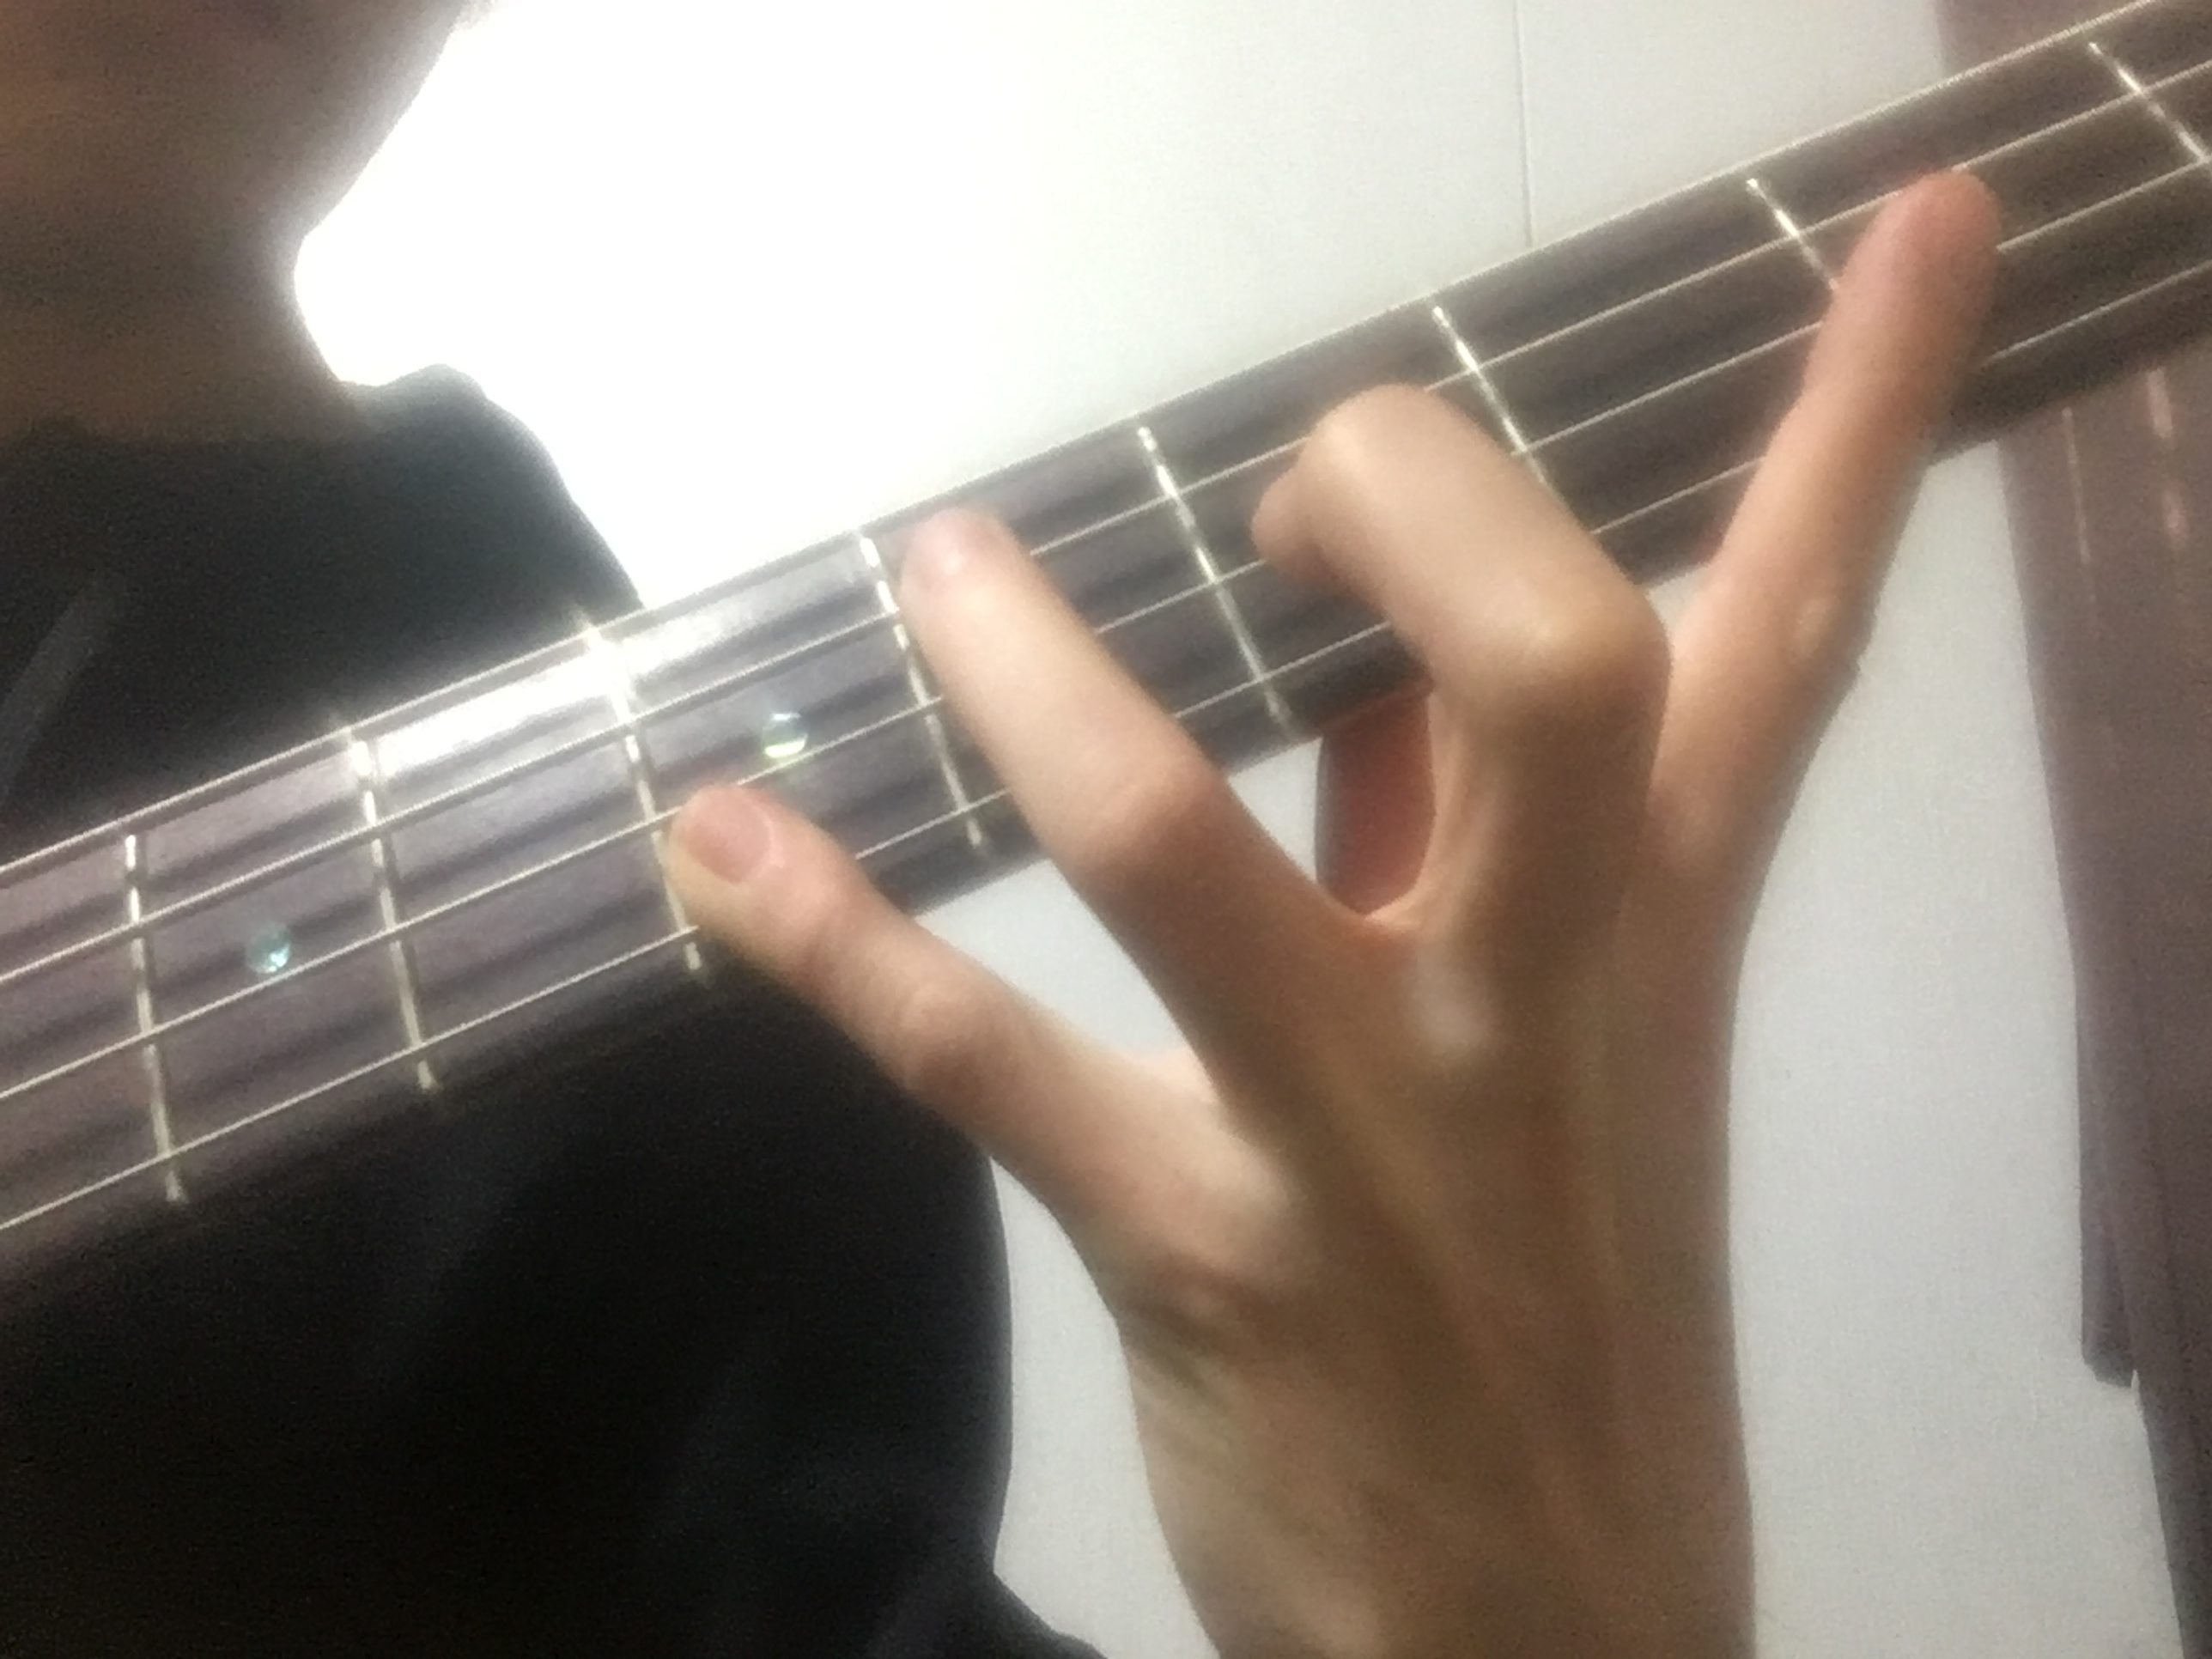
Instead: play your index and middle fingers, then shift your thumb slightly toward the ring and pinky side before placing those fingers.

Index and middle fingers on fretboard

Then shift your thumb toward the pinky side:

Thumb shifted toward pinky side for ring and pinky fingers

Think of it as a small thumb slide — not a full hand stretch. This makes the exercise much more manageable and keeps your technique sustainable as you build strength.

How Much Should You Practice?

It depends on your schedule, and it changes as you progress. But if you’re a complete beginner — working a regular job, weekends off, never practiced bass before — the most important thing isn’t how long you practice. It’s whether you practice at all.

Start with 10 minutes a day. That’s it. Build the habit first, then the duration.

Consistent short sessions beat occasional long ones. Once practice becomes a natural part of your day, you can extend it naturally.

Want Personalized Feedback on Your Playing?

This is exactly the kind of thing that’s hard to fix alone — and where having a teacher makes all the difference.

At Line on Bass, I offer an online lesson service where you send me a video of your playing, and I give you specific, detailed feedback — every single day if you want.

Students from around the world are using this to fix exactly these kinds of issues and steadily improve their jazz bass skills.
Check Out the Lesson Service →

Posted on Leave a comment

Introduction to Electric Bass #4: Picking and Practice Phrases

Welcome to Session 4 of the Introduction to Electric Bass series.

This lesson covers picking technique — what the different styles are, where to position your right hand, and four practice phrases to get your picking motion solid.

What Is Picking?

“Picking” is the act of plucking or striking the strings to produce sound. There are several different ways to do it.

Common Picking Styles

Pick Playing

Pick playing uses a plectrum — the same kind of pick guitarists use — rather than touching the strings directly with your fingers.

Pick playing on bass

The strong attack of a pick makes it especially popular in rock and heavier styles of music.

Pick playing on bass — wider view

Finger Picking

Finger picking includes two main techniques: one-finger picking (index finger only) and two-finger picking (alternating index and middle fingers). It’s used across a wide range of genres — pop, jazz, and beyond.

Finger picking on bass

Slap (Thumb & Pull)

Also called “chops,” slap technique combines two movements:

  • Thumping — striking the string with your thumb
  • Pulling — hooking and snapping a string with your middle or index finger

Originally rooted in funk and Black music, slap has since spread into many popular styles.

Slap bass technique

In this session we’ll focus on finger picking — it’s the most common style among my students.

Right-Hand Thumb Position for Finger Picking

“Where should my right hand go when finger picking?” is one of the questions I hear most. There’s no single rule, but here are the three most common positions:

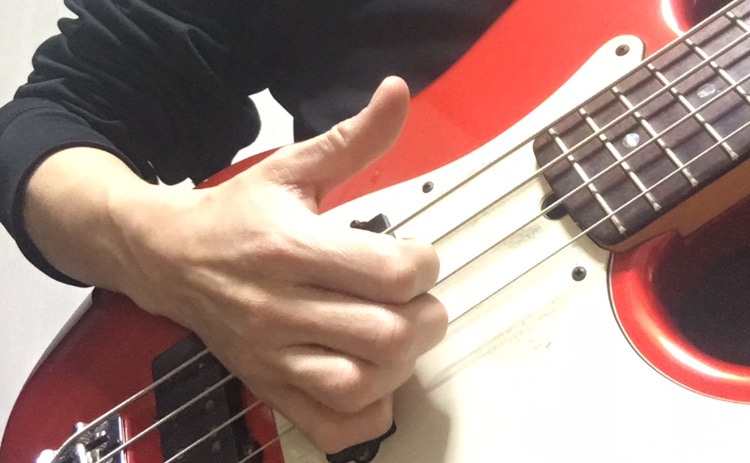
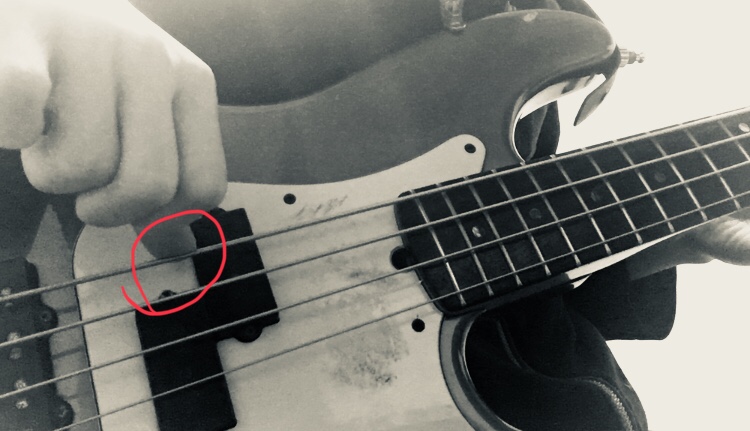
① Thumb on the Front (Neck) Pickup

Anchoring your thumb on the front pickup stabilizes your hand and makes each pluck easier to control.

Thumb resting on the front pickup

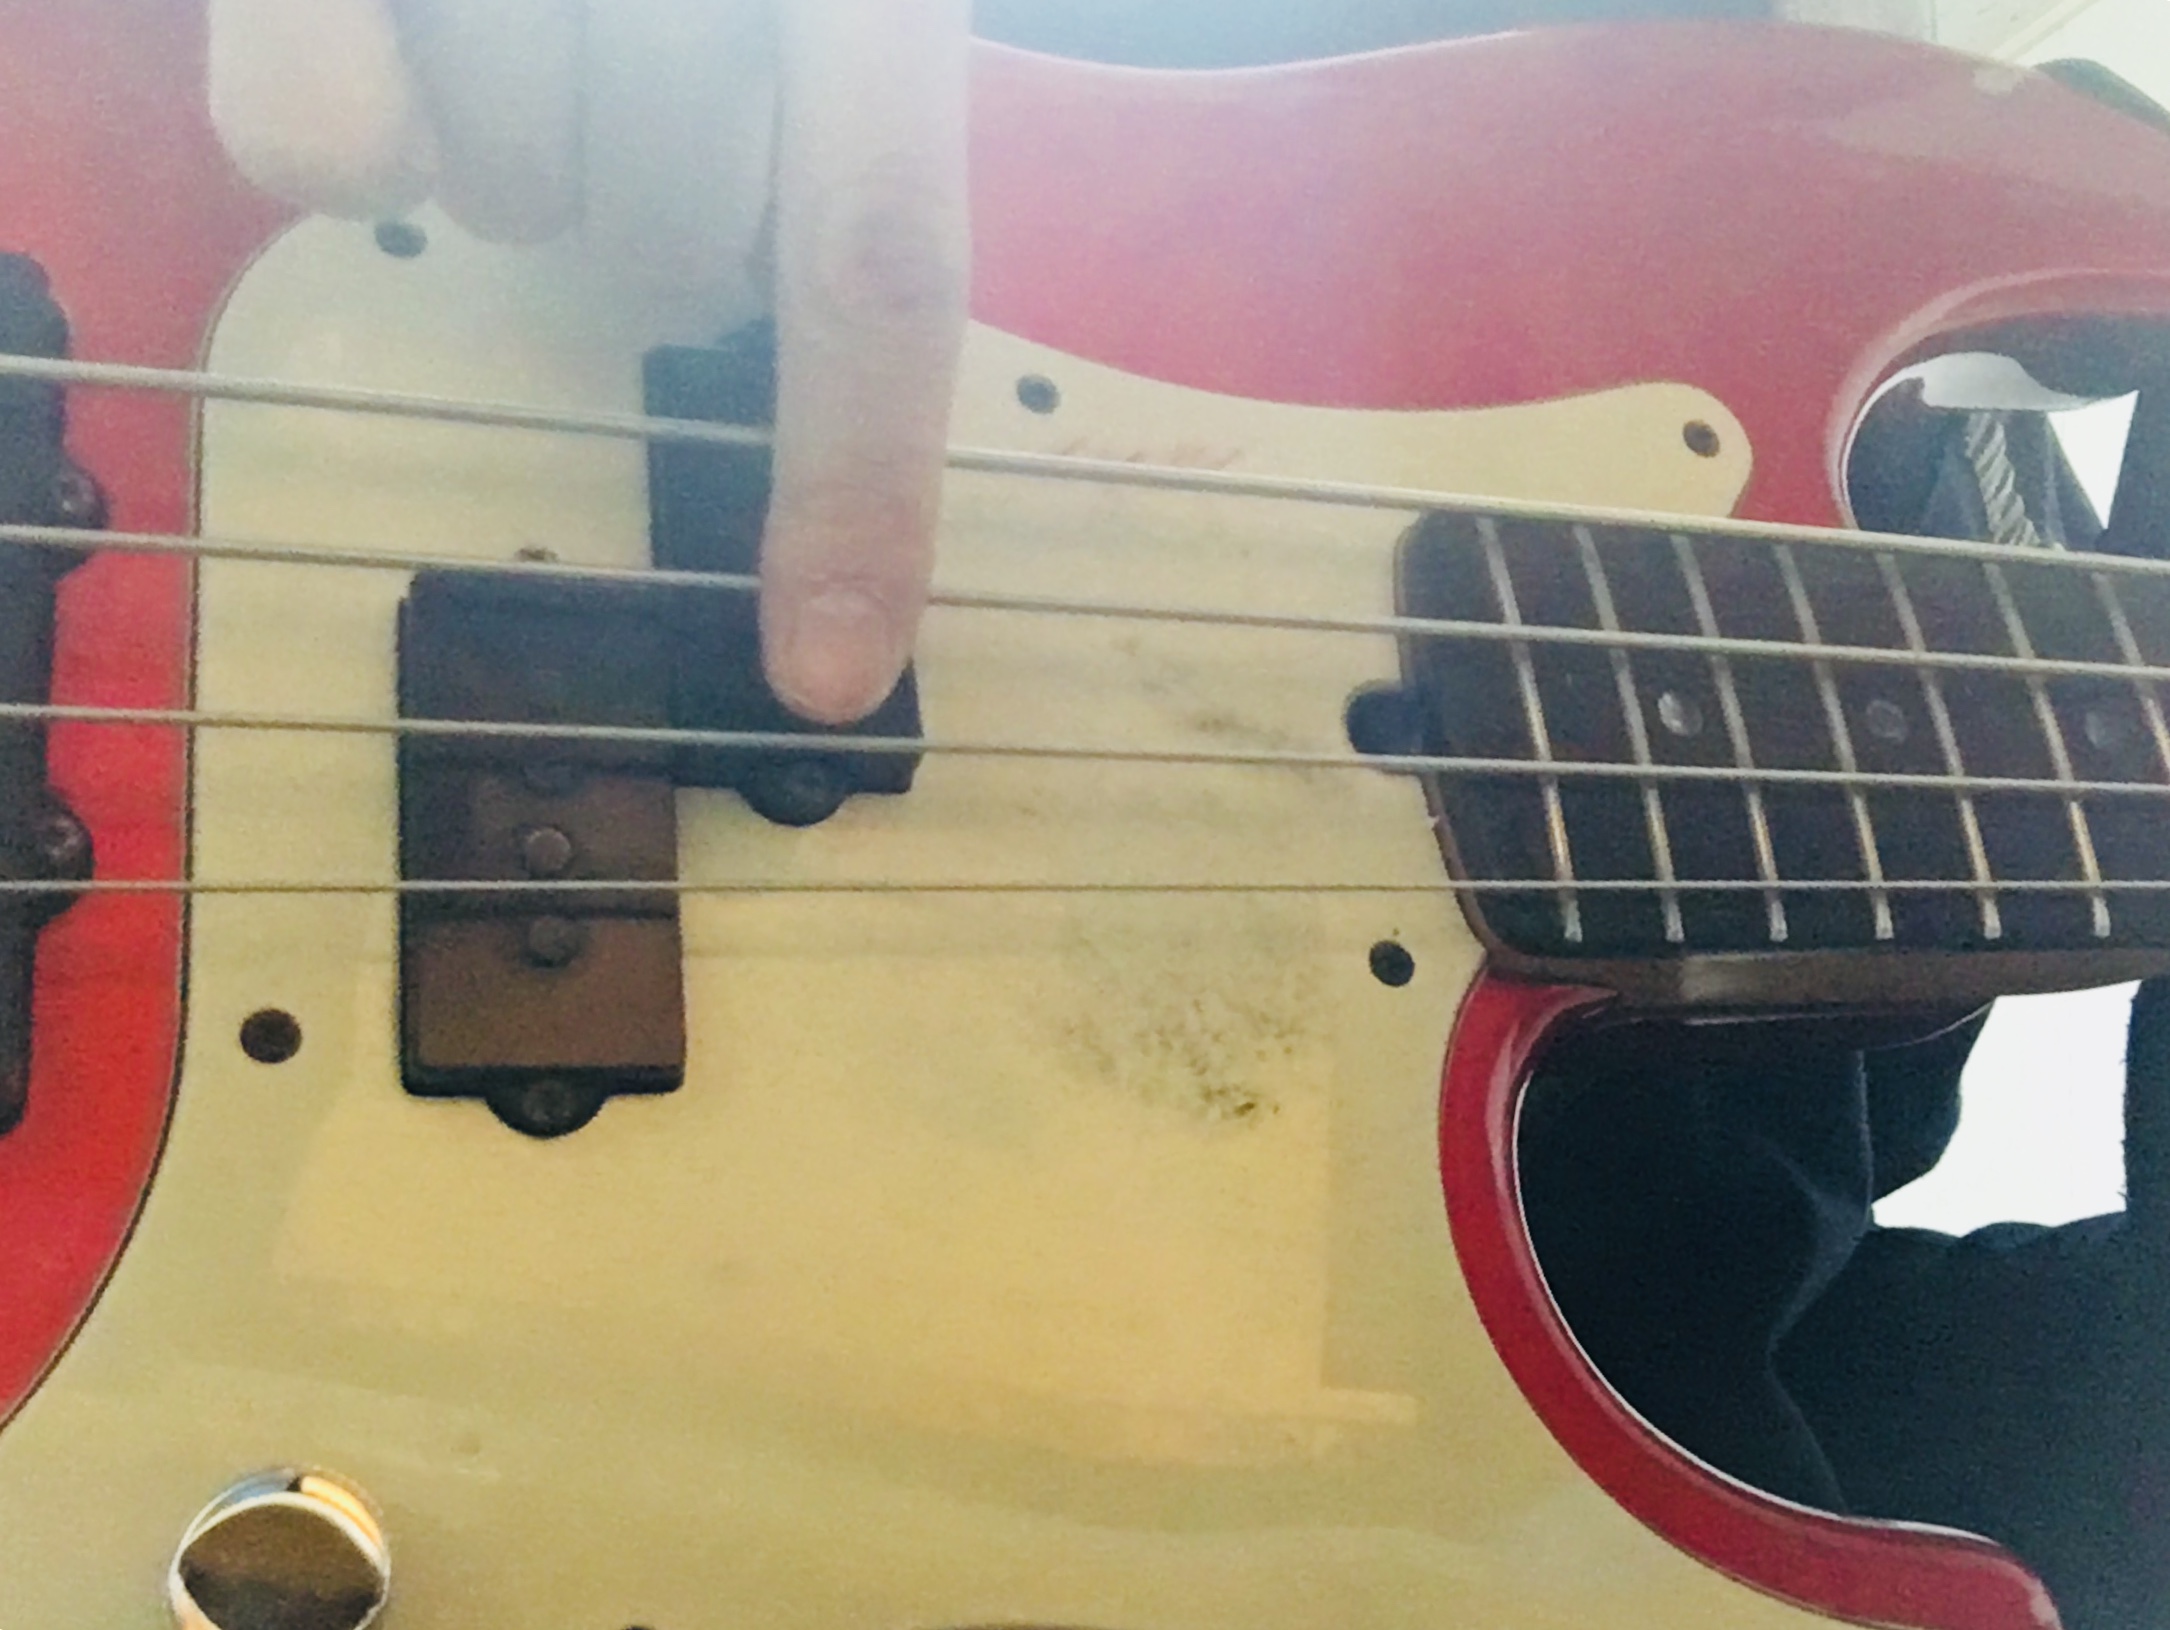
② Thumb on a String

When playing the 1st or 2nd string, the front pickup can feel too far away. In that case, rest your thumb on the 3rd or 4th string as a closer anchor point.

Thumb resting on a string

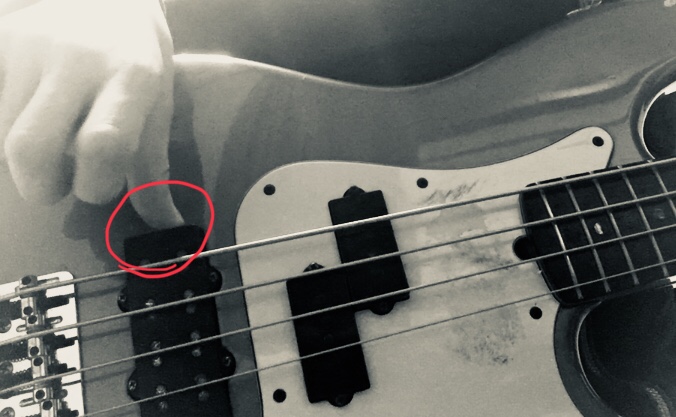
③ Thumb on the Rear (Bridge) Pickup

Anchoring on the rear pickup is also an option. Because string tension is higher near the bridge, this produces a firmer, brighter tone.

Thumb resting on the rear pickup

I personally move between positions ① and ②, shifting my thumb depending on which strings I’m playing.

Picking Practice Phrases

Let’s put this into practice. Work through each phrase slowly and focus on producing an even, consistent tone.

① One-Finger Picking

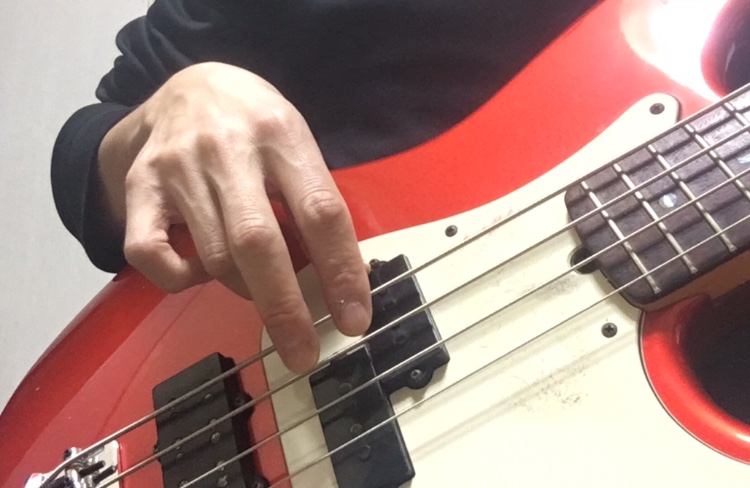
Use only your index finger for this exercise.

One-finger picking position

Practice phrase 1 — tab notation

② Two-Finger Picking

Alternate your index and middle fingers on each note.

Two-finger picking position

Practice phrase 2 — tab notation

③ One-Finger — Different Rhythm

Still using one finger, but with a slightly more interesting rhythmic pattern this time.

Practice phrase 3 — tab notation

④ Two-Finger — Rock Eighth Notes

Two-finger picking with a driving rock feel — straight eighth notes all the way through.

Practice phrase 4 — tab notation

Want Personalized Feedback on Your Playing?

This is exactly the kind of thing that’s hard to fix alone — and where having a teacher makes all the difference.

At Line on Bass, I offer an online lesson service where you send me a video of your playing, and I give you specific, detailed feedback — every single day if you want.

Students from around the world are using this to fix exactly these kinds of issues and steadily improve their jazz bass skills.
Check Out the Lesson Service →

Posted on Leave a comment

Beginner Bass Guide: Where Do I Start?

This article is written by Toru Hoshino, a jazz bassist and instructor based in Japan who teaches online lessons to students worldwide.

This guide is for:

  • People picking up a bass for the first time
  • People who are about to start playing bass
  • People who want to revisit the basics or rethink their playing style

I wrote this as a hint for anyone wondering: “I want to start playing bass, but I have no idea where to begin.”

Where to Start When You Want to Play Bass

When you’re starting out, there’s a lot you probably don’t know — and a lot you’re not sure where to begin. Here are the most important things I think every beginner should know.

What Kind of Instrument Is the Bass?

First things first — what actually is a bass? It looks similar to a guitar, but it’s a different instrument. Understanding how it differs from the guitar, and what role it plays in a band, is a good starting point before diving in.

What Bass Should You Buy?

When you start jogging or going to the gym, getting yourself some new shoes and clothes tends to make you feel more motivated. Bass is the same — having a bass of your own makes you want to play. And without one, you can’t practice at all, so let’s get the essentials sorted.

If you have no idea where to start, a beginner bundle that includes the bass body, an amp, a cable, and a tuner all in one package is a solid first choice. These are widely available online and at music stores, with entry-level sets typically starting around $150–200 USD.

If you have a bit more budget and want something of better quality, I’d recommend a Fender Jazz Bass. That said, I’d also suggest visiting a local music store in person and talking to the staff about:

  • What bands or styles you like
  • Your budget
  • Songs you want to learn
  • Whether you’re already in a band or starting fresh

Getting advice tailored to your situation will help you find the right fit.

Upright Bass or Electric Bass — Which Should You Start With?

This is a question I often get from people interested in playing jazz. Either one works, really — but the easiest thing to do is picture a musician you like and see which one they play.

I’d recommend starting with whatever type of bass your favorite musician uses. If no one comes to mind, electric bass is the safer default — it takes up less space and is generally less expensive.

For more on the differences, pros, and cons between the two:

Upright Bass vs. Electric Upright Bass: Differences, Pros, and Cons

What Should You Practice First?

There are many ways to practice, but the one I always suggest to beginners first is a metronome-based exercise. It’s simple, but it’s great for finger training.

A 10-Minute Daily Metronome Exercise for Bass

Other Things That Will Help You Enjoy Bass as a Beginner

Try Starting or Joining a Band

Having a band makes your bass playing improve. When you have a song to work on together, you have a shared responsibility — you can’t slack off.

Bass isn’t the most common instrument, so cover bands and amateur bands are often actively looking for a bassist. Try searching for “bassist wanted” or “bass player needed” on musician networking sites or social media in your area — there are plenty of people looking.

Playing in a band is deep and genuinely fun. I have students who are in over their heads, running around like crazy — but their eyes are lit up and they’re growing fast.

Once You Join a Band, Pick a Goal Song

Practicing without direction will burn you out within a few months.

Having a clear goal — “I want to be able to play [this song] by [this date]” — keeps you going and gives your practice purpose. In music, that goal is usually a live performance, a recital, or a target song.

There are hard songs and easy songs, but start by looking for something you genuinely think sounds cool or that you actually want to learn. That’s what makes practice feel worth doing.

Want Personalized Feedback on Your Playing?

This is exactly the kind of thing that’s hard to fix alone — and where having a teacher makes all the difference.

At Line on Bass, I offer an online lesson service where you send me a video of your playing, and I give you specific, detailed feedback — every single day if you want.

Students from around the world are using this to fix exactly these kinds of issues and steadily improve their jazz bass skills.

Check Out the Lesson Service →

Posted on Leave a comment

This Year’s Top 3 Viewer-Favorite YouTube Videos

This article is written by Toru Hoshino, a jazz bassist and instructor based in Japan who teaches online lessons to students worldwide.

Today I want to share the top 3 most-watched videos from my channel this year, picked out by viewers like you.

This year again, I posted a new video every single Friday at 9pm, without missing a week. I’ve been doing this for about six years now, and somewhere along the way the channel passed 13,000 subscribers! To everyone who watches regularly — thank you so much.

Today I’m sharing the top 3 most-watched videos of the year. These covered topics a lot of people were interested in, so if you missed any of them, or you’re curious, take a look.

#3 — How to Build a Bass Line When the Same Chord Lasts Two Bars

When the same chord repeats for two bars or more, like:

C7 / C7
Dm7 / Dm7

…I get asked all the time how to build a bass line through it.

This video walks through the thinking behind it, with concrete, usable phrases for that exact situation.

Watch the video here

#2 — What Changed About My 4-String Playing After Switching to 5-String Bass

After playing a 5-string bass for several years, this video looks at how it ended up affecting my playing on 4-string bass, from a few different angles.

The conclusion: picking up the 5-string had a lot of positive effects on my 4-string playing. If you’re thinking about trying a 5-string, this one’s worth a watch.

Watch the video here

#1 — [Keep This Forever] Walking Bass Line Tabs for 10 Jazz Standards!

This video puts together walking bass lines, with tab, for 10 jazz standards — including:

・Autumn Leaves
・My Favorite Things
・Take Five

…and more. You’ll get free tab for bass lines you can use over the chord changes of these popular standards.

If you’re looking to get started with walking bass, this is well worth checking out.

Watch the video here

Bonus

This one got a ton of comments along the lines of “this warmed my heart” — a review and taste-test of a bakery called “Chet Bakery” that plays jazz all day.

A bakery every jazz lover needs to visit!

Not too beginner-focused, not too advanced either. Not overloaded with theory or jargon, but still has to feel like “me.” That’s the balance I’m always wrestling with when I’m trying to figure out what to make next — and I put real care into every single video.

I plan to keep posting every week without a break through the rest of this year too. Thanks for sticking with me, and I hope you’ll keep watching!

Want Personalized Feedback on Your Playing?

This is exactly the kind of thing that’s hard to fix alone — and where having a teacher makes all the difference.

At Line on Bass, I offer an online lesson service where you send me a video of your playing, and I give you specific, detailed feedback — every single day if you want.

Students from around the world are using this to fix exactly these kinds of issues and steadily improve their jazz bass skills.
Check Out the Lesson Service →

Posted on Leave a comment

How to Get Your Pinky to Reach on Bass

This article is written by Toru Hoshino, a jazz bassist and instructor based in Japan who teaches online lessons to students worldwide.

“My pinky just doesn’t reach the string on bass.”

If that’s you, here’s a simple tip that can make a big difference. The key is your elbow.

Bring Your Elbow Forward

If you have small hands or short fingers and your pinky won’t reach, here’s a hint: tuck your elbow in and push it slightly forward. Your pinky will naturally land on the string. It doesn’t affect your form’s appearance either, so if you’re struggling with fingering, it’s worth a try.

Just a Little Push Forward

I have a student whose pinky is quite short, yet she uses it freely and confidently — she’s just a regular high school student, nothing special about her hands.

I asked her how she manages to use her pinky so well, since my fingers have always been naturally long and I’d never had to deal with short-finger struggles.

She told me: “When I use my pinky, I tuck my elbow in toward my body as much as possible.”

Here’s roughly what that looks like.

↓ This is the typical posture:

1

↓ This is what my student does:

2

3

Push your elbow forward, just a little bit, in a firm motion. Doing that brings your pinky naturally onto the string.

If Your Pinky Is Short, Try Pushing Your Elbow Forward

There’s only so much you can do about the physical length of your pinky finger. When that’s the case, just try bringing your left elbow forward a bit.

It won’t affect how your form looks, either.

2

A 3-Minute Daily Pinky Exercise for Bassists

With all that in mind, here’s a video you can use to put it into practice. Just three minutes a day, and you’ll gradually find your left hand stops flailing around, helping you lock in a smoother, more controlled form.

More on Bass Playing Form

Building the right form for your body will speed up your progress. The article below covers right hand, left hand, strap length, angle, and more — worth a look as well.

My Electric Bass Playing Form: Right Hand, Left Hand, Strap Length, and More

Thanks for reading all the way through!

Want Personalized Feedback on Your Playing?

This is exactly the kind of thing that’s hard to fix alone — and where having a teacher makes all the difference.

At Line on Bass, I offer an online lesson service where you send me a video of your playing, and I give you specific, detailed feedback — every single day if you want.

Students from around the world are using this to fix exactly these kinds of issues and steadily improve their jazz bass skills.
Check Out the Lesson Service →

Posted on Leave a comment

My Electric Bass Playing Form: Right Hand, Left Hand, Strap Length, and More

This article is written by Toru Hoshino, a jazz and upright bassist and instructor based in Tokyo, and covers the form and habits I keep in mind when playing walking bass on electric bass.

Form varies from person to person depending on body type, gender, genre, and more, so none of this is a “you must do it this way” rule — but I hope it’s useful as a reference.

Bass Position

I wear my bass pretty high.

I use a COMFORT strap set to its shortest length, and I make a point of keeping the body of the bass in the same position whether I’m standing or sitting.

Funk and jazz players tend to wear the strap short, while rock players tend to wear it longer.

I used to wear mine super long back in my punk rock days, too — but for anyone playing with a long strap, I’d recommend practicing standing up, even at home, so your form carries over to how you’ll actually play live.

Look at the Fretboard with Your Eyes Only

To check my fingering, I look at my left hand.

When I do this, tilting my head way down to stare at the fretboard makes the playing look amateurish.

It’s hard to play without looking at the fretboard at all, but where I can, I try to keep my head straight and check the fretboard with just my eyes.

↑ This is looking way too much. My mouth’s even hanging open.

↑ This is checking the fretboard subtly, with just my eyes.

Keep Your Left Hand from Flapping Around

Opening and closing your left hand like you’re throwing rock-paper-scissors doesn’t look great, and it isn’t very efficient either.

The less you open and close your left hand, the more easily you can adapt to whatever phrase comes next.

Right Elbow Position

I rest my elbow just slightly forward of where it naturally falls on top of the body of the bass.

The angle you see in the photo below is what feels the most relaxed for my own style.

Left Hand Position

I keep my elbow tucked slightly inward. My thumb isn’t there to pinch the neck — it’s just resting against it for support.

I also try to keep my hand curled as much as possible, so I’m always ready to fret the next note right away.

Want Personalized Feedback on Your Playing?

This is exactly the kind of thing that’s hard to fix alone — and where having a teacher makes all the difference.

At Line on Bass, I offer an online lesson service where you send me a video of your playing, and I give you specific, detailed feedback — every single day if you want.

Students from around the world are using this to fix exactly these kinds of issues and steadily improve their jazz bass skills.

Check Out the Lesson Service →

Posted on Leave a comment

My Experience With Tendinitis From Bass Practice (and What I Did About It)

Hi, I’m Toru Hoshino, a bass teacher.

If you practice bass a lot, you can end up developing tendinitis.

I’m not a doctor, so I can’t give you specific medical advice for preventing tendinitis in this article, but

I want to share my own experience with it, and what I did while dealing with it.

What Is Tendinitis?

Tendinitis is, as the name suggests, inflammation of a tendon. Most everyday cases come from overusing the muscles of the hand and arm in ways that put strain on the fingers or wrist. Often you don’t even realize you’ve been overdoing it until you’re suddenly diagnosed with it. There are also cases caused by infection through an injury, or linked to an underlying condition like diabetes or rheumatoid arthritis.

What Causes Tendinitis in Bass Players

Poor form and overpracticing seem to be the most common causes of tendinitis.

Even when you think you’ve relaxed your grip, you can still be putting unnecessary strain on your hand without realizing it.


Most players never think it’ll happen to them, so they don’t take any precautions — and only start worrying once they’re already dealing with it.

In my case it never got bad enough to disrupt daily life, but apparently severe cases can leave you unable to even hold chopsticks.

I actually know a drummer who got tendinitis so bad he couldn’t hold his drumsticks anymore.

What I Did While Dealing With Tendinitis

Getting diagnosed was a shock, but I decided to stop playing bass for a while.

Every doctor I saw told me the same thing: not playing is the best thing you can do.

I wanted to keep getting better on bass, so it was a hard call to make, but there wasn’t really a choice.


So instead of using my hands, I spent my time on these three things:

· Going to see live music
· Studying music theory
· Drinking and listening to music

Going to See Live Music

I went out to see all kinds of shows — genres outside what I usually play, bands led by old friends I’d lost touch with, all sorts of things.

Watching other people play taught me a lot, and honestly it was good medicine for the frustration of dealing with tendinitis.

Studying Music Theory

I figured this was as good a time as any, so I dug into music theory, which I’d always struggled with. I’d look things up when I didn’t understand them, and ask my teacher when even that didn’t help — just chipping away at it bit by bit.

I still do this today, and I think that period is where I picked up the habit of reading a little music theory every day.

Drinking and Listening to Music

Drinking too much obviously isn’t a good idea, but sipping a whiskey while listening to some smooth jazz and soaking in a cool, quiet moment isn’t a bad way to spend an evening either.

All the practice you’ve put in up to that point is never wasted, so when your body’s telling you it’s had enough, I think taking a little time to rest is part of what lets you keep playing music for the long haul.

If it starts to hurt, please don’t push through it!

Want Personalized Feedback on Your Playing?

This is exactly the kind of thing that’s hard to fix alone — and where having a teacher makes all the difference.

At Line on Bass, I offer an online lesson service where you send me a video of your playing, and I give you specific, detailed feedback — every single day if you want.

Students from around the world are using this to fix exactly these kinds of issues and steadily improve their jazz bass skills.
Check Out the Lesson Service →

Posted on Leave a comment

What Is “Walking Bass,” Anyway?

This site is dedicated to helping bass players improve, with a focus on walking bass, jazz bass, and improvisation.

This article is written for bass players who:

· Want to learn how to play walking bass

· Want to write stylish bass lines

· Want to play jazz-flavored bass lines

What Is “Walking Bass”?

“This is what walking bass sounds like.”

“Walking bass has to be played exactly like this.”

There’s no strict definition like that, but in this article I’ll explain what’s generally referred to as “walking bass.”

What Walking Bass Sounds Like

Here’s a short video of a simple walking bass line.

This is a video of me playing a bass line over the chord changes to the jazz standard “Fly Me to the Moon.”

Features of a Walking Bass Line

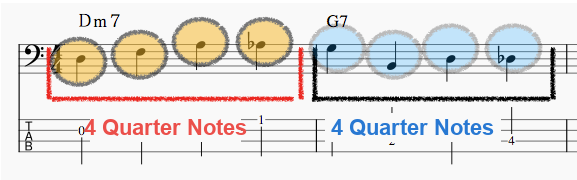
Toru: Like this, you play four quarter notes per bar, and instead of just hammering the root the way you might in rock, you use a variety of different notes. That’s generally what’s meant by a “walking bass line.”

It’s commonly used in jazz, blues, and shuffle-feel music.

It also works great on upright bass. ^^

How to Build a Walking Bass Line

Student: It sounds really difficult — like I’d need to know some complicated music theory just to get started.

A lot of people feel that way, but once you grasp the basic idea, anyone can build a walking bass line easily.

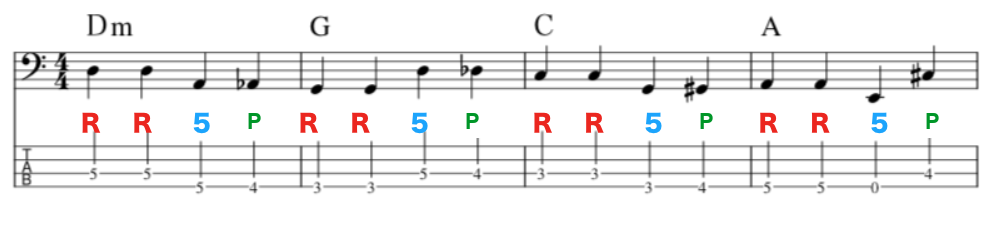
Today I’ll walk you through how to build a walking bass line over this simple chord progression.

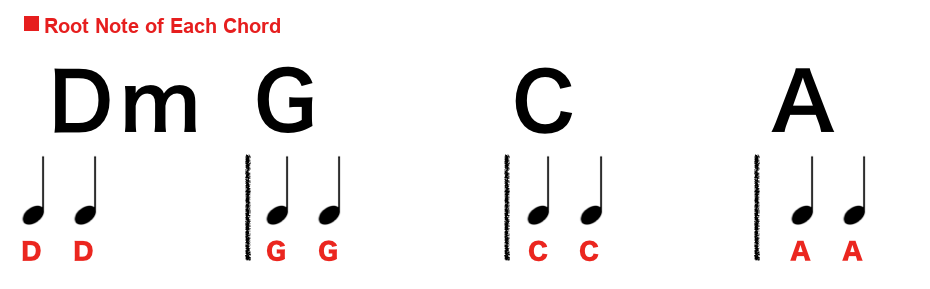
Notes 1 and 2: The Root

You’ll place four quarter notes in each bar.

First, make the 1st and 2nd notes the root note of the chord.

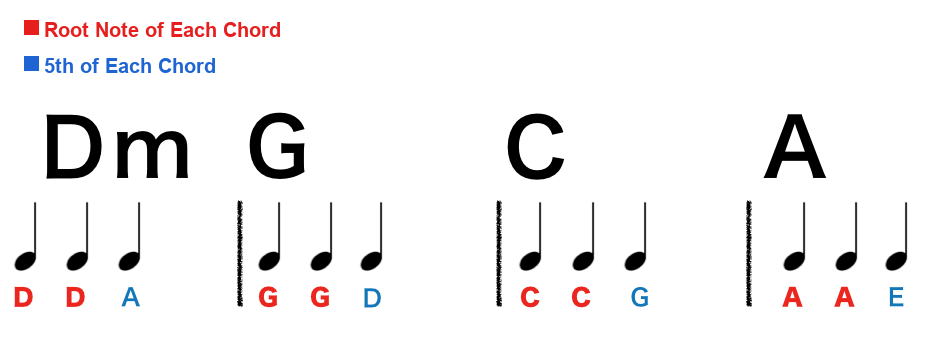
Note 3: The 5th

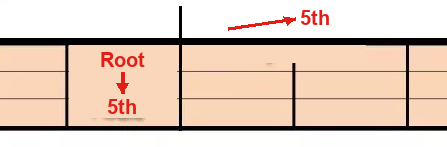
For the 3rd note, use the 5th of the chord.

Simply put, the 5th is the note found at this position relative to the root.

If you’ve played rock or pop bass before, the first three notes probably feel familiar already — but the 4th note is where it gets interesting.

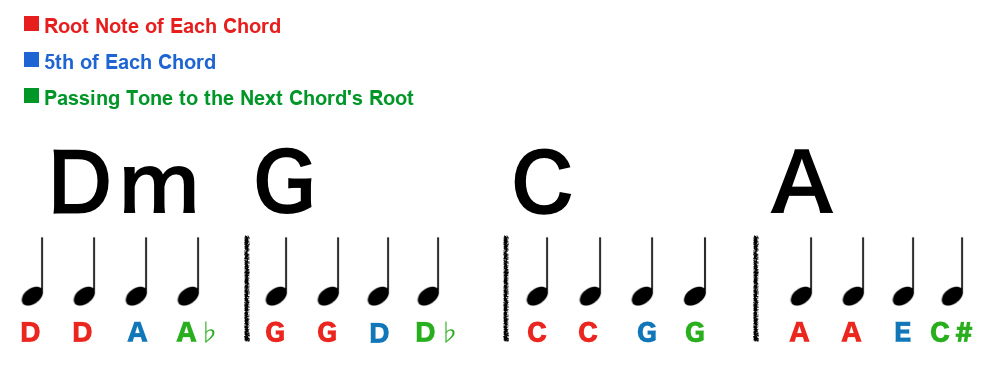
Note 4: The Passing Tone

For the 4th note, it doesn’t matter much whether it’s a chord tone or not — approaching the next root from a half step above or below sounds great.

Toru: This is called a “passing tone,” and it’s a great tool whenever you want a jazzier sound.

For example:

When approaching G, the root of the G7 chord in bar 2,

you can approach from Ab (a half step above) or Gb (a half step below).

When approaching C, the root of the CΔ7 chord in bar 3,

you can approach from Db (a half step above) or B (a half step below).

This kind of approach gives you that jazzy taste pretty easily.

This time, I built it like this with playability (fingering) in mind:

Here’s how it sounds against the actual track:

What did you think?

A convincing jazz bass line might sound like it requires a lot, but you can get surprisingly far using just the root, the 5th, and a passing tone.

I hope this gives you some ideas for building your own bass lines going forward.

Want Personalized Feedback on Your Playing?

This is exactly the kind of thing that’s hard to fix alone — and where having a teacher makes all the difference.

At Line on Bass, I offer an online lesson service where you send me a video of your playing, and I give you specific, detailed feedback — every single day if you want.

Students from around the world are using this to fix exactly these kinds of issues and steadily improve their jazz bass skills.
Check Out the Lesson Service →

Posted on Leave a comment

Walking Bass Lines Over “Take the A Train”: A Breakdown

Hi there, I’m Toru Hoshino (@jazzbassisttoru), a bass instructor.

This article breaks down a walking bass line approach over the chord changes to the jazz standard “Take the A Train.”

It’s a popular tune that comes up often at jam sessions, so it’s well worth having in your back pocket.

A Walking Bass Line Over “Take the A Train”

The line is built mostly around the low frets (roughly frets 1–7), centered on one chorus in C major. It’s a catchy line overall, but with a few deliberate twists thrown in along the way to keep things varied. Let’s look at a few of those ideas.

Using a Minor Approach Over a Major Chord

Student: “Wait — isn’t that a minor 3rd over a major chord?”

Toru: Good catch!

A C6 chord is a major chord — the same family as C or C△7 — so you’d expect the major 3rd, E, to be the “correct” note here. But in this line, I actually used the minor 3rd, E♭.

An approach like “C E E A” below would have worked just fine too:

But by deliberately landing on E♭ — a note outside the scale — for the second note, you get a brief flash of “something’s off here” tension. Then, on the third note, the line resolves down to the chord tone E:

Tension → resolution — that’s the effect this creates.

Toru: It has a bit of a bluesy flavor to it, and it works well any time you’ve got the same chord lasting two bars in a row, like here.

Using the Whole-Tone Scale Over D7

This shows up over bars 3–4, and again over bars 10–11:

Student: That’s a lot of sharps…

Toru: This is the whole-tone scale — every interval in it is a whole step.

For a D whole-tone scale, the notes are:

D  E  F#  G#  A#  C

It’s a go-to approach over this particular bar of this particular tune — worth filing away for future reference.

What to Do When the Same Chord Lasts Several Bars

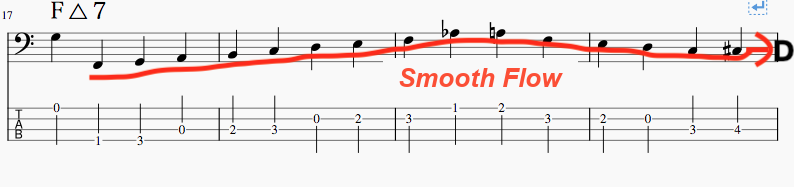
Section B of this tune (where the same chord lasts for several bars in a row) trips a lot of people up. A common but not-so-great approach looks like this:

Resetting to the root note at the start of every bar like this can make the line feel stuck and choppy.

Student: But doesn’t the first note of a bar have to be the root?

Toru: It depends — there are plenty of cases where it doesn’t have to be.

In this case, over the F△7 progression, I built a smooth line with a strong sense of forward motion, aiming to land cleanly on D — the first note of bar 5 of section B:

When the same chord lasts two or more bars, the first note of each bar doesn’t always have to be the root.

That’s a useful idea to keep in your back pocket.

That wraps up this breakdown.

Want Personalized Feedback on Your Playing?

This is exactly the kind of thing that’s hard to fix alone — and where having a teacher makes all the difference.

At Line on Bass, I offer an online lesson service where you send me a video of your playing, and I give you specific, detailed feedback — every single day if you want.

Students from around the world are using this to fix exactly these kinds of issues and steadily improve their jazz bass skills.
Check Out the Lesson Service →