Posted on Leave a comment

The 5th: The Easiest Way to Add Movement to Your Bass Lines

Hi, I’m Toru Hoshino (@jazzbassisttoru), a bass instructor.

Today’s lesson is for beginners who want to build better bass lines.

“I don’t really understand the theory, but I want a bass line that at least sounds like it’s moving.”

If that’s you, there’s one note you can add that will get you there immediately. It’s the 5th.

Just add the 5th to the root note of the chord, and your bass line will instantly feel like it’s moving. Let’s look at how to use it.

A Root-Only Bass Line vs. a Bass Line With the 5th

Example 1: Adding the 5th

First, here’s a bass line played using only the root of each chord.
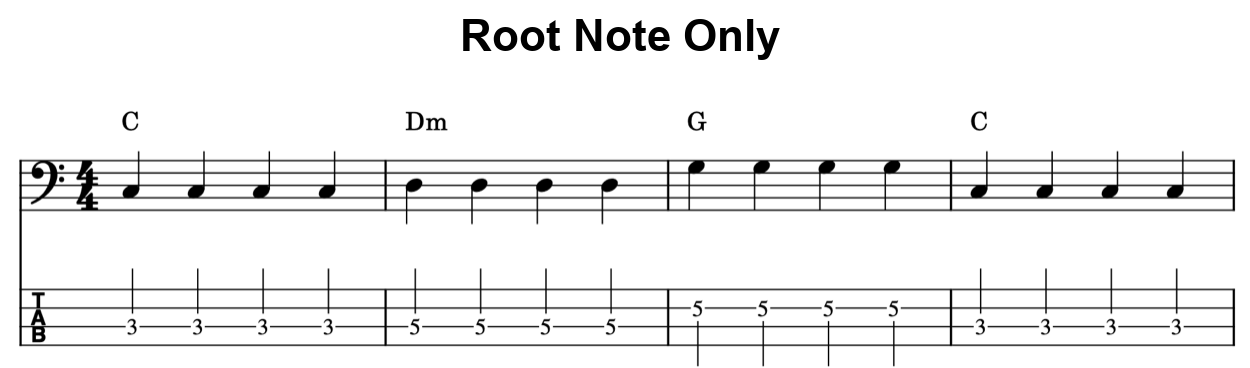
And here’s the same progression, but with the 5th added to the root.
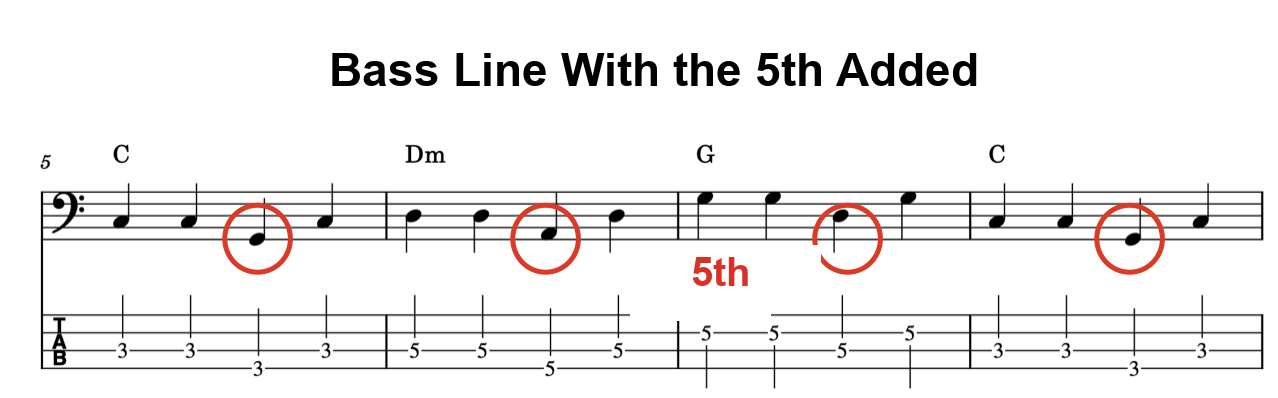
Each measure uses the 5th on beat 3 — but doesn’t it feel like the bass line suddenly has some “movement” to it?

Let’s look at one more example with a different chord progression.


Example 2: Adding the 5th

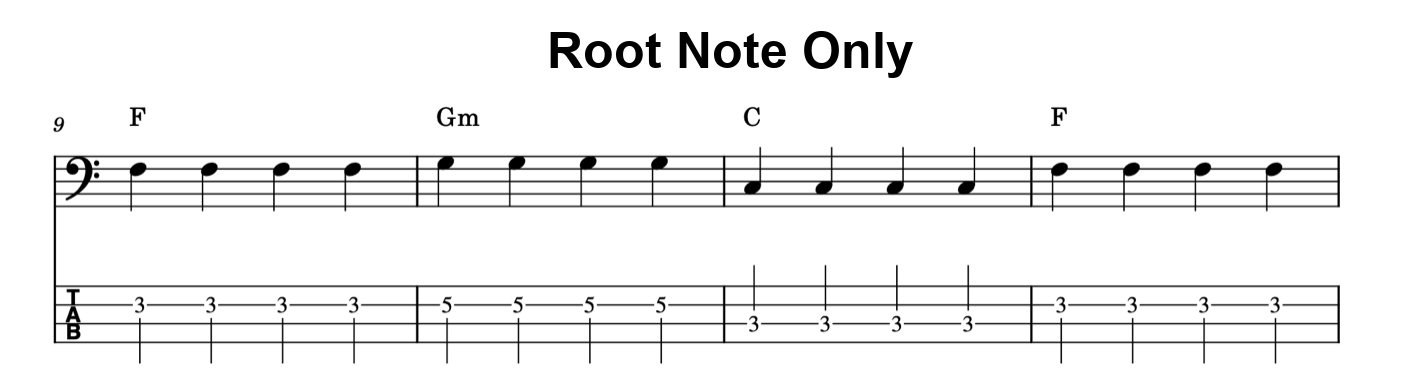
Here’s a bass line played using only the root.
And here’s the same progression with the 5th added to the root.
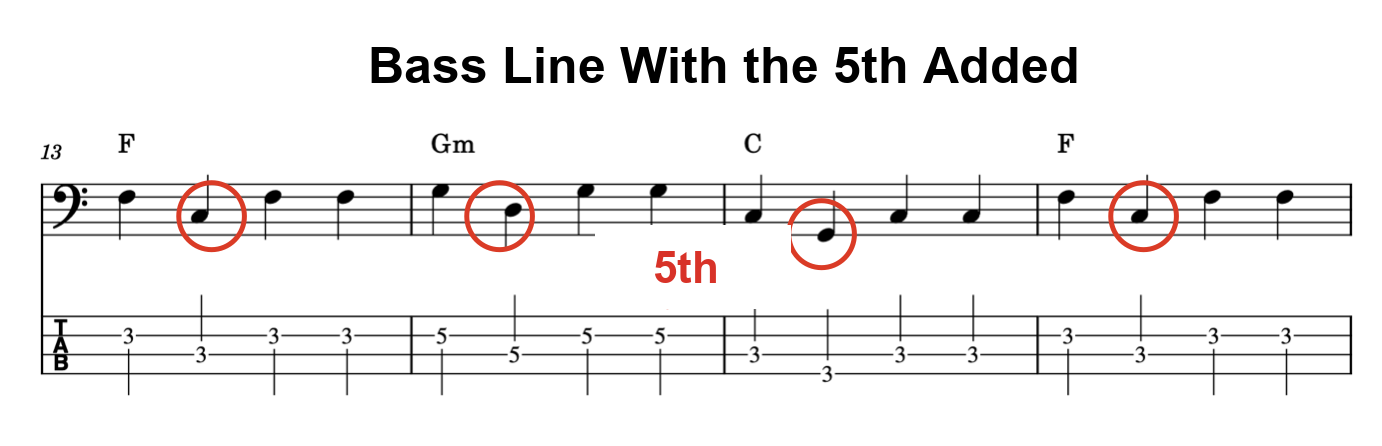
Even with a different chord progression, doesn’t the bass line feel like it has more “movement” once again? This time the 5th lands on beat 2 of each measure.

The 5th is a convenient note that works in pop, rock, and jazz alike. Whenever you want a bass line that “moves” without having to think too hard about theory, just mix the 5th in with the root and you’ll get a great result.

If you’ve ever played in a band doing original material, you’ve probably done this instinctively without even realizing it. I know I did, before I ever learned the theory behind it.

And the 5th has another advantage: it’s easy to remember by its position on the fretboard.


Where the 5th Sits Relative to the Root

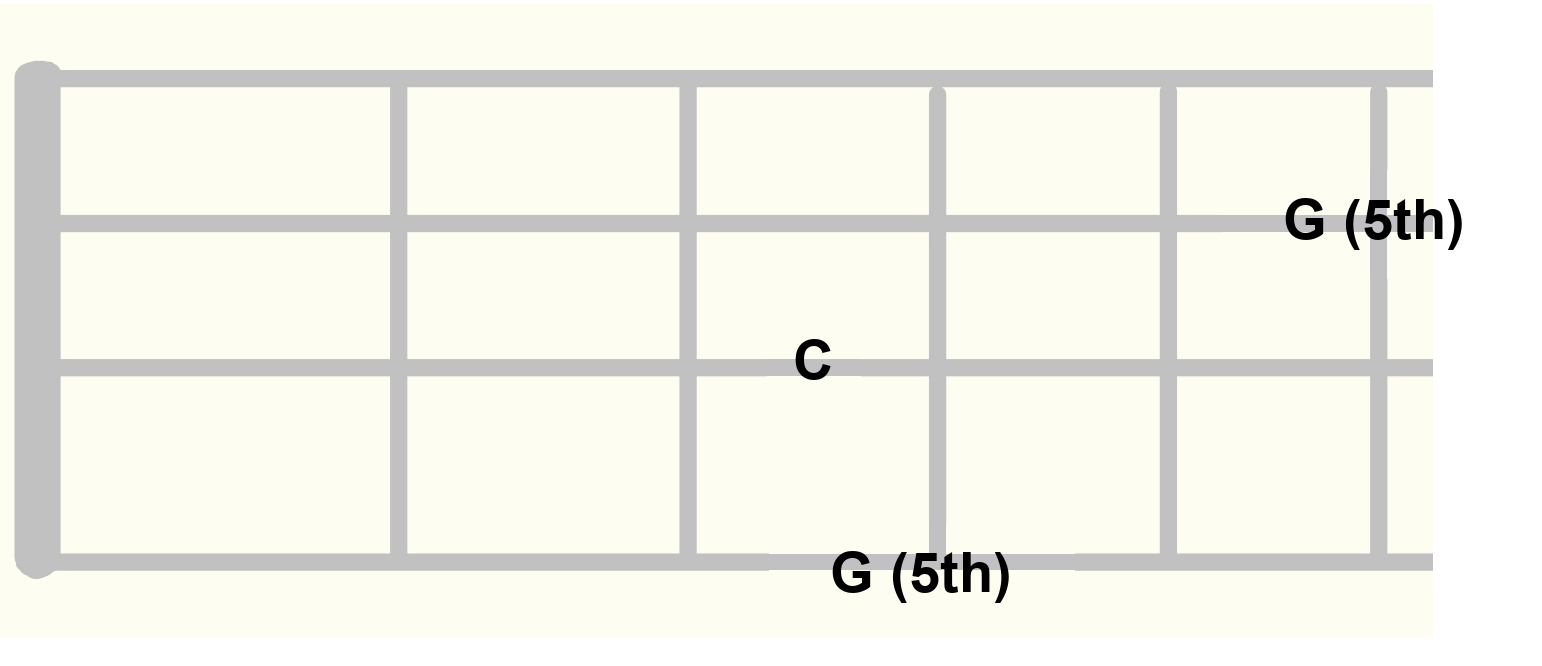
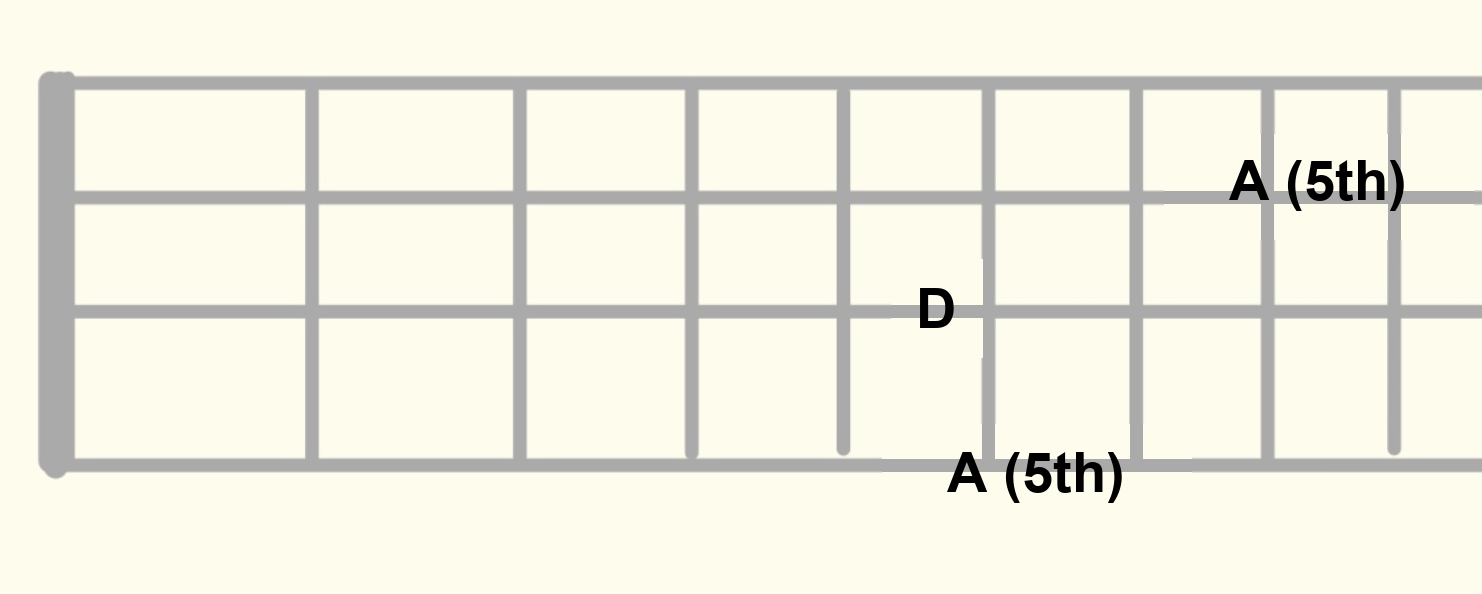
Here’s where the 5th sits relative to the root on the fretboard.
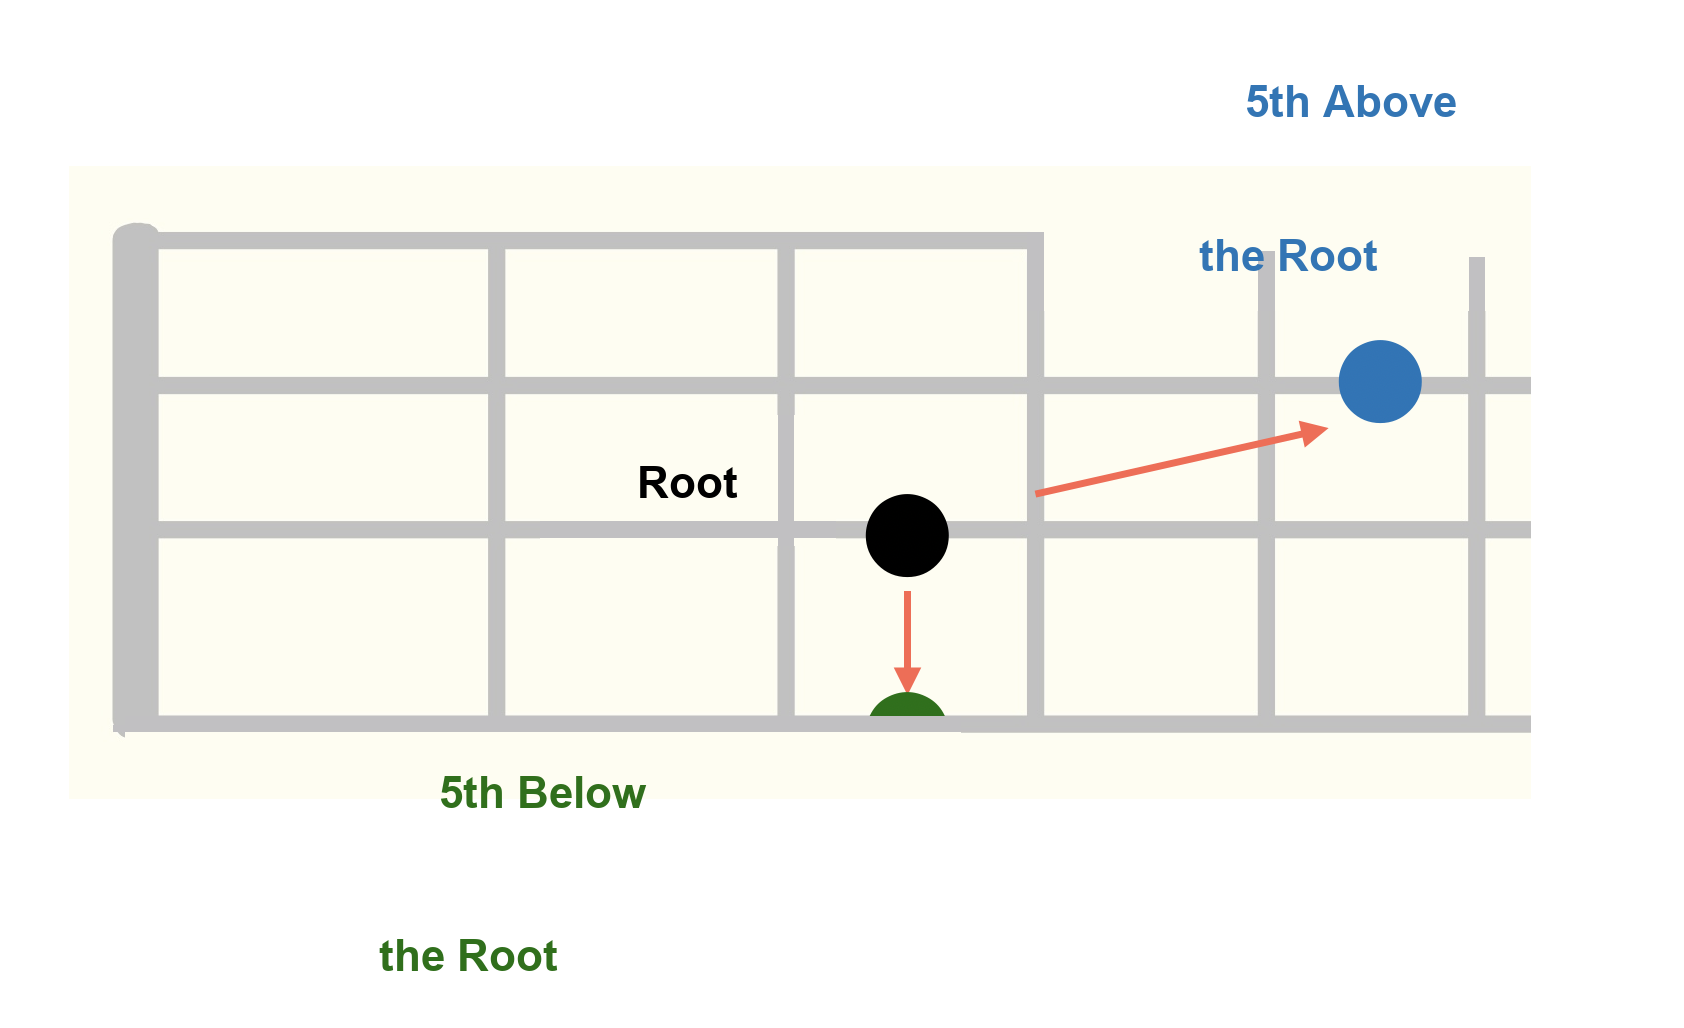
For a C note (3rd string), the relationship looks like this:
For a D note (3rd string), the relationship looks like this:
And for an F note (2nd string), the relationship looks like this:
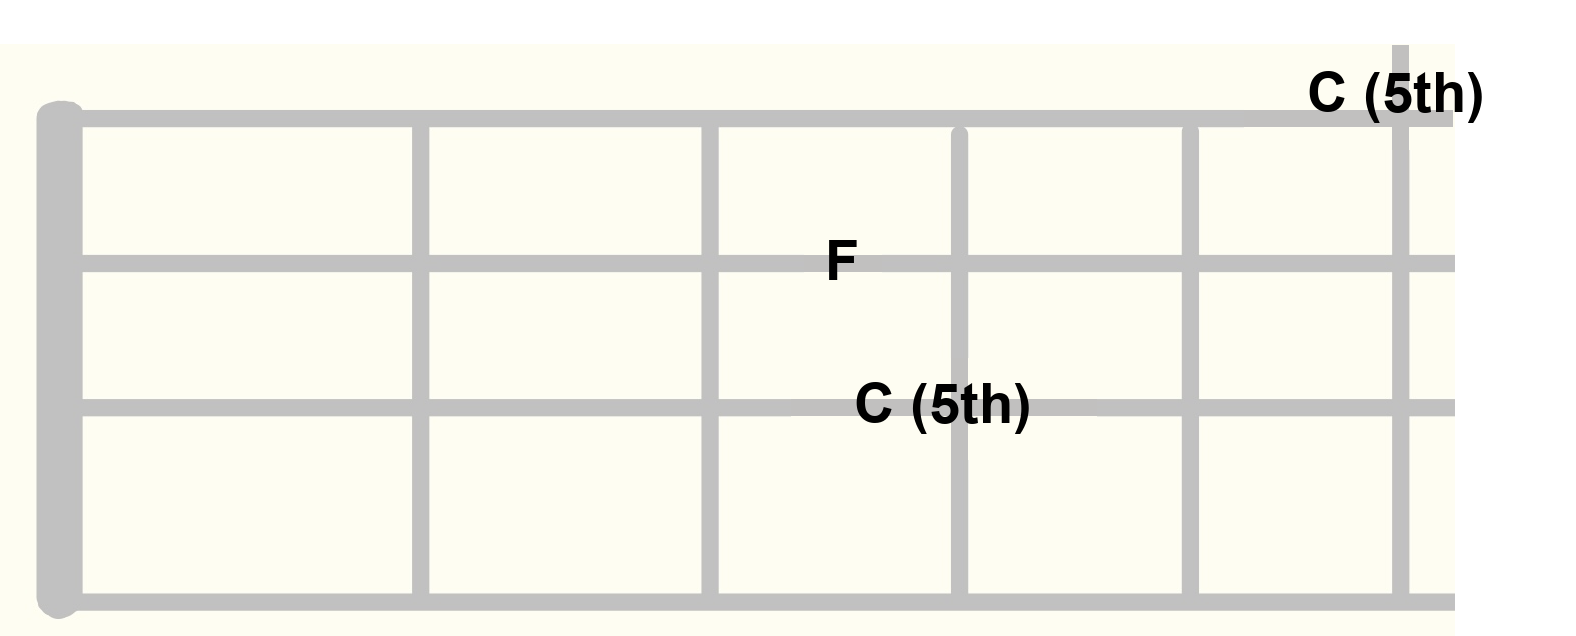
 

That’s the shape, no matter which root you start from.

This kind of visual, position-based recognition is one more reason the 5th is so easy to work with.


A Little Music Theory: Understanding the 5th

While we’re at it, let’s take a quick look at the music theory behind this.

Starting from C at the 3rd fret of the 3rd string, let’s play C D E F G A B (do re mi fa sol la ti do).
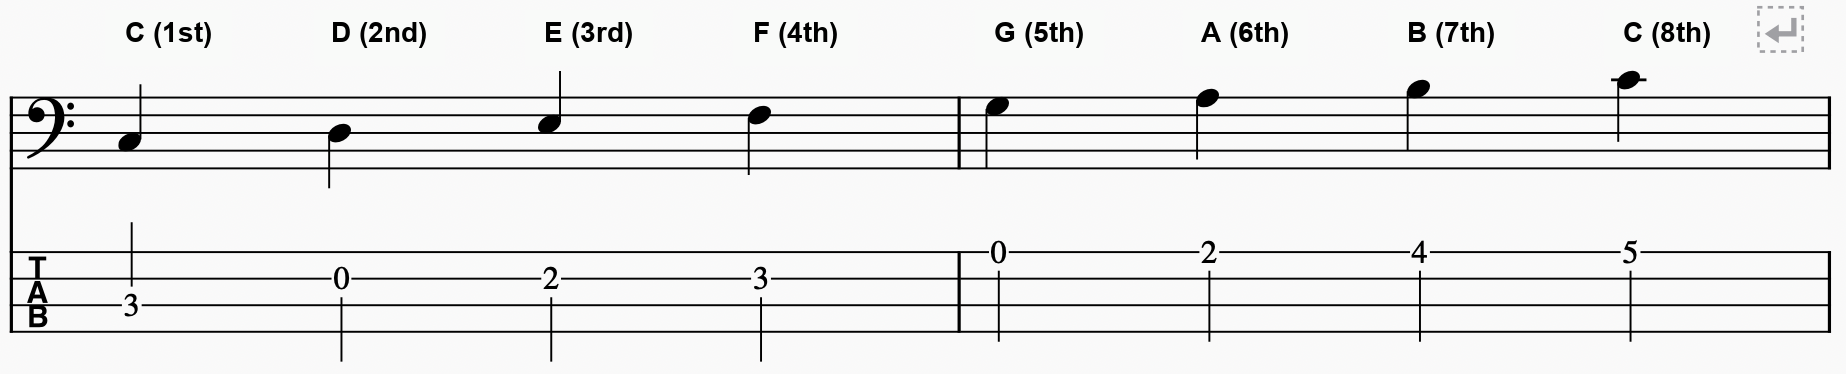
 

This is what’s known as the “C major scale.”

Here, we call the first note, C, the “1st.”

From there, relative to that 1st (the note C), the other notes are labeled like this:

D is the 2nd
E is the 3rd
F is the 4th
G is the 5th
A is the 6th
B is the 7th

This way of describing notes by number is called thinking in “scale degrees.”

When you start working on chords, note choices, composing, or more complex bass lines and solos, knowing scale degrees makes it much easier to understand what’s going on.

Want Personalized Feedback on Your Playing?

This is exactly the kind of thing that’s hard to fix alone — and where having a teacher makes all the difference.

At Line on Bass, I offer an online lesson service where you send me a video of your playing, and I give you specific, detailed feedback — every single day if you want.

Students from around the world are using this to fix exactly these kinds of issues and steadily improve their jazz bass skills.
Check Out the Lesson Service →

Posted on Leave a comment

A 10-Minute Daily Metronome Exercise for Bass: The Simple but Surprisingly Tricky Chromatic Scale

This article is written by Toru Hoshino, a bassist and instructor based in Tokyo.

This is an explainer for people who are just getting started on bass.

It’s a basic exercise that helps stabilize your rhythm — chromatic scale practice.

It varies from person to person, but

if you keep doing this chromatic scale exercise for 10 minutes a day, your rhythm will stabilize within 1 to 3 months.

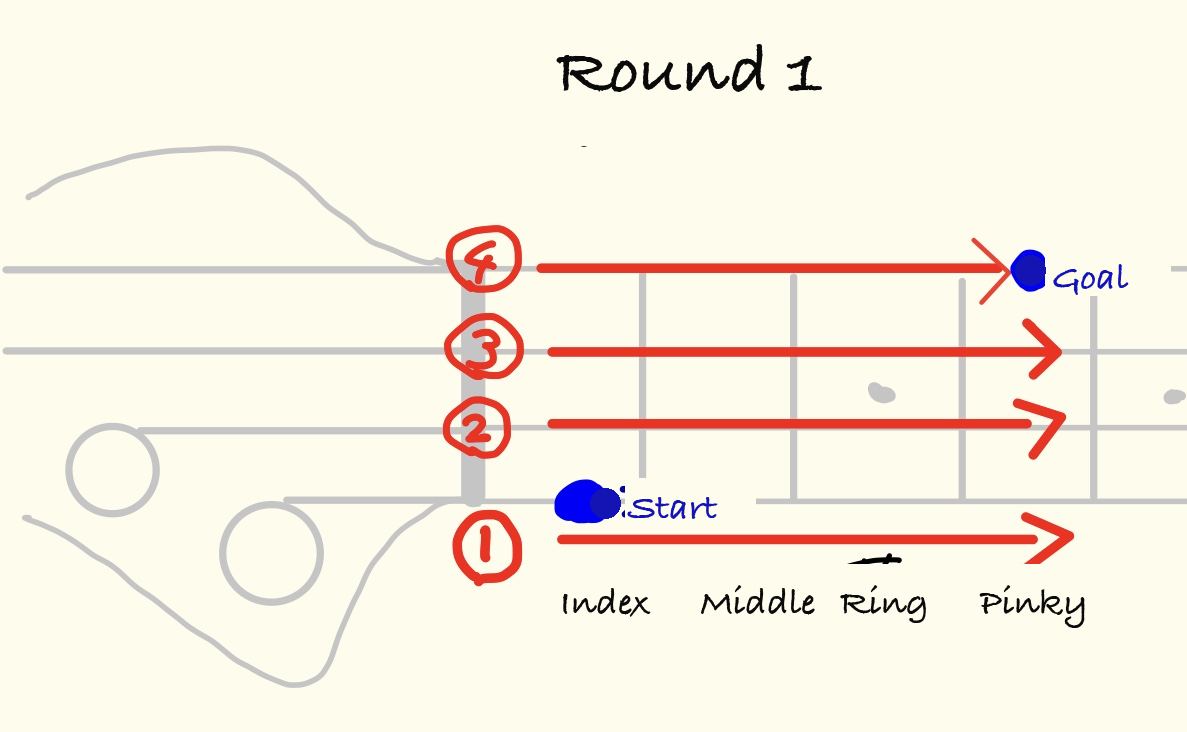
As shown in the example, it’s an exercise where you move one fret at a time, using all four fingers from your index to your pinky.

How to Practice the Chromatic Scale

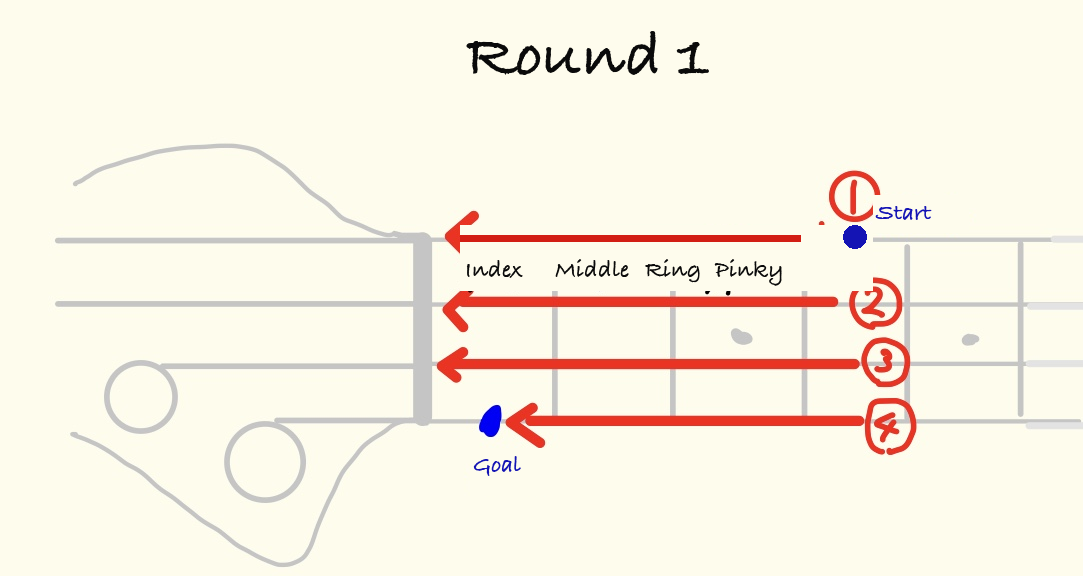
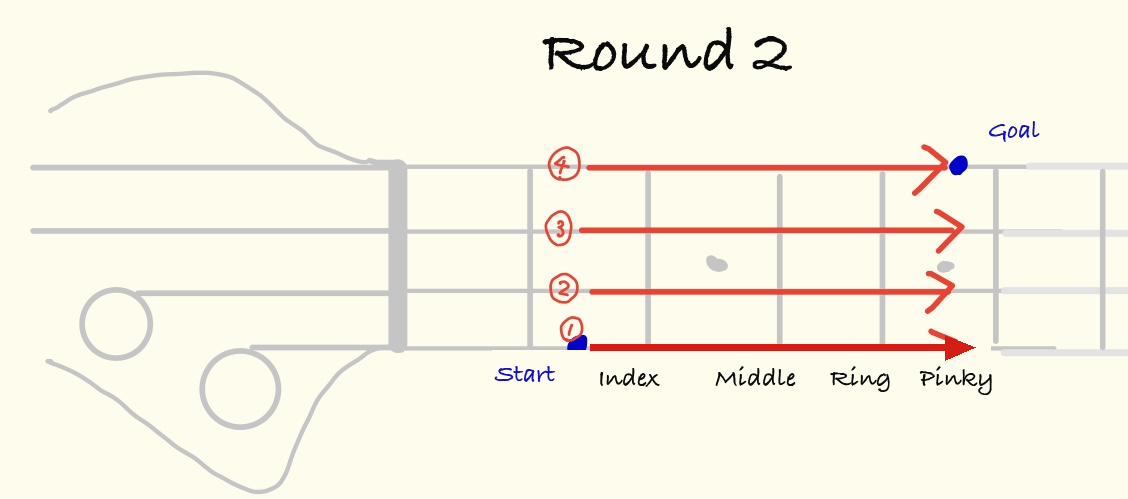
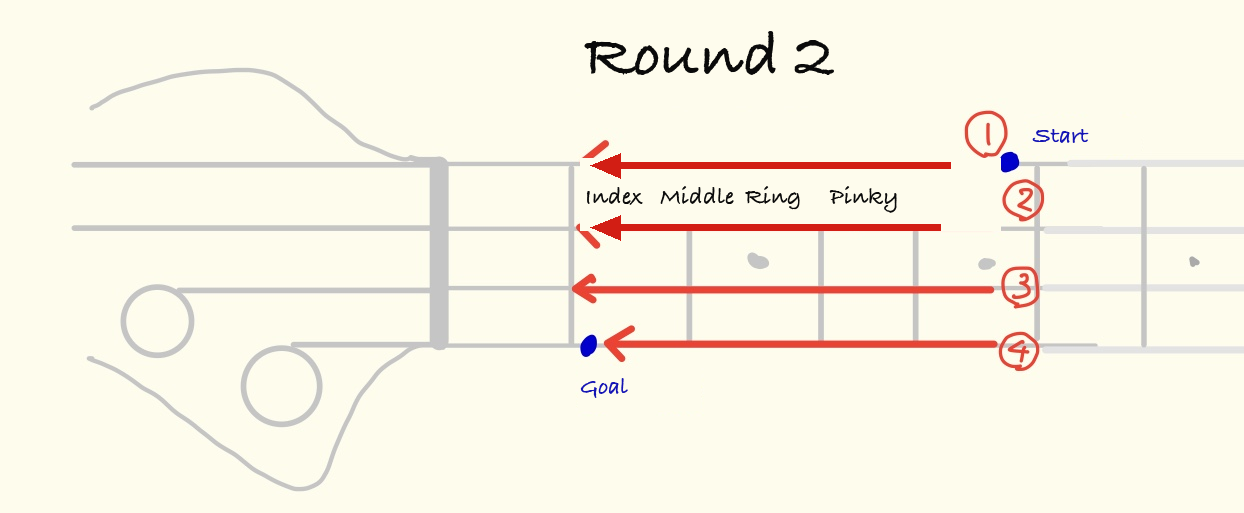
Here’s the breakdown, explained with text and diagrams.

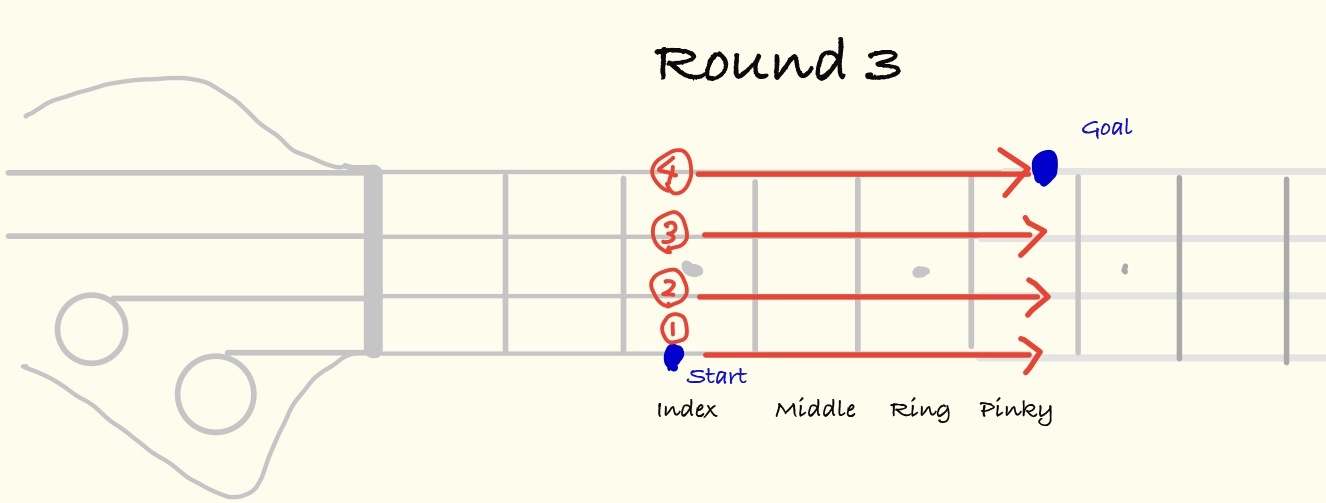
First, place your index finger on the 1st fret of the 1st string.

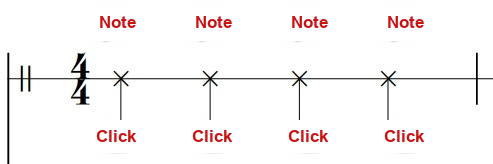
Set your metronome to 60 BPM, and move one note for every click.

Here’s how it goes — make sure you’re using all four fingers properly to fret each note.

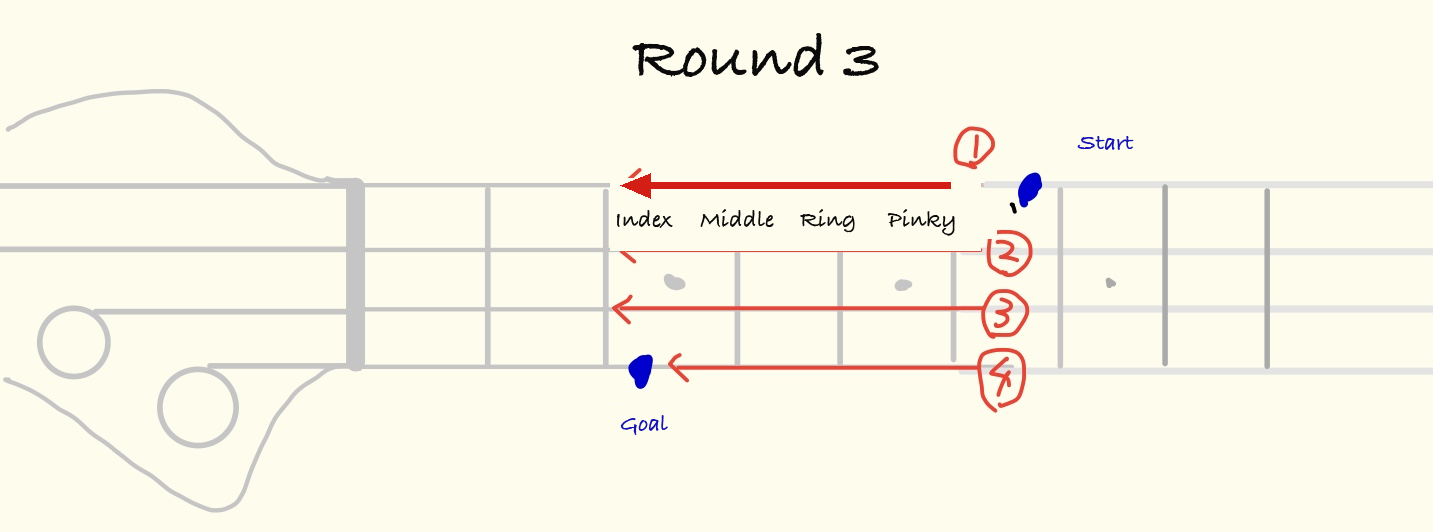
Then come back.

Once you’re back, move on to starting from the 2nd fret.

Then come back.

Next, go from the 3rd fret and come back. That’s one full set.

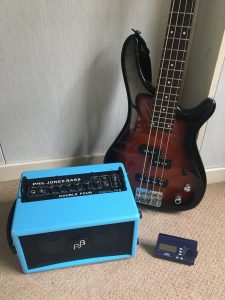
What You’ll Need

· A metronome
· A bass
· An amp

You also want to be mindful of evening out your note attacks (smoothing out the volume differences caused by your fingers or pick), so practice plugged into an amp whenever you can.

If playing through an amp isn’t practical, a headphone amp simulator that lets you hear your tone through earphones is a handy option.

How to Practice at Home

Do this exercise at home for 10 minutes a day.

Go from the 1st fret and come back
Go from the 2nd fret and come back
Go from the 3rd fret and come back

This whole sequence takes under 2 minutes at a tempo of 60.

Ten minutes is plenty — that’s about 4 to 5 sets.

But during those 10 minutes, focus completely.

Turn off the music, turn off the TV, move to a different room from your family, and if you can, switch your phone off too.

And when the 10 minutes are up, stop — even if you didn’t get through everything. Don’t let it drag on. Cut it off right there.

Keep this up for one to three months, and your fundamentals will improve.

Why 10 Minutes Is Enough

If you actually time yourself doing this, you’ll see just how long 10 minutes really is.

Unlike playing along with a recording, metronome practice has no backing track to hide behind, so your weaknesses — in picking, form, sustain, and so on — become obvious.

And the more seriously you approach it, the more it tests your focus.

You might not even make it 3 minutes at first — but give the full 10 minutes a try anyway!

Things to Watch Out for With the Chromatic Scale

Note Length (Sustain)

Focus on making each note ring out evenly — boooom, boooom, boooom — with the same sustain each time.

If it comes out like booooooom, bo, boooom, that’s not even.

Note Strength (Picking)

Focus on keeping each note at the same volume — boooom, boooom, boooom.

If it comes out like boooom, BOOOOM, boom, boooom, that’s not even.

Don’t Drift From the Metronome

Focus on playing each note at a perfectly steady interval.

If Fretting With Your Pinky Feels Tough

If fretting with your pinky feels like a strain, try tucking your elbow in toward your body as you fret.

It’s something I cover in more detail in a separate guide on pinky-finger technique.

The Chromatic Scale Isn’t Exactly Fun, But…

Chromatic scale practice isn’t a song, so it’s not exactly fun. And despite how simple it looks, it’s surprisingly hard to play it cleanly.

With no backing track, it’s actually much harder than playing a normal tune.

So don’t get discouraged if you can’t nail it right away.

That said, it packs in all the essential fundamentals — picking, sustain, rhythm, fingering — into one compact exercise.

I still do this myself before every practice session, even now.

It’s a training method I’d genuinely recommend for stabilizing your rhythm. Give it a try.

Want Personalized Feedback on Your Playing?

This is exactly the kind of thing that’s hard to fix alone — and where having a teacher makes all the difference.

At Line on Bass, I offer an online lesson service where you send me a video of your playing, and I give you specific, detailed feedback — every single day if you want.

Students from around the world are using this to fix exactly these kinds of issues and steadily improve their jazz bass skills.
Check Out the Lesson Service →

Posted on Leave a comment

How to Use the “3rd” to Escape Root-Only Basslines (Beginner Chord Theory)

This article explains how to use the “3rd” on bass.

Playing the root note will always get a bassline to work, but holding down the root for an entire song gets boring fast.

Just a small tweak to the notes you choose can make a bassline much more expressive.

This time, we’re focusing on the “3rd.”

I’ll walk through how major and minor 3rds work and how to use them, both here and in the video below.

· Anyone wondering what a “3rd” (or “degree”) even means

· Anyone wanting to study music theory

· Anyone wanting to rethink how they build basslines

First, a Quick Bit of Chord Theory

Chords break down broadly into two types:

minor chords

and

major chords.

In general, a chord is built from the 1st, 3rd, and 5th of a scale (for a basic triad).

If a chord is written as “C,” it’s built from “C E G.”

If a chord is written as “G,” it’s built from “G B D.”

If a chord is written as “Cm,” it’s built from “C E♭ G.”

If a chord is written as “Gm,” it’s built from “G B♭ D.”

The Key to Telling Major and Minor Apart

The 3rd is what tells major and minor apart.

The two clips below are both a “C” chord — the only difference is whether the 3rd is “E” or “E♭.” Give them a listen.

This one is “C-E-G” (the major sound):

This one is “C-E♭-G” (the minor sound):

Don’t they give a really different impression?

Generally, minor sounds darker, and major sounds brighter.

That’s enough theory for now — let’s put this to use in practice.

Comparing to Root-Only: A 3rd-Based Bassline Approach

Let’s work through the chord progression C → Am → Dm → G7 as an example.

First, the root-only approach:

Next, here’s an approach using the 3rd. Out of the four quarter notes in each measure, I swapped just one note for the 3rd.

Doesn’t the bassline feel like it has more dimension now?

Use the 3rd Just Above the Root

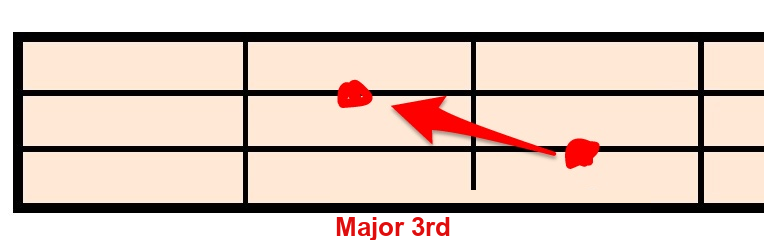
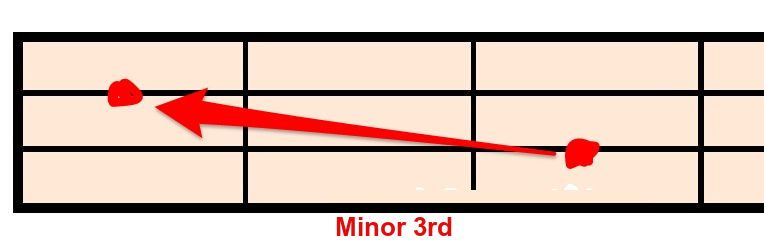
The “3rd just above” refers to a 3rd that sits in the fretboard position shown below. Early on, using a 3rd in this position makes it much easier to actually hear that you’re “making it sound right.”

· Major 3rd

Major 3rd

· Minor 3rd

Minor 3rd

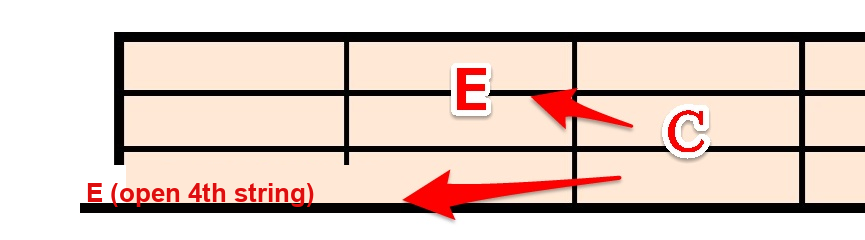
For example, take the note C: technically, both the 3rd fret on the 2nd string and the open 4th string count as a “3rd.” But that lower 3rd tends to get buried in the bass’s tone.

E (open 4th string)

Compare the two below.

· Bassline using the lower 3rd

↑ I wrote this one on a 5-string bass because of the fret positions involved. You can hear the accent, but the light/dark contrast you get from root-to-upper-3rd is harder to feel here. (There’s nothing wrong with this — it’s totally fine if it’s intentional.)

· Bassline using the upper 3rd

↑ This one has a clear outline and a more distinctly upbeat feel.

Using the 3rd in a Bassline

Once you get comfortable using the 3rd, it’ll help your bass improvisation too.

Want Personalized Feedback on Your Playing?

This is exactly the kind of thing that’s hard to fix alone — and where having a teacher makes all the difference.

At Line on Bass, I offer an online lesson service where you send me a video of your playing, and I give you specific, detailed feedback — every single day if you want.

Students from around the world are using this to fix exactly these kinds of issues and steadily improve their jazz bass skills.
Check Out the Lesson Service →

Posted on Leave a comment

What Is the “Root” Note on Bass?

“What even is the ‘root’ on bass?”

This article (and accompanying video) is for anyone asking that question.

The root note comes up no matter what you’re playing — pop, rock, jazz, you name it — so make sure you get comfortable with it.

What Is the Root?

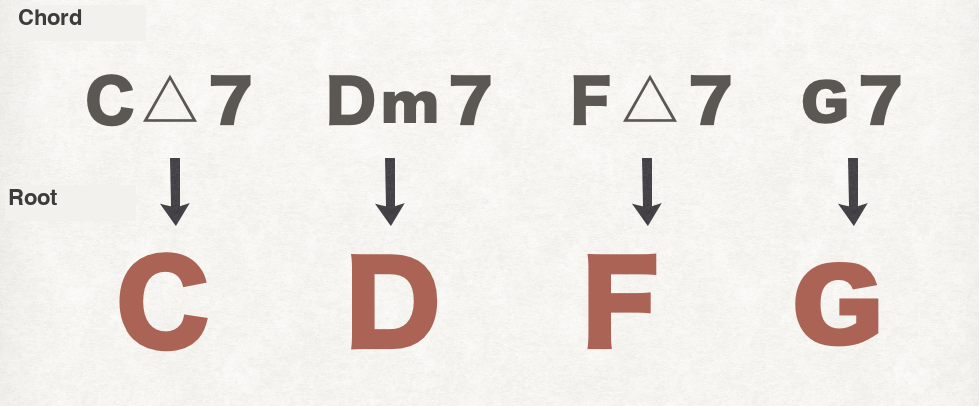
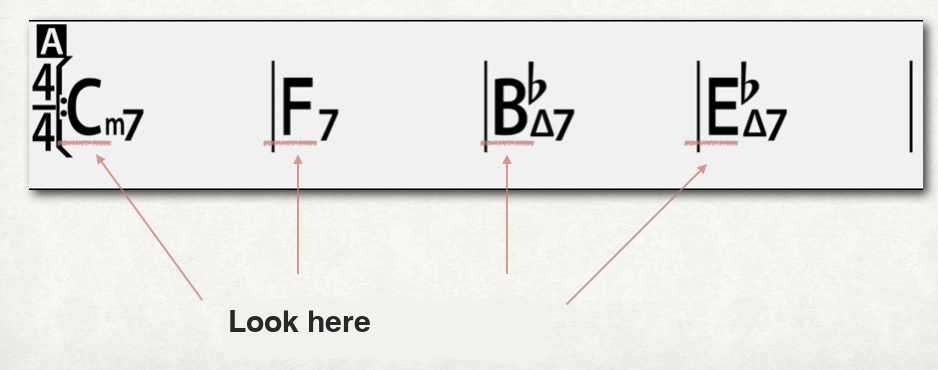
Take the sheet music above, for example:

The root note of measure 1 is “C”

The root note of measure 2 is “D”

The root note of measure 3 is “F”

The root note of measure 4 is “G”

At the top of each measure, you’ll see a “chord” symbol written.

A chord is what’s called a “harmony” — a symbol that represents several stacked notes. The symbols underlined in red below — Cmaj7, Dm7, Fmaj7, G7, and so on — are chords.

Chords have all kinds of symbols attached on the right — maj7, 7, m7, and so on.

If you strip all of those away, you’re left with just C, D, F, and G.

Chord to root note

That’s the root note.

When you see Cmaj7 written, think of it as

C maj7 — in other words, “C” is the root note.

When you see G7 written, think of it as

G 7 — in other words, “G” is the root note.

Going Deeper: More on Bass Roots

Let’s say you’ve got a chord progression like this, and you want to play just the root notes.

The backing track here is just a piano playing these chords.

On bass, each fret position corresponds to a fixed note, like this:

Now back to the chords. With a progression like this, look at the chord symbols on the left.

Chord progression with root focus

Now back to the fretboard. Find the root notes — you’ll find them right where the arrows point.

Those are the root notes. Let’s try playing each one four times.

Playing the root note is what makes a bassline feel like it “fits” with the harmony.

If that’s hard to hear, try listening to what happens when I deliberately avoid the root. It feels off, right?

Just Changing the Root Changes Everything!

Let’s run an experiment to show how much the root note alone can change the feel of a piece.

I played the same Do-Re-Mi-Fa-Sol-La-Ti-Do melody on piano, and created two versions that differ only in the root note.

· Pattern 1

· Pattern 2

Notice how different they feel?

Pattern 1 sounds bright and catchy.

Pattern 2 sounds dark and a bit sad.

But all I changed was the bassline:

Pattern 1’s bassline is just “C-C-C-C” (the root held on C).

Pattern 2’s bassline is just “A-A-A-A” (the root held on A).

That’s how much the bass root note can shape the mood of a piece of music.

That said, when you’re just starting out, don’t overthink it — it’s fine to simply go with:

When you see Cmaj7 written, think of it as

C maj7 — “C.”

When you see G7 written, think of it as

G 7 — “G.”

That’s a perfectly good starting interpretation.

Want Personalized Feedback on Your Playing?

This is exactly the kind of thing that’s hard to fix alone — and where having a teacher makes all the difference.

At Line on Bass, I offer an online lesson service where you send me a video of your playing, and I give you specific, detailed feedback — every single day if you want.

Students from around the world are using this to fix exactly these kinds of issues and steadily improve their jazz bass skills.
Check Out the Lesson Service →

Posted on Leave a comment

How to Read Bass TAB

This article is by Toru Hoshino, founder of the online bass school Line on Bass (@jazzbassisttoru). It explains how to read bass TAB notation.

How to Read Bass TAB

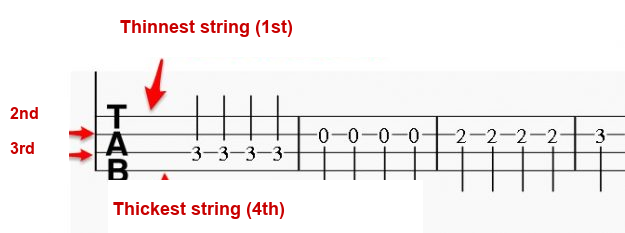
For 4-string bass, TAB notation has four horizontal lines, like this:


The top line represents the thinnest string (the 1st string).

The bottom line represents the thickest string (the 4th string).

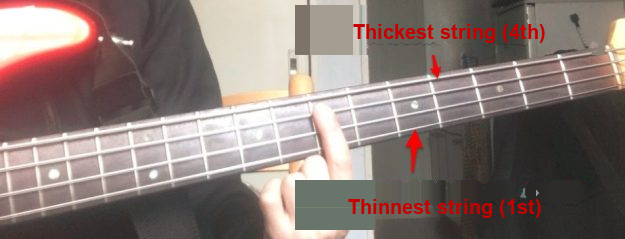
Here’s what that looks like on the actual instrument:

If you see a “1” written on the bottom line, that means play here (4th string, 1st fret):

If you see a “2” written on the top line, that means play here (1st string, 2nd fret):

If you see a “3” written on the third line from the top, play this note (3rd string, 7th fret):


Putting It Into Practice

Example 1

If you see TAB like this, play the notes in this order:

Example 2

This TAB…

…is played like this. (Note: “6” means open string.)


It’s certainly better to be able to read standard notation, but reading notes and instantly translating them into finger positions is hard at first, and takes practice.

I’ve been playing since high school myself, and in the beginning I couldn’t read standard notation, so I relied on TAB.

Reading TAB is far easier than reading standard notation.

If you’re just starting out on bass, I think it’s perfectly fine to start by learning to read TAB. 🙂

Here’s an F blues — a progression that comes up a lot in jazz — played with TAB notation included. Feel free to use it as a reference.


Want Personalized Feedback on Your Playing?

This is exactly the kind of thing that’s hard to fix alone — and where having a teacher makes all the difference.

At Line on Bass, I offer an online lesson service where you send me a video of your playing, and I give you specific, detailed feedback — every single day if you want.

Students from around the world are using this to fix exactly these kinds of issues and steadily improve their jazz bass skills.
Check Out the Lesson Service →

Posted on Leave a comment

What Does the Ideal Left-Hand Shape Look Like on Bass?

This article is written by Toru Hoshino, a jazz bassist and instructor based in Japan who teaches online lessons to students worldwide. In this article, he talks about what the ideal left-hand shape looks like on bass.

Keep Your Left Hand Curled

A curled shape like this is the ideal form for your left hand.

Keep your hand resting in that curled position at all times.

For example, say your ring finger is currently fretting the 5th fret, and your next note requires your index finger to play the 3rd fret.

If your hand is already curled, your index finger is sitting right there, ready to land on the 3rd fret instantly.

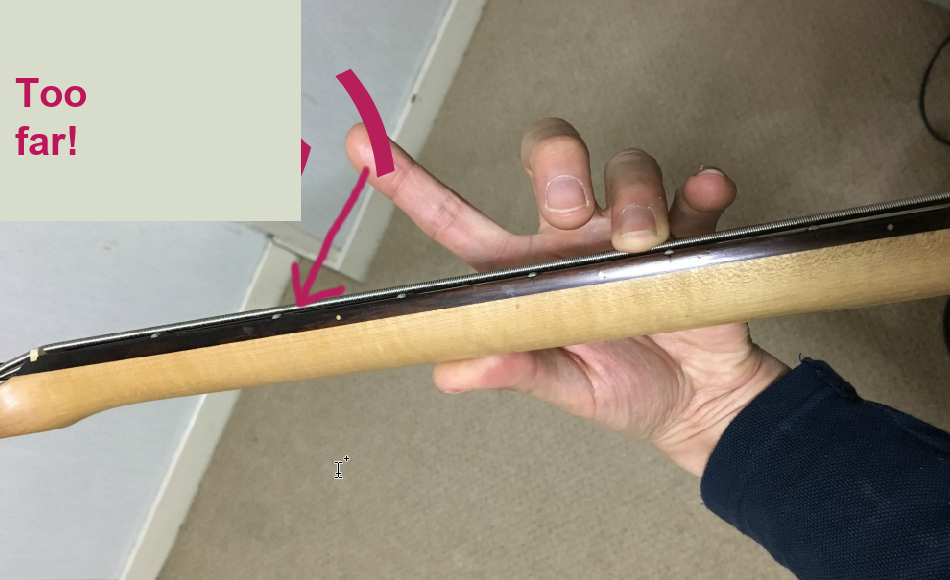
A Bad Example

↑ This is a bad example.

The index finger is way too far off the fretboard, right?

When your hand sits like this, it takes noticeably longer to actually fret the note.

If your fingers stay right at the edge of the strings, every single fretting motion becomes much easier.

Make a conscious habit of keeping that “left-hand curl” in mind.

Curled vs. Uncurled

Here’s a roughly 18-second comparison: with the left hand kept curled, fretting a simple major scale takes noticeably less movement and feels far more efficient than the uncurled version — which one looks easier to play is obvious at a glance.

That said, it’s genuinely difficult for a beginner to build a curled-hand habit right from the start.

Staying Curled All the Time Is Hard

I’ve made it sound simple, but keeping your fingers curled at all times is genuinely difficult.

So here’s a practice you can build into your daily routine, focused on developing that curl gradually: hold a relaxed, curled hand shape over the fretboard and walk it slowly up and down each string, fret by fret, keeping every finger hovering just above the strings instead of letting it drift away after each note.

If you work on this daily while staying mindful of the curl, your left hand stops flailing around within about a month.

It also works great as a warm-up before practice, so give it a try.

I hope this gives you something useful for your daily practice.

Once your left hand starts holding that curled shape naturally, getting a second pair of eyes on your actual playing is the next step toward locking it in for good.

Want Personalized Feedback on Your Playing?

This is exactly the kind of thing that’s hard to fix alone — and where having a teacher makes all the difference.

At Line on Bass, I offer an online lesson service where you send me a video of your playing, and I give you specific, detailed feedback — every single day if you want.

Students from around the world are using this to fix exactly these kinds of issues and steadily improve their jazz bass skills.
Check Out the Lesson Service →

Posted on Leave a comment

A Quick Refresher on Music Notation Symbols and Chord Notation

This article is written by Toru Hoshino, a jazz bassist and instructor based in Japan who teaches online lessons to students worldwide. In this article, he shares a quick refresher on the notation symbols and chord notation you’ve probably been reading on autopilot without ever stopping to look up what they actually mean.

You’re playing through tunes just fine, but could you actually explain what every symbol and notation marking in front of you is doing? Let’s take a moment to get the common ones straight.

Sharp, Flat, Natural

Sharp

#

Raises the note a half step.

Flat

Lowers the note a half step.

Natural

Cancels out a sharp or flat that was applied earlier in the same measure, restoring the note to its original pitch.

Final Barline, Double Barline, and Repeat Marks

Final Barline

This marks the end of one full chorus of the tune. A “chorus” here means one full pass through the tune’s form — verse, B section, and hook all together, like one complete “lap.”

Double Barline

This is used to mark a transition — the end of the verse section, the end of the B section, and so on.

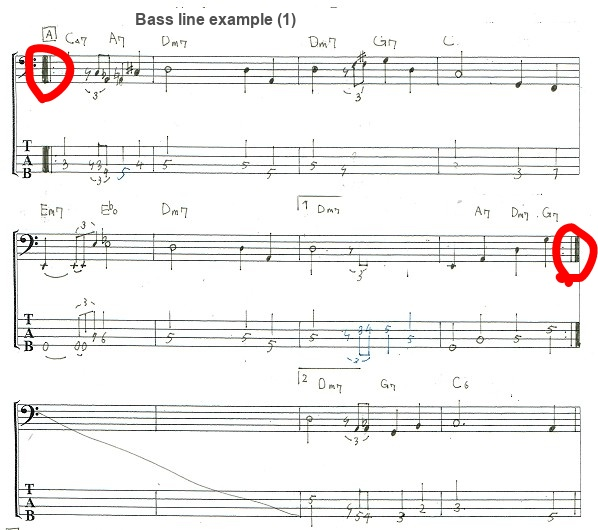
Repeat Marks

When you hit this mark,

you jump back to wherever this matching mark is.

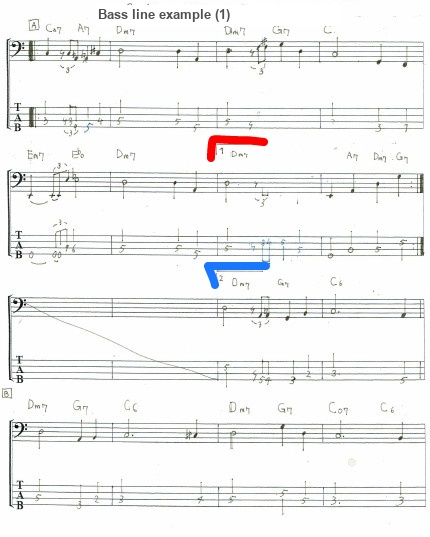
First Ending and Second Ending Brackets

Here’s how to read first-ending and second-ending brackets like the ones below.

Being able to read first- and second-ending brackets is essential if you want to avoid getting lost in a tune.

Major, Minor, Diminished, and the Rest

I’ll skip over the theory behind what each of these actually does and just cover how to read them.

Major Seventh

△7

Read as a triangle plus “7” — “major seventh.”

C△7 ← “C major seven”
B♭△7 ← “B-flat major seven”

Some published charts write C△7 as CM7 instead, with a capital M. Same chord, different notation.

Seventh

7

Sometimes you’ll just see a plain “7” with no triangle at all. That’s a dominant seventh.

C7 ← “C seven”
B♭7 ← “B-flat seven”

Minor

m7

Cm7 ← “C minor seven”
B♭m7 ← “B-flat minor seven”

You’ll also sometimes see m7 written as “-7” instead (C-7, B♭-7, etc.) — same chord, just different notation.

Diminished

dim

Cdim (“C diminished”)
B♭dim (“B-flat diminished”)

Diminished is sometimes written as a small circle instead (C°, B♭°, etc.) — same chord either way.

Minor Seventh Flat Five (Half-Diminished)

m7(♭5), -7♭5

Read as “minor seven flat five,” also called “half-diminished.”

Cm7(♭5) (“C minor seven flat five” / “C half-diminished”)
B♭m7(♭5) (“B-flat minor seven flat five” / “B-flat half-diminished”)

Since the full name is a mouthful, players often just shorten it to “C half-dim,” “B-flat half-dim,” and so on. You’ll also sometimes see it written with a Ø symbol (CØ, BØ, etc.) — same chord.

Slash Chords

A7/F, C7/E, etc.

Sometimes you’ll see two chords written together separated by a slash, like A7/F or C7/E. This is called a “slash chord” — the chord to the left of the slash is the chord itself, and the note to the right is the bass note underneath it. It mostly comes up because of what’s happening in the piano or other harmony instruments.

In these cases, the safest bet for the bass is to play the root note on the right side of the slash (F for A7/F, E for C7/E) — that’ll keep things solid and in place.

There are plenty more symbols used in music notation beyond these, but knowing the ones above will already make reading through well-known jazz standards a lot smoother.

I hope this gives you something useful for your day-to-day practice — and once you’re reading these symbols comfortably, working on translating that into clean, confident playing is exactly the next step worth getting feedback on.

Want Personalized Feedback on Your Playing?

This is exactly the kind of thing that’s hard to fix alone — and where having a teacher makes all the difference.

At Line on Bass, I offer an online lesson service where you send me a video of your playing, and I give you specific, detailed feedback — every single day if you want.

Students from around the world are using this to fix exactly these kinds of issues and steadily improve their jazz bass skills.

Check Out the Lesson Service →

Posted on Leave a comment

Notation Symbols and Chord Notation Every Bassist Should Know

This article is written by Toru Hoshino, a jazz bassist and instructor based in Japan who teaches online lessons to students worldwide. In this article, he shares a refresher on the notation symbols and chord notation every bassist runs into on a chart.

You’ve probably been playing tunes just fine without thinking too hard about it — but could you actually explain what every symbol and marking on the chart means? Let’s go through the common ones and get them straight.

Sharp, Flat, and Natural

Sharp

#

Raises the note by a half step.

Flat

Lowers the note by a half step.

Natural

Cancels out a sharp or flat that was applied earlier within the same measure, bringing the note back to its original pitch.

Notation example showing a natural sign canceling a sharp

Final Bar Line, Double Bar Line, and Repeat Marks

Final Bar Line

Final bar line notation

Marks the end of one chorus of the tune. A “chorus” here means one full pass through the song’s form — the A section, B section, and the bridge/hook all grouped together as one complete cycle, similar to what you’d call a “verse” structure repeating once through.

Double Bar Line

Double bar line notation

Used to mark the end of a section — for example, “the A section ends here” or “the B section ends here.”

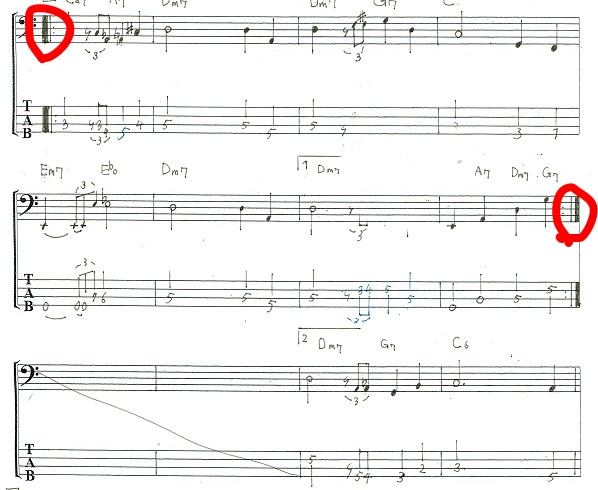
Repeat Marks

Repeat end mark

When you hit this mark…

Repeat start mark

…you jump back to wherever this matching mark appears earlier in the chart.

A full chart example showing repeat marks in context

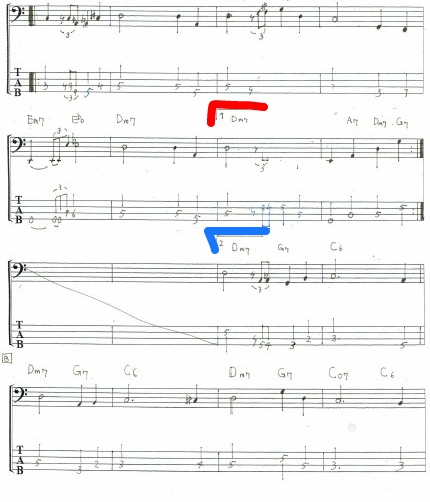
First Ending and Second Ending Brackets

Here’s how to read the “1st ending” and “2nd ending” brackets you’ll often see on a chart:

Example of first ending and second ending brackets in a chord chart

Being able to read 1st-ending and 2nd-ending brackets correctly is important if you want to avoid getting lost in the form while playing.

Major, Minor, Diminished, and More

I’ll skip over what each chord quality actually sounds like and just focus on notation here.

Major Seventh

△7

Read as “major seventh” — the triangle plus a 7.

C△7 is read “C major seven.”
B♭△7 is read “B-flat major seven.”

Some publishers write C△7 as CM7 instead, using a capital M. Same meaning, different notation.

Seventh (Dominant)

7

Sometimes you’ll just see a plain “7” with no triangle. That’s a dominant seventh chord.

C7 is read “C seven.”
B♭7 is read “B-flat seven.”

Minor

m7

Cm7 is read “C minor seven.”
B♭m7 is read “B-flat minor seven.”

You’ll sometimes see m7 written as “-7” instead (e.g., C-7, B♭-7). Same chord, different notation.

Diminished

dim

Cdim is read “C diminished.”
B♭dim is read “B-flat diminished.”

dim is sometimes written as a small circle instead (e.g., C°, B°). Same chord — just written in lowercase-style shorthand.

Half-Diminished (Minor Seventh Flat Five)

m7(♭5), or -7♭5

Read as “minor seven flat five,” also commonly called “half-diminished.”

Cm7(♭5) is read “C minor seven flat five” (or “C half-diminished”).
B♭m7(♭5) is read “B-flat minor seven flat five” (or “B-flat half-diminished”).

Since the full name is a mouthful, players often just shorten it to “C half” or “B-flat half.”

This is also sometimes written using the symbol Ø (e.g., CØ, BØ). Same chord either way.

Slash Chords

A7/F, C7/E, and so on.

Sometimes you’ll see two chords separated by a slash, like A7/F or C7/E. This is called a “slash chord” — the chord on the left of the slash is the chord itself, and the note on the right is the bass note underneath it. This mostly comes up in relation to chordal instruments like piano.

In these situations, the safest bet for a bassist is to play the root indicated after the slash (F for A7/F, E for C7/E) — that’ll keep things solid and in line with what everyone else is playing.

There are plenty more symbols used in music notation, but knowing the ones above will already make a big difference when you’re working through well-known jazz standards. Hopefully this gives you something useful for your daily practice.

Want Personalized Feedback on Your Playing?

Knowing what a symbol means on paper is one thing — actually reacting to it correctly in real time while you’re playing is a different skill, and one that’s much easier to build with someone watching and giving you feedback.

This is exactly the kind of thing that’s hard to fix alone — and where having a teacher makes all the difference.

At Line on Bass, I offer an online lesson service where you send me a video of your playing, and I give you specific, detailed feedback — every single day if you want.

Students from around the world are using this to fix exactly these kinds of issues and steadily improve their jazz bass skills.
Check Out the Lesson Service →

Posted on Leave a comment

How to Stop Your Left-Hand Thumb From Hurting on Bass

This article is written by Toru Hoshino, a jazz bassist and instructor based in Japan who teaches online lessons to students worldwide. In this article, he shares a simple way to stop your left-hand thumb from hurting when you practice.

If you’ve been teaching yourself bass and you’ve noticed “my left thumb has been hurting lately,” try the approach in this article.

Why Your Left-Hand Thumb Starts Hurting

Hand gripping the bass neck tightly

A common cause of thumb pain is practicing with a grip where you’re really pressing hard into the back of the neck with your thumb.

First off — if it already hurts, it’s fine to take a few days off from practicing. Don’t push through pain. That’s never worth it.

Once you’ve rested properly and you feel like the pain is starting to ease up, try this exercise: play with your thumb lifted off the neck entirely.

Practice Playing With Your Thumb Off the Neck

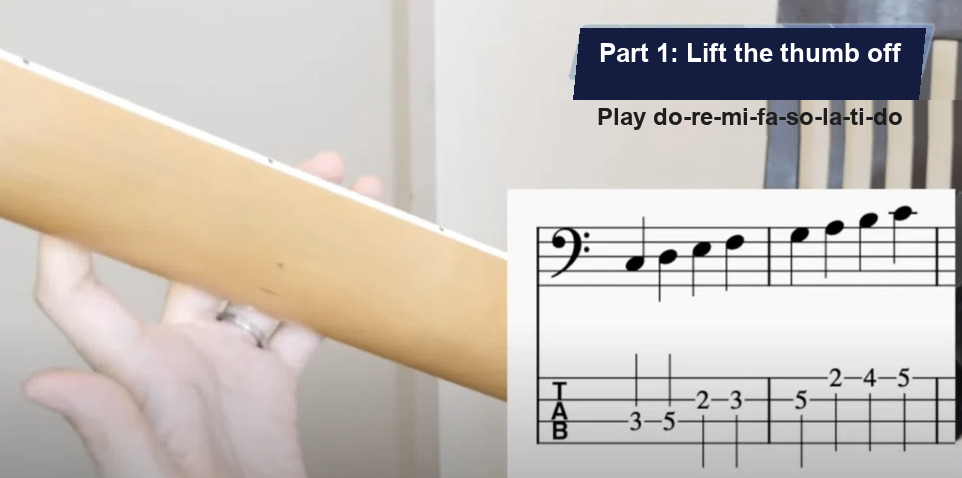
Playing a scale with the thumb lifted off the back of the neck

Try lifting your left thumb completely off the neck and playing do-re-mi-fa-so-la-ti-do.

It’ll feel really awkward at first. But you’ll find you can actually do it — barely!

After playing through do-re-mi-fa-so-la-ti-do a few times with your thumb lifted off, bring your thumb back — but this time, just rest it lightly against the back of the neck instead of pressing into it.

Once you do that, you’ll find you can play through the same do-re-mi-fa-so-la-ti-do smoothly and lightly, without needing to dig your thumb into the back of the neck at all.

The whole point of this exercise is to first feel that instability of playing with no thumb support, so that when you bring your thumb back in lightly, you really notice just how stable your hand can be with barely any thumb pressure at all.

This is a lot easier to follow by watching it than reading about it, so I made a video covering everything above.

Want Personalized Feedback on Your Playing?

Whether you’re actually gripping too hard without realizing it is something that’s genuinely difficult to judge on your own — it’s exactly the kind of habit a second pair of eyes catches instantly.

This is exactly the kind of thing that’s hard to fix alone — and where having a teacher makes all the difference.

At Line on Bass, I offer an online lesson service where you send me a video of your playing, and I give you specific, detailed feedback — every single day if you want.

Students from around the world are using this to fix exactly these kinds of issues and steadily improve their jazz bass skills.

Check Out the Lesson Service →

Posted on Leave a comment

What Are Relative Keys? A Clear Explanation With a Full Key Chart

This article is written by Toru Hoshino, a jazz bassist and instructor based in Japan who teaches online lessons to students worldwide. In this article, he gives a clear explanation of relative keys, with a full reference chart for every key.

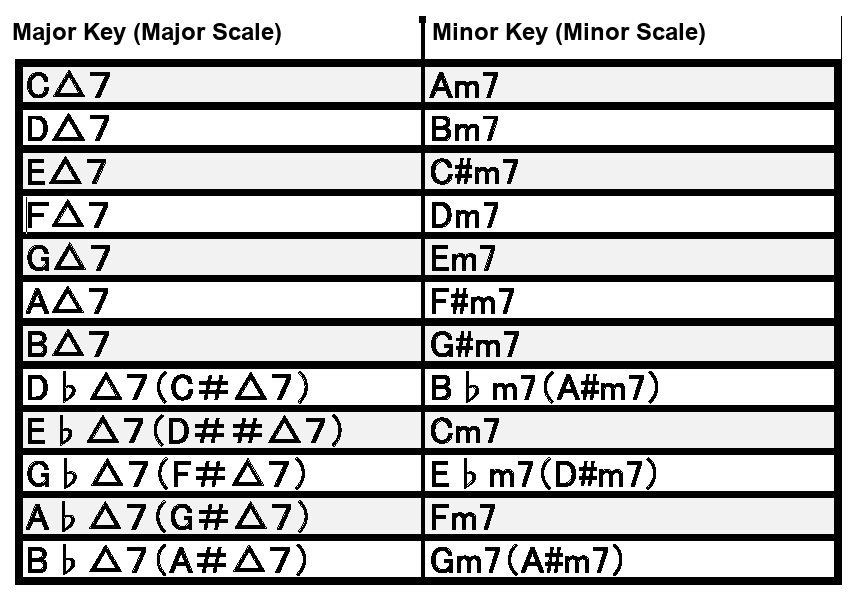
Here’s a quick-reference chart of relative keys:

Chart of relative major and minor keys

The chords linked by the bold black boxes on the left and right are relative to each other. Let’s break down exactly what that means.

Hearing It in Action: How Relative Keys Work

↑ That’s do-re-mi-fa-so-la-ti-do. This is the key of C major — the C major scale.

↑ That’s la-ti-do-re-mi-fa-so-la. This is the key of A minor — the A minor scale.

↑ That’s Bb-C-D-Eb-F-G-A-Bb. This is the key of B♭ major — the B♭ major scale.

↑ That’s G-A-Bb-C-D-Eb-F-G. This is the key of G minor — the G minor scale.

Chart of relative major and minor keys

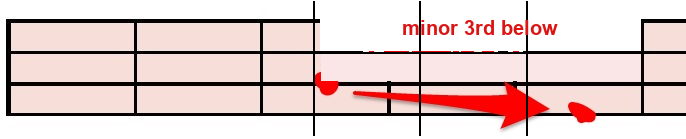
If you take the exact same notes used in a major scale on the left of the chart and start playing them from a minor third below, you get its relative key.

Minor third below:

Diagram showing a minor third interval on the fretboard

For C major, the scale is do-re-mi-fa-so-la-ti-do:

C major scale on the fretboard

For A minor, the scale is la-ti-do-re-mi-fa-so-la:

A minor scale on the fretboard

For a C△7 chord, if you take the same do-re-mi-fa-so-la-ti-do notes from the scale and instead start playing from the 5th fret on the 4th string, playing “la-ti-do-re-mi-fa-so-la,” that’s the relative key.

The notes being used are exactly the same — only the starting point and the chord’s “home base” change.

What Makes Relative Keys Distinctive (Major vs. Minor Scales)

Here’s a simple audio example — just the melody re-do-ti-la, re-do-ti-la, re-do-ti-la, re-do-ti-la — but I split the bass line into a C major version and an A minor version.

Major and minor give you a really different feel, even over the same melody.

· Major (C major scale)

· Minor (A minor scale)

This is the basic principle behind why major scales sound bright and minor scales sound dark. It’s a foundation used in an enormous number of songs out there.

Relative Keys and Walking Bass

In practice, nobody’s going to tell you “this tune is in a relative key relationship, so build your walking bass line this way.” You’re also not going to hear band mates or session players say things like “give me a bass line that sounds relative-key-ish” — in everyday musical communication, this concept almost never comes up directly in conversation.

That said, understanding how relative keys work is genuinely useful when you’re studying a chart, analyzing a tune, or writing your own music — it makes that whole process go a lot more smoothly.

Want Personalized Feedback on Your Playing?

Understanding the theory behind relative keys is one thing — actually hearing how that major/minor contrast comes through in your own bass lines is much easier to judge with outside ears.

This is exactly the kind of thing that’s hard to fix alone — and where having a teacher makes all the difference.

At Line on Bass, I offer an online lesson service where you send me a video of your playing, and I give you specific, detailed feedback — every single day if you want.

Students from around the world are using this to fix exactly these kinds of issues and steadily improve their jazz bass skills.

Check Out the Lesson Service →