Posted on Leave a comment

How to Make Notation Swing in MuseScore (Free Notation Software)

This article is written by Toru Hoshino, a jazz bassist and instructor based in Japan who teaches online lessons to students worldwide. In this article, he explains how to make your notation actually swing in MuseScore, the free notation software.

How to Create a Swing Rhythm in MuseScore

Let’s say you write out a phrase for jazz practice like this:

A straight eighth-note jazz phrase in notation

If it’s not swung, it ends up sounding a little flat and lifeless, like this:

Swing it, though, and it becomes a lot more usable:

How to Turn On Swing Mode

1. In MuseScore’s palette panel, find and click on “Swing.”

2. Drag the Swing marking onto the very first note of the passage you want to swing.

That’s it.

If you don’t like how the label looks once it’s placed, you can double-click the text and change it to whatever you’d like.

One thing to watch out for: if you delete the text completely, the passage will stop swinging altogether — so leave at least some label there, even if you customize the wording.

A Quick Lesson on Swing Rhythm

One of the things that makes a line actually sound like jazz is the swing rhythm. Listen to the difference between these two:

Version ② has a lot more bounce and forward motion to it, right? You can especially hear the difference in how the drummer’s ride cymbal swings.

Both versions are playing the exact same quarter notes shown below — the difference comes entirely from feel:

A simple quarter-note line used for the swing comparison

If you keep the classic “ding, ding-a-ding, ding-a-ding” cymbal pattern in your head while you play, it gets a lot easier to bring out that swing feel in your own lines.

MuseScore is a free, full-featured notation program, and it’s quite easy to pick up — well worth trying out if you write charts or practice material.

Want Personalized Feedback on Your Playing?

Notation can tell you where the swing marking goes, but actually nailing that bounce and forward motion in your own playing is something that’s much easier to dial in with outside ears listening.

This is exactly the kind of thing that’s hard to fix alone — and where having a teacher makes all the difference.

At Line on Bass, I offer an online lesson service where you send me a video of your playing, and I give you specific, detailed feedback — every single day if you want.

Students from around the world are using this to fix exactly these kinds of issues and steadily improve their jazz bass skills.

Check Out the Lesson Service →

Posted on Leave a comment

Walking Bass Lines When One Chord Lasts Two Bars (With 3 Real Examples)

This article is written by Toru Hoshino, a jazz bassist and instructor based in Japan who teaches online lessons to students worldwide. In this article, he answers a student’s question: how do you build a walking bass line when the same chord lasts for two bars in a row?

I got this question from a student:

“When the same chord continues for two bars, how should I play over it?”

So I put this article together to answer it.

In jazz standards, you’ll often run into chord progressions where the same chord lasts two bars or more. A lot of people aren’t sure how to approach that, so let’s dig in.

Building a Bass Line When the Same Chord Lasts Two Bars

Say you’ve got a progression like C–C–D–D.

As a general rule, you want the first note of each bar to be the root. But if you do that here…

Bass line hitting the root on every bar over C-C-D-D


…it ends up sounding like this. And honestly, this doesn’t really show off what makes a walking bass line work.

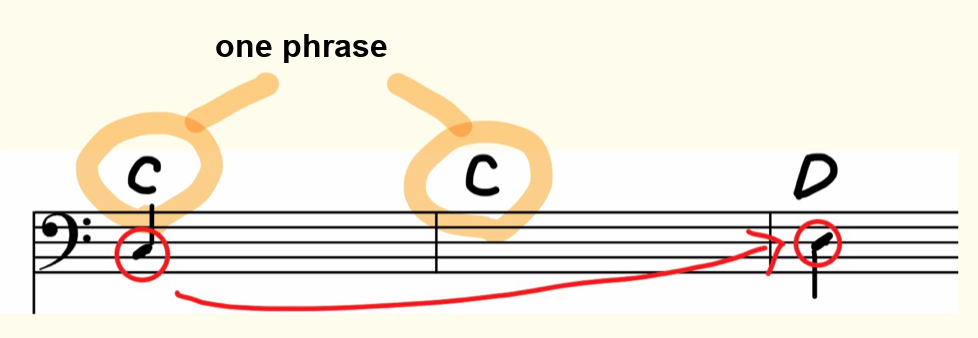
In a case like this, it helps to think of the first two bars as one unit, and aim for:

connecting the first note of bar 1 to the root of bar 3, using all 8 notes across those two bars as one continuous line.

Thinking of it that way makes it much easier to create a smooth, flowing line.

Diagram showing two bars grouped together as one continuous phrase from C to D

So at this point you might be thinking: “okay, what about something like this instead?”

Bass line running straight up the C major scale from C to D

And yeah, in theory that’s exactly the idea. That said, running straight up “do-re-mi-fa-so-la-ti-do” like that is a little too plain and predictable, so let’s add a bit more flavor to it.

With that in mind, let’s pull a few real examples from actual jazz standards and see how this plays out in practice.

Three Real Examples of Two-Bar Chord Walking Lines

Bars 3–5 of an F Blues

Chord chart for an F blues

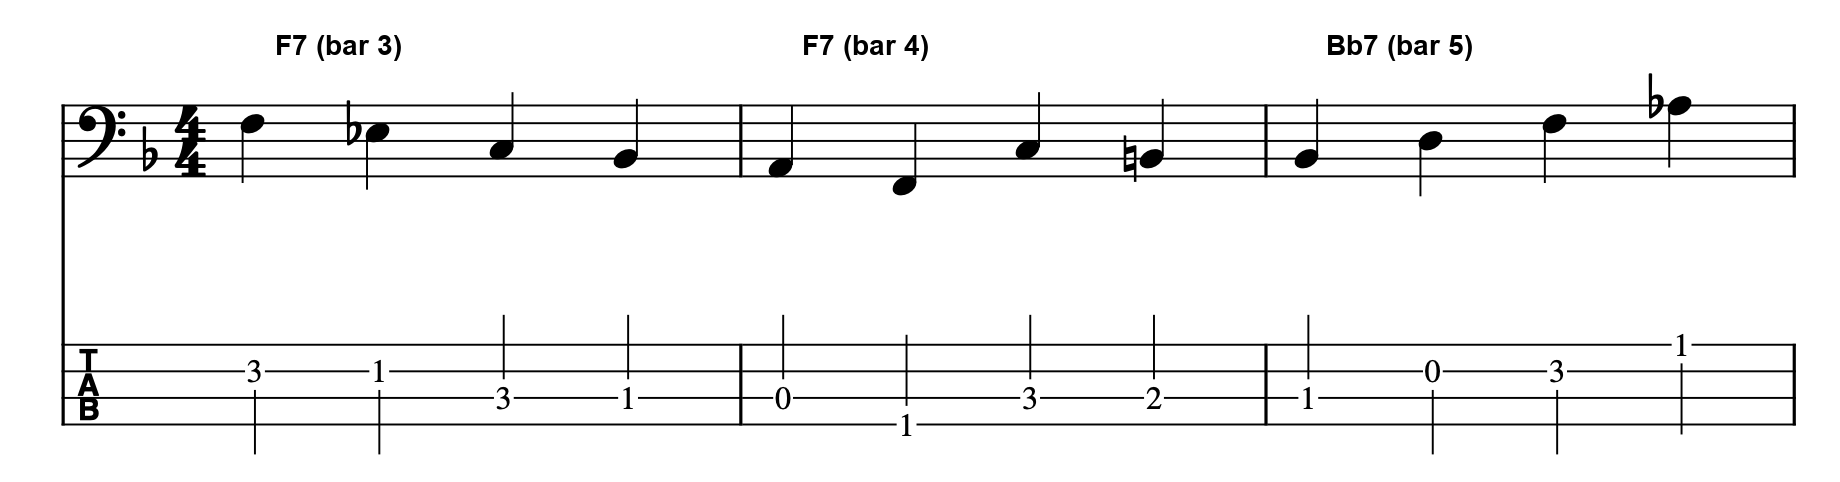
Bass line over F7 in bar 3 and bar 4 of an F blues

The Key Idea

F7 lasts through both bar 3 and bar 4 here. Rather than starting bar 4 on the root, F, I deliberately started it on the major 3rd, A.

The line is already descending from the F at the start of bar 3, and by not interrupting that descent, the motion carries smoothly straight through into bar 4.

The B Section of Autumn Leaves, Bars 3–5

Chord chart for Autumn Leaves with the B section highlighted

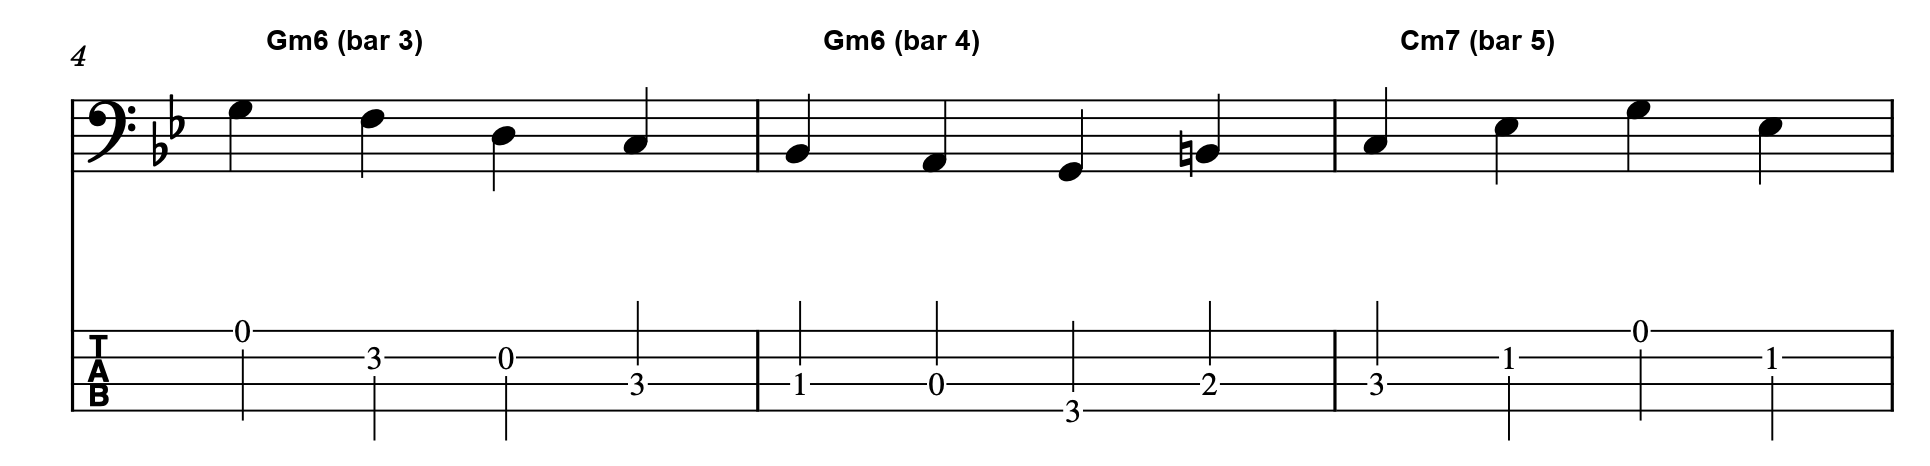
Bass line over Gm6 in bar 3 and bar 4, leading into Cm7 in bar 5

The Key Idea

Gm6 lasts through bar 3 and bar 4 of the B section here. Instead of starting bar 4 on the root, G, I started it on the minor 3rd, B♭.

The line is descending from the G on the first string in bar 3, and keeping that downward motion going lets it flow smoothly into bar 4 as well.

Bars 1–3 of All of Me

Chord chart for All of Me

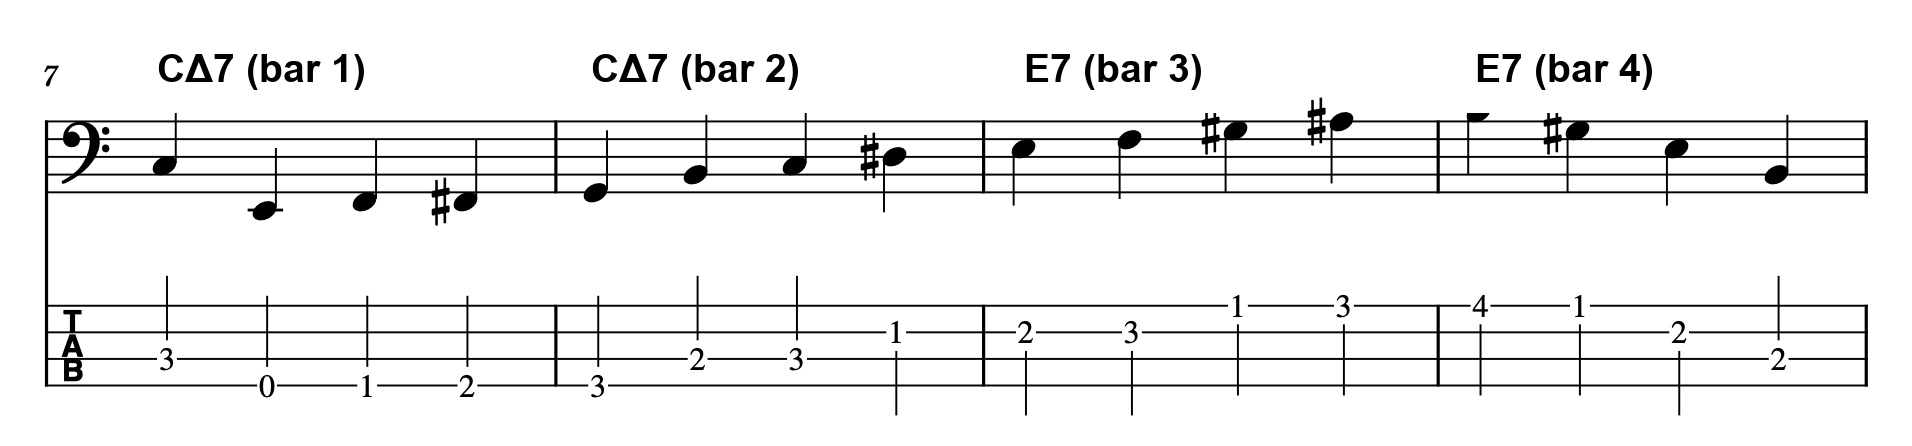
Bass line over C major 7 in bars 1 and 2, leading into E7 in bars 3 and 4

The Key Idea

Starting on C at the top of bar 1, I jump down to the open E string on the 4th string as the second note, then climb back up from there into the root, E, at the start of bar 3.

If you’ve ever been unsure how to build a bass line when the same chord sticks around for two bars or more, give this approach a try.

Want Personalized Feedback on Your Playing?

Figuring out which chord tone to land on at the start of a long static chord — and whether your line actually flows smoothly into it — is much easier to judge with a second pair of ears.

This is exactly the kind of thing that’s hard to fix alone — and where having a teacher makes all the difference.

At Line on Bass, I offer an online lesson service where you send me a video of your playing, and I give you specific, detailed feedback — every single day if you want.

Students from around the world are using this to fix exactly these kinds of issues and steadily improve their jazz bass skills.

Check Out the Lesson Service →

Posted on Leave a comment

Ghost Notes for Bass: A Beginner’s Guide to Adding Groove

This article is written by Toru Hoshino, a jazz bassist and instructor based in Japan who teaches online lessons to students worldwide. In this article, he introduces a beginner’s guide to ghost notes, with a video lesson included.

An Intro to Ghost Notes

I recently posted a video of myself playing a J-pop bass line with a vocalist, and that performance actually uses quite a few ghost notes.

A ghost note is a technique where you mute the string with your fretting hand instead of letting a note actually ring out.

On their own, ghost notes don’t sound very musical. But combine them with real, ringing notes, and they add a real sense of depth to your groove.

How to Fret a Ghost Note

There are a few different ways to fret a ghost note, but let’s start with what normal fretting looks like:

Normal fretting hand position on the bass

For a ghost note, lift your fretting hand slightly — but keep your fingers in contact with the strings.

Hand lifted slightly while still touching the strings, for a ghost note

If you lift your whole hand off the strings completely like this, the string isn’t muted anymore, so you won’t get a ghost note at all.

Hand lifted completely off the strings, which does not produce a ghost note

I’ve also put together a video walking through all of this, so check that out too if you want to see it in action.

Want Personalized Feedback on Your Playing?

Ghost notes are subtle — it’s easy to either mute too much (so nothing comes through) or not enough (so it just sounds like a missed note), and that’s a tricky balance to judge in your own playing.

This is exactly the kind of thing that’s hard to fix alone — and where having a teacher makes all the difference.

At Line on Bass, I offer an online lesson service where you send me a video of your playing, and I give you specific, detailed feedback — every single day if you want.

Students from around the world are using this to fix exactly these kinds of issues and steadily improve their jazz bass skills.

Check Out the Lesson Service →

Posted on Leave a comment

5 Jazz Bass Books I’ll Still Be Reading in 10 Years

This article is written by Toru Hoshino, a jazz bassist and instructor based in Japan who teaches online lessons to students worldwide. In this article, he shares five jazz books and play-along collections from his own shelf that he expects to keep coming back to for the next ten years.

I was tidying my bookshelf today, and it got me thinking about which books and music collections I keep coming back to year after year.

These aren’t necessarily “easy beginner books you can read in one sitting.” They’re the kind of material that rewards you more and more as your own playing grows — every time you revisit them, you understand a little more than you did before.

If any of these catch your eye, I’d encourage you to check them out. Let’s get into the first one.

The Real Book (a.k.a. “The Black Book”)

This is the fake book that’s used at pretty much every jazz session on the planet. It has lead sheets for 227 standards that come up constantly in sessions, and just listening your way through the tunes in it is genuinely educational.

I personally use the handy/pocket-size edition — being able to keep it open flat on a stand makes it more practical day-to-day than the full A4-size version.

Bass Workbooks for Constant-Motion Practice

Another play-along/etude book. This one is packed wall-to-wall with eighth notes over blues progressions and jazz standard changes — no rests, just constant motion.

It would probably take years to actually play through the whole thing, but even just getting comfortable playing the lines that are written here will seriously build up your jazz vocabulary.

Analyzing Jazz Standards — Unlocking the Mysteries Behind How the Great Songs Were Written

This book was full of “wait, I never thought about it that way” moments for me. It looks at the melodies and chord progressions of jazz standards through the lens of harmony, lyrics, and compositional intent — explaining the reasoning behind why a melody was written the way it was.

I’ve borrowed a huge amount of what I learned from this book for my own lessons and YouTube videos. I’m genuinely glad I came across it.

Jazz Standard Theory

This is by the same author as the Real Book mentioned above, and it’s an analysis of the standards that appear in that book. Some of the trickier areas of jazz theory — subdominant minor, minor ii-V-i — finally clicked for me after reading this book multiple times; I got to the point where I could actually explain them to other people.

I still pull this one off the shelf whenever I think, “wait, how does that piece of theory work again?” or “how am I supposed to interpret this chord progression?”

A Guide to Blue Note’s Classic Recordings

This book introduces a huge number of classic jazz albums. I’ve read plenty of “essential albums” guides over the years, but this one focuses specifically on releases from Blue Note, jazz’s legendary label.

Just working your way through the recordings featured in this book will teach you a lot on its own.

If anything here caught your interest, I hope you’ll check it out. I hope these help with your daily practice.

Thanks for reading all the way through — if you made it this far, you’re clearly someone who’s serious about jazz.

Want Personalized Feedback on Your Playing?

Reading and listening will take you a long way, but knowing exactly which habits or weak spots to work on next is exactly the kind of thing that’s hard to fix alone — and where having a teacher makes all the difference.

At Line on Bass, I offer an online lesson service where you send me a video of your playing, and I give you specific, detailed feedback — every single day if you want.

Students from around the world are using this to fix exactly these kinds of issues and steadily improve their jazz bass skills.
Check Out the Lesson Service →

Posted on Leave a comment

How I Finger the Low Positions on Bass (And Why I Skip the Ring Finger)

This article is written by Toru Hoshino, a jazz bassist and instructor based in Japan who teaches online lessons to students worldwide. In this article, he breaks down how he fingers the low positions on the bass with his left hand, for anyone wondering how they should be fretting notes down there.

Fingering in the Low Positions

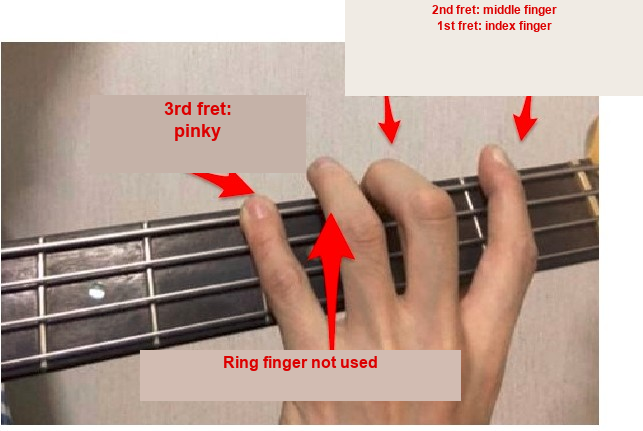
For low-position fingering, I use:

1st fret: index finger, 2nd fret: middle finger, 3rd fret: pinky

1st Fret: Index Finger, 2nd Fret: Middle Finger, 3rd Fret: Pinky

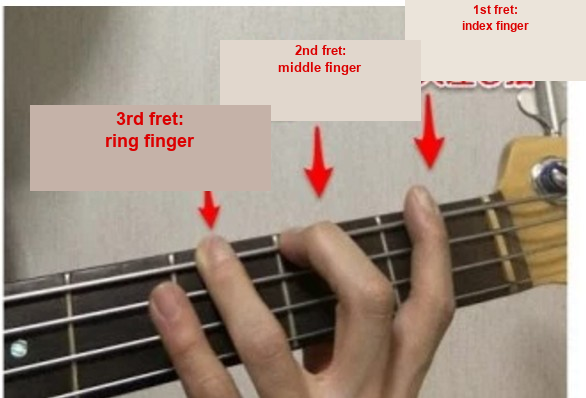
I don’t fret the 3rd fret with my ring finger, like this:

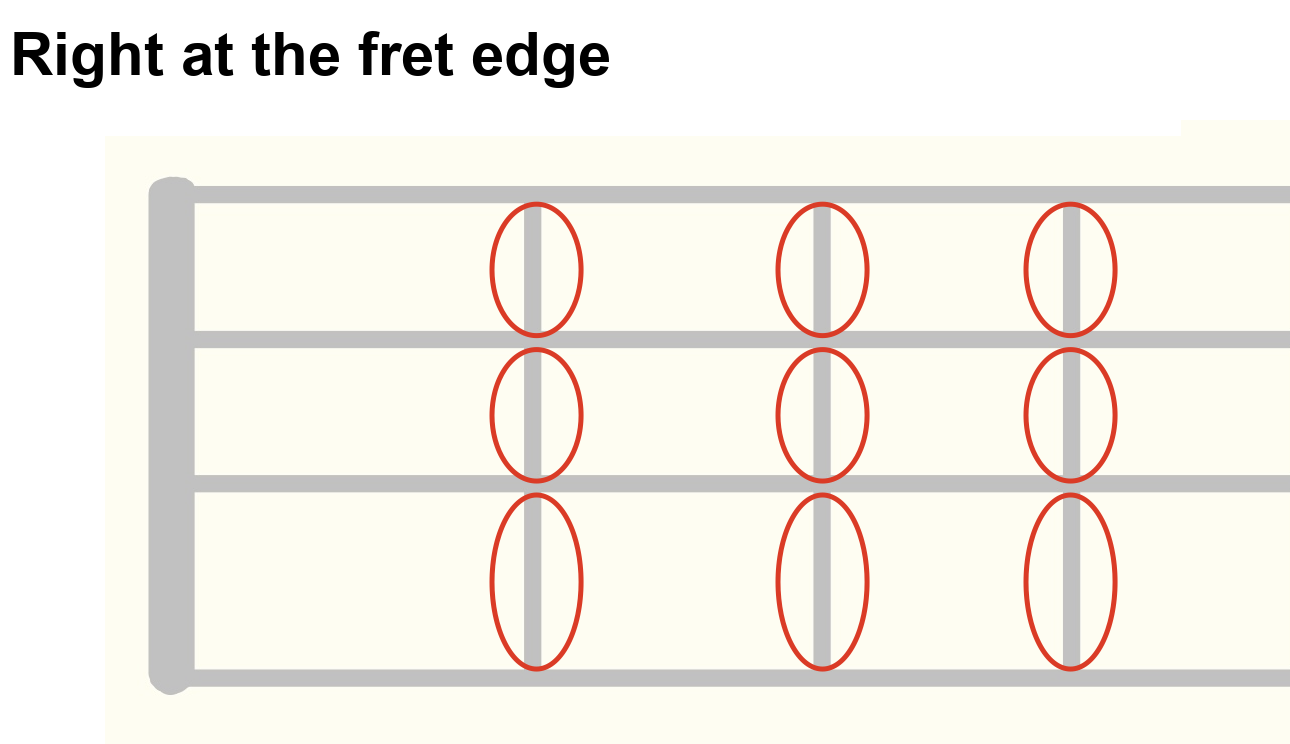
Here’s why. When I fret a note, I want to be pressing right at the edge of the fret — the part closest to the fret wire itself.

This is what I mean by the edge of the fret:

It’s not that you can’t reach that spot with your ring finger — it’s just that the pinky reaches that edge more comfortably.

So When Do I Use My Ring Finger?

There’s no hard rule for this, but I start bringing it in from around the 7th fret. From the 7th fret up into the higher positions, I switch to what’s usually called “one fret, one finger” — using all four fingers, one per fret.

Plenty of players use one-fret-one-finger even down in the low positions, and there’s no right or wrong answer here. But if your notes tend to buzz, or you want to take a fresh look at your fingering, this might be worth trying out.

I hope this gives you something useful to experiment with in your own playing — and ironing out a fingering habit like this is exactly the kind of thing that’s hard to catch on your own.

Want Personalized Feedback on Your Playing?

This is exactly the kind of thing that’s hard to fix alone — and where having a teacher makes all the difference.

At Line on Bass, I offer an online lesson service where you send me a video of your playing, and I give you specific, detailed feedback — every single day if you want.

Students from around the world are using this to fix exactly these kinds of issues and steadily improve their jazz bass skills.

Check Out the Lesson Service →

Posted on Leave a comment

Where Should Your Thumb Go When Fingerpicking Bass?

This article is written by Toru Hoshino, a jazz bassist and instructor based in Japan who teaches online lessons to students worldwide. In this article, he breaks down where to rest your right-hand thumb when fingerpicking a 4-string bass.

Thumb Position

I think of thumb position as falling into five basic patterns:

  • Resting on the front pickup
  • Resting on the rear pickup
  • Resting at the base of the neck
  • Resting on a string
  • Not resting anywhere (floating)

I often get asked, “Is it better to rest my thumb on a string, or on the pickup?” Honestly, either works fine.

A Small Detail That Actually Matters

If you rest your thumb on the low E string, your index and middle fingers end up that much closer to the G string. Keep your thumb parked on the pickup the whole time, on the other hand, and the G string stays farther away.

That’s why I’ll often recommend resting the thumb on the low string to players with smaller hands. And if you’re on a 5- or 6-string bass, where the neck is wider, resting your thumb on a string might be the better call regardless.

Here’s how I’d weigh the pros and cons of each.

Resting Your Thumb on the Pickup: Pros

It gives you a stable anchor. Your thumb position stays fixed, which gives your picking hand a stable pivot point.

Resting Your Thumb on the Pickup: Cons

The G string is farther away.

Resting on the pickup puts a real gap between your thumb and the G string. If you have shorter fingers, that gap can be a struggle.

Resting Your Thumb on a String: Pros

The G string is close by.

Picking the G string becomes effortless this way — a good fit if you have shorter fingers.

Muting the low E string is easy. If you keep your thumb resting on the E string while you pick it, you get an easy, built-in ghost note. A lot of Motown-style and older R&B basslines use this kind of two-finger ghost note — different from the slap version — and resting your thumb on the string makes that sound much easier to produce.

Resting Your Thumb on a String: Cons

You have to lift your thumb off to play the low string normally.

If you want a normal picked tone out of the low E string, your thumb has to come off it. Depending on the situation, it might move up to the pickup or just float in the air — either way, your pivot point shifts.

Take a look at where the thumb moves:

From here —

— to here.

It’s a tiny distance, but getting that transition to feel smooth takes some getting used to.

Try a Few Approaches and Find What Works Best for You

As I said at the start — as long as you’re getting a good sound and playing well, your thumb position can really go anywhere. Plenty of players rest their thumb on a string, plenty of players don’t rest it anywhere at all. Listen to the music and bassists you love right now, and think about what’s working for your right hand too.

I Also Cover This in Video Form

I hope this gives you something useful to experiment with in your own playing — and figuring out exactly what’s holding your right hand back is exactly the kind of thing that’s hard to diagnose alone.

Want Personalized Feedback on Your Playing?

This is exactly the kind of thing that’s hard to fix alone — and where having a teacher makes all the difference.

At Line on Bass, I offer an online lesson service where you send me a video of your playing, and I give you specific, detailed feedback — every single day if you want.

Students from around the world are using this to fix exactly these kinds of issues and steadily improve their jazz bass skills.
Check Out the Lesson Service →

Posted on Leave a comment

A Common Misunderstanding About How Minor Scales Move on the Bass

This article is written by Toru Hoshino, a jazz bassist and instructor based in Japan who teaches online lessons to students worldwide. In this article, he covers a common misunderstanding about how minor scales actually move on the bass — something he himself got wrong before he learned the theory behind it.

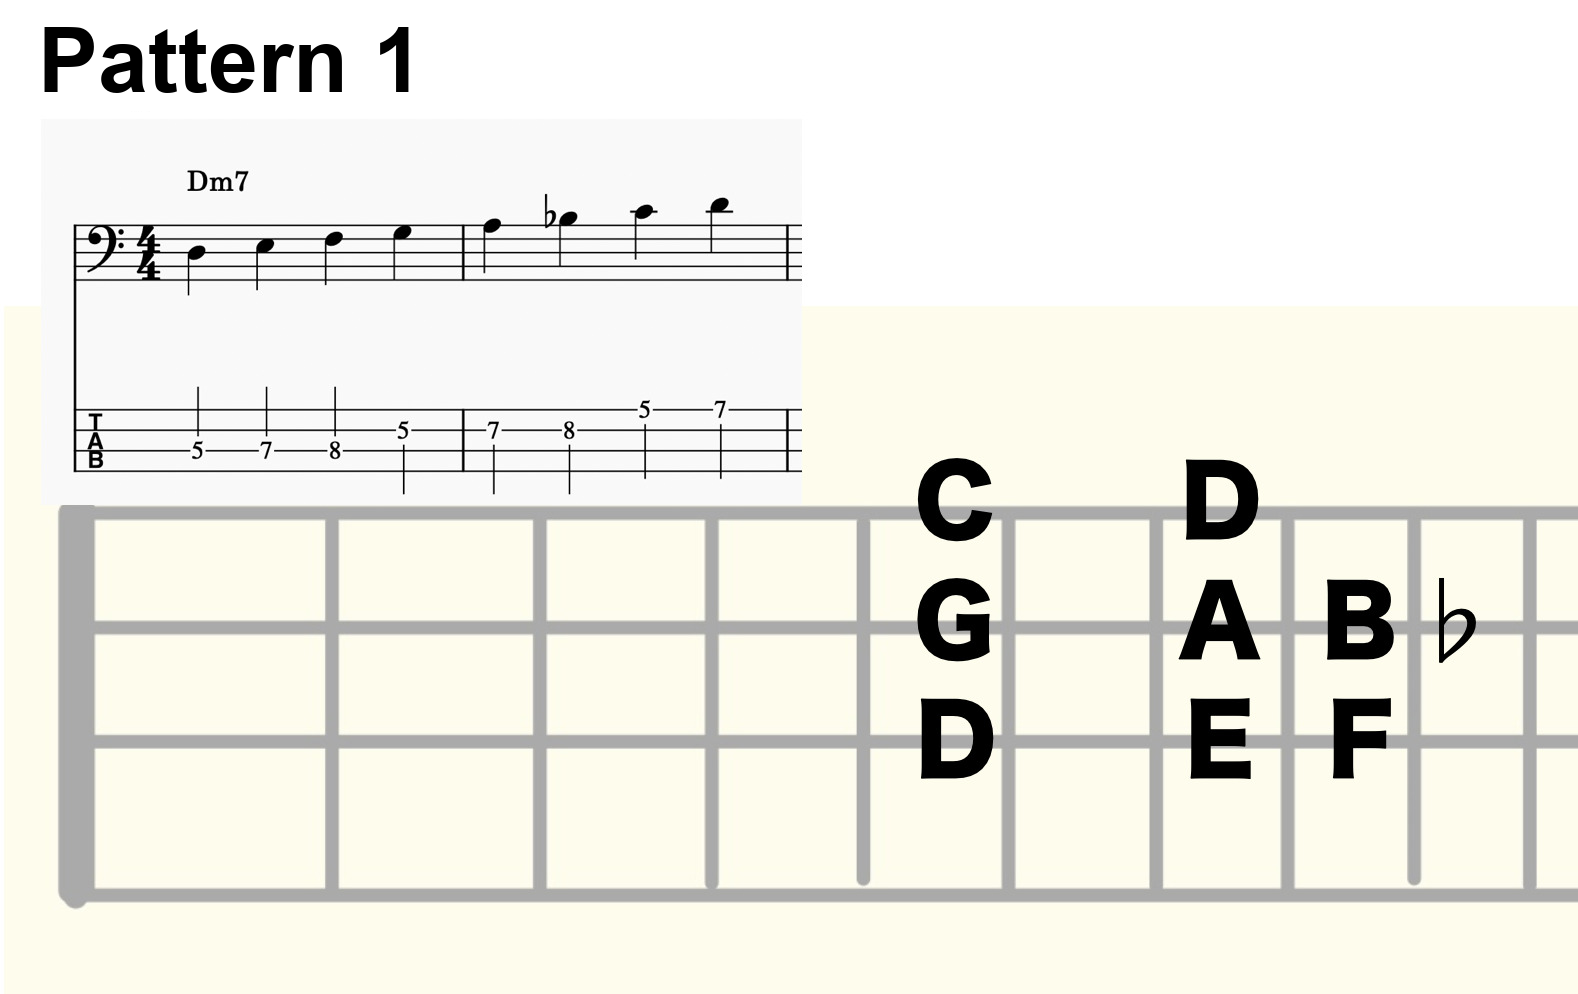
Minor Scale Pattern 1

You can play a D minor scale using a fingering pattern like this:

This is the shape I picked up by ear, self-taught, back when I was playing rock bass. But D minor isn’t limited to this one shape — there are other fingering patterns and ways the scale moves on the neck.

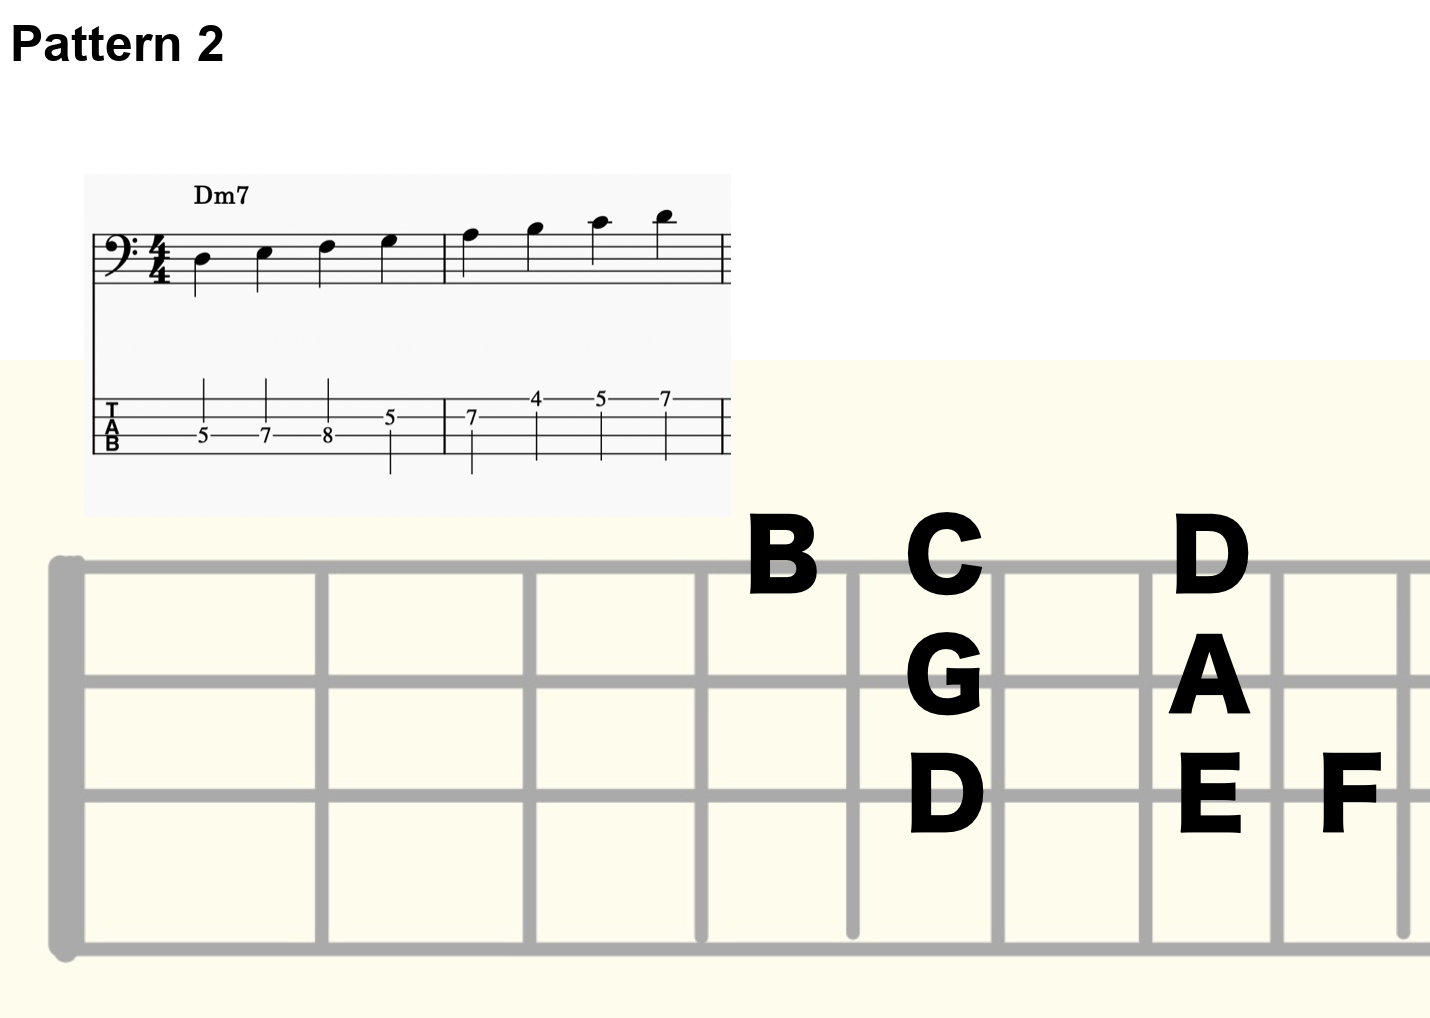
Minor Scale Pattern 2

For example, it can also move like this:

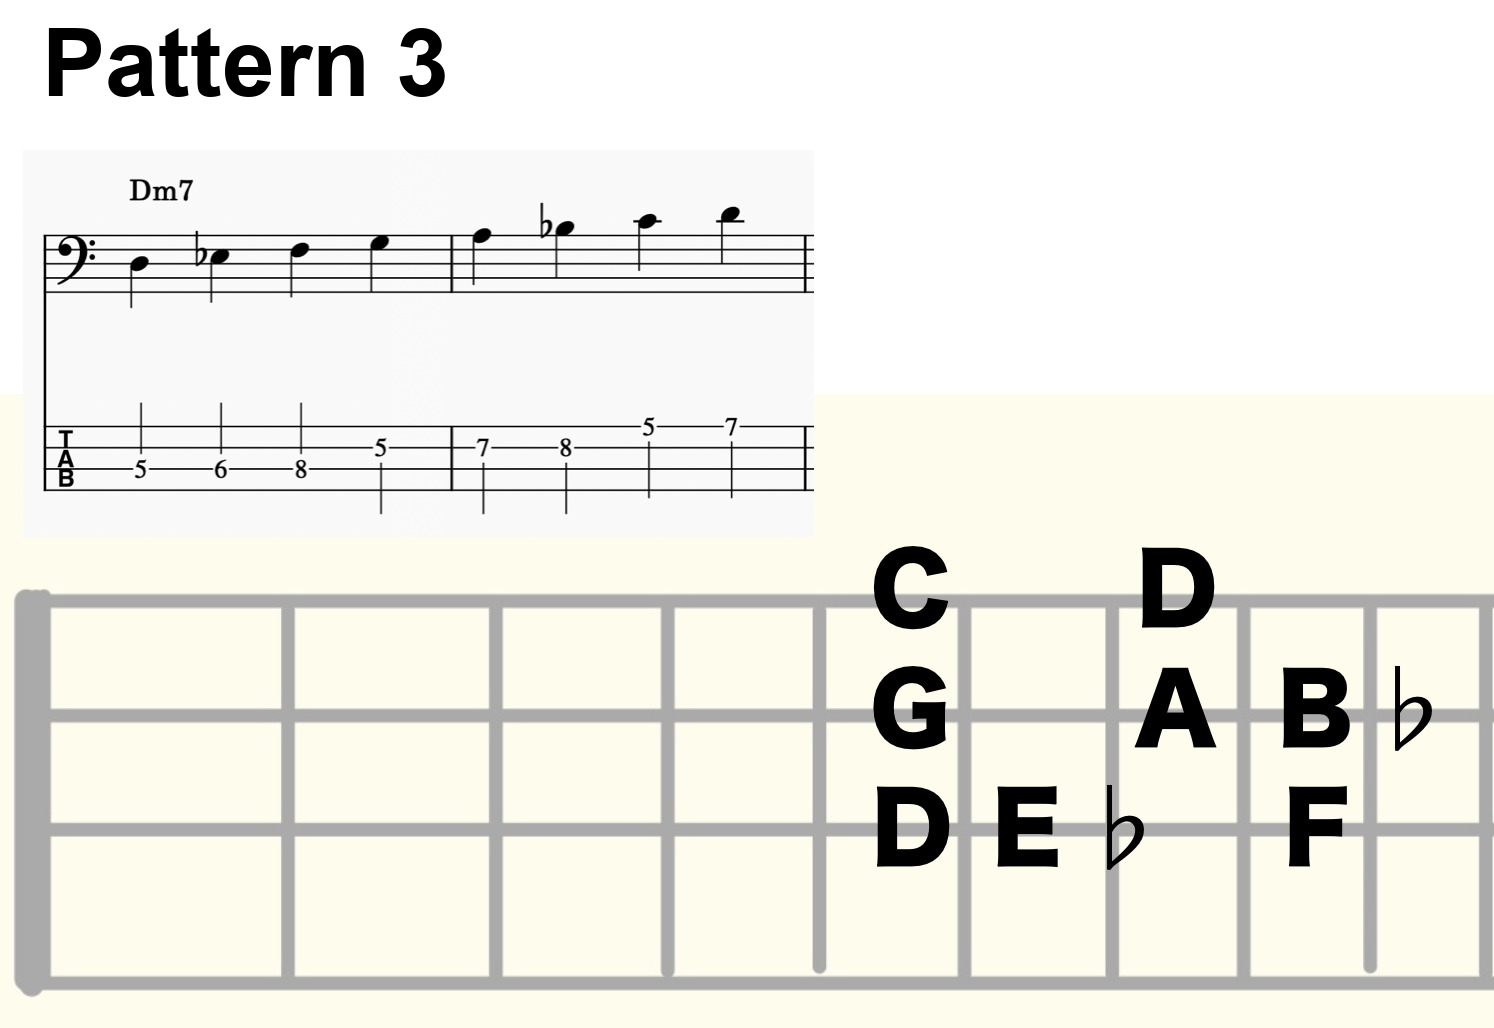
Minor Scale Pattern 3

Or like this:

That’s probably a shape you don’t run into very often.

Why does the same D minor scale move differently like this? It’s because the scale you can use depends on the key (or more precisely, the chord) you’re playing over.

Because the minor scale shape is so easy to memorize visually on the fretboard, it’s easy to fall into the trap of thinking Pattern 1 is the only shape there is — which is a big mistake (I know, because that was exactly my mistake).

But I still vividly remember how it felt the first time this theory clicked for me after spending real time with it — like I’d leveled up, and my whole sense of the music had opened up.

For reference: Pattern 1 is the D Aeolian scale, Pattern 2 is the D Dorian scale, and Pattern 3 is the D Phrygian scale.

If this has caught your interest and you’re in the middle of studying scales and chord tones, getting comfortable moving between these shapes is well worth the time.

I hope this gives you something useful to think about in your own practice.

Want Personalized Feedback on Your Playing?

This is exactly the kind of thing that’s hard to fix alone — and where having a teacher makes all the difference.

At Line on Bass, I offer an online lesson service where you send me a video of your playing, and I give you specific, detailed feedback — every single day if you want.

Students from around the world are using this to fix exactly these kinds of issues and steadily improve their jazz bass skills.

Check Out the Lesson Service →

Posted on Leave a comment

Should You Practice Scales in All 12 Keys?

This article is written by Toru Hoshino, a jazz bassist and instructor based in Japan who teaches online lessons to students worldwide. In this article, he answers a common question: should you practice scale fingerings in all 12 keys?

I get this question a lot: “Should I be practicing scale fingerings in all 12 keys?”

It genuinely matters a lot. But trying to cover all 12 keys is endless, so my usual advice is:

Focus intensively on the scales actually used in whatever tune you’re currently working on.

Should You Practice Scale Fingerings in All 12 Keys?

Take the C major scale, for example:

C D E F G A B C C D E F G A B C…

You’d play C major starting from the C at the 3rd fret of the 3rd string, all the way up to the C at the 17th fret of the 1st string, then back down. Then move on to D♭ major:

D♭ E♭ F G♭ A♭ B♭ C D♭ D♭ E♭ F G♭ A♭ B♭ C D♭…

D E F♯ G A B C♯ D D E F♯ G A B C♯ D…

And so on, repeating the same process all the way through B major — the question is whether you actually need to grind through all 12 keys like that.

It’d be great if you could, sure, but it’s genuinely endless. So my advice is:

Focus intensively on the scales that actually show up in the tune you’re working on right now.

A fretboard diagram showing note positions

Why Focusing on the Scales a Tune Actually Uses Makes More Sense

It’s Not Just Major Scales

Scales aren’t limited to major scale patterns — there are minor scale patterns too. And within minor, there are several different types: half-diminished, diminished, melodic minor, harmonic minor, Dorian, Phrygian… the list goes on endlessly.

You’d Also Need to Cover Every Possible Tempo

There are countless tempos to consider. And if you start factoring in playing on the beat versus behind it, triplet feels, and other subtle timing choices, that multiplies out infinitely too.

There Are Endless Possible Fingering Routes Too

Even just a low-position C major scale has countless possible ways to finger your way up the neck, like these:

Multiple fingering routes for a C major scale in low position

An alternate fingering route
Another alternate fingering route

It really is endless. Practicing every combination of tempo and key would require an enormous amount of time you don’t have.

So again: focus intensively on the scales that actually show up in the tune you’re working on.

Focus on the Scales the Actual Tune Uses

Scale practice is dry and easy to get bored of, but it’s still genuinely important. That’s exactly why I tell students:

“Start by practicing the fingering for the scale your current tune actually calls for.”

Take “Autumn Leaves,” for example — it’s in the key of G minor. Using the diatonic scale, you’ll mostly be working with the notes G, A, B♭, C, D, E♭, and F.

Even within just that one progression, there’s a wide range of possible movement:

A fingering pattern for the B flat major scale An alternate B flat fingering pattern Another B flat fingering pattern

Knowing a range of fingering variations and progression styles like this pays off both when soloing and when building walking bass lines.

My Own Failed Attempt at 12-Key Practice

When I was in the US, I had some free time, so I tried practicing major 7th and natural minor scales in all 12 keys every day, from tempo 60 up to 240, working out different fingering routes along the way. I gave up almost immediately.

Like I keep saying — it’s genuinely endless. And on top of that, scale practice isn’t the only thing you need to work on.

Jazz theory, rhythm training, solo analysis, and applying everything to real tunes — each of these deserves serious, focused practice time in its own right.

There’s a lot to work on, but you’ve also got a life, a job, family, and friends. Rather than cramming everything in, I think it’s more important to keep asking: “given the time I actually have — 10 minutes, an hour, whatever it is — what can I realistically get done?”

Working out which scales actually matter for your current repertoire, and getting honest feedback on your fingering choices, is exactly the kind of thing a teacher helps cut through.

Want Personalized Feedback on Your Playing?

This is exactly the kind of thing that’s hard to fix alone — and where having a teacher makes all the difference.

At Line on Bass, I offer an online lesson service where you send me a video of your playing, and I give you specific, detailed feedback — every single day if you want.

Students from around the world are using this to fix exactly these kinds of issues and steadily improve their jazz bass skills.
Check Out the Lesson Service →

Posted on Leave a comment

3 Things I Wish I’d Known Back in My Rock Band Days

This article is written by Toru Hoshino, a jazz bassist and instructor based in Japan who teaches online lessons to students worldwide. In this article, he shares 3 things he wishes he’d known back in his rock band days.

It’s been about 10 years since I quit playing in rock bands, and looking back, here are 3 things I wish I’d known at the time.

This one’s especially for anyone currently in a rock band wondering, “is there some new approach I could be taking?” — hopefully it gives you something useful.

3 Things I Wish I’d Known Back in My Rock Band Days

I Wish I’d Played in an Acoustic Band

A bass guitar

In a loud band, everything around you is loud too, so — for better or worse — the bass tends to get buried in the mix, and you can get away with a lot of sloppy playing.

Acoustic and jazz bands are different: the bass is way more exposed, so you get a much clearer, more visceral sense of what your actual role is.

In fact, I distinctly remember that after spending some time in acoustic and jazz bands and then going back to a rock band, my own bass tone suddenly felt a lot more three-dimensional.

Back then I was completely consumed by my own band, but I wish I’d had the bandwidth to peek into genres outside of rock.

I Wish I’d Worked on 16th-Note Feel

Once you can really feel the smaller subdivisions, your phrasing vocabulary opens up, and your sense of sustain sharpens too.

I wasn’t exactly playing slap-funk back then, but I wish I’d spent even a little time training a 16th-note feel and brought it into my rock playing at the time.

I Wish I’d Understood What Melody Was Riding on Top of the Chords

Back in my band days, I’d come up with a melody humming to myself on a walk and just slap power chords underneath it. I wish I’d thought more about things like:

Is the melody riding on top of the chord a chord tone?

Or is it a tension note?

And exactly what scale degree is it, relative to the chord?

If I’d been thinking about that while writing, I think I could’ve written deeper songs.

No point dwelling on regrets, and honestly, “all gas, no overthinking” is a perfectly valid way to be in your 20s as a band member. But skills like this are also exactly the kind of thing that makes you easy to pick up by another band if yours ever breaks up.

“I’m not exactly planning on my band breaking up!” — fair, but having more tools in your kit rarely hurts. Hopefully this gives you something useful to chew on.

Hearing about these ideas is one thing — actually being able to apply them in real time on your instrument is exactly where a teacher’s feedback speeds up the process.

Want Personalized Feedback on Your Playing?

This is exactly the kind of thing that’s hard to fix alone — and where having a teacher makes all the difference.

At Line on Bass, I offer an online lesson service where you send me a video of your playing, and I give you specific, detailed feedback — every single day if you want.

Students from around the world are using this to fix exactly these kinds of issues and steadily improve their jazz bass skills.

Check Out the Lesson Service →

Posted on Leave a comment

Why 10 Minutes a Day Beats One Long Weekly Practice Session

This article is written by Toru Hoshino, a jazz bassist and instructor based in Japan who teaches online lessons to students worldwide. In this article, he shares his thinking on why practicing 10 minutes a day beats one long weekly session, even when the total time is the same.

Here’s the question I want to dig into: 10 minutes of practice, 6 days a week — or one 60-minute session, once a week? Both add up to the same 60 minutes total. Which one actually gets you better results?

Short answer up front: the first one wins.

A Student’s Example

A student practicing

One of my students is a high schooler. Between schoolwork, volleyball club, and cram school, her schedule is packed. She’s on a competitive team in the city, so she’s up at 4am for practice from 6 to 8am every day, plus club after school. With a tournament roughly every two months, she barely gets a day off from volleyball, and on top of that she’s at cram school several times a week preparing for university entrance exams.

That extremely busy student still takes lessons with me twice a month — and every single lesson, her improvement is noticeable.

She’s got youth and drive on her side, sure, but she’s not someone with extraordinary natural musical talent, and she’s not aiming to go pro on bass either.

What she does have is this: she’s committed to practicing for just 10 minutes a day.

Let’s compare what that actually looks like on a calendar, against doing one 60-minute session a week.

Comparing the Two Schedules

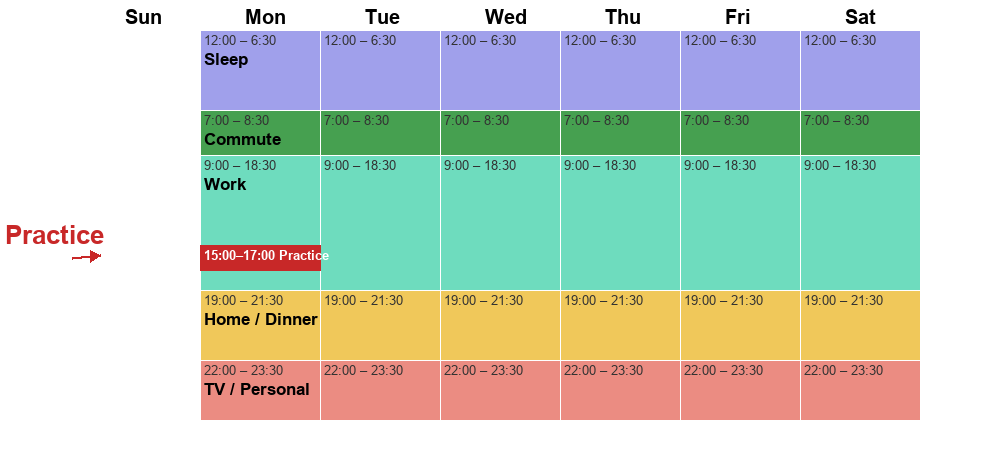
Example: One 60-Minute Practice Session a Week

A weekly schedule with one 60-minute bass practice session on Monday only

Weekdays
Wake at 6:30
Commute at 7:30
Work from 9:00 to 18:30
Home by 7:00pm: dinner, family time
9:00–11:00pm: TV, bath, personal time
Lights out at midnight

Sunday
Free time — head to the studio and practice for an hour.

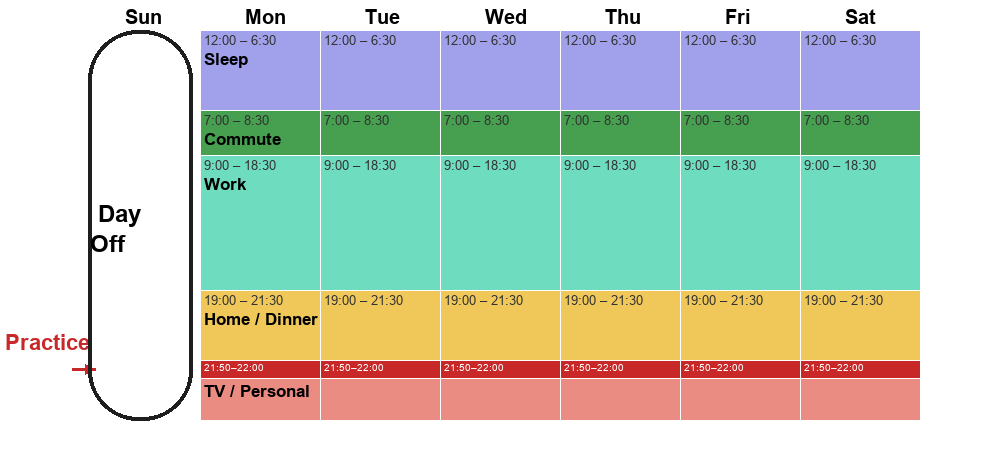
10 Minutes a Day, 6 Days a Week

A weekly schedule with 10 minutes of bass practice every weekday evening and Sunday off

Weekdays
6:30: Wake
7:30: Commute
9:00–18:30: Work
7:00pm: Home, dinner, family time
7:50–8:00pm: Practice
9:00–11:00pm: TV, bath, personal time
12:00: Lights out

Sunday
A backup practice day, or just free time to relax or go out.

Same total of 60 minutes a week, but the second schedule is far more likely to produce real improvement.

That’s because the second version is built around thinking about bass every single day.

In other words, it’s a schedule built around actual improvement. Six days a week, your calendar is quietly reminding you, “I want to get better at bass.”

A bass guitar

If something unexpected comes up and you miss a day, that mindset of “I want to get better at bass” hasn’t gone anywhere — you’ve still got six chances a week reinforcing it.

And having one fully free day on Sunday means you get a real mental reset, plus a built-in makeup day if you missed a session during the week.

With the once-a-week version, on the other hand, there’s only a single day where you’re even thinking about getting better.

And worse: if you happen to catch a cold or have something come up that one Sunday, you could go a full two weeks without touching the bass. Two weeks without playing makes real improvement genuinely difficult.

Make Practice a Habit, Like Brushing Your Teeth

Brushing teeth as a daily habit

Nobody skips brushing their teeth before bed — it just feels gross not to. Practice can become that same kind of automatic habit.

How do you get there? Just keep doing a little bit every day, and the habit builds itself — assuming you actually enjoy playing bass, of course.

Once you start thinking, “I haven’t practiced today and it’s bugging me a little,” you’ve already crossed into a place where you’ll keep improving from here on out.

If 10 Minutes Feels Like Too Much…

A bass player practicing

At first, even 10 minutes can feel long if it’s not yet a habit.

If that’s the case, start with 5 minutes. Or even just 2–3 minutes — that’s fine too.

The chromatic scale exercise I recommend to beginners, for instance, only takes about 3 minutes. The high schooler I mentioned earlier built her habit over her first two months on exactly that kind of short chromatic exercise.

Once a habit like that takes hold, finding a little time for it every day stops feeling like an effort.

When practice feels like it’s not going anywhere, my advice is always the same: don’t try to do it all in one sitting — just chip away at it a little every day.

Building a habit is the hard part to do alone — having someone check in on your progress regularly is exactly what keeps a daily practice habit from quietly fading out.

Want Personalized Feedback on Your Playing?

This is exactly the kind of thing that’s hard to fix alone — and where having a teacher makes all the difference.

At Line on Bass, I offer an online lesson service where you send me a video of your playing, and I give you specific, detailed feedback — every single day if you want.

Students from around the world are using this to fix exactly these kinds of issues and steadily improve their jazz bass skills.

Check Out the Lesson Service →