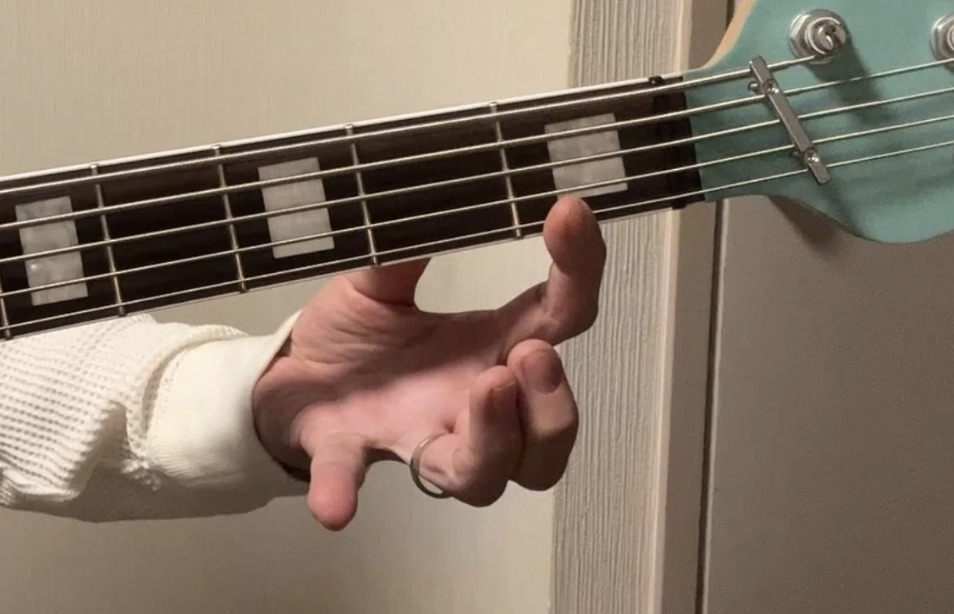
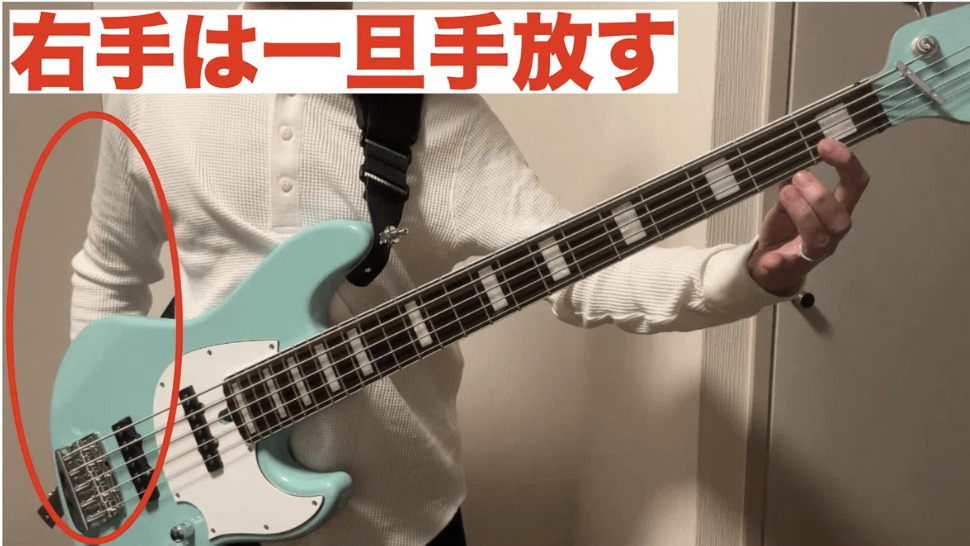
Posted on Leave a comment

Should You Use Your Ring Finger in the Low Position on Electric Bass?

This article is written by Toru Hoshino, a jazz bassist and instructor based in Japan who teaches online lessons to students worldwide. In this article, he answers a question about whether to use the ring finger in the low position on electric bass.

I recently got a question from an electric bass player that went something like this: “I found one method book that shows the low position fretted like this” —
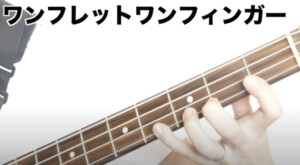
One-finger-per-fret technique using the index, middle, ring, and pinky fingers

— “using a one-finger-per-fret approach with the index, middle, ring, and pinky all spread out. But another book shows the low position fretted like this instead” —
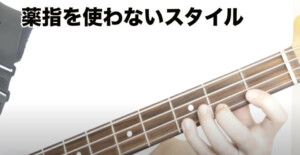
A three-finger technique using only the index, middle, and pinky

— “using only the index, middle, and pinky, skipping the ring finger entirely. Which one should I actually trust?

My honest answer to this: it depends on the playing style you’re going for.

Personally, I go with the second approach — skipping the ring finger and fretting the low position with just index, middle, and pinky. There are 2 reasons why:

1. Because I also play upright bass
2. Because the one-finger-per-fret approach doesn’t reach the very edge of the fret as comfortably for me

1. Because I Also Play Upright Bass

On upright bass, the low position is typically fretted using just the index, middle, and pinky fingers. Here’s what that hand shape looks like:
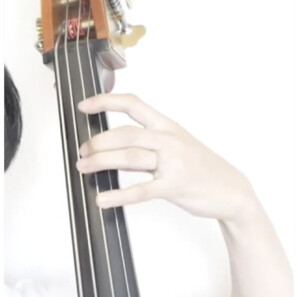
Upright bass low-position hand shape using index, middle, and pinky

I used to use my ring finger in the low position on electric bass too, but once I started playing upright, my electric bass fingering naturally lined up with my upright technique instead.

2. Because the One-Finger-Per-Fret Approach Doesn’t Reach the Edge of the Fret as Well

Here’s a shot of fretting the 3rd fret on the 1st string. This is pressing down right at the edge closest to the headstock, which tends to cause fret buzz.
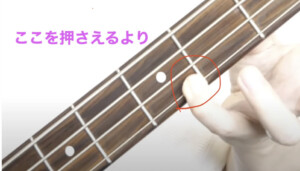
Fretting near the headstock-side edge of the fret, which can cause buzzing

Whereas fretting closer to the body-side edge, like this, tends to buzz less.
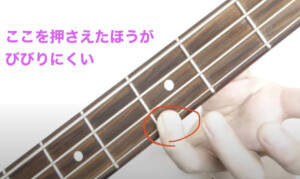
Fretting near the body-side edge of the fret, which produces a cleaner note

Personally, I find it harder for my left-hand fingers to comfortably reach that body-side edge when I’m locked into one-finger-per-fret. So I use the index/middle/pinky approach instead, since it makes that cleaner fretting position easier to reach consistently.

That’s the reasoning behind why I personally play the low position on electric bass using just three fingers — index, middle, and pinky.

In lessons, for students who eventually want to pick up upright bass, I often recommend starting with this index/middle/pinky approach on electric bass. For students without that goal who find one-finger-per-fret more comfortable, I’m just as happy to have them stick with that instead.

Genuinely opposite opinions like this come up a lot in instrumental technique — strap length, string height (action), you name it: some swear “longer/higher is better,” others swear the exact opposite.

In the end, I think the real answer always comes down to: what style are you going for, what tone do you want, and what do the players you admire actually do? That’s usually what resolves the contradiction.

Hopefully this gives you a useful way to think it through next time you run into two pieces of conflicting advice.

Working out which approach actually fits your hand and your goals is exactly the kind of judgment call that’s easier to make with a second pair of eyes watching you play.

Want Personalized Feedback on Your Playing?

This is exactly the kind of thing that’s hard to fix alone — and where having a teacher makes all the difference.

At Line on Bass, I offer an online lesson service where you send me a video of your playing, and I give you specific, detailed feedback — every single day if you want.

Students from around the world are using this to fix exactly these kinds of issues and steadily improve their jazz bass skills.
Check Out the Lesson Service →

Posted on Leave a comment

Bass Basics #5: Learning the Fretboard with the C Major Scale

This article is written by Toru Hoshino, a jazz bassist and instructor based in Japan who teaches online lessons to students worldwide. In this article, he covers a beginner exercise for learning the note names across the fretboard using a simple C-major scale.

For anyone picking up a bass for the first time
For anyone about to start learning bass
For anyone who wants to revisit the basics or rethink their playing style

For installment #5, we’re going to play through a major scale to learn the note names across the fretboard. This is commonly called “scale practice,” and it builds several skills at once — fingering, knowing where notes live on the neck, and rhythmic timing.

The Bass Has a Scale Too

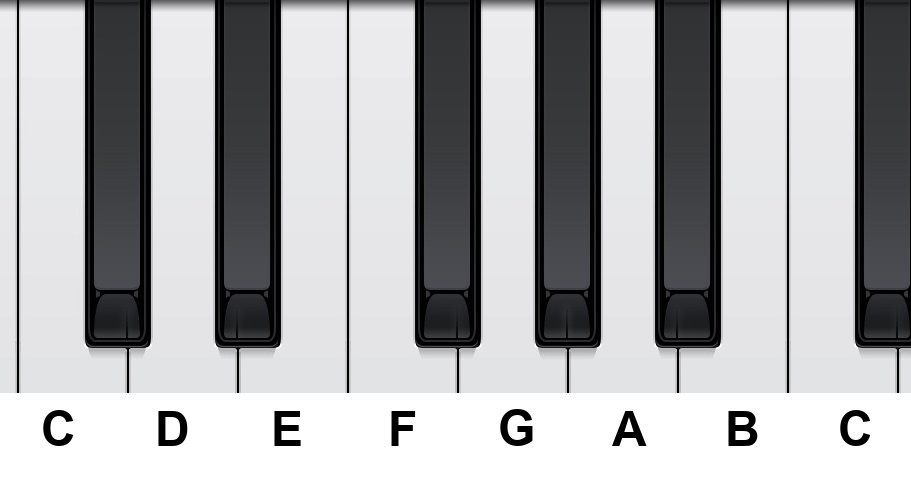
Just like a piano keyboard has note names:

A piano keyboard showing the note names C D E F G A B C

The bass has note names too.

Bass fretboard with note names

This is the C-major scale, and in the context of popular music, rock, and similar styles, it’s typically referred to by its letter names: C D E F G A B C.

Today, we’re going to learn to play this C-D-E-F-G-A-B-C scale on the bass.

Scale Pattern 1

First, the position for C: fret the 3rd fret of the 3rd string with your index finger.

Fretting C with the index finger

Next, the position for D: play the 5th fret of the 3rd string with your pinky.

Fretting D with the pinky finger

Next, the position for E: play the 2nd fret of the 2nd string with your index finger.

Fretting E with the index finger

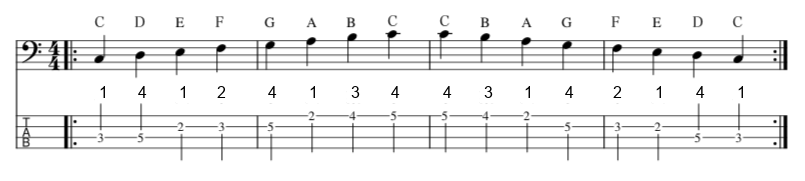
Following this same logic, try playing through the full pattern shown below:

Fingering pattern for the C major scale ascending and descending, numbered 1 (index), 2 (middle), 3 (ring), 4 (pinky)

Once you’re comfortable, try playing along with the audio below.

(Note: this is played at a tempo of 60, going up and back down the scale twice.)


Scale Pattern 2

The C-major scale isn’t limited to just the one fingering pattern above — there’s another shape too.

For example, D is also available as an open string on the 2nd string, and G as an open string on the 1st string, so the same scale can also be played like this:

An alternate fingering for the C major scale using open strings

Which one’s better depends on the tune you’re playing, but being comfortable with both will widen your playing range, so work toward learning both eventually.

Try this one too once the hand shape starts to feel natural.

Applied Practice With C-D-E-F-G-A-B-C

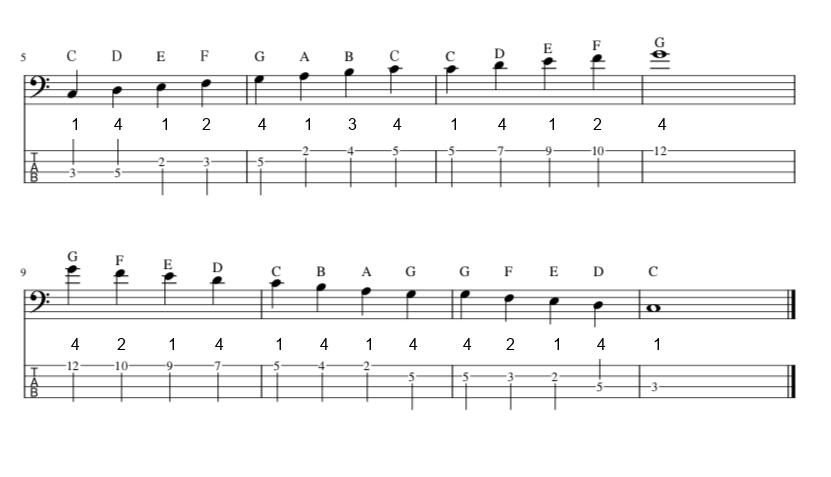
Once you’re comfortable with the above, here’s a bit of an applied exercise. Play the scale up, and keep going past the octave into the notes above.

Extending the scale beyond the octave

And here’s an efficient fingering pattern I worked out for it:

An extended scale fingering pattern going up past the octave and back down

Play up through C-D-E-F-G-A-B-C-D-E-F-G, reaching the higher notes, then come back down:

G-F-E-D-C-B-A-G-F-E-D-C

back to where you started.

Playing through a fixed sequence of notes like this is what’s called “scale practice.”

Once you’re comfortable, try playing along.

Make a Point of Learning C-D-E-F-G-A-B-C

You can absolutely play bass reading only tab notation. But the longer you stick with bass, the more often you’ll find yourself reading chord symbols instead.

Chord symbols written above a staff

Learning your note names as C-D-E-F-G-A-B-C will pay off down the line by making chord symbols much easier to work with — so make a habit of learning the letter names of your notes.

Connecting note names to actual fretboard positions in real time, without having to think about it, is exactly the kind of thing that’s faster to build with a teacher watching and correcting you.

Want Personalized Feedback on Your Playing?

This is exactly the kind of thing that’s hard to fix alone — and where having a teacher makes all the difference.

At Line on Bass, I offer an online lesson service where you send me a video of your playing, and I give you specific, detailed feedback — every single day if you want.

Students from around the world are using this to fix exactly these kinds of issues and steadily improve their jazz bass skills.

Check Out the Lesson Service →

Posted on Leave a comment

Bass Basics #2: Tuning and How to Read Tab Notation

This article is written by Toru Hoshino, a jazz bassist and instructor based in Japan who teaches online lessons to students worldwide. In this article, he covers the basics of tuning and reading tab notation for complete beginners.

For anyone picking up a bass for the first time
For anyone about to start learning bass
For anyone who wants to revisit the basics or rethink their playing style

This article covers tuning and how to read tab notation.

Tuning Your Bass

Before tuning, let’s learn the names of the strings. Looking at the bass from the front, from thinnest to thickest, they’re called the 1st, 2nd, 3rd, and 4th strings.

Bass strings viewed from the front

Here’s the view from above. When you’re holding the bass, the string closest to your face is the 4th string.

Bass strings viewed from above

When tuning, the standard pitches are:

4th string = E
3rd string = A
2nd string = D
1st string = G

Adjust each string’s open-string pitch to match these notes.

For example, on the 4th string:

Tuner reading showing the pitch too low

↑ This is too low, so tighten the tuning peg (the part being turned here) to bring the needle toward center.

Tuner reading showing the pitch too high

↑ This, on the other hand, is too high, so loosen the peg instead.

Tuner reading showing the pitch correctly centered

↑ This is what you’re aiming for. Once the needle’s centered, do the same for the rest of the strings.

It doesn’t matter whether you start tuning from the 1st string or the 4th. Experienced players can tune in a few seconds, but when you’re just starting out, even one string can take a while. It gets faster the more you do it.

A Recommended Tuner

A clip-on tuner is the easiest option for a beginner — affordable, quick to respond, and reliable. Many beginner bass packages even come with one included.

Why Bother Tuning?

Just like a piano, the bass has a fixed scale (a sequence of pitches). Listen to the difference:

Piano:


Bass:

On a bass, you adjust the pitch by turning the tuning pegs shown here:

Bass tuning pegs

During transport, or after long playing sessions, the pegs can shift slightly and throw the pitch off without you noticing.

So make it a habit to tune every time before you practice or head into a rehearsal space.

Once You’re Tuned, Try Some Practice Phrases

Once you’re tuned up, let’s get into some practice phrases. As a beginner, learning to read tab notation will serve you well.

Most people aren’t comfortable with standard notation at first.

That’s exactly what tab notation is for. Here’s what it looks like.

An example of tab notation

Tab notation tells you exactly which string and which fret to play, using numbers — making it easy for beginners to read.

The bottom line of the tab represents the thickest string, the 4th string. The top line represents the thinnest, the 1st string.

Let’s Try Playing Some Tab

Let’s play through a few tab examples.

Tab Pattern 1

Tab pattern 1

Here, you’re playing:

The open 4th string, 4 times
The open 3rd string, 4 times
The open 2nd string, 4 times
The open 1st string, 4 times

Tab Pattern 2

Tab pattern 2

Here, you’re playing:

4th string, 3rd fret, 4 times
3rd string, 2nd fret, 4 times
3rd string, 3rd fret, 4 times
The open 2nd string, 4 times

Tab Pattern 3

Tab pattern 3

Here, you’re playing:

4th string, 2nd fret, 4 times
2nd string, 4th fret, 4 times
1st string, 2nd fret, 4 times
2nd string, 2nd fret, 4 times

Try actually playing through these yourself!

Use the Position Markers

Tab notation is convenient, but early on, it can still be tricky to connect the numbers on the page to actual fret positions. That’s where the position markers (the dots inlaid on the neck) come in handy.

Fretboard position markers

As mentioned earlier, most basses have position markers at the 3rd, 5th, and 7th frets counting from the headstock. There are more further up the neck too — use these as landmarks while reading tab, and it becomes much more efficient.

That covers the basics — next time, we’ll get into fundamental practice routines.

Getting your hands to actually find these positions cleanly and consistently is exactly the kind of thing real-time feedback speeds up.

Want Personalized Feedback on Your Playing?

This is exactly the kind of thing that’s hard to fix alone — and where having a teacher makes all the difference.

At Line on Bass, I offer an online lesson service where you send me a video of your playing, and I give you specific, detailed feedback — every single day if you want.

Students from around the world are using this to fix exactly these kinds of issues and steadily improve their jazz bass skills.

Check Out the Lesson Service →

Posted on Leave a comment

Memorize the 3rd and 5th by Their Shape on the Fretboard, Not by Counting

This article is written by Toru Hoshino, a jazz bassist and instructor based in Japan who teaches online lessons to students worldwide. In this article, he shares an easier way to remember the 3rd and 5th chord tones — by their visual shape on the fretboard, rather than by counting.

When it comes to memorizing chord tones like the 3rd and 5th on bass, a lot of players end up thinking something like: “Okay, the 5th of D is… counting up five notes from D… D, E, F♯, G, A… wait, did A have a sharp on it or not?”

Rather than working it out in your head like that every single time, it’s much easier to learn the shape these intervals make on the fretboard relative to the root. This article is for:

✅️ Anyone just starting to learn bass theory

✅️ Anyone who’s heard of the 3rd and 5th but isn’t sure what to actually do with them

Let’s start with the 5th, since it’s the easier of the two to learn.

The Root-to-5th Relationship

Here’s the position of C and its 5th, G:

The 5th of C (G) shown on two different strings relative to the root

And D and its 5th, A:

The 5th of D (A) shown on two different strings relative to the root

And F and its 5th, C:

The 5th of F (C) shown on two different strings relative to the root

Notice the pattern: relative to the root, the 5th is consistently either two strings over (toward the thinner strings) and two frets up, or the same fret on the neighboring thicker string.

The standard root-to-5th shape illustrated across the fretboard

A few less-common root positions where the same 5th shape still applies

Unfortunately, there’s no shortcut for memorizing the handful of irregular fretboard spots shown above — but learning to see the 5th this way, as a consistent shape, makes building a bass line noticeably easier.

The Root-to-3rd Relationship

The 3rd comes in two flavors: a major 3rd and a minor 3rd.

About the Major 3rd

For a C chord, you can use the major 3rd whenever you see something like “6,” “7,” or “△7” written to the right of the letter C.

About the Minor 3rd

For a C chord, you can use the minor 3rd whenever you see something like “m7,” “m6,” “m7♭5,” or “dim” written to the right of the letter C.

Root-to-Major-3rd Shape

C and its major 3rd:

The major 3rd of C shown on the fretboard

D and its major 3rd:

The major 3rd of D shown on the fretboard

F and its major 3rd:

The major 3rd of F shown on the fretboard

Seeing the major 3rd this way, as a consistent shape relative to the root, makes it much easier to remember:

The standard root-to-major-3rd shape illustrated across the fretboard

Root-to-Minor-3rd Shape

C and its minor 3rd:

The minor 3rd of C shown on the fretboard

D and its minor 3rd:

The minor 3rd of D shown on the fretboard

F and its minor 3rd:

The minor 3rd of F shown on the fretboard

Same idea — seeing the minor 3rd as a consistent shape relative to the root makes it much easier to recall on the fly:

The standard root-to-minor-3rd shape illustrated across the fretboard

A few less-common root positions where the same minor 3rd shape still applies

As with the 5th, there’s unfortunately no shortcut for the irregular spots — but being able to instantly picture where the root, major 3rd, and minor 3rd sit relative to each other on the fretboard makes building a bass line considerably easier.

Recognizing these shapes by sight is one thing — actually hearing whether you’re reaching for the right one in real time, under tempo, is exactly what a teacher’s ear can confirm.

Want Personalized Feedback on Your Playing?

This is exactly the kind of thing that’s hard to fix alone — and where having a teacher makes all the difference.

At Line on Bass, I offer an online lesson service where you send me a video of your playing, and I give you specific, detailed feedback — every single day if you want.

Students from around the world are using this to fix exactly these kinds of issues and steadily improve their jazz bass skills.

Check Out the Lesson Service →

Posted on Leave a comment

Quick Basic Bass Drills for When You’re Short on Practice Time

This article is written by Toru Hoshino, a jazz bassist and instructor based in Japan who teaches online lessons to students worldwide. In this article, he shares a few quick basic drills for players who are self-taught and short on practice time.

A complaint I hear constantly from students is “I just can’t find the time to practice.” If you’re taking lessons, I can suggest something tailored to your specific situation — but if you’re teaching yourself, staying motivated when time is tight is genuinely tough. Here are a handful of short, focused drills worth keeping in your back pocket for exactly those days — especially useful if you’ve been playing less than a year.

Left-Hand Warm-Up (4 Minutes)

A drill that touches every part of the fretboard, from the lowest positions up to the highest. Great as a pre-practice warm-up, and it also helps build a wider stretch in your left hand over time.

Right-Hand Warm-Up (5 Minutes)

A drill that runs from slow to fast tempos, helping you check that your picking hand is making solid, consistent contact with the strings rather than getting tangled up.

A Drill for Keeping Your Pinky From Popping Up (3 Minutes)

It’s extremely common for the left-hand pinky to pop straight up awkwardly — especially early on. This drill gradually trains your pinky to stay relaxed and “lying down” instead.

Scale Practice (5 Minutes)

A drill that works on fretboard note names, rhythm, and fretting accuracy all at once — a great all-around way to build your fundamentals.

A Drill for Memorizing Fretboard Note Names

A drill where you play specified notes evenly across all four strings. If you’re struggling to memorize where each note name lives on the fretboard, this one’s worth working into your routine.

Putting in even a small amount of practice every day means that when you do find a big chunk of free time, you’ll be able to dive into deeper practice that much more smoothly.

Hopefully these are useful additions to your daily routine.

Short daily drills like these build the fundamentals — but knowing whether your specific habits and form are actually solid is exactly the kind of thing a teacher can confirm fast.

Want Personalized Feedback on Your Playing?

This is exactly the kind of thing that’s hard to fix alone — and where having a teacher makes all the difference.

At Line on Bass, I offer an online lesson service where you send me a video of your playing, and I give you specific, detailed feedback — every single day if you want.

Students from around the world are using this to fix exactly these kinds of issues and steadily improve their jazz bass skills.
Check Out the Lesson Service →

Posted on Leave a comment

What Does a Chord Symbol Like “C△7” Actually Mean for a Bassist?

This article is written by Toru Hoshino, a jazz bassist and instructor based in Japan who teaches online lessons to students worldwide. In this article, he explains what a chord symbol like “C△7” or “Dm7” actually means for a bass player, in plain language with no jargon.

This article is for anyone who’s ever wondered:

  • What exactly is a chord like “C△7” or “Dm7”?
  • What does that even mean for the bass?
  • Does a bassist even need to think about chords?

Here’s a no-jargon breakdown of how a bass player should actually interpret a chord symbol.

What Are These Symbols Like “△7” or “m7” Actually Saying?

Most music isn’t made of single, isolated notes played one at a time — it’s made of several notes stacked together at once. That stack of notes is what creates the actual harmony you hear underneath a melody.

But spelling out every single note in that stack every time would get unwieldy fast. So instead, music uses a shorthand: a chord symbol.

A symbol like C△7 or G7 is really just shorthand that says “these specific notes are available to use here.” That’s what a chord is — a defined, named stack of notes.

What Should a Bassist Actually Do When They See a Chord Symbol?

There are an enormous number of possible chords out there. But there’s a simple way bass players can cut through that complexity: focus on the letter on the left-hand side of the chord symbol.

That letter is called the root note. Playing along to that root note is called “playing the root.”

There are exceptions, but when a bassist is playing along with a chord progression, the first and most important thing is simply being able to find and play that root note by reading the chord symbol.

A Quick Example

Say you see:

C△7
Dm7
F△7
G7

If a bassist plays the root note of each — C, then D, then F, then G — that’s already enough to make the music work, regardless of everything else written to the right of each letter.

Understanding the “Root Note”

In chords like:

C△7
Dm7
F△7
G7

the bolded letter on the left — C, D, F, G — is what’s called the root note. Playing the root note that matches each chord is called “playing the root,” or a “root-note bass line.”

Exceptions aside, when a bass player is told to “play along with the chords,” the single most important skill is being able to look at a chord chart and play its root notes.

Chord-Reading Summary

Whether you see:

C[ ] ← where [ ] might be △7, m7, dim, etc.
D[ ] ← where [ ] might be △7, m7, dim, etc.
E♭[ ] ← where [ ] might be △7, m7, dim, etc.

what matters first is the letter on the left — the root — regardless of what symbol follows it on the right.

If you’re told to “play along with the chords” on bass, simply playing the root notes is enough to make the music work.

Root Note Reference Chart

Here are the root notes from the open string up through the 4th fret.

A reference chart of root notes on the bass fretboard from open string to the 4th fret

If someone says “play an F,” you want to be able to instantly land on either the 3rd fret of the 2nd string or the 1st fret of the 4th string. If they say “play a B♭,” you want the 3rd fret of the 1st string or the 1st fret of the 3rd string to come just as naturally. Memorizing this chart is well worth the effort.

Hopefully this article is a useful addition to your daily practice.

Root notes are the foundation, but actually locking those roots into a tight, in-the-pocket groove with a band is exactly the kind of thing a teacher’s ear can fine-tune fast.

Want Personalized Feedback on Your Playing?

This is exactly the kind of thing that’s hard to fix alone — and where having a teacher makes all the difference.

At Line on Bass, I offer an online lesson service where you send me a video of your playing, and I give you specific, detailed feedback — every single day if you want.

Students from around the world are using this to fix exactly these kinds of issues and steadily improve their jazz bass skills.

Check Out the Lesson Service →

Posted on Leave a comment

A Simple Fix for Thumb Pain at the Base of Your Left Hand

This article is written by Toru Hoshino, a jazz bassist and instructor based in Japan who teaches online lessons to students worldwide. In this article, he offers a simple fix for pain at the base of the left thumb when fretting.

Pain at the base of your left thumb while fretting is a common issue for players just starting out. Here’s a fix worth trying.

Try Fretting Without Using Your Thumb at All

Try fretting without using your thumb at all, and play do-re-mi-fa-sol-la-ti-do starting from the 3rd fret of the 3rd string.

It’ll feel really awkward — but notice where the effort is concentrated while you’re fretting.

If you’re relying on the strength of your fingers alone rather than the strength of your whole arm to do the pressing, try shifting to using the strength of your entire arm instead. Doing this, you can usually manage to fret the notes even without your thumb.

Now, Bring the Thumb Back — Just “Resting” It

That said, playing with no thumb at all is awkward. So bring the thumb back in, but with the image of just “resting” it in place.

Think of it as “resting” the thumb against the neck, not “clamping” it.

This takes a lot of the load off your thumb.

It’ll feel clumsy and a little difficult at first, but you should be able to feel a real reduction in strain on your thumb. Try to keep this image in mind as a general habit during practice.

If the base of your thumb keeps hurting, it can develop into tendinitis. The author has actually dealt with this himself — there was a stretch where overworking with a bad form caught up with me. If something hurts, that’s usually a sign something’s off, and it may be worth reconsidering your form and how you’re using your body.

A subtle shift like “clamping” versus “resting” the thumb is genuinely hard to self-diagnose — having a teacher watch your hand directly is the fastest way to catch it before it becomes an injury.

Want Personalized Feedback on Your Playing?

This is exactly the kind of thing that’s hard to fix alone — and where having a teacher makes all the difference.

At Line on Bass, I offer an online lesson service where you send me a video of your playing, and I give you specific, detailed feedback — every single day if you want.

Students from around the world are using this to fix exactly these kinds of issues and steadily improve their jazz bass skills.

Check Out the Lesson Service →

Posted on Leave a comment

Why Does My Pinky Keep Popping Up? A Left-Hand Drill to Fix It

This article is written by Toru Hoshino, a jazz bassist and instructor based in Japan who teaches online lessons to students worldwide. In this article, he answers a question about why the pinky finger keeps popping up while fretting.

Here’s a question I got recently: “No matter how many times I practice, my pinky keeps popping straight up. What can I do about it?”

This came in through a contact form, so I can’t say for certain without actually seeing your hand in action — but here’s one thing worth trying: set your right hand aside for a moment and watch your left hand’s movement on its own.

Say you’re fretting the 3rd string with your index finger on the 1st fret, middle finger on the 2nd fret, and pinky on the 3rd fret, one after another.

A common pattern is that the pinky pops straight up while you’re fretting with the index or middle finger.

The pinky finger popping straight up while fretting with the index finger

The pinky just isn’t a finger you move much in everyday life, so when you’re still getting used to it and you’re moving both hands at once, your brain can’t fully control what the pinky’s doing — and that’s a big part of why it pops up.

So: set your right hand aside entirely, go left-hand only, and fret the 3rd string’s 1st fret with your index, 2nd fret with your middle finger, and 3rd fret with your pinky, one after another.

While you’re fretting the 1st fret, consciously focus on keeping the pinky on the 3rd fret from lifting.

Doing this often makes the pinky noticeably easier to control than when the right hand was also in the mix.

Practicing the same fingering with the left hand only, focusing on keeping the pinky down

Adding more moving parts at once often makes it harder to control things the way you intend. So if your pinky just won’t cooperate no matter what, try isolating the movement by setting your right hand aside and checking your left hand alone.

Hopefully this helps with your daily practice.

A habit like this is hard to fully diagnose from a written description alone — a teacher watching your actual hand can usually spot the exact cause in seconds.

Want Personalized Feedback on Your Playing?

This is exactly the kind of thing that’s hard to fix alone — and where having a teacher makes all the difference.

At Line on Bass, I offer an online lesson service where you send me a video of your playing, and I give you specific, detailed feedback — every single day if you want.

Students from around the world are using this to fix exactly these kinds of issues and steadily improve their jazz bass skills.
Check Out the Lesson Service →

Posted on Leave a comment

5 Rules for Practicing Your Instrument in a Park

This article is written by Toru Hoshino, a jazz bassist and instructor based in Japan who teaches online lessons to students worldwide. In this article, he shares what three years of practicing upright bass in public parks taught him.

Sax and trumpet players, string players on violin, cello, or upright bass, singers doing vocal warmups — it’s pretty common to see musicians practicing outdoors in parks. These are all instruments that are simply too loud to practice at home without bothering the neighbors, and parks also save you the cost of renting a studio space.

Musicians are, generally speaking, always looking to save money. I practiced in parks myself for about three years, and whenever I see someone else out there gamely practicing in a park, I can’t help but slow down and take notice.

Picking the Right Park

Not every park works for instrument practice. Tiny neighborhood parks tend to carry sound straight into nearby houses, so they’re best avoided. Look for something large — the kind of big, open city park where you can find a spot far enough from foot traffic and houses that you won’t bother anyone. A few hours of research into large parks near you goes a long way.

Parks that are great for instrument practice tend to share a few things in common: they’re large enough to put real distance between you and nearby homes, they’re not packed with foot traffic on weekdays, and ideally they have some open lawn or tree cover where the sound won’t carry as far. Parks to avoid: ones where instruments are explicitly banned, ones that are constantly packed with crowds, or small neighborhood parks tucked right up against houses.

5 Rules for Practicing in a Park

1. Your Sheet Music Will Fly Away

Sudden gusts of wind will send your sheet music flying. Use clothespins to clip it down. For practicing after dark, a clip-on LED light for your music stand is also genuinely useful.

2. Set a Firm Time Limit

This matters most in summer and winter. Practicing in a park for too long without a clear cutoff is a fast track to catching a cold or, in summer, heatstroke. Personally, I never went past about 90 minutes — I’d set a timer on my phone and stop the moment my focus started to slip.

3. Plan Your Practice Routine at Home, Beforehand

Since you’ve made the effort to go outside, save any fiddly prep work — writing things out, sorting sheet music, and so on — for home ahead of time, so you can devote your outdoor time purely to actually playing.

4. Practice in the Shade, Near Trees, Whenever You Can

This protects you against sudden rain and heatstroke alike. If there’s a covered spot that won’t get in anyone’s way, make use of it.

5. Dress for the Weather — Properly

Spring and fall are easy, but summer and winter are no joke. Here’s what to keep in mind for each:

Summer:

  • Skip sandals (mosquito bites)
  • Bring bug spray
  • Wear a hat

Stick to the shade as much as you can, and keep drinking water throughout.

Winter:

  • Layer up — seriously
  • Tights under your pants
  • Two pairs of socks
  • Boots
  • A thermos of hot tea

No matter how many layers you put on, the cold seeps into your whole body after about an hour. If you absolutely have to practice for longer, bring hot tea in a thermos. I practiced through winters myself, eventually splurging on some genuinely expensive thermal tights just to make it bearable — and they were unbelievably warm and held up well over time.

A Few More Things to Keep in Mind

Keep Up with Instrument Maintenance

Humid months are hard on your instrument when you’re playing outdoors. Use a backup instrument if you have one, and if you only have your main one, stay on top of maintenance.

Avoid Cherry Blossom Season and Sports Events

Crowds and noise from games or festivals make it impossible to concentrate, and in summer you’ll sometimes run into people setting off fireworks nearby — distracting at best, and a little alarming if one heads your way.

Skip It When You’re Not Feeling Well

Summer and winter conditions outdoors will make you feel worse, not better. Stick to practicing at home during those times.

If Someone Heckles You, Just Stay Confident

I’ve never had a run-in with anyone genuinely dangerous, but I’ve definitely had drunk passersby comment on my way past — “what is that, a cello or something?” (it’s an upright bass, for the record). Once in a while a tourist mistakes it for a street performance and leaves a tip. Either way, the key is not to let any of it get to you. Don’t be shy about practicing in public, even as a beginner — there’s something genuinely great about the feeling of your sound resonating outdoors. Enjoy it.

Even with all the outdoor practice in the world, the thing that’s genuinely hard to catch on your own is what your playing actually sounds like to someone else listening — which is exactly where a teacher comes in.

Want Personalized Feedback on Your Playing?

This is exactly the kind of thing that’s hard to fix alone — and where having a teacher makes all the difference.

At Line on Bass, I offer an online lesson service where you send me a video of your playing, and I give you specific, detailed feedback — every single day if you want.

Students from around the world are using this to fix exactly these kinds of issues and steadily improve their jazz bass skills.

Check Out the Lesson Service →

Posted on Leave a comment

Should You Read Notes as Do-Re-Mi or as Letter Names?

This article is written by Toru Hoshino, a jazz bassist and instructor based in Japan who teaches online lessons to students worldwide. In this article, he answers a question from one of his jazz students about how to read note names.

Here’s a question I got from one of my jazz students, along with my answer:

“Should I think of notes by solfège — do-re-mi-fa-sol — or by letter names — C-D-E-F-G?”

My Answer: Get Comfortable Reading by Letter Names (C-D-E-F-G)

In popular music — rock, pop, jazz, and so on — you’re constantly thinking in terms of chords, so I recommend getting comfortable reading notes as letter names rather than solfège.

One big reason: when you’re writing your own phrases or analyzing a chord progression, thinking in letters links up much more intuitively with the chord symbols you’re already reading.

How to Build the Habit

To get comfortable with letter names, the key is to consciously say the note names to yourself while playing slowly during scale practice and other basics.

For example, while playing a major scale, say “C… D… E… F… G…” in your head as you go. This steadily strengthens the connection between your fingers and the note names.

It’s Fine If You Can’t Keep Up at Faster Tempos

That said, once the tempo picks up, it gets genuinely hard to consciously think “C-D-E-F-G” in your head. This happens to everyone — don’t worry about it.

I still find it hard to consciously track note names once things get fast enough myself.

Even so, practicing with letter names in mind at slower tempos strengthens the connection between phrases and chords over time, which ultimately improves how well you remember and understand phrases.

Early On, the Effort to Stay Conscious of It Matters

When you’re just starting out, consciously tracking note names while also moving your fingers can feel like a lot to juggle.

But building this habit early means that, eventually, the note name will just pop into your head the instant you look at the fretboard.

You don’t need to get there right away. Take it slow and steady.

Building a habit like this on your own can feel slow — but a teacher can usually tell you exactly which exercises will get you there fastest.

Want Personalized Feedback on Your Playing?

This is exactly the kind of thing that’s hard to fix alone — and where having a teacher makes all the difference.

At Line on Bass, I offer an online lesson service where you send me a video of your playing, and I give you specific, detailed feedback — every single day if you want.

Students from around the world are using this to fix exactly these kinds of issues and steadily improve their jazz bass skills.

Check Out the Lesson Service →