Hi, I’m Toru Hoshino (@jazzbassisttoru), a jazz bass teacher.
This article walks through a training method that will help you improvise walking bass lines, instead of relying on lines you’ve memorized ahead of time.
For this one, we’ll use a chord progression from a famous jazz standard: “Autumn Leaves.”
This ended up being a pretty long article, so I’d recommend bookmarking it and working through it when you have some time to really dig in.
Contents
Want to Be Able to Improvise Walking Bass Lines?
Being able to improvise a walking bass line on the spot, instead of relying on a line you wrote out ahead of time, is a great feeling.
But it’s not easy, and a lot of players end up searching YouTube over and over trying to figure out how to get there.
In this article, we’ll take the first 8 bars of the “Autumn Leaves” chord progression
Cm7 → F7 → B♭Δ7 → E♭Δ7
→ Am7♭5 → D7♭13 → Gm6 → Gm6
and break down how to build a walking bass line over it that you can improvise in real time.

Step 1: Play Roots
Start by getting comfortable playing the roots, then gradually add more notes.
I covered roots in detail in another article — if you’re already comfortable playing bass lines from the root, feel free to skip ahead.
The chords go Cm7 in bar 1, F7 in bar 2, B♭Δ7 in bar 3, and E♭Δ7 in bar 4.
Start at a slow tempo and play the root on beat 1 of each bar.

Once that’s solid, try playing the root four times per bar as quarter notes.

Once you can play the whole progression on quarter-note roots at around 100–120 bpm, move on to the next step.
Step 2: Play Root and 5th
Now we add the 5th to the root.

Compared to roots only, doesn’t this already feel like it’s moving a lot more?
About the 5th
If the root of Cm7 is C (3rd string, 3rd fret), the 5th is located here:
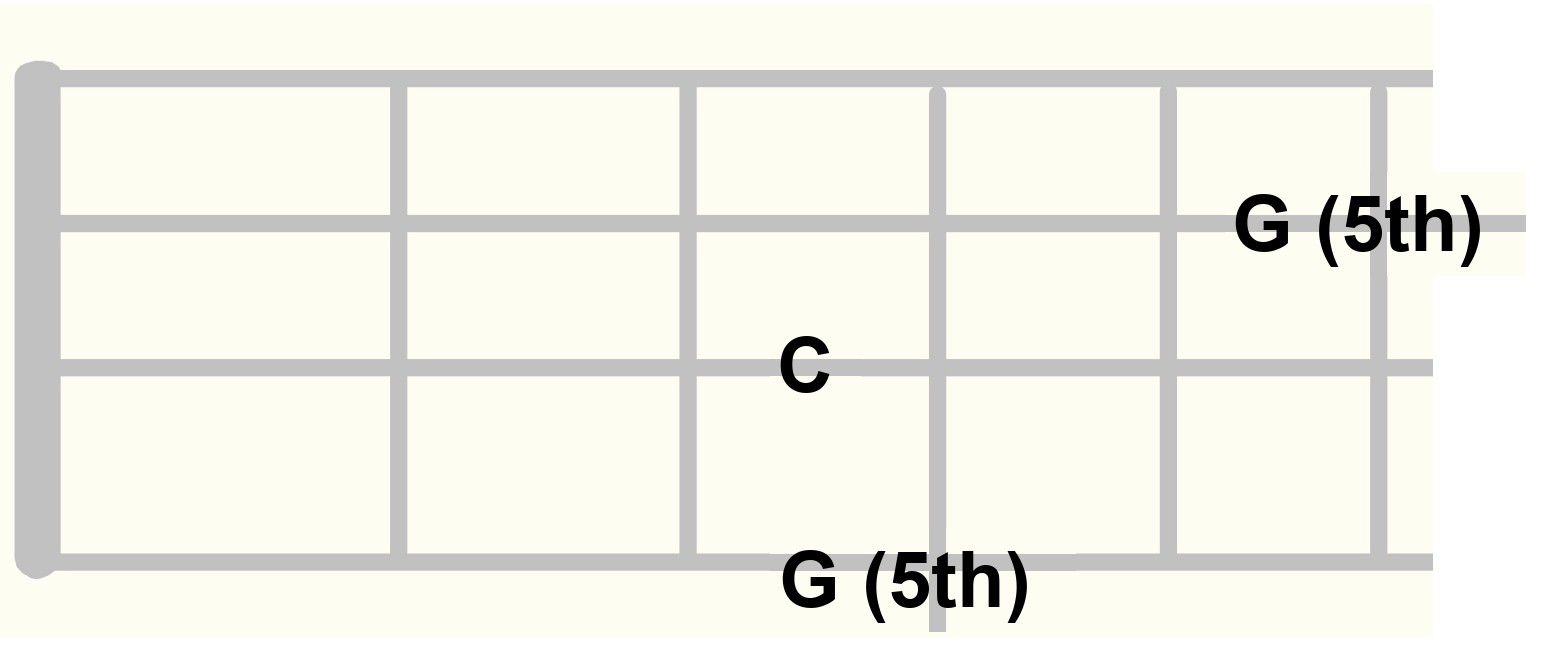
If the root of F7 is F (2nd string, 3rd fret), the 5th is located here:
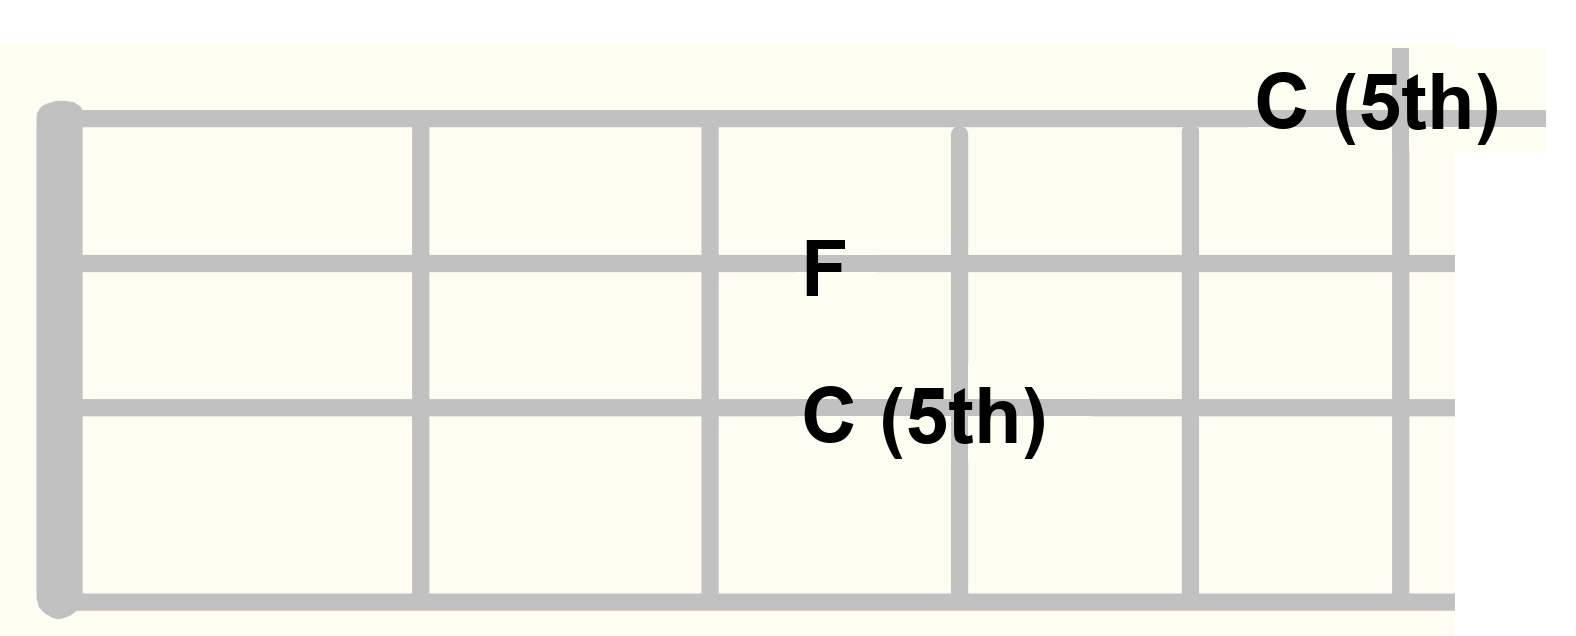
Across the whole neck, this is how the 5th sits relative to the root:
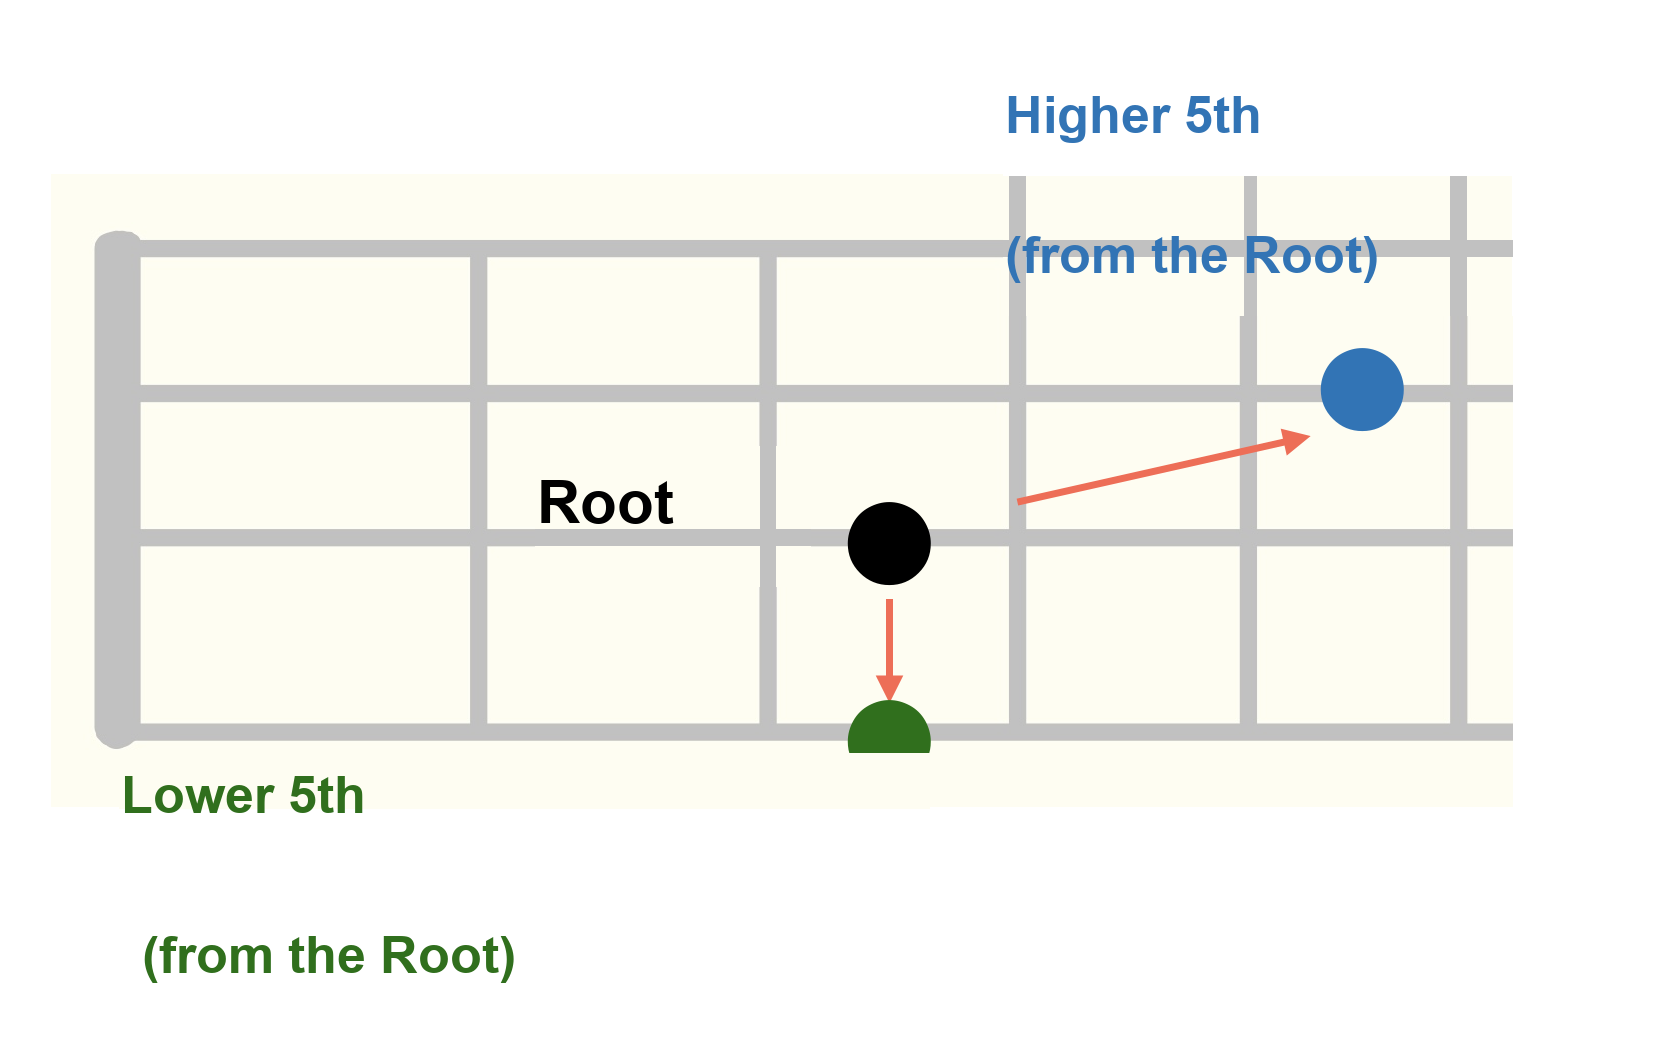
If I had to put the idea of the 5th into simple terms, it would be this:
When you’re building a moving bass line and wondering what note besides the root you can safely use, the 5th is a reliable choice.
That’s really all you need to know for now.
Step 3: Play Root and 3rd

I used a different pattern for the first half and the second half here.
About the 3rd
The note you can use for the 3rd is different for major chords versus minor chords.
If the root of Cm7 is C (3rd string, 3rd fret), the 3rd is located here:

If the root of F7 is F (2nd string, 3rd fret), the 3rd is located here:
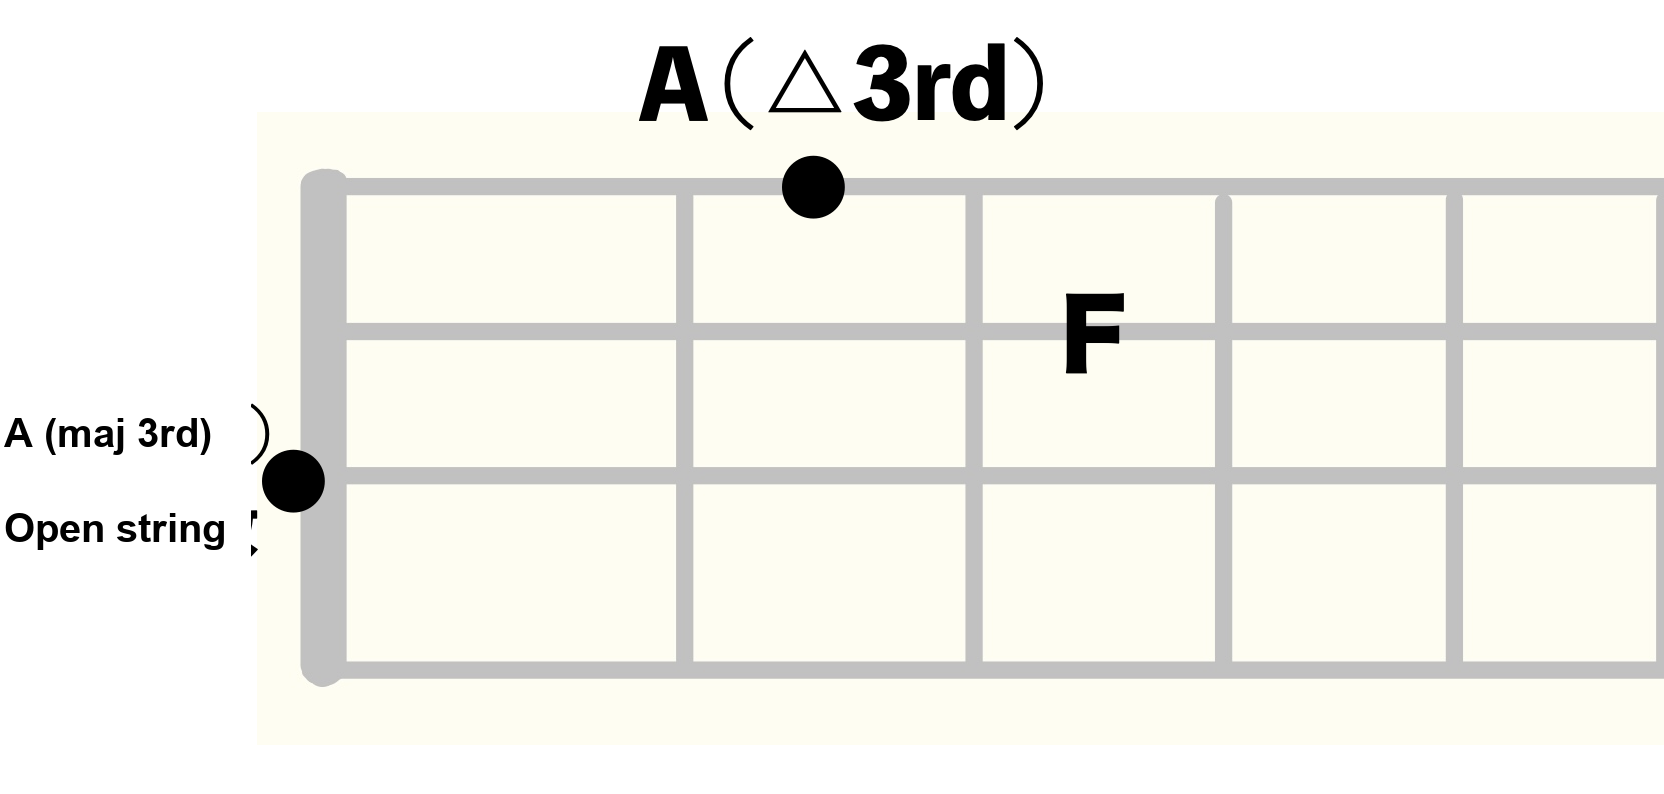
The 3rd works differently for major versus minor chords, and going into that fully here would make this article way too long, so I’ve covered it in detail in a separate article.
How to Practice What We’ve Covered So Far
The goal isn’t to drill a line into muscle memory — what matters is staying aware of exactly where you are in the chord while you practice.
Try placing the 3rds and 5ths we’ve covered at different points within the bar.
Example 1 — bars 1–2: the 5th moved to beat 2

Example 2 — bars 3–4: sometimes using the 5th twice, sometimes only once

Example 3 — bars 5–6: adding movement with the 3rd

Once you’re comfortable with this, let’s move on.
Step 4: Play Root, 3rd, and 5th Together
Now let’s put the 3rd and the 5th into the same bar.
Here’s one example:

I didn’t put a 3rd or a 5th in every single bar — I also factored in how easy it is to finger — but doesn’t adding the 3rd and 5th make the line feel a lot more alive?
The root, 3rd, and 5th together are what’s called the “chord tones.”
Chord tones are essential when you’re building a walking bass line.
Just like in the practice approach above, try placing the 3rd and 5th at different points in the bar again here, checking the fingering, the sound, and how playable each option feels as you go.
Example 1

Example 2

In both examples, I moved around every note used within the bar. Here’s how that sounds:
Last, let’s add passing tones.
How to Add Passing Tones
For a straight quarter-note four-feel, the passing tone is most often the note a half step above or below the root of the next bar’s chord, placed on beat 4.
That’s a bit hard to picture from words alone, so here’s an example.
If you build a bass line over the first 8 bars using just the root and passing tones, it looks like this:

I marked the passing tones with “P.” In bars 2 and 3, the passing tone happens to land on the 3rd of that bar’s chord; in bars 4 and 5, it lands on the 5th.
That already sounds decent on its own, but let’s add the 5th.

In a few spots the 5th and the passing tone land on the same note, but here we’re treating beat 4 as a passing tone regardless.
Now let’s add the 3rd as well.

And that’s what it ends up sounding like.
Get Comfortable Using Root + 3rd + 5th + Passing Tones
It’s not the case that every recorded bassist’s line over “Autumn Leaves” is built entirely from root, 3rd, 5th, and passing tones —
that would never actually happen.
But once you can control the movement between root, 3rd, 5th, and passing tones, you’ll gradually be able to handle a much wider range of musical situations.
I’ll say it again: this isn’t about memorizing a line by rote — it’s practice that’s meant to get you improvising.
Try things, think them through, and let yourself fail — that’s what matters.
Try placing notes in different spots, and at a slow tempo, check in on the fingering, the sound, and how playable each choice feels as you practice.
I’d recommend doing this kind of practice when you’re not too tired and can really focus.
Want Personalized Feedback on Your Playing?
This is exactly the kind of thing that’s hard to fix alone — and where having a teacher makes all the difference.
At Line on Bass, I offer an online lesson service where you send me a video of your playing, and I give you specific, detailed feedback — every single day if you want.
Students from around the world are using this to fix exactly these kinds of issues and steadily improve their jazz bass skills.