Posted on Leave a comment

What Are Diatonic Chords? #1 — Why Bassists Need to Know Them

This article is written by Toru Hoshino, a jazz bassist and instructor based in Japan who teaches online lessons to students worldwide.

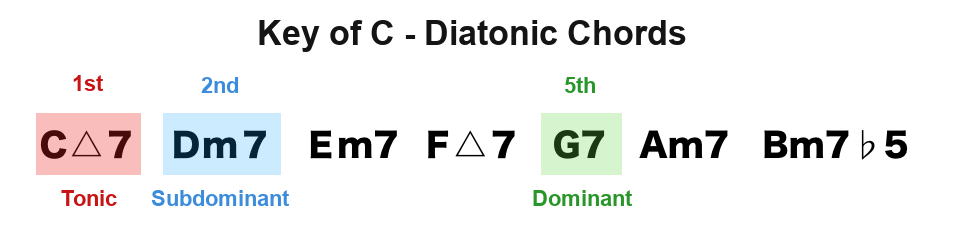
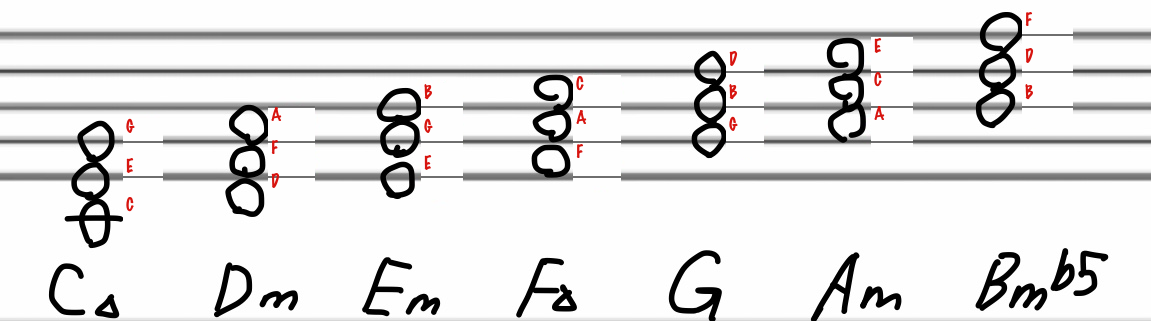
Every music theory book covers “diatonic chords” — usually in a diagram like this:

And most people’s reaction to that is something like: “…okay, I kind of get it in theory, but what’s the point?” That’s usually where things fall apart — and it’s exactly where I got stuck too.

My initial reaction was: “I’m a bassist, not a guitarist. I don’t play chords. All I play is roots.”

It looks impressive to know, but when you see all those chord tones on the page, from a bassist’s perspective it’s easy to wonder, “do I even need this?” — and even useful books stop clicking at that point.

That said, learning diatonic chords genuinely did make music and bass more enjoyable, even if it took me a while to get there.

Before getting into the theory, this article focuses on giving you a bassists-eye view of where diatonic chords actually come in useful.

This article is for:

  • Bassists who want to play jazz but aren’t sure where to start
  • Bassists who want to try improvising
  • Anyone who bought a music theory book and then gave up — with that book still gathering dust in a drawer somewhere

Over the next few articles, I’ll work through the notoriously tricky topic of diatonic chords step by step.

Diatonic Chords — In Every Theory Book

The goal of this article is simply to give you the rough overall impression that diatonic chords matter for bassists too. I’ll be using intentionally simplified explanations, and real-world music has plenty of exceptions — but I’m deliberately keeping those aside for clarity. Just go with the general feeling for now.

Why Diatonic Chords Are Useful

Knowing diatonic chords helps with a lot of things, but one of the biggest is improvisation.

Knowing diatonic chords lets you identify the key of a song.

Knowing the key lets you analyze the song.

Being able to analyze the song lets you judge which notes are available over each chord — making it much easier to play something that sounds right when improvising.

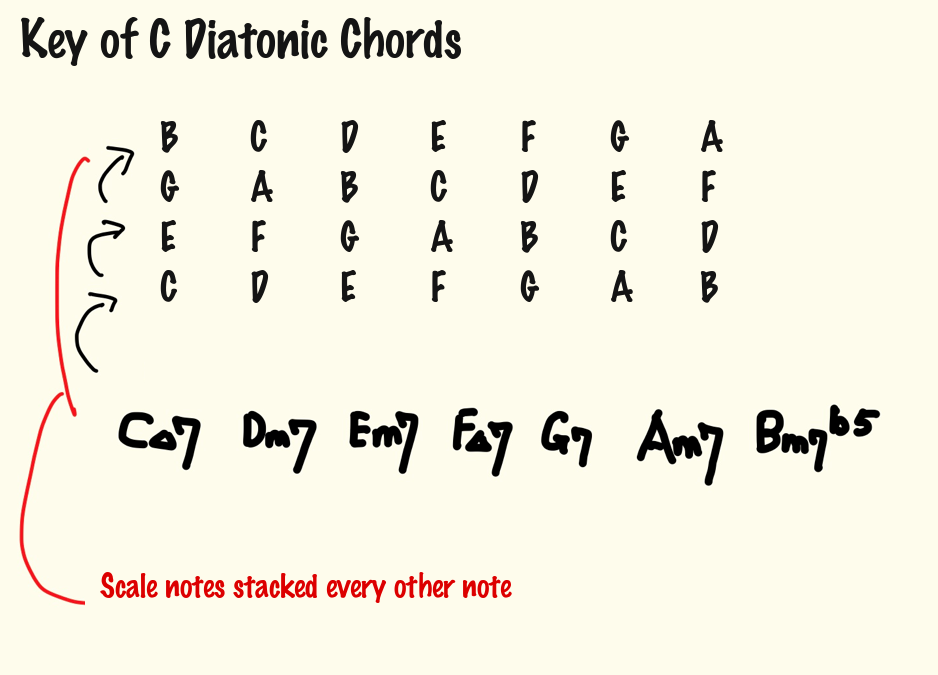
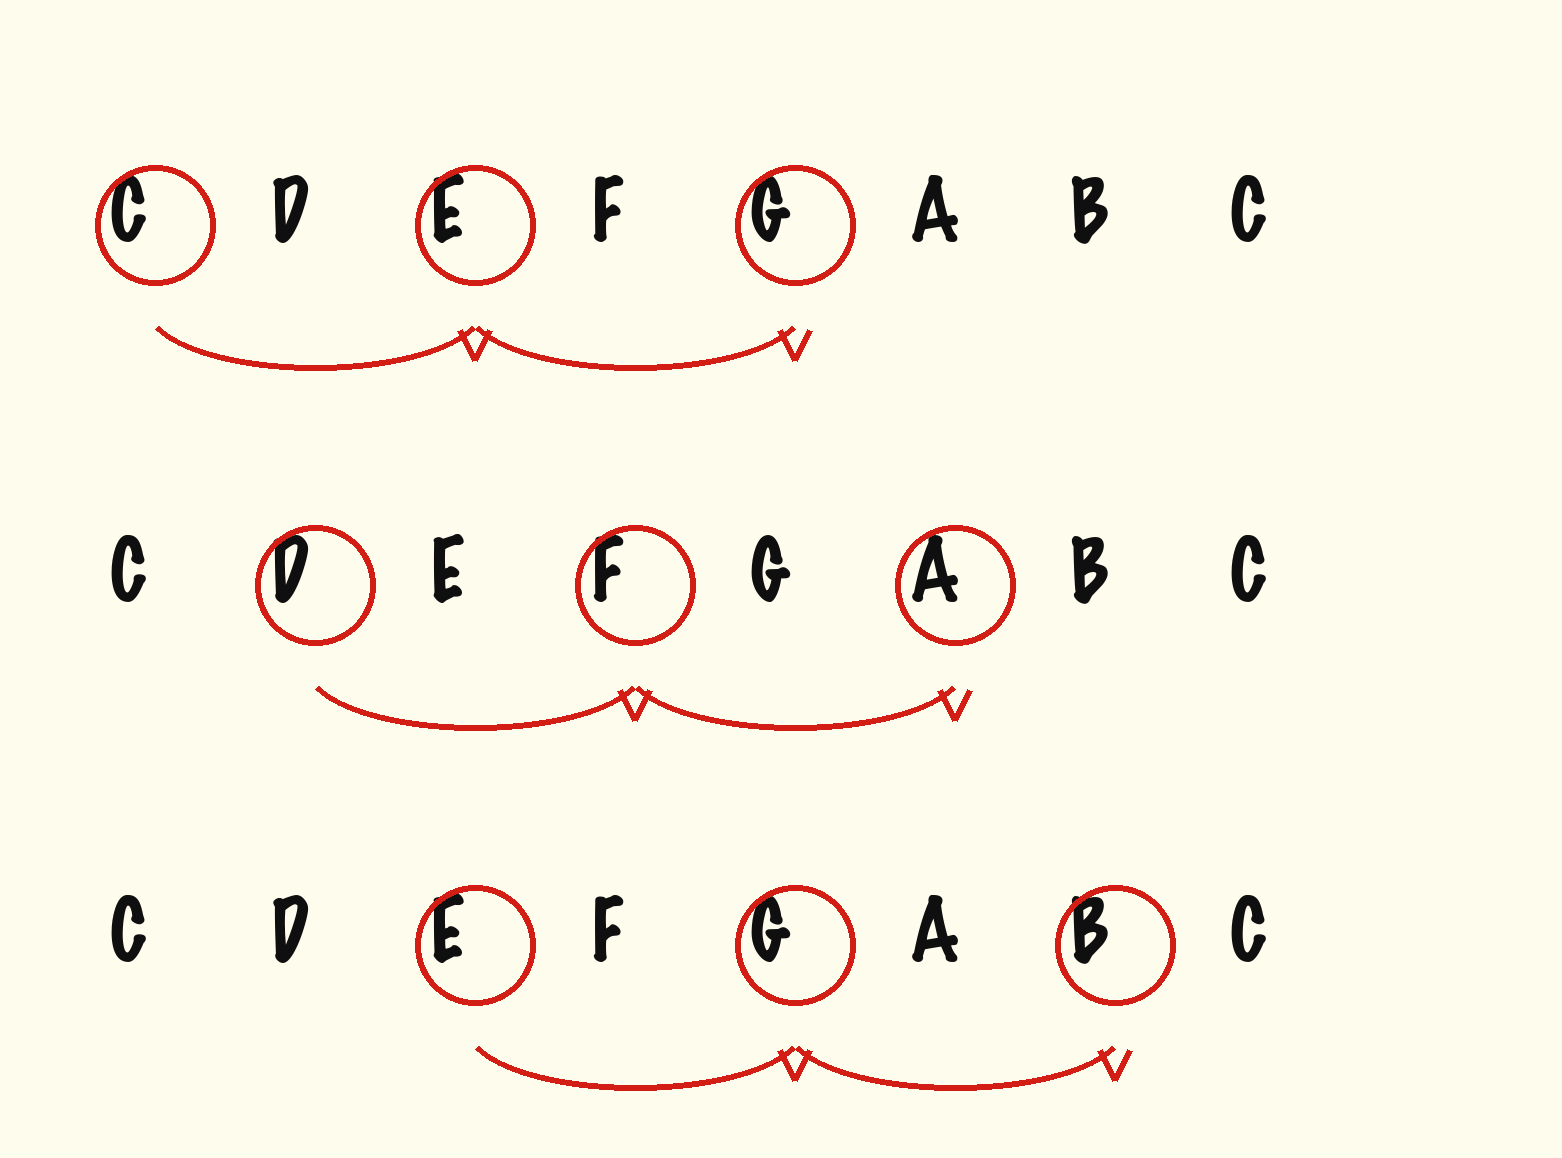
That’s the chain. Very roughly speaking, diatonic chords are built by stacking scale notes in thirds (“every other note”) on top of each scale degree — like this:
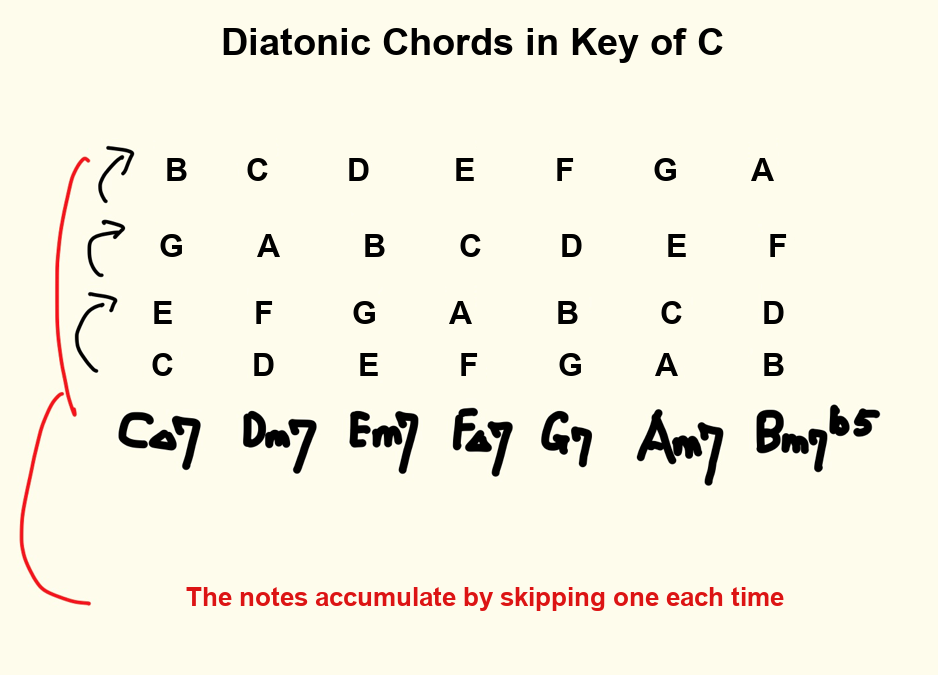
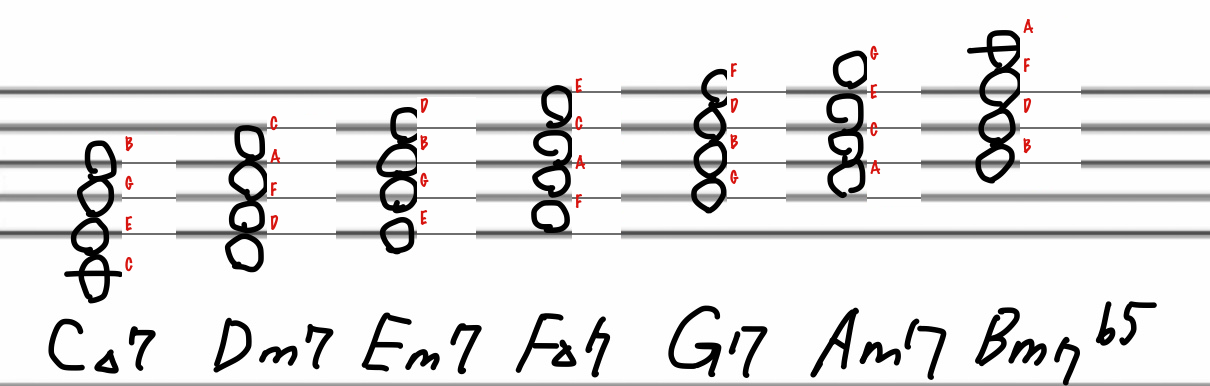
Diatonic Chords in Key of C

These are the seven diatonic chords in the key of C. More detail on the structure comes later — for now, just a general sense of it is fine.

Example 1 — Using Diatonic Chords for Improvisation

Say you’re improvising over a chord progression in the key of C:

C△7 → Em7 → A7 → Dm7

Cross-referencing with the diatonic chord table, the underlined chords are diatonic:

C△7Em7 → A7 → Dm7

Here’s a phrase I played over that:

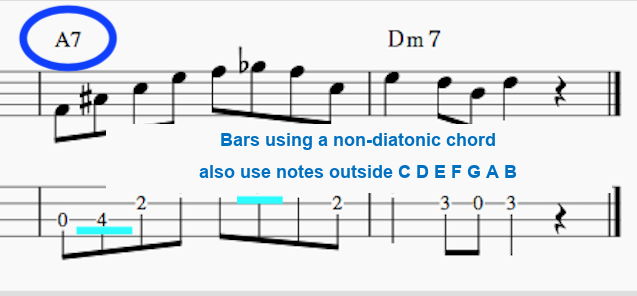
When you understand diatonic chords, you realize that across all the diatonic chords, you can improvise using just the major scale (C D E F G A B) — without having to switch scales for each chord.
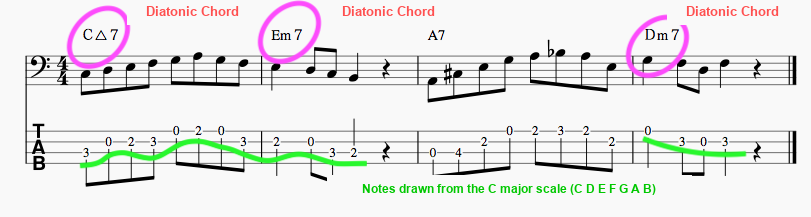
And when a non-diatonic chord appears — like the A7 in bar 3 — you know: “I can’t just use C D E F G A B here.”
Example 2 — Diatonic Chords Speed Up Transcribing by Ear

Transcribing a Diatonic Chord Progression

Say you’re transcribing over this chord progression:

C△7 → Dm7 → F△7 → G7

If you know that all four chords are diatonic in key of C, you can make a judgment call even before you start hunting note-by-note by ear: “This solo is probably using mostly C D E F G A B.”

Here’s what it actually sounds like in practice:

When a Non-Diatonic Chord Appears

Now try this:

C△7 → Dm7 → F△7 → Fm7

If you notice that the fourth chord is NOT diatonic in key of C, you can predict: “The fourth chord probably uses notes outside C D E F G A B.”

And that’s exactly what’s happening:

Transcribing feels impossibly hard if you think you have to hunt through every possible note on the fretboard. But if you know “I can probably find it within C D E F G A B” — that simplifies things enormously.

More Benefits of Knowing Diatonic Chords

There are many other areas where they help:

  • Learn songs faster
  • Arrange songs more easily
  • Expand your composing options
  • Build bass lines more easily
  • Develop more arranging ideas
  • Understand existing songs more deeply
  • Transpose songs to different keys more easily

They’re genuinely versatile. For now, just take away the general sense that diatonic chords matter for bassists. That’s the goal of this article.

Continue with Part 2, where I go deeper into the structure of diatonic chords:

What Are Diatonic Chords? #2 — How They Are Built (With Reference Tables)

Want Personalized Feedback on Your Playing?

This is exactly the kind of thing that’s hard to fix alone — and where having a teacher makes all the difference.

At Line on Bass, I offer an online lesson service where you send me a video of your playing, and I give you specific, detailed feedback — every single day if you want.

Students from around the world are using this to fix exactly these kinds of issues and steadily improve their jazz bass skills.

Check Out the Lesson Service →

Posted on Leave a comment

A Simple Trick for More “Jazz-Sounding” Bass Solos: The ♭9th (Flat Ninth)

This is part of an ongoing series on bass solos and improvisation.

This time, I want to share a small but handy trick you can use in your bass solos: the ♭9 (flat ninth).

What This Article Covers

This article is written by Toru Hoshino — a jazz bassist and instructor based in Tokyo who has played bass on an estimated 1,000+ jam sessions around the city and continues to perform and teach today. It’s for anyone who:

· Isn’t sure how to put together an improvised solo
· Wants to add some new ideas to their solo vocabulary
· Feels like their phrases never quite sound “jazzy” enough

This time, I’ll explain the ♭9th — a note that comes in incredibly handy over dominant chords in a ii–V–I progression.

First, give it a listen.

A Few Phrases That Use the ♭9th

Example 1

Without the ♭9th

With the ♭9th

Don’t those feel pretty different, even though only one note changed? The first one isn’t bad at all — but the second has a bit more “character” to it.

Let’s look at one more example.

Example 2

Without the ♭9th

With the ♭9th

Just like in Example 1, only one note is different — but again, that distinctive flavor shows up in the second version.

That’s because both of these examples use the ♭9 note.

Put simply, the ♭9th is “the 2nd degree, flatted.” Even more simply: it’s the note right next to the chord’s root on the fretboard.

In Example 1, that’s A♭ against G:

In Example 2, that’s B against B♭:

Point: Adding the ♭9th over a dominant chord is an easy way to bring a real jazz flavor into your sound — and it’s conveniently easy to reach on the bass fretboard too.

Tension Notes and Dominant Motion

In jazz, when a seventh chord resolves through dominant motion, players often reach for tension notes like the ♭9th.

Let’s go over what “tension notes” and “dominant motion” actually mean.

Tension Notes and the ♭9th

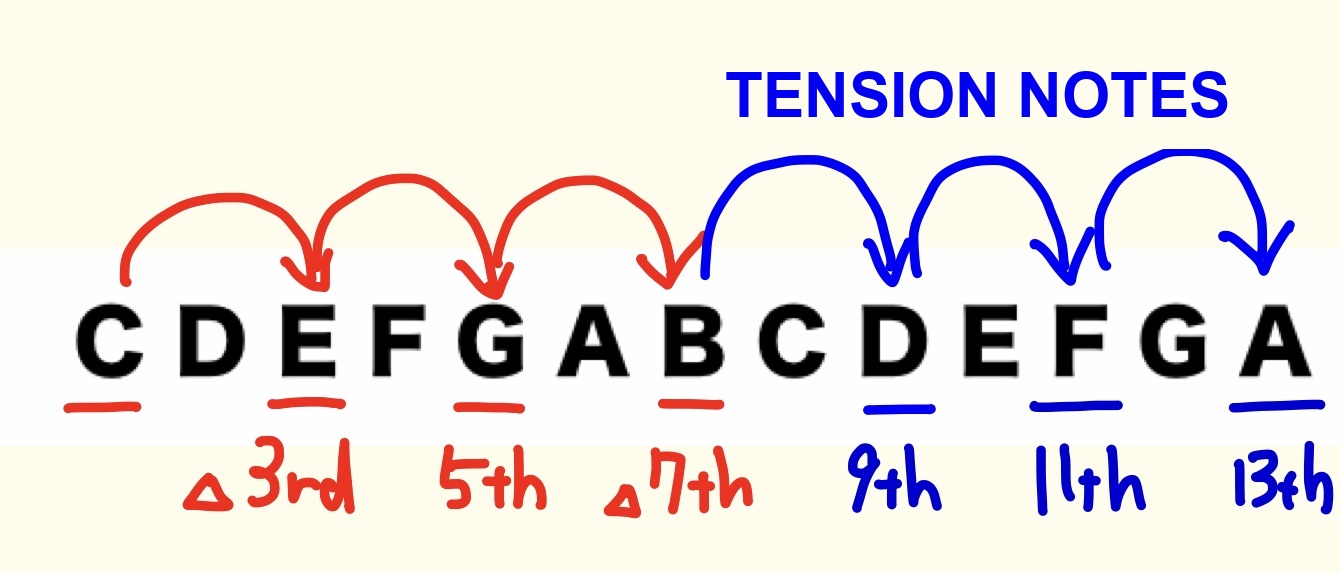
A chord is built by stacking notes from a scale every other note. Sometimes that stacking goes beyond one octave — those extra notes are called tension notes.

The 9th note here (the D) gets flatted to become the ♭9th.

In this example, against a C, the note D♭ is the ♭9th.

Reading it out like that every time is a bit much, though, so it’s common to just refer to the note right next to the root on the fretboard as the “♭9th” — in other words, the flatted 2nd.

To put it another way — yes, that’s basically it.

What Is Dominant Motion?

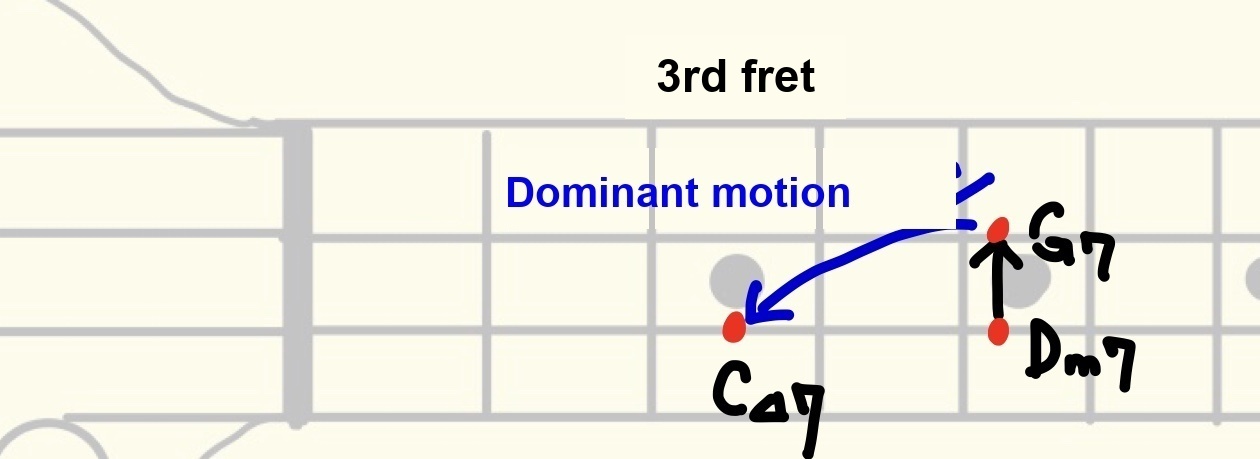
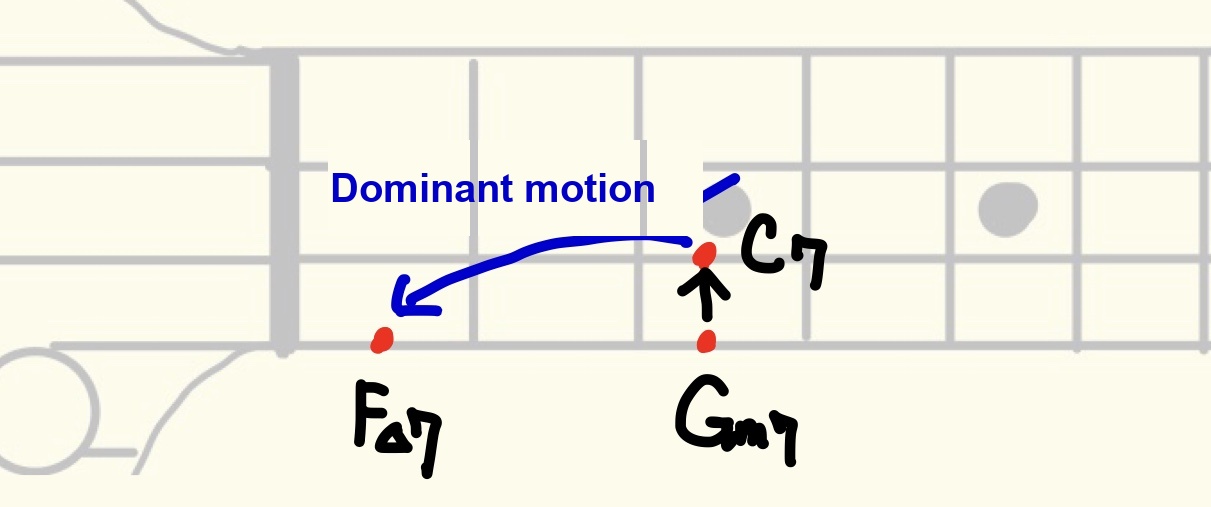
In a ii–V–I progression, the move from the dominant chord to the tonic is called “dominant motion.”

G7 to CΔ7, as dominant motion:

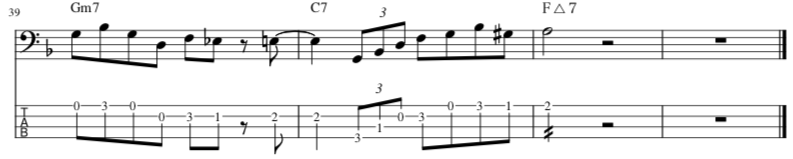
C7 to FΔ7, as dominant motion:

In jazz, this is often where players add real tension to the sound, and tension notes are a common way to do that.

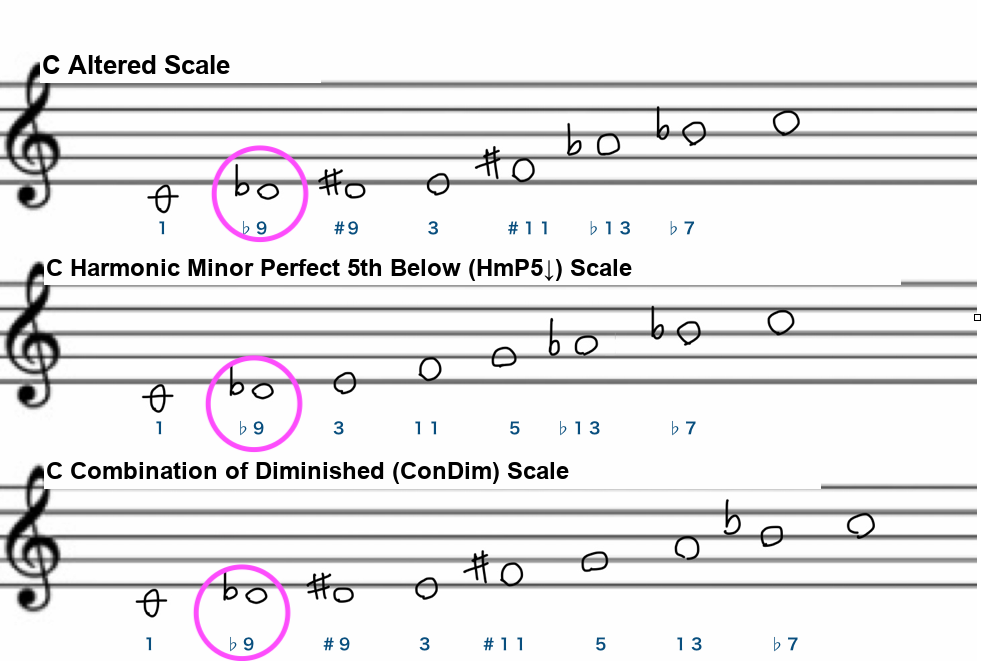
Some of the scales where tension notes show up most are:

Altered Scale

Harmonic Minor Perfect 5th Below Scale

Combination of Diminished (ConDim) Scale

…and the ♭9th shows up in every one of them.

I get it — jumping straight into using these scales fluently can feel like a tall order.

That’s exactly why I’d recommend starting with just the ♭9th — marked in pink in the diagrams above — over dominant seventh chords. It’s far more approachable on the fretboard, and a great first step.

Tips for Using the ♭9th in Your Solos

To really make the ♭9th part of your improvising vocabulary, it helps to build it into muscle memory.

A good way to do that is to start using it outside of your solos too — specifically, while you’re playing walking bass behind someone else.

Used this way, the ♭9th fits naturally into walking bass lines over dominant progressions too. The more your ear gets used to hearing it, the better — so give it a try.

That’s it for this small but handy trick you can use in your bass solos: the ♭9 (flat ninth).

Want Personalized Feedback on Your Playing?

This is exactly the kind of thing that’s hard to fix alone — and where having a teacher makes all the difference.

At Line on Bass, I offer an online lesson service where you send me a video of your playing, and I give you specific, detailed feedback — every single day if you want.

Students from around the world are using this to fix exactly these kinds of issues and steadily improve their jazz bass skills.

Check Out the Lesson Service →

Posted on Leave a comment

I Played a Bass Solo Over “Autumn Leaves”

Hi, I’m Toru Hoshino, a bass teacher.

In this article, I break down a solo I played over “Autumn Leaves,” a chord progression that’s a favorite at jam sessions.

When you look up bass solo videos, a lot of them are

amazing, but moving around so much you can’t really copy them.

I think that’s a common feeling.

So here I played a solo that stays in a range that’s easy to copy, with minimal use of the high register, while still sounding “jazzy.”

My “Autumn Leaves” Bass Solo

Filmed in April 2019. One chorus.

Points I Kept in Mind While Soloing

Point 1: Don’t Go All-Out Right From the Start

When you start a solo, it’s really common to rush in and play too much, too soon — especially at sessions.

A lot of this just comes down to experience, but by leaning into long tones in the opening, I’m setting up a contrast with the eighth-note lines that come later.

A section, measure 1. Video 0:00–

Point 2: Note Intervals

As a “jazzy” way of using notes, I often move through phrases using intervals of a whole step or more, especially 3rds.

Here’s a phrase built around an ascending run of 3rds.

A section, measure 8. Video 0:14–


I go into more detail on 3rd intervals in this article:

Why Your Solo Doesn’t Sound “Jazzy” Yet — and How to Fix It

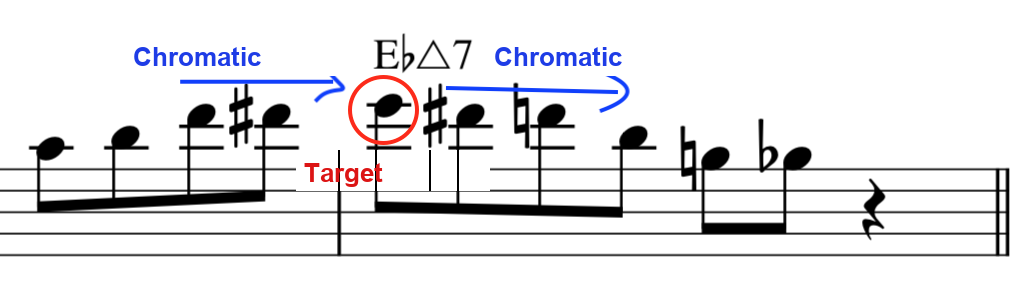
Point 3: Phrases Built on Chromatic Approach

Another “jazzy” trick I use a lot is the chromatic approach.

Measures 3–4 of the B section.

This phrase climbs chromatically toward the target note, then immediately descends chromatically right back down.

B section, measures 7–8. Video 0:47–

I hope this gives you some ideas for your own playing! ^^

Want Personalized Feedback on Your Playing?

This is exactly the kind of thing that’s hard to fix alone — and where having a teacher makes all the difference.

At Line on Bass, I offer an online lesson service where you send me a video of your playing, and I give you specific, detailed feedback — every single day if you want.

Students from around the world are using this to fix exactly these kinds of issues and steadily improve their jazz bass skills.

Check Out the Lesson Service →

Posted on Leave a comment

Chord Tones and Scales: How Are They Actually Different?

I’m Toru Hoshino, an upright and electric bassist and instructor based in Tokyo.

Today I want to cover something I get asked about a lot in lessons:

the difference between chord tones and scales.


A lot of players find this stays fuzzy no matter how long they’ve been playing.

Both are essential for playing bass, but they’re actually used in slightly different ways.

Chord Tones

Let’s start with chord tones.

A chord tone is a note you use when playing a given chord.

For example, a C major chord contains the notes C, E, and G.
Those three notes are the “chord tones.”

You use chord tones to build a bass line that follows the progression of the tune.

The more often you use chord tones, the more your line locks in with the chord changes.


Scales

A scale, on the other hand, is a group of notes arranged in order.

A C major scale, for instance, is C-D-E-F-G-A-B-C — eight notes in a row.
Using a scale lets you build melodies and solos freely, without being tied down to the chord.

Since a scale includes notes outside the chord as well, it gives you a much wider palette to play with.

To sum it up: think of chord tones as “stable notes,” and scales as “notes you’re free to use.”

Both matter, and once you learn when to reach for each one, playing bass gets a lot more fun!

Want Personalized Feedback on Your Playing?

This is exactly the kind of thing that’s hard to fix alone — and where having a teacher makes all the difference.

At Line on Bass, I offer an online lesson service where you send me a video of your playing, and I give you specific, detailed feedback — every single day if you want.

Students from around the world are using this to fix exactly these kinds of issues and steadily improve their jazz bass skills.

Check Out the Lesson Service →

Posted on Leave a comment

Why Your Solo Doesn’t Sound ‘Jazzy’ Yet — and How to Fix It

This article is written by Toru Hoshino, a bassist and instructor based in Tokyo, and it’s a column on how to build improvised solos.

Today I’ll be answering a question from one of my students.

Student: “I connect triads through scale tones and chromatic passing tones, but it still doesn’t sound very jazzy. What should I do?”

In response to that question,

Toru: Try using intervals of a 3rd for your phrases instead of whole steps or half steps.

is what I told them.

The Student’s Phrase, Explained

Let’s take a look at the actual transcribed notation.

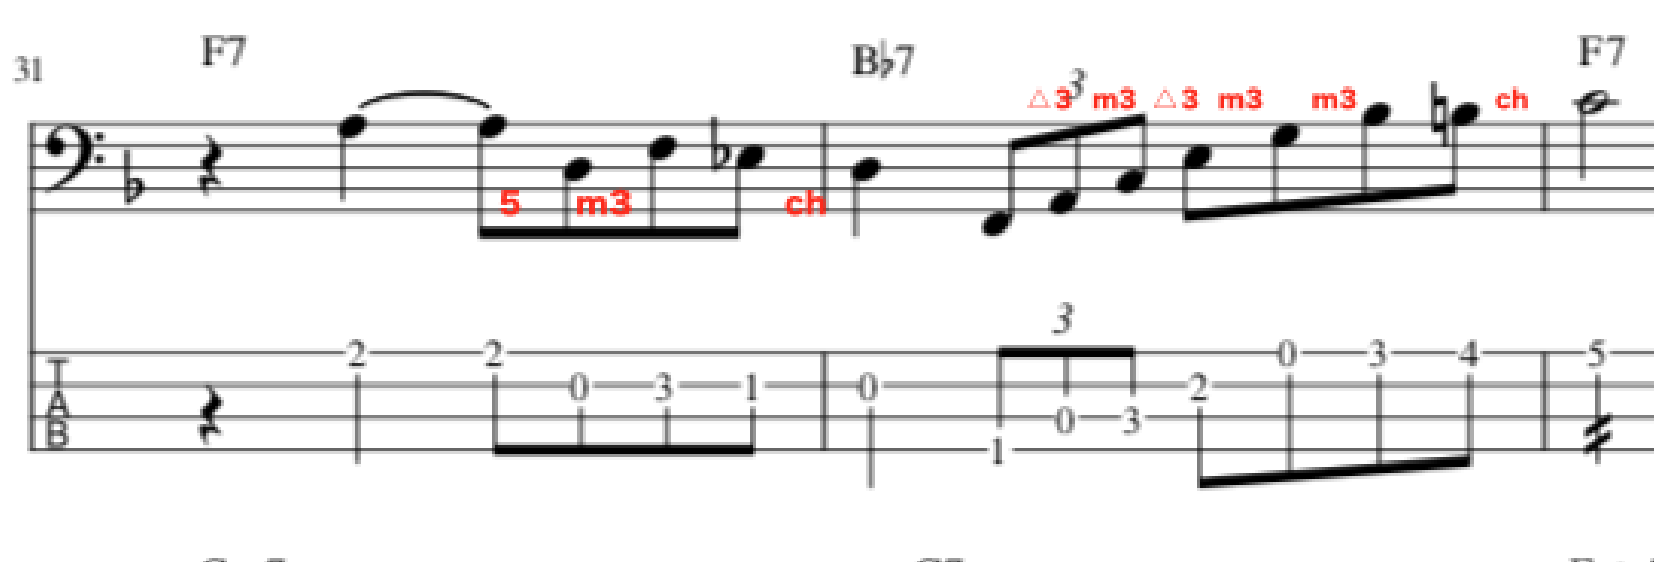
Example 1 — The Original Question

Triads are connected chromatically, resolving to chord tones.

Pulling this off in real time already takes serious skill, but in Example 1, most of the movement is by whole steps or half steps.

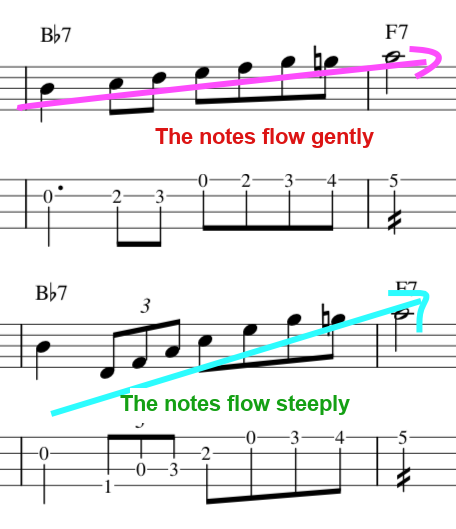
Example 2 — My Suggested Revision

Here’s what I turned it into.

This is an example built using chromatic motion and intervals of a 3rd instead of whole-step or half-step motion.

Especially in the second measure, where it’s all intervals of a 3rd. Compared to Example 1, the flow of the notes is noticeably steeper, right?

If you’re deliberately going for a smoother, more gradual melodic flow, sticking to whole-step or half-step motion is perfectly fine,

but bebop and other jazzy-sounding lines are often built from intervals wider than a whole step.

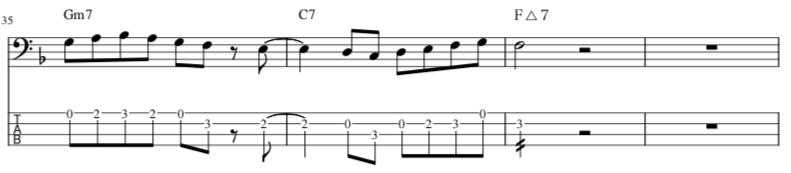
Example 3 — Another Question

Same as Example 1: triads connected chromatically, resolving to chord tones.

Looking at it this way, the intervals are once again mostly whole steps or half steps.

It has a real “this is just muscle memory” kind of feel to it.

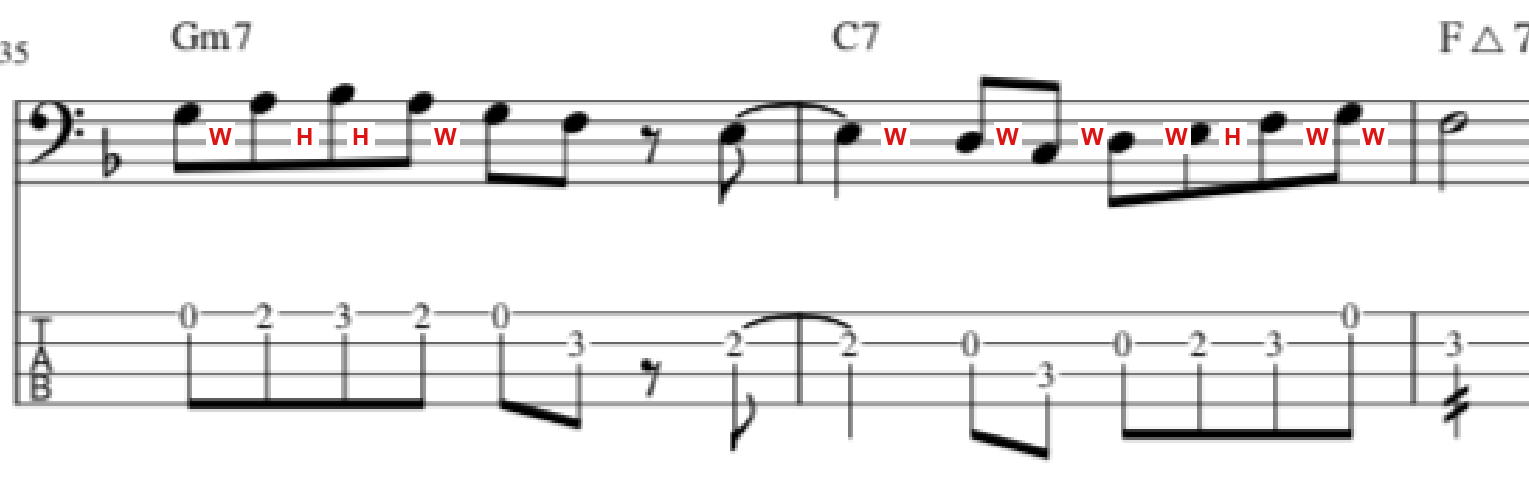
Example 4 — My Suggested Revision

Here too, I removed the whole-step and half-step motion and built the line using intervals of a 3rd plus chromaticism, with the second measure made entirely of 3rd intervals to give the line a steeper, more dramatic flow.

Just Being Aware of 3rd Intervals Can Make Your Lines Sound “Jazzy”

If you ever feel like “this doesn’t quite sound jazzy,” try consciously building your solo around intervals of a 3rd like in these examples.

Just by shifting your mindset from whole-step/half-step motion to 3rd-interval motion, lines that sound flat, repetitive, or rock-ish can instantly start to sound jazzy.

Want Personalized Feedback on Your Playing?

This is exactly the kind of thing that’s hard to fix alone — and where having a teacher makes all the difference.

At Line on Bass, I offer an online lesson service where you send me a video of your playing, and I give you specific, detailed feedback — every single day if you want.

Students from around the world are using this to fix exactly these kinds of issues and steadily improve their jazz bass skills.

Check Out the Lesson Service →

Posted on Leave a comment

The II-V-I, Tonic, Dominant, and Subdominant Explained for Bassists

This article is written by Toru Hoshino, an upright and electric bassist and instructor based in Tokyo, for bassists who want to understand

the II-V-I

and

Tonic, Dominant, and Subdominant

Understanding what these mean and how they work will make analyzing a tune much faster.

I covered how to analyze a tune in this article, and getting faster at analysis means you can look at a chart and put together a bass line or an improvised solo more quickly too, which is especially useful if you’re:

• A bassist who composes

• A bassist who improvises

• A bassist studying music theory

• A bassist who wants to level up

• A bassist who plays in jam sessions

Tonic, Dominant, and Subdominant, Explained

Let’s try playing a bass line over a progression like this.

Example 1

That doesn’t really feel like it “ends,” does it? It feels like the tune is going to keep going.

Example 2

Now what about this one — doesn’t this feel like it actually comes to a rest?

Example 1 has that unresolved, hanging feeling — like something’s left unfinished.

Example 2 has a settled, resolved feeling — like things have wrapped up cleanly.

Looking at it in terms of chords:

Ending on the chord G7 creates that unresolved feeling (Example 1).

And arriving at the chord C△7 creates that resolved, settled feeling (Example 2).

The role that G7 plays here — creating that unresolved, hanging feeling — is called the “dominant.”

The role that C△7 plays — creating that resolved feeling — is called the “tonic.”

And then there’s a third role: a chord that’s neither as unresolved as the dominant nor as settled as the tonic — somewhere in between. That’s called the “subdominant,” and here that’s the Dm7 chord.

The last 3 bars of this example move:

subdominant ▸ dominant ▸ tonic

and this particular motion is widely considered very pleasant to the ear, and gets used constantly in jazz and pop music.

Since saying “subdominant, dominant, tonic” every time is a mouthful, this motion gets a shorthand name: the “II-V-I.”

What Is a II-V-I?

This builds directly on the diatonic chord chart.

Key I△7 IIm7 IIIm7 IV△7 V7 VIm7 VIIm7(♭5) Key Signature
C C△7 Dm7 Em7 F△7 G7 Am7 Bm7(♭5) None
G G△7 Am7 Bm7 C△7 D7 Em7 F♯m7(♭5) 1 sharp
D D△7 Em7 F♯m7 G△7 A7 Bm7 C♯m7(♭5) 2 sharps
A A△7 Bm7 C♯m7 D△7 E7 F♯m7 G♯m7(♭5) 3 sharps
E E△7 F♯m7 G♯m7 A△7 B7 C♯m7 D♯m7(♭5) 4 sharps
B B△7 C♯m7 D♯m7 E△7 F♯7 G♯m7 A♯m7(♭5) 5 sharps
F♯ F♯△7 G♯m7 A♯m7 B△7 C♯7 D♯m7 E♯m7(♭5) 6 sharps
C♯ C♯△7 D♯m7 E♯m7 F♯△7 G♯7 A♯m7 B♯m7(♭5) 7 sharps
F F△7 Gm7 Am7 B♭△7 C7 Dm7 Em7(♭5) 1 flat
B♭ B♭△7 Cm7 Dm7 E♭△7 F7 Gm7 Am7(♭5) 2 flats
E♭ E♭△7 Fm7 Gm7 A♭△7 B♭7 Cm7 Dm7(♭5) 3 flats
A♭ A♭△7 B♭m7 Cm7 D♭△7 E♭7 Fm7 Gm7(♭5) 4 flats
D♭ D♭△7 E♭m7 Fm7 G♭△7 A♭7 B♭m7 Cm7(♭5) 5 flats
G♭ G♭△7 A♭m7 B♭m7 C♭△7 D♭7 E♭m7 Fm7(♭5) 6 flats
C♭ C♭△7 D♭m7 E♭m7 F♭△7 G♭7 A♭m7 B♭m7(♭5) 7 flats

Going back to that subdominant ▸ dominant ▸ tonic motion, and applying it to the diatonic chords:

The 2nd chord is the subdominant
The 5th chord is the dominant
The 1st chord is the tonic

So:

The motion subdominant ▸ dominant ▸ tonic is what’s called a 2-5-1, or “II-V-I.”

That said, when you change key, the tonic and dominant chords change along with it, as shown below.

Key 1st (Tonic) 2nd (Subdominant) 5th (Dominant)
C C△7 Dm7 G7
G G△7 Am7 D7
D D△7 Em7 A7
A A△7 Bm7 E7
E E△7 F♯m7 B7
B B△7 C♯m7 F♯7
F♯ F♯△7 G♯m7 C♯7
C♯ C♯△7 D♯m7 G♯7
F F△7 Gm7 C7
B♭ B♭△7 Cm7 F7
E♭ E♭△7 Fm7 B♭7
A♭ A♭△7 B♭m7 E♭7
D♭ D♭△7 E♭m7 A♭7
G♭ G♭△7 A♭m7 D♭7
C♭ C♭△7 D♭m7 G♭7

Looking at the table above:

In the key of F, Gm7 is the 2nd chord, C7 is the 5th chord, and F△7 is the 1st chord

In the key of G, Am7 is the 2nd chord, D7 is the 5th chord, and G△7 is the 1st chord

An Easier Way to Think About the II-V-I

The II-V-I is a lot easier to grasp if you think about it visually, on the bass neck.

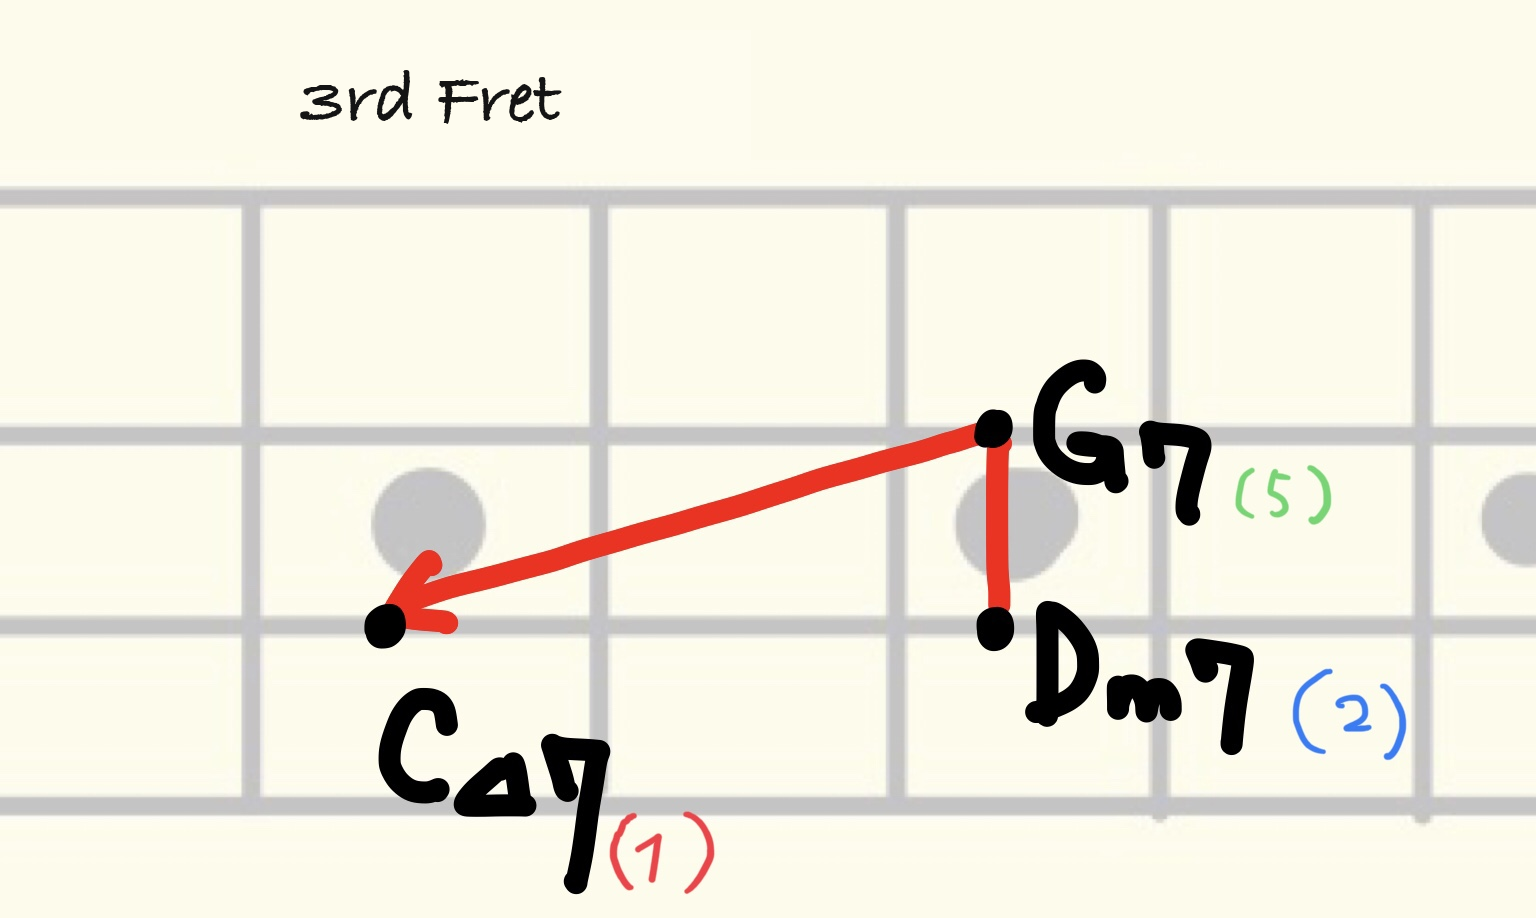
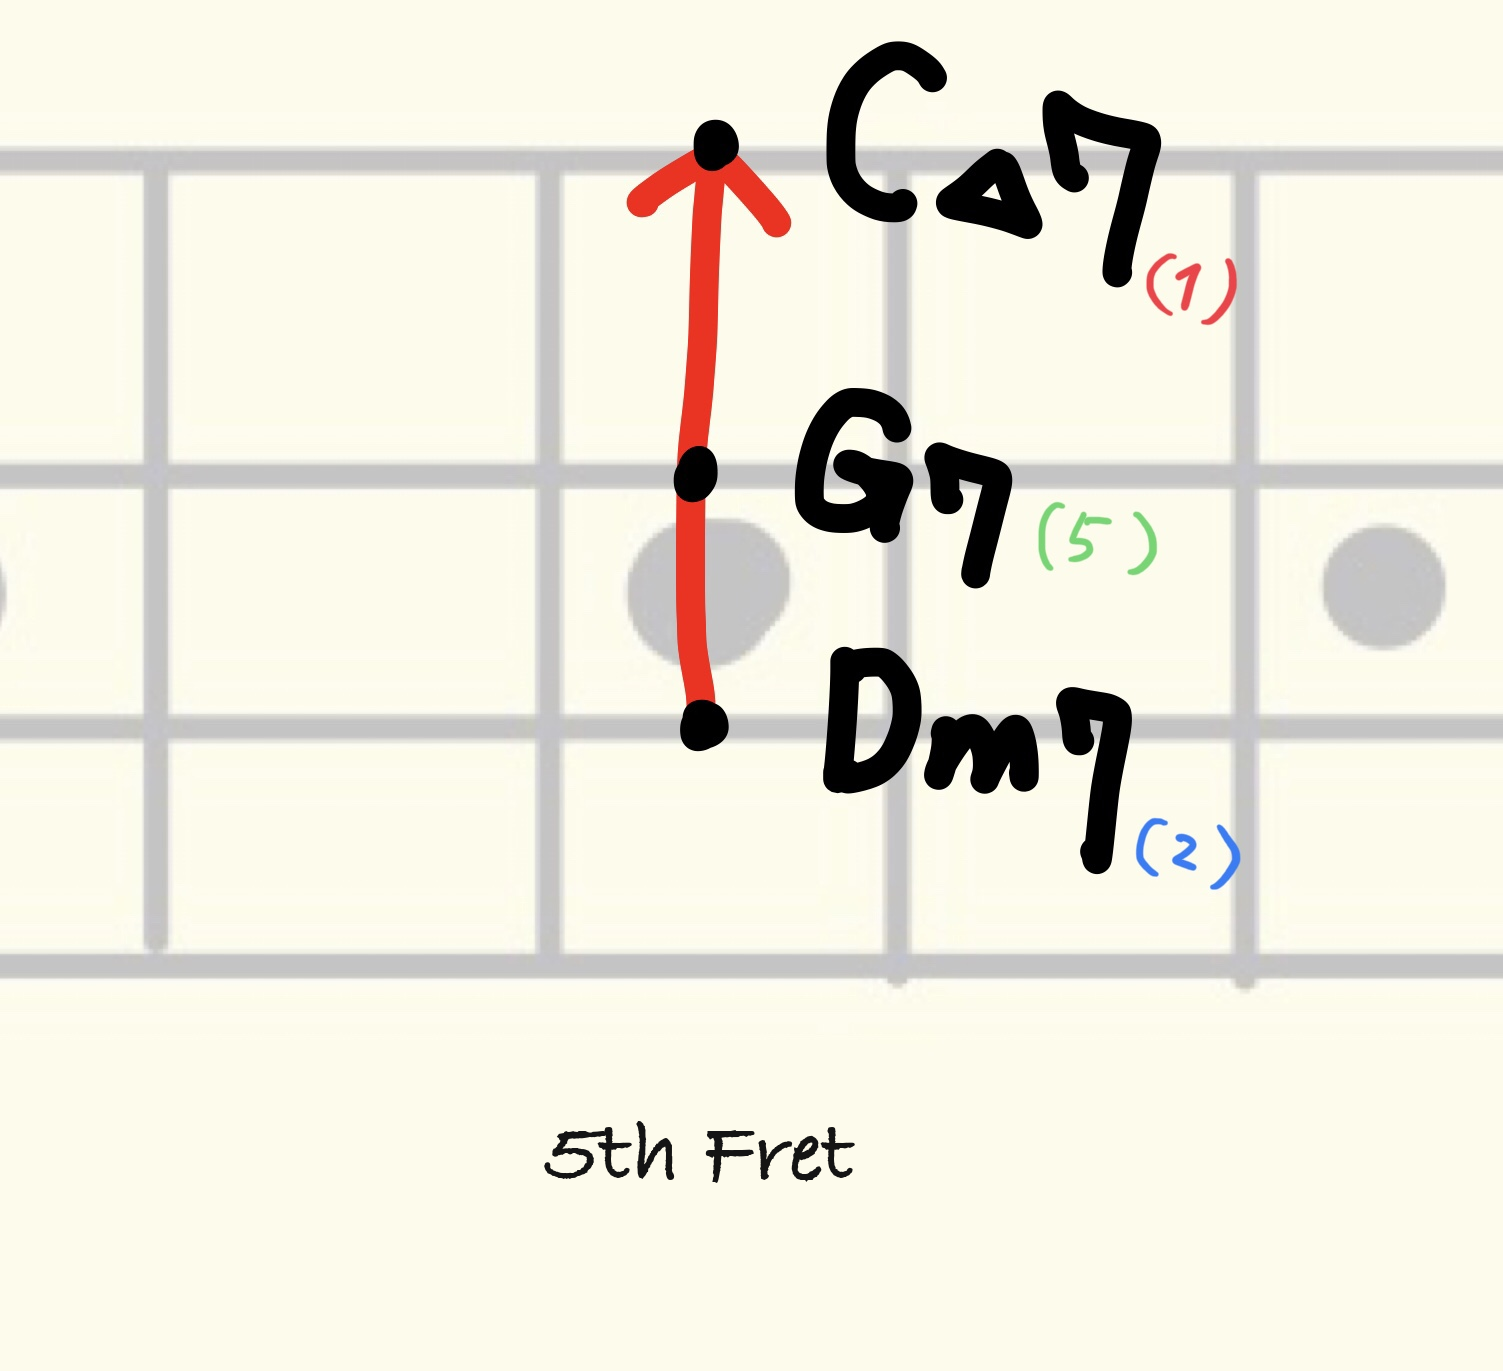
Take Dm7 ▸ G7 ▸ C△7. That motion looks like this on the neck…

  or like this…

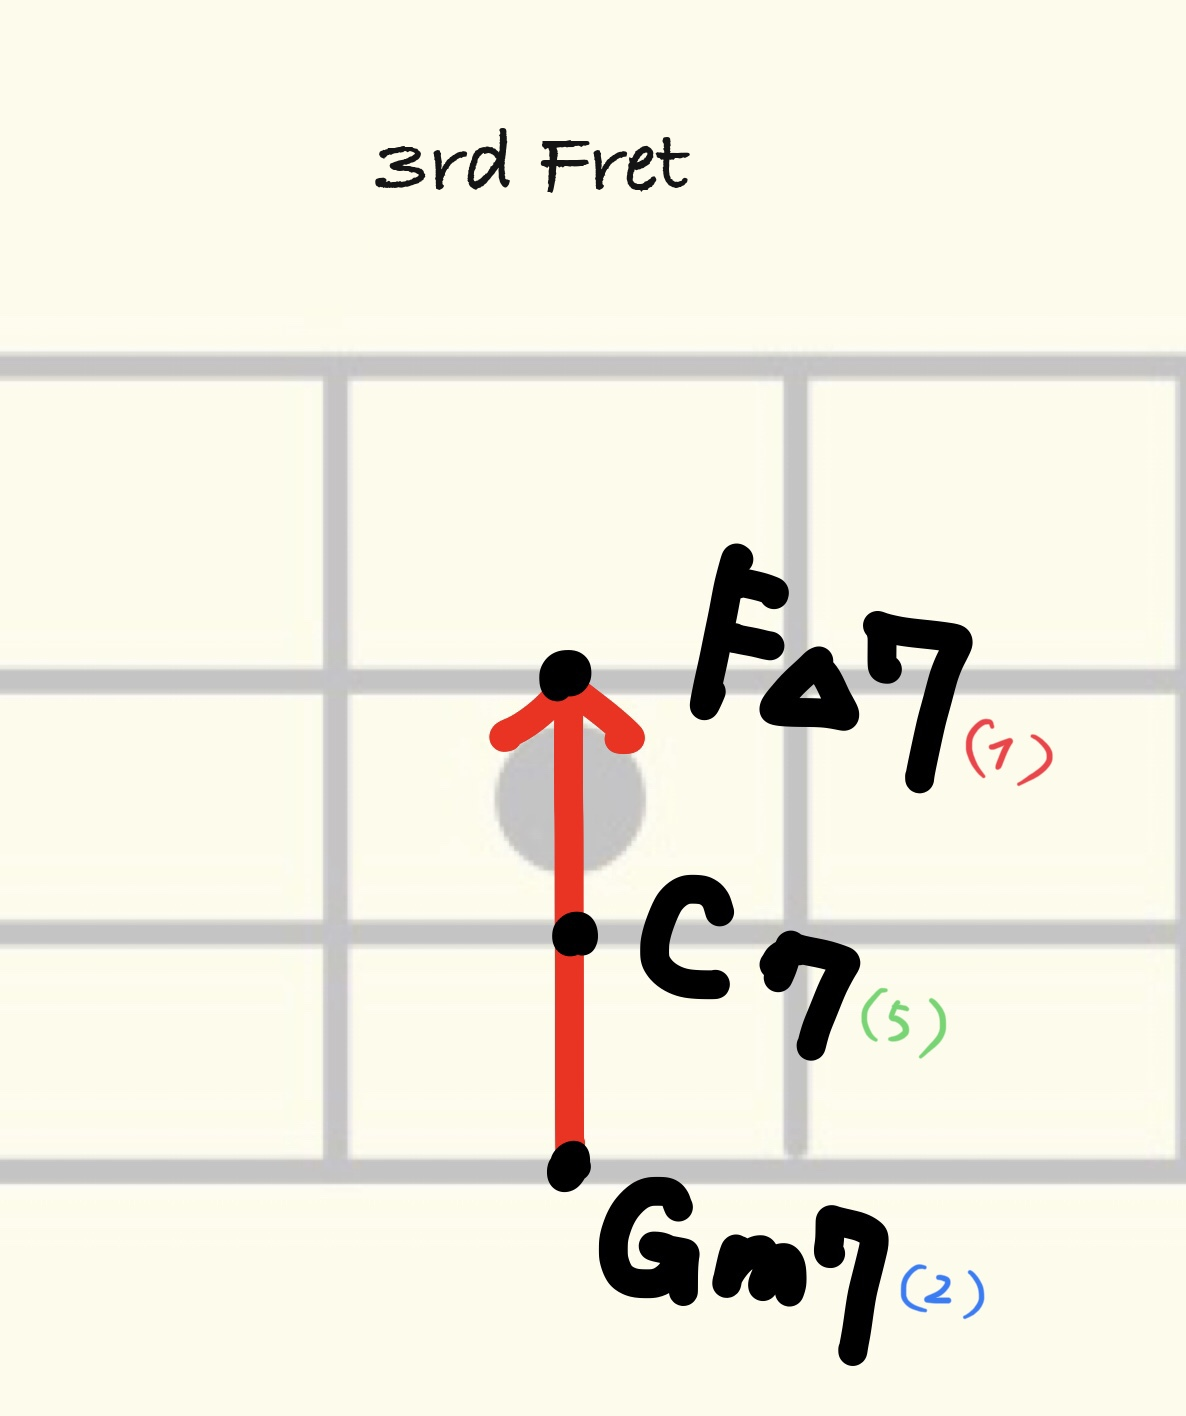
Take Gm7 ▸ C7 ▸ F△7, and that motion looks like this…

…or like this.

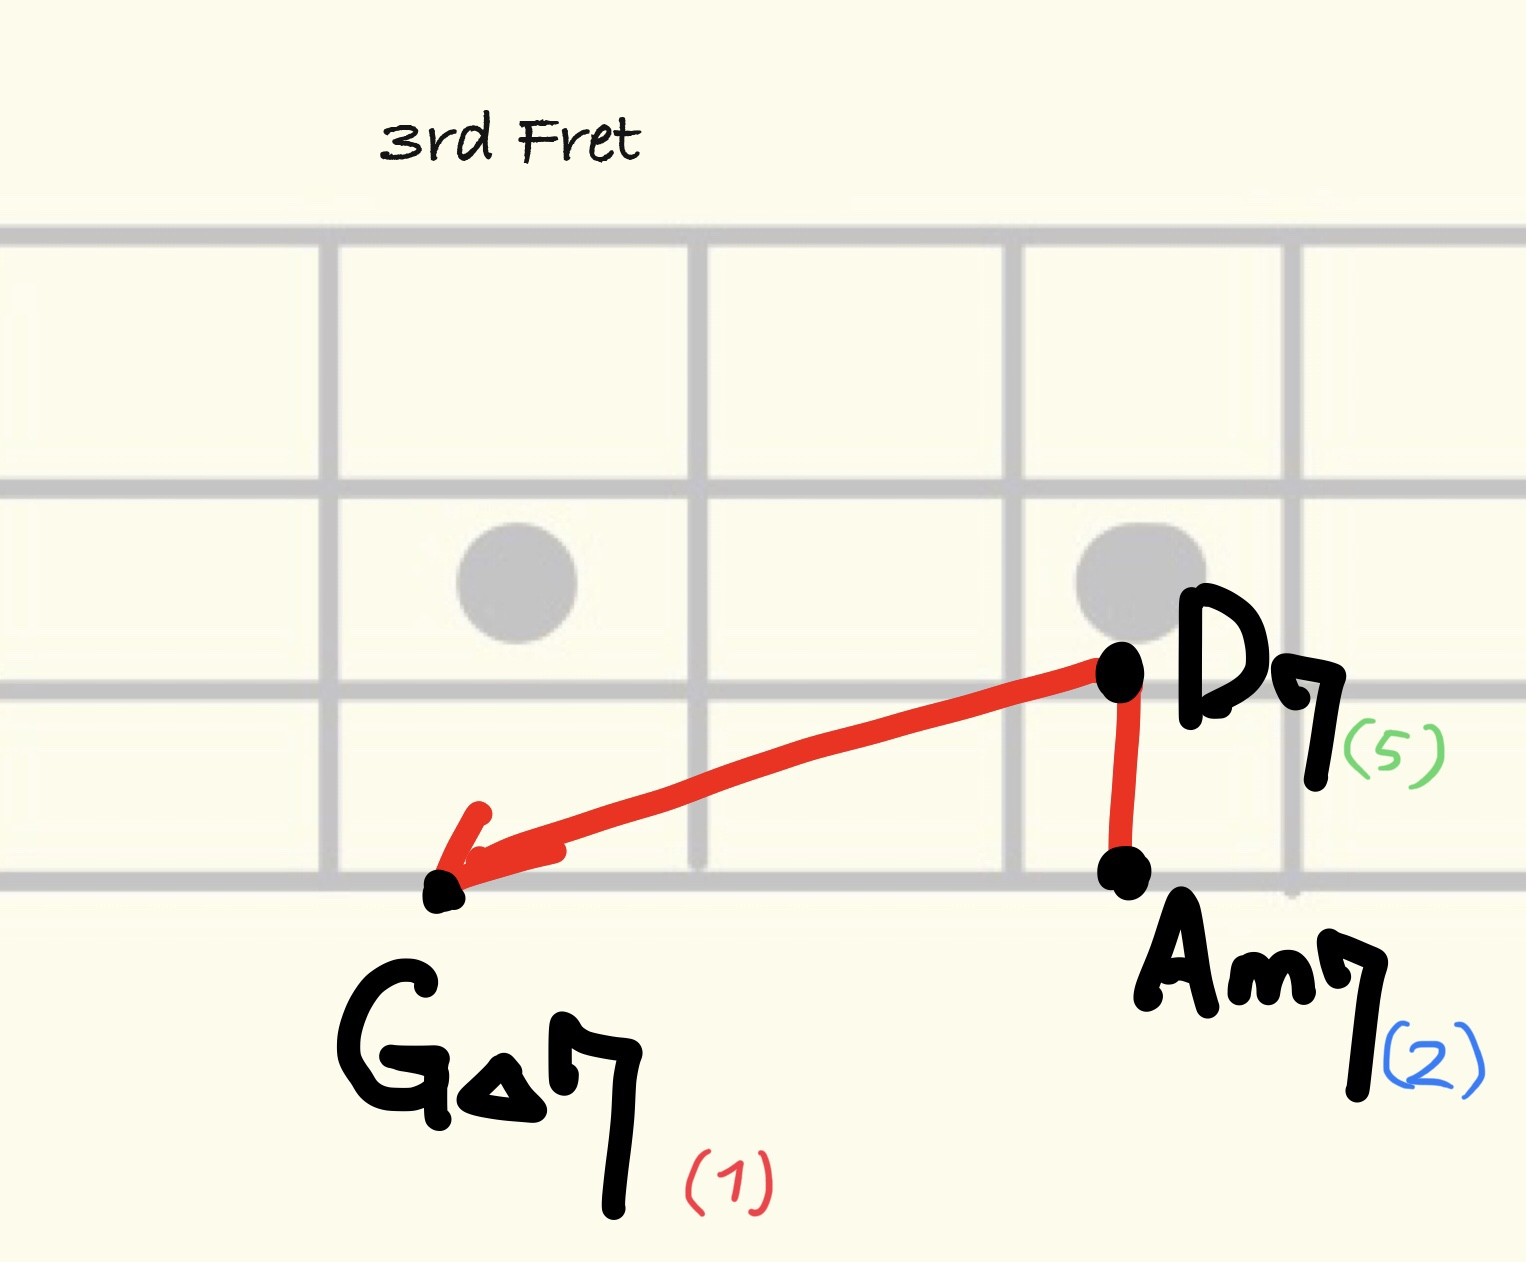
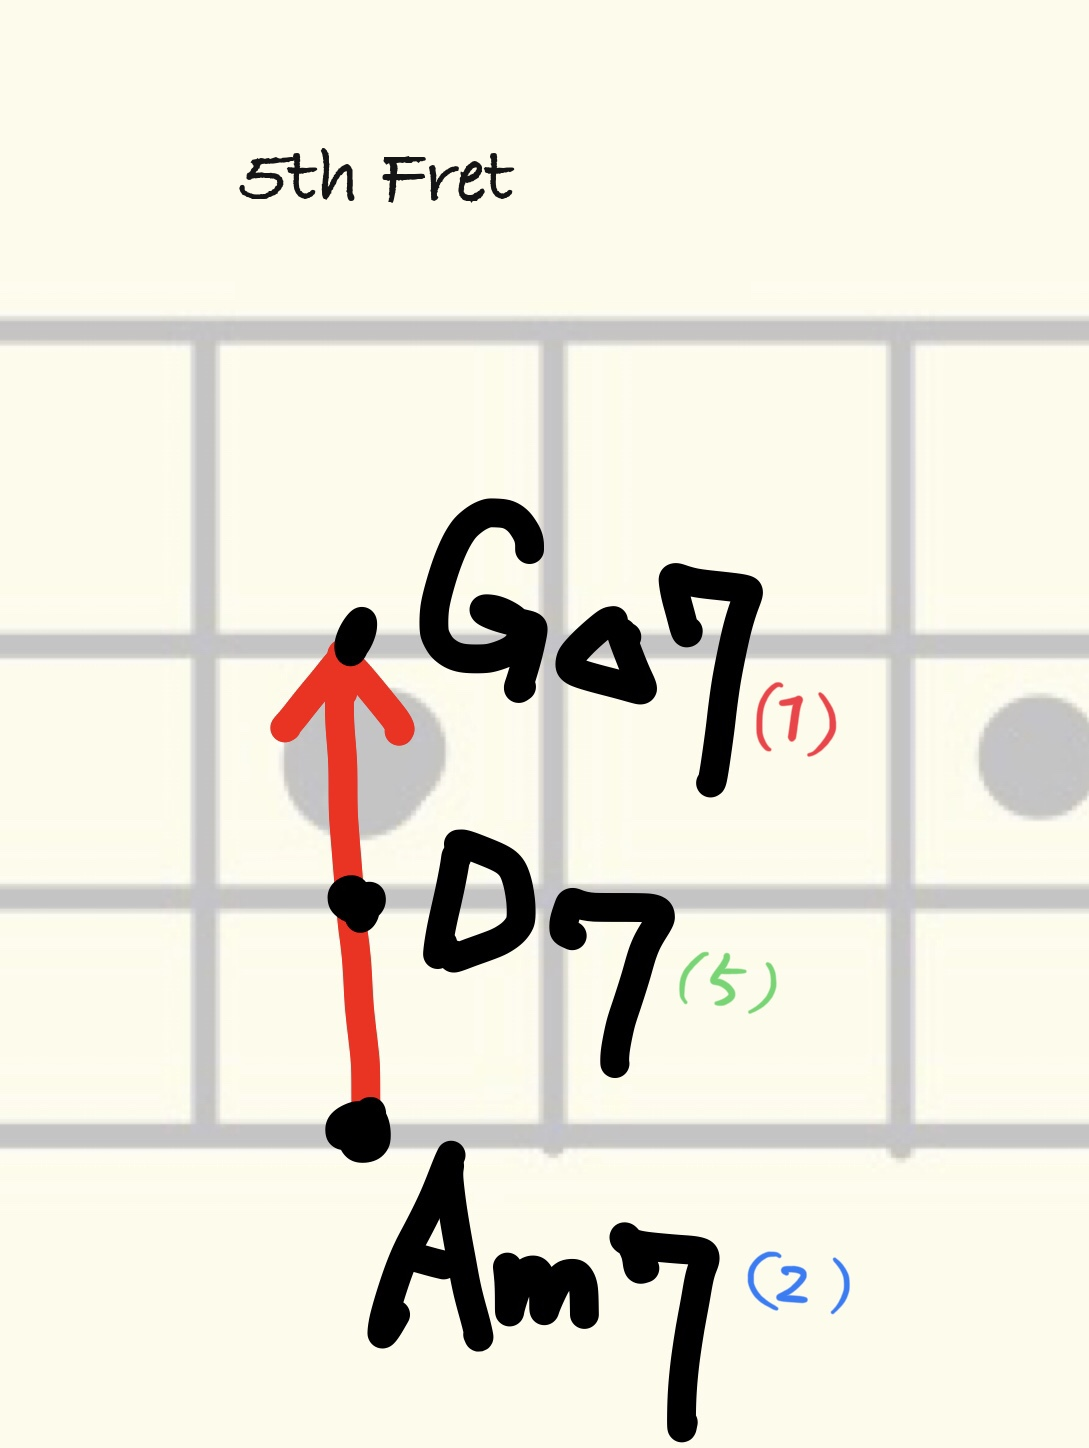
Take Am7 ▸ D7 ▸ G△7, and that motion looks like this…

…or like this.

Once you see it this way, it’s a lot easier to recognize and react to on the fretboard.

What’s the Point of Knowing About the II-V-I?

You might be thinking: “Okay, I get the theory behind the II-V-I, but what do I actually do with it?”

Once you recognize a progression as a II-V-I, you can reuse material you’ve already worked out.

This is especially useful if you’re someone who struggles to come up with a bass line or a solo on the spot just by looking at the chord symbols.

Reusing a Bass Line

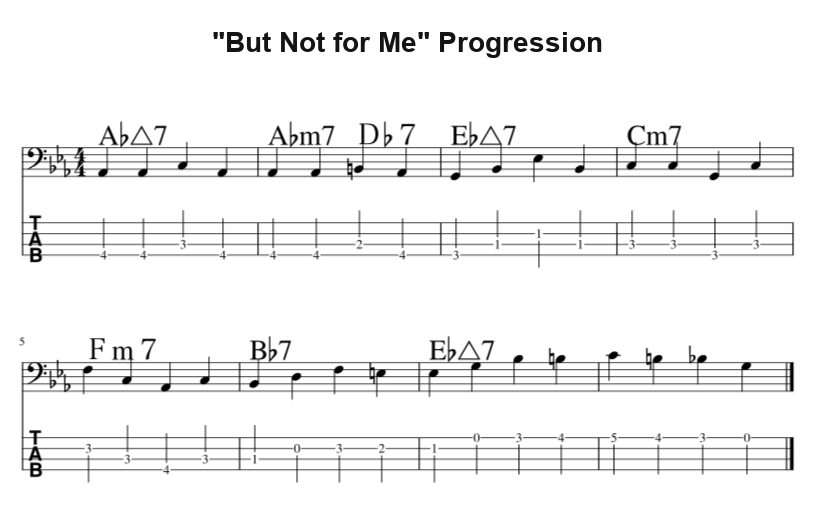
Say you worked out a bass line like this over a progression like this one.

A bass line used in tunes like “But Not for Me”

The chord motion used here — Fm7 → B♭7 → E♭△7 — shows up constantly in jazz tunes.

So I took this exact same bass line and dropped it directly into a different tune.

A bass line used in tunes like “It Could Happen to You”

In theory, this same bass line works over this tune’s progression too.

You’ll still want to actually play it and check whether it fits the feel of the tune, but once you can reuse material like this, you can work through tunes more efficiently and react a lot faster.

So that’s the rundown on tonic, dominant, subdominant, and the 2-5-1, aimed at bassists.

I hope it’s useful for your daily practice.

Want Personalized Feedback on Your Playing?

This is exactly the kind of thing that’s hard to fix alone — and where having a teacher makes all the difference.

At Line on Bass, I offer an online lesson service where you send me a video of your playing, and I give you specific, detailed feedback — every single day if you want.

Students from around the world are using this to fix exactly these kinds of issues and steadily improve their jazz bass skills.
Check Out the Lesson Service →

Posted on Leave a comment

How to Analyze a Tune for Easier Improvising, Using Diatonic Chord Theory

This article is written by Toru Hoshino, an upright and electric bassist and instructor based in Tokyo.

✅ You want to get into jazz but aren’t sure where to start

✅ You’re a bassist who wants to try improvising

✅ You sort of understand diatonic chords, but you’re not sure what to actually do with them

✅ You bought a music theory book, gave up around page 3, and it’s been gathering dust in a closet ever since

This article is for you.

I’m going to walk through how to use diatonic chord theory to analyze a tune, and how that analysis feeds directly into your improvising.

• This is written with bassists in mind, but the ideas apply to any instrument.

A Quick Refresher on Diatonic Chords

I covered diatonic chords in detail in another article.

If anything here doesn’t quite click, or you find yourself wondering “wait, why is that?”, it’s worth circling back to that article and then coming back to this one.

• Why knowing your diatonic chords actually matters — the basics, explained

Why Bother Analyzing a Tune?

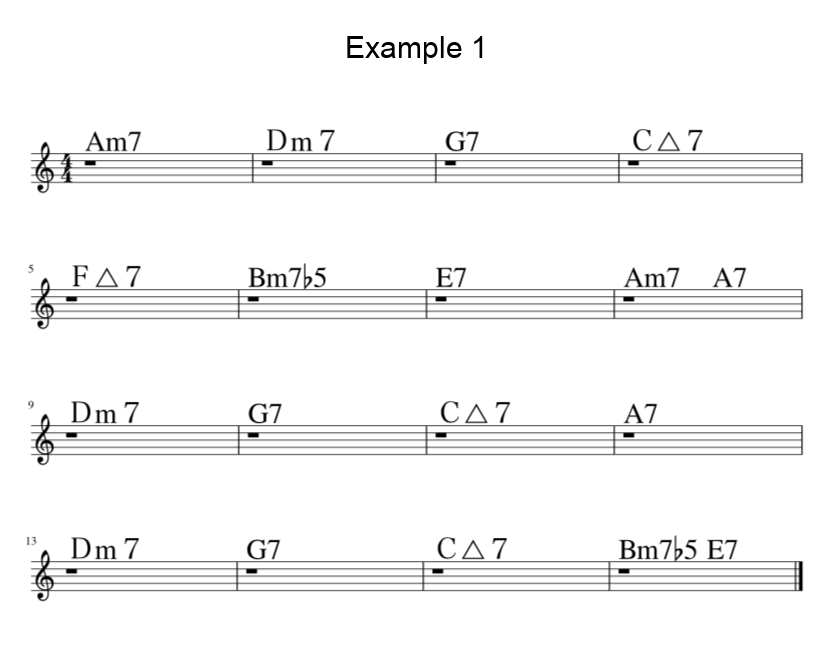
Say you’re in the key of C and you run into a progression like this. How would you think about improvising over it?

A typical first instinct: “Okay… it’s Am7, so I can use A. Then Dm7, so I can use D… but once you throw a ‘7’ on there, I’m not totally sure what’s safe anymore.”

That’s a completely normal way to feel. Since improvising happens in real time, wouldn’t it help to already have a rough sense of which notes work, ahead of time, before you even start playing?

Here’s the thing: in this particular 4-bar example, regardless of the chord changes, you can build everything entirely out of the plain major scale (do-re-mi-fa-sol-la-ti).

• Example of a phrase built entirely from the major scale

Notice how natural and easy that sounds on the ear, even though it’s that simple? Once you can see several bars at a time and know which notes work across all of them as a group, improvising gets a lot more approachable.

So with that in mind, let’s actually walk through how to analyze a tune to make improvising easier.

This time we’ll use a slightly altered version of the first 16 bars of a progression like the one used in “Fly Me to the Moon” as our example.

Steps for Analyzing a Tune

Here’s the process I use:

1. Figure out the key of the tune

2. Identify the diatonic chords and work out which notes are available

3. Identify the non-diatonic chords and work out which notes are available

Let’s go through this using a diatonic chord chart and a key signature chart as reference.

Diatonic Chord Chart

Key I△7 IIm7 IIIm7 IV△7 V7 VIm7 VIIm7(♭5) Key Signature
C C△7 Dm7 Em7 F△7 G7 Am7 Bm7(♭5) None
G G△7 Am7 Bm7 C△7 D7 Em7 F♯m7(♭5) 1 sharp
D D△7 Em7 F♯m7 G△7 A7 Bm7 C♯m7(♭5) 2 sharps
A A△7 Bm7 C♯m7 D△7 E7 F♯m7 G♯m7(♭5) 3 sharps
E E△7 F♯m7 G♯m7 A△7 B7 C♯m7 D♯m7(♭5) 4 sharps
B B△7 C♯m7 D♯m7 E△7 F♯7 G♯m7 A♯m7(♭5) 5 sharps
F♯ F♯△7 G♯m7 A♯m7 B△7 C♯7 D♯m7 E♯m7(♭5) 6 sharps
C♯ C♯△7 D♯m7 E♯m7 F♯△7 G♯7 A♯m7 B♯m7(♭5) 7 sharps
F F△7 Gm7 Am7 B♭△7 C7 Dm7 Em7(♭5) 1 flat
B♭ B♭△7 Cm7 Dm7 E♭△7 F7 Gm7 Am7(♭5) 2 flats
E♭ E♭△7 Fm7 Gm7 A♭△7 B♭7 Cm7 Dm7(♭5) 3 flats
A♭ A♭△7 B♭m7 Cm7 D♭△7 E♭7 Fm7 Gm7(♭5) 4 flats
D♭ D♭△7 E♭m7 Fm7 G♭△7 A♭7 B♭m7 Cm7(♭5) 5 flats
G♭ G♭△7 A♭m7 B♭m7 C♭△7 D♭7 E♭m7 Fm7(♭5) 6 flats
C♭ C♭△7 D♭m7 E♭m7 F♭△7 G♭7 A♭m7 B♭m7(♭5) 7 flats

Key Signature Chart

Key Signature Key (Major) Key (Relative Minor)
None C Am
1 F Dm
2 B♭ Gm
3 E♭ Cm
4 A♭ Fm
5 D♭ B♭m
1 G Em
2 D Bm
3 A F♯m
4 E C♯m
5 B G♯m
6 F♯ D♯m

1. Figure Out the Key of the Tune

The key is determined by the key signature at the start of the tune — how many sharps or flats are written there.

Checking against the chart above, this tune has no sharps or flats in its key signature, so the key is C.

2. Identify the Diatonic Chords and Work Out Which Notes Are Available

Once you know the key, go back to the diatonic chord chart and find the row for that key.

For the key of C, the diatonic chords are the ones in this row of the chart:

C△7 – Dm7 – Em7 – F△7 – G7 – Am7 – Bm7(♭5)

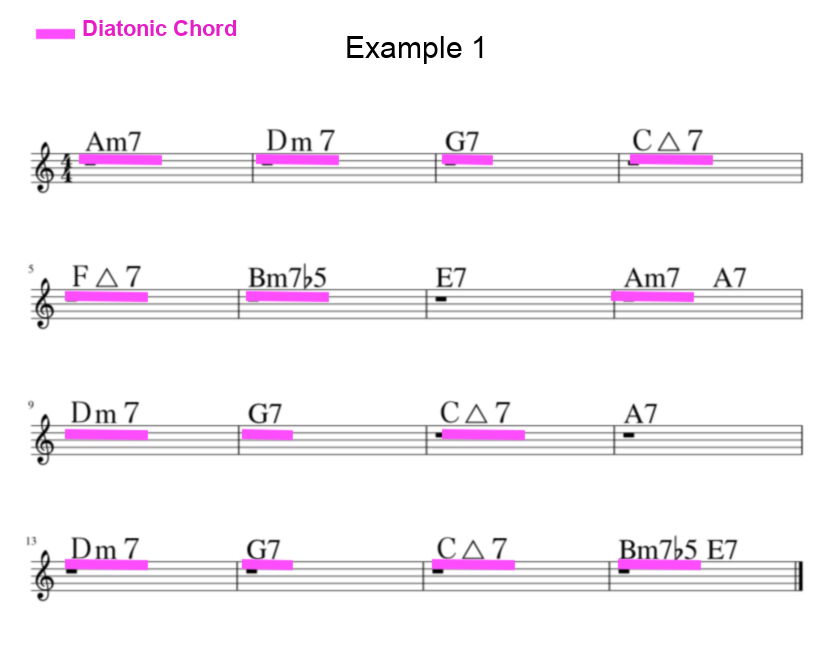
Now let’s mark every chord in our progression that matches one of those — those are our diatonic chords, highlighted below in magenta:

Regardless of which bar you’re in, anywhere you see a magenta highlight, you can use the diatonic scale for this key (here, the notes C–D–E–F–G–A–B) and it’ll sound “right at home.”

3. Identify the Non-Diatonic Chords and Work Out Which Notes Are Available

A chord that isn’t diatonic to the key is called a non-diatonic chord.

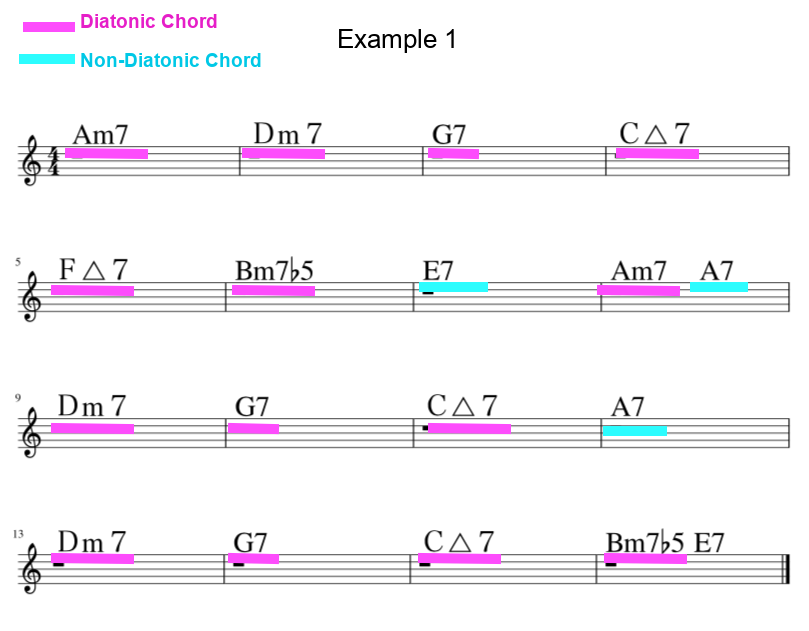
In this tune, the chords marked in cyan are the non-diatonic ones:

There are several ways to think about which scales work over non-diatonic chords, but for now, the simplest approach is: you can always use the notes of the chord’s own triad — the 1st, 3rd, and 5th.

For E7: E (root), G♯ (3rd), B (5th)
For A7: A (root), C♯ (3rd), E (5th)

Here’s the Key Point: The Note Choice Over Non-Diatonic Chords

Over the magenta diatonic chords: the notes C–D–E–F–G–A–B

Over the cyan non-diatonic chords: E (root)–G♯ (3rd)–B (5th) for E7, and A (root)–C♯ (3rd)–E (5th) for A7

What’s worth paying attention to here is that over the cyan chords, you’re reaching for notes that are different from the diatonic scale.

Specifically, the 3rd of E7, G♯, and the 3rd of A7, C♯.

By deliberately stepping outside the diatonic scale at these spots, you create a moment that stands out a bit from the rest of the progression.

And with that, we’ve got our analysis.

Now let’s actually improvise over it.

Improvising After the Analysis

Listen for how the note choice shifts over the non-diatonic chords.

Pattern 1 — Improvising Over the First 8 Bars

From 0:00–0:12, the phrase is built entirely from the plain major scale.

Around 0:13, I lean into the note G♯ (the 3rd of E7) for a moment — can you hear how that creates a little bit of contrast?

Pattern 2 — Improvising Over the Second 8 Bars

Around 0:06, I lean into C♯ (the 3rd of A7) for a moment — same idea, creating a bit of contrast.

Outside of that one spot, this phrase is also built almost entirely from the plain major scale.

So that’s the basic approach to analyzing a tune using diatonic chord theory.

I hope it’s useful for your own practice going forward.

On Church Modes

Once you’ve got a handle on diatonic chords and can make these rough note choices on the fly, the next step is to get more specific about exactly which notes work over each individual bar.

I go into “scales” and the church modes in detail in this article:

Want Personalized Feedback on Your Playing?

This is exactly the kind of thing that’s hard to fix alone — and where having a teacher makes all the difference.

At Line on Bass, I offer an online lesson service where you send me a video of your playing, and I give you specific, detailed feedback — every single day if you want.

Students from around the world are using this to fix exactly these kinds of issues and steadily improve their jazz bass skills.

Check Out the Lesson Service →

Posted on Leave a comment

Building Jazz Bass Solos with 3rds: A Practice Method Using “Fly Me to the Moon”

This article is written by Toru Hoshino, a working jazz bassist and instructor based in Tokyo who has played bass for an estimated 500+ jam sessions around the city.

It’s for you if:
· You’re not sure how to build an improvised solo
· You want some new ideas for improvising solos
· You’re a bassist who’s about to get started with jazz bass

Last time, I shared a written-out transcription of one of my own solos over “Fly Me to the Moon” and walked through how it was built. This time it’s the hands-on version: a practice method for getting there without writing anything out first.

• You can find the previous article here.

This time, let’s build an improvised solo over the 8-bar A section progression used in “Fly Me to the Moon” and many other tunes, shown below.

A Major Scale Will Sort of Work… But

“Fly Me to the Moon” is built mostly around diatonic chords in the key of C, more or less throughout.

If you take a solo over the opening 8 bars, you can get away with just playing the C major scale up and down — it’ll sound “sort of right” — but it ends up feeling pretty flat and uninteresting.

Here’s what it sounds like when you noodle through those opening 8 bars using only the major scale, without much thought:

For moments like that, I want to share a practice method that helps you capture more of each chord’s character and make your lines sound more like singing.

Here’s the roadmap we’ll follow:

1. The key is the 3rd! Get familiar with how it sounds first

2. Improvise using 1st–3rd–5th (the triad)

3. Improvise using 3rd–1st–5th (a rearranged triad)

4. Improvise using 5th–3rd–1st (another rearranged triad)

5. Mix these rearranged triads randomly into each bar as you improvise

6. Play freely while staying aware of the underlying triad

That’s the order we’ll go in.

The Key Is the 3rd! Get Familiar with How It Sounds First

The note that makes it easiest to hear a melody “riding” on top of a chord is the 3rd.

For example, let’s take the chords from those same 8 bars and play nothing but long tones on the major or minor 3rd of each chord.

Even though there are fewer notes than before, doesn’t it already sound a lot more melodic — like it’s actually singing?

Now let’s connect those 3rds using a variety of rhythms.

Something like this:

Doing this brings out even more of that singing quality.

This approach — building a solo around the 3rd — carries over to a huge number of standards, so I really encourage you to try it for yourself.

How to Practice It

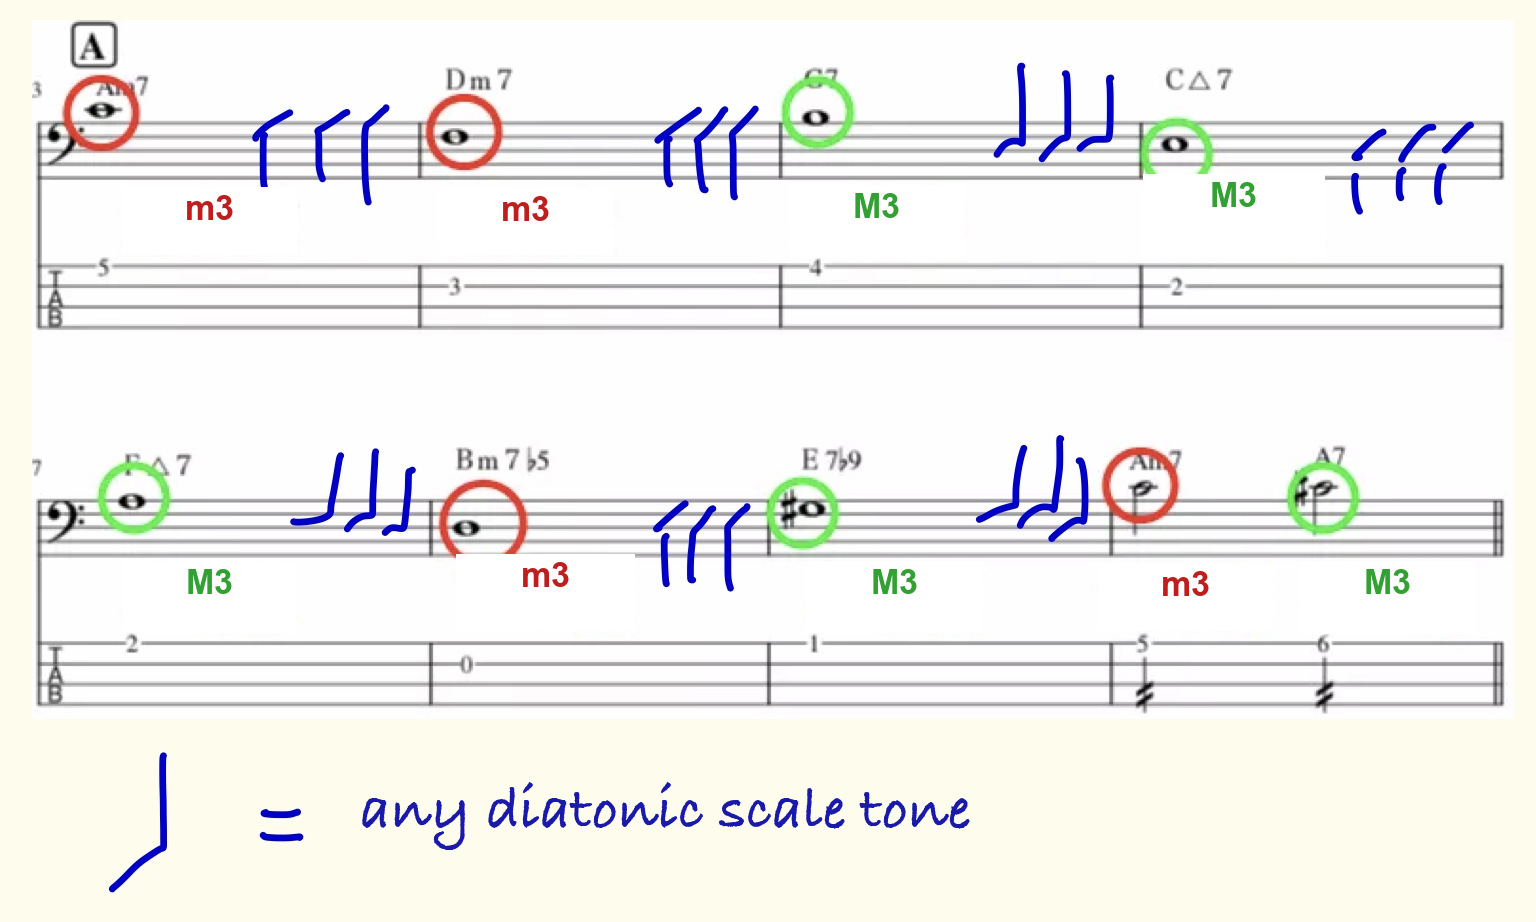
First, without a metronome, go through and find the 3rd for each chord.

As mentioned above, try out a few different positions on the neck for each one.

Once you’ve got the notes down, connect them with long tones, like this:

Once you can do that, fill the space between the long tones with any note from the diatonic scale, connecting them like this:

Don’t rush — what matters most is staying aware of exactly which note you’re playing as you play it.

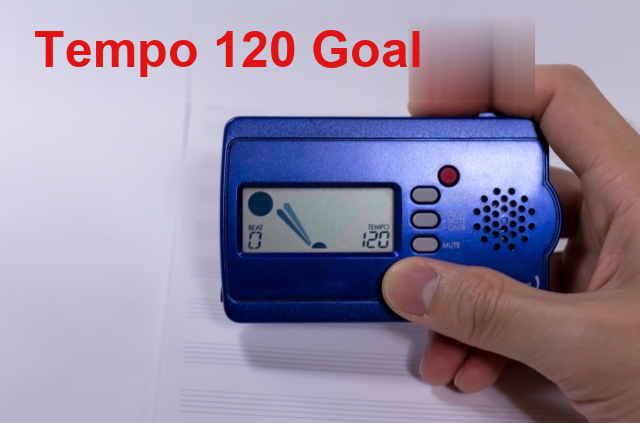
Once you can do this comfortably at a tempo of 120, move on to the next step.

What This 3rds Practice Is Really Aiming For

Open-ended practice like this — as opposed to copying a transcription note-for-note — can go on forever if you let it, so it helps to set yourself some rules and a clear goal.

For this exercise, the goal is tempo 120.

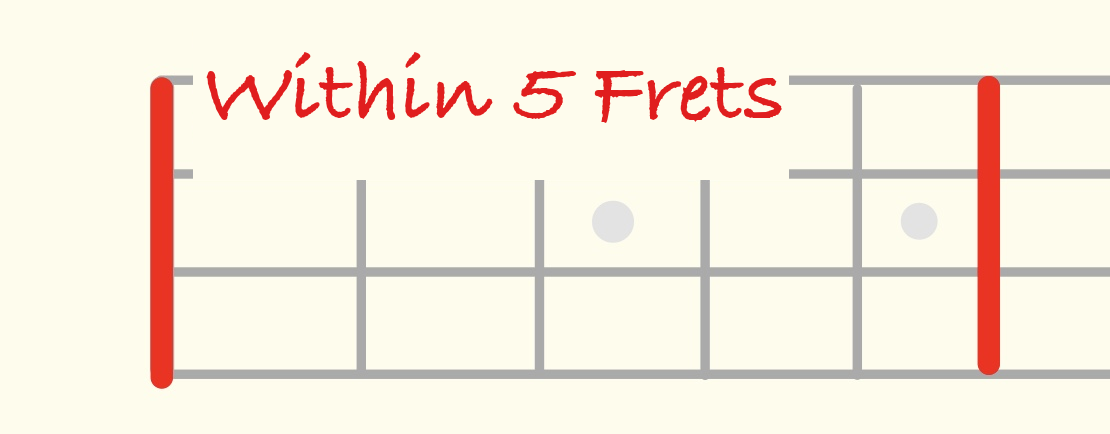
If you let yourself range freely up into the high frets there’s no end to it, so limit yourself to the first 5 frets (up to second position on upright) while you practice.

If You Can’t Find the 3rd Right Away

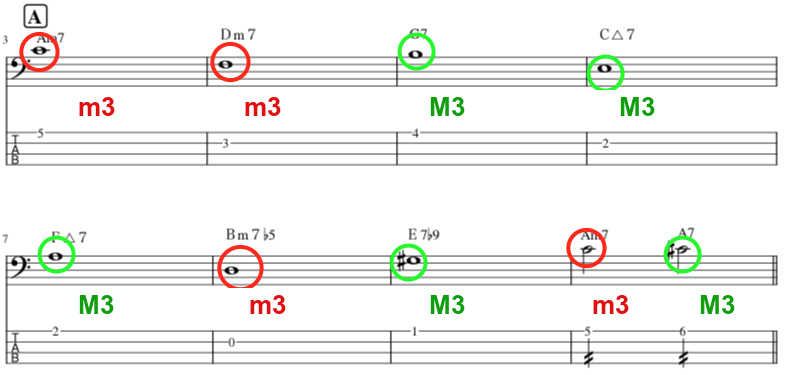
If the 3rd doesn’t come to you immediately, it’s fine to jot it down like this:

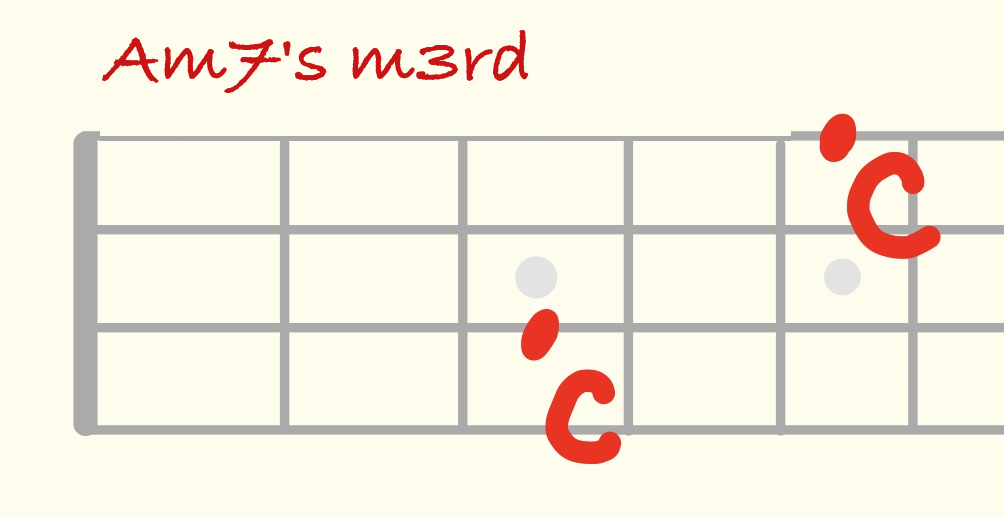
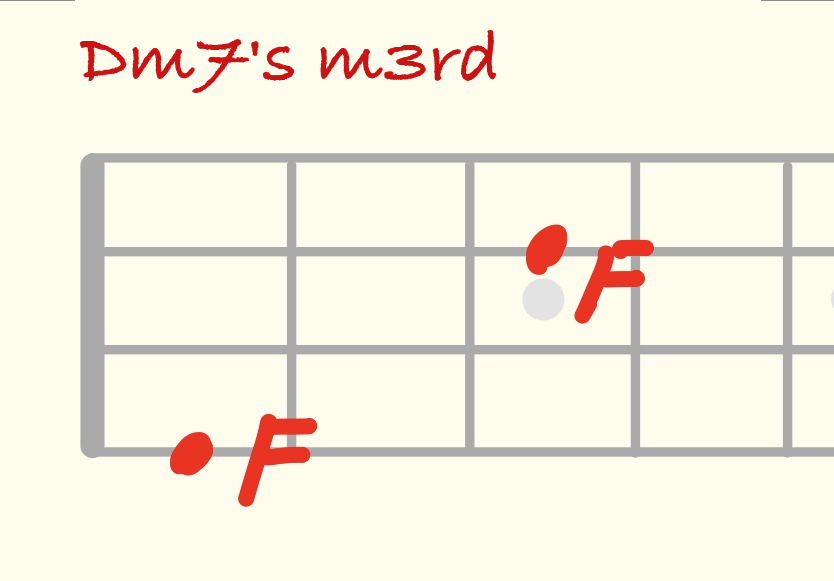
Keep practicing this and before long, you’ll find yourself instinctively associating the m3rd of Am7 with C, the m3rd of Dm7 with F, the M3rd of G7 with B, and so on, without even thinking about it.

Try Out a Few Different Positions for Each 3rd

For example, the m3rd of Am7 can be found in these two spots:

And the m3rd of Dm7 can be found in these two spots:

This isn’t about drilling your fingers to memorize one fixed position.

By not locking each note into a single position, you build up your ability to improvise on the fly.

Want Personalized Feedback on Your Playing?

This is exactly the kind of thing that’s hard to fix alone — and where having a teacher makes all the difference.

At Line on Bass, I offer an online lesson service where you send me a video of your playing, and I give you specific, detailed feedback — every single day if you want.

Students from around the world are using this to fix exactly these kinds of issues and steadily improve their jazz bass skills.
Check Out the Lesson Service →

Posted on Leave a comment

What Are Diatonic Chords? #2 — How They Are Built (With Reference Tables)

This article is for:

· Bassists who want to play jazz but don’t know where to start

· Bassists who want to try improvising

· Anyone who bought a music theory book, gave up, and now has it gathering dust in a closet

Quick Recap

Last time, I explained that:

Diatonic chords are useful for improvising and copying solos by ear. Here are the diatonic chords in the key of C — when you solo, you can use the notes Do Re Mi Fa Sol La Ti Do.

Key of C diatonic chords

…but that was a pretty rough explanation, and I didn’t go into the detailed structure behind it.

This time, I’ll explain more specifically how diatonic chords are actually built.

Understanding this will take some time, but once you get it, you’ll be able to use diatonic chords freely for improvising, copying solos by ear, and building basslines — giving you much more freedom in your playing.

You can find the previous article in this series, “What Are Diatonic Chords? #1,” on this site once it’s translated — for now, here’s a quick recap above to get you up to speed.

How Diatonic Chords Are Built

A diatonic chord is simply a chord built from a diatonic scale.

This time, I’ll explain both the “diatonic scale” and the “chord” side of that equation.

What Is a Diatonic Scale?

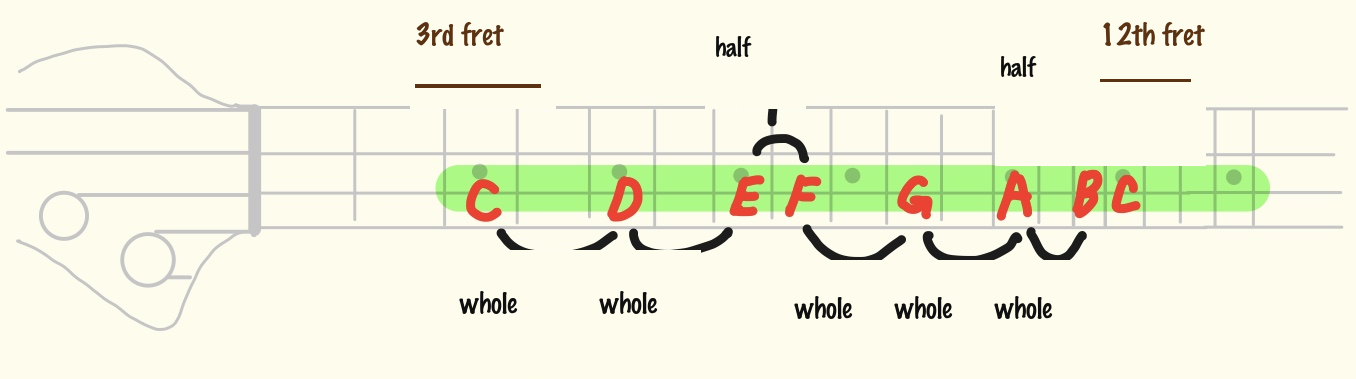
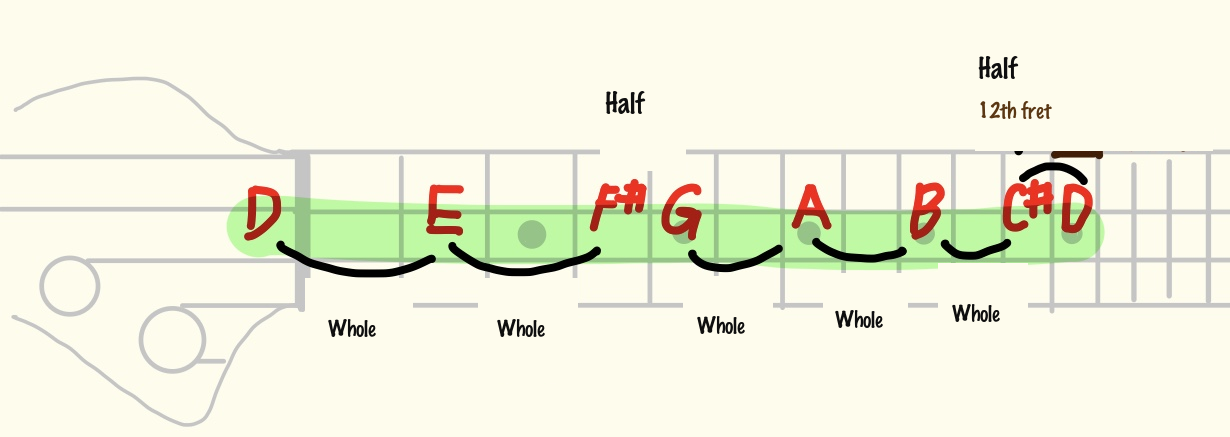
A diatonic scale is, within one octave, a scale made up of five whole-step intervals and two half-step intervals.

For example, here’s a well-known one. To keep it simple, I’ve written it out on a single string.

Example 1

Whole — Whole — Half — Whole — Whole — Whole — Half

This pattern of intervals is called the major scale.

Major scale whole and half steps on the fretboard

Starting from C at the 3rd fret of the 3rd string: C D E F G A B C. In other words, Do Re Mi Fa Sol La Ti Do.

There’s another common pattern too.

Example 2

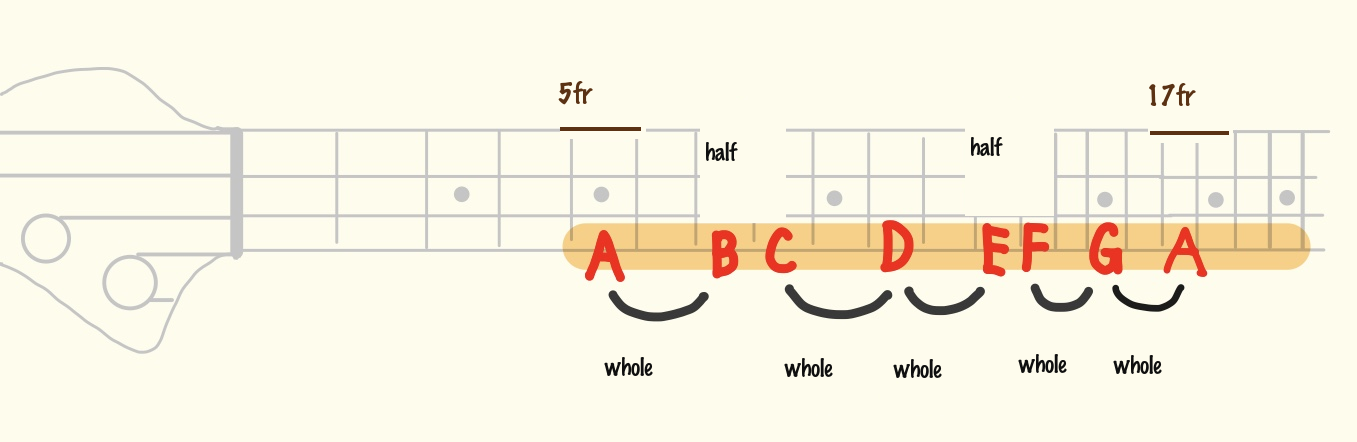
Whole — Half — Whole — Whole — Half — Whole — Whole

This is called the minor scale. It’s also a type of diatonic scale.

Minor scale whole and half steps on the fretboard

For this article, I’ll use the major scale as the main example going forward.

What Is a Chord?

A chord is essentially a symbol that represents a stack of notes.

Generally this is called a “harmony,” and there are countless possible combinations.

For example, take this progression:

C / a chord made of C, E, G
Am / a chord made of A, C, E
Dm / a chord made of D, F, A
G7 / a chord made of G, B, D, F

You could stack any notes, in any way, and technically call it a “chord” —

…but as you can hear, that doesn’t exactly sound pleasant to the ear!

That’s where a stacking pattern that’s generally considered pleasant to the ear comes in.

What Makes a Stack of Notes Sound “Pleasant”?

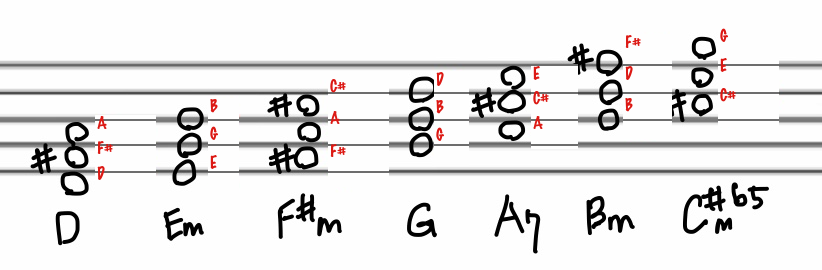
Take that diatonic scale from before, and stack the notes by skipping every other one, like this:

Stacking diatonic scale notes every other note

This “skip one note at a time” stacking is generally considered to sound pleasant to the ear.

This is exactly what a diatonic chord is: a chord built by stacking the notes of a scale, skipping every other note.

Pop and rock songs are often written using these as 3-note chords (triads):

Diatonic triads in the key of C

In jazz and other styles that use a wider harmonic palette — seventh chords, tension notes, and so on — chords are more often written as these 4-note chords:

Diatonic seventh chords in the key of C

Diatonic Chords and Transposition

Now, say you have a chord progression like this, and your vocalist says:

“This is hard to sing in the key of C — can you bump it up a whole step? (Make it key of D?)”

What happens to the diatonic chords in that case?

If you’re just playing root notes, you could simply shift your hand position — but let’s actually think it through theoretically, since we’re here.

If in the key of C, Do Re Mi Fa Sol La Ti Do is the diatonic scale, then wouldn’t the diatonic chords in the key of D be built from Re Mi Fa Sol La Ti Do Re?

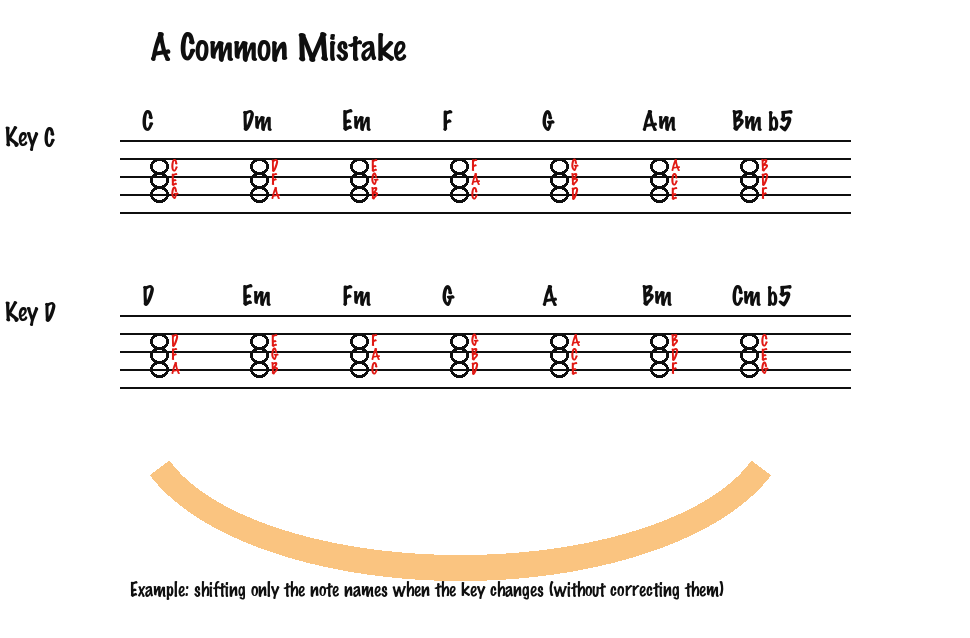
If you think about it that way… you’d be wrong.

A common mistake: shifting only the note names

Let’s look at it the same way as before, using Whole — Whole — Half — Whole — Whole — Whole — Half.

Key of D major scale whole and half steps on the fretboard

Oh, I see — F and C both have sharps.

Exactly right, good catch. Now let’s stack these notes again, skipping every other one, to find the “pleasant-sounding” chords.

In terms of diatonic chords, here’s how that breaks down (as triads):

Diatonic triads in the key of D

So, raising the key by a whole step gives you these diatonic chords:

Key Point

When you change keys, the diatonic chords change too — sharps and flats may appear.

But no matter what key you’re in, the diatonic scale’s interval pattern of

Whole — Whole — Half — Whole — Whole — Whole — Half

never changes.

For this article, it’s enough to get a general sense of this. Your understanding will deepen as you apply it to real songs going forward.

Finally, here’s a reference table and summary.

Key & Diatonic Chord Reference Tables

A song’s key is determined by the number of sharps or flats written at the start of the sheet music.

For example:

Key of D has two sharps in the key signature

Key of F has one flat in the key signature

Key of C has no key signature

…and so on. It’s all fixed and predictable.

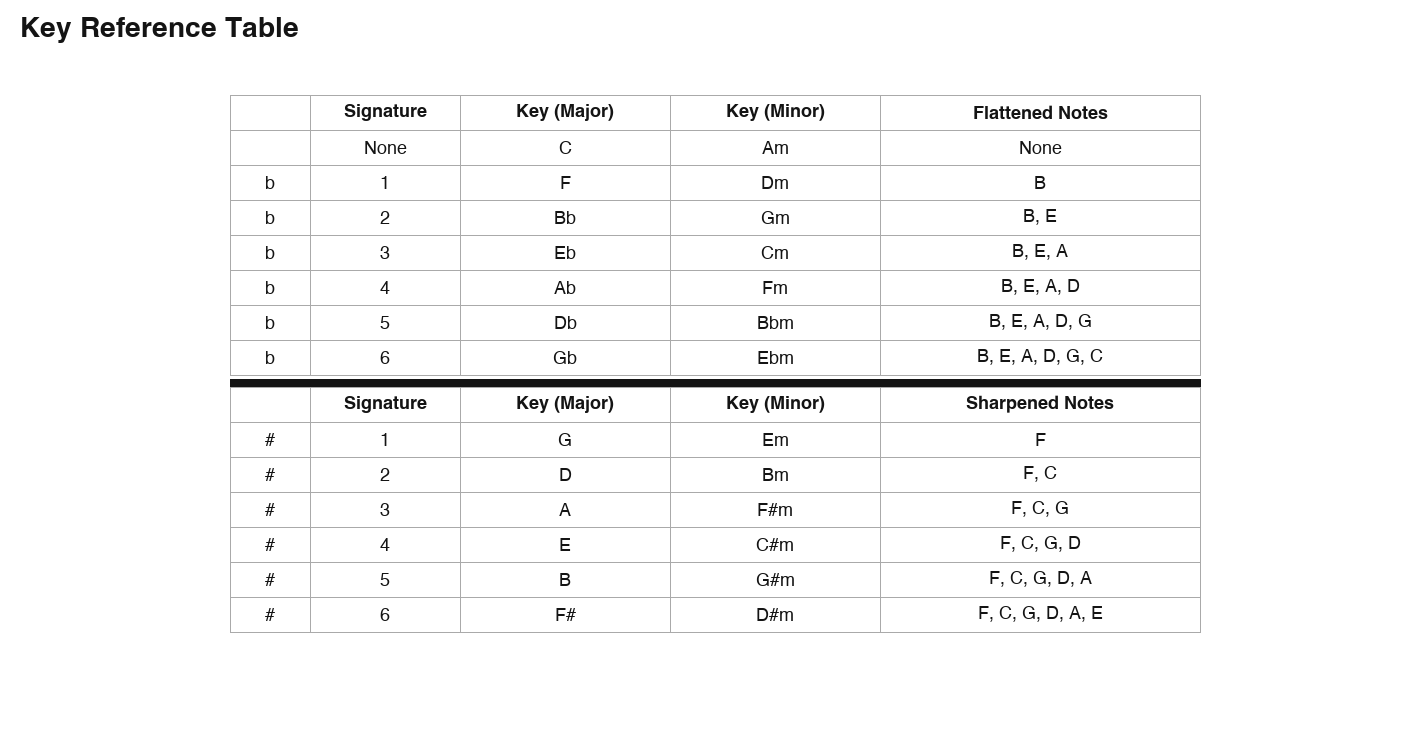
Here’s a reference table of key signatures and keys.

Key reference table

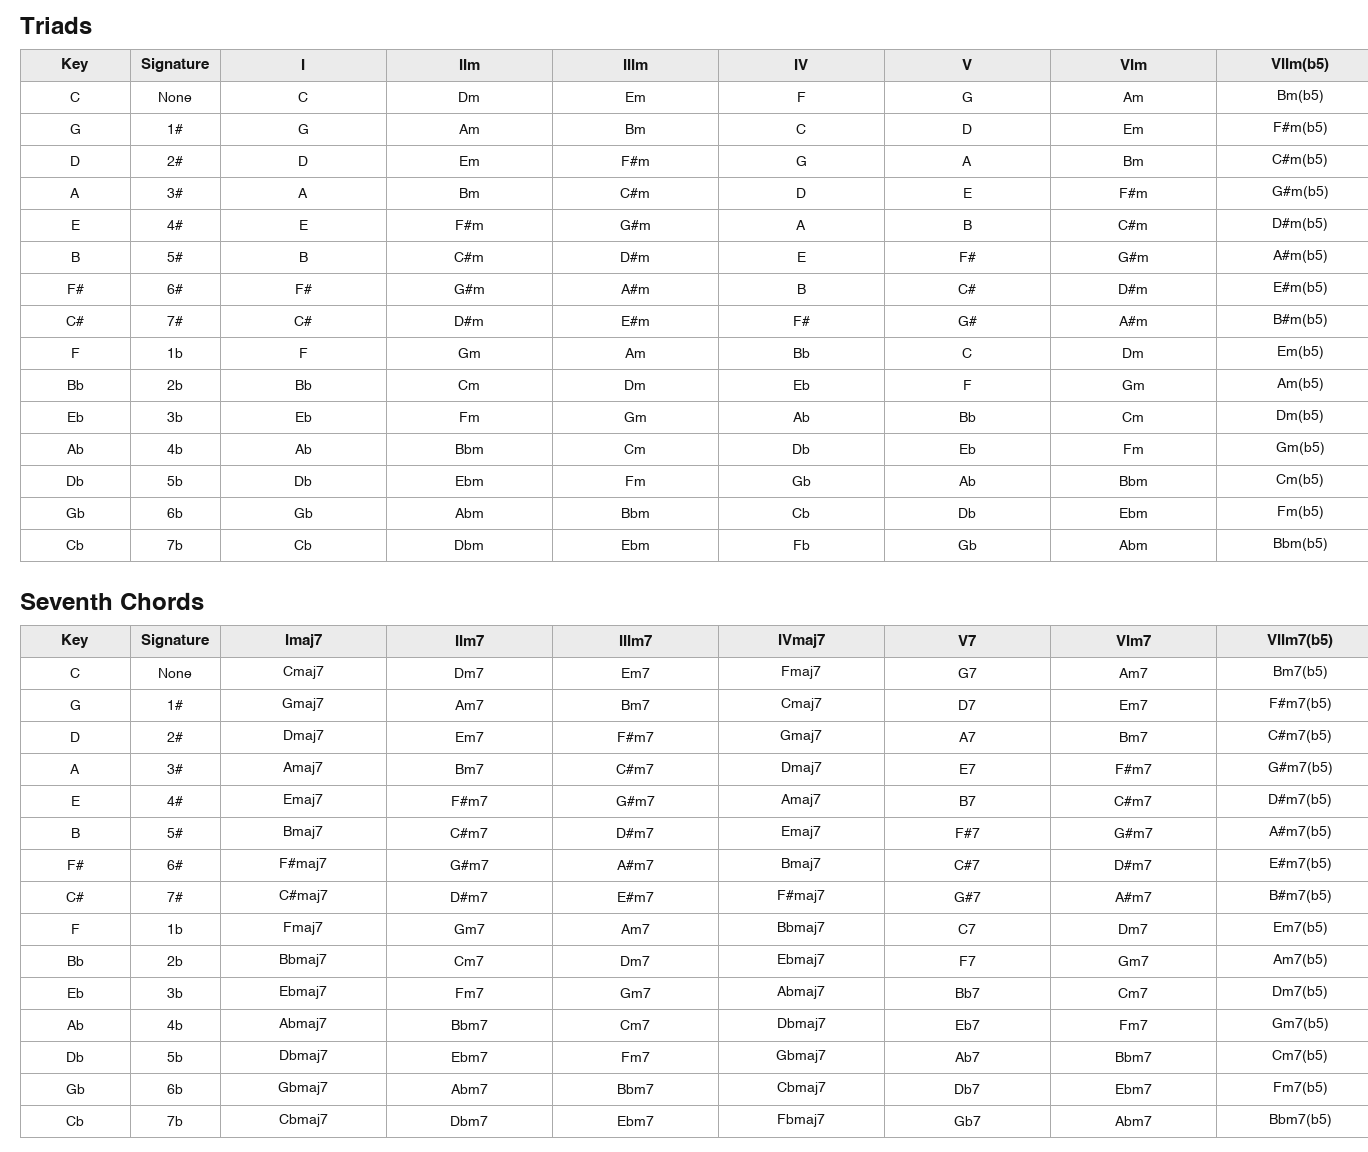
And here’s a reference table of key signatures and diatonic chords.

Diatonic chord reference table

You probably won’t be able to recall key signatures and their diatonic chords instantly — keep these tables handy as a reference.

As you apply this to real songs — analyzing tunes and writing your own — you’ll gradually get more comfortable with diatonic chords.

When a bassist has this knowledge, it helps in all kinds of ways:

· You can analyze songs
· You can improvise, including bass solos
· It’s easier to build moving basslines
· It opens up your range as a songwriter
· You’ll get faster at learning songs and copying parts by ear

Next time, I’ll apply diatonic chords to a real song.

Want Personalized Feedback on Your Playing?

This is exactly the kind of thing that’s hard to fix alone — and where having a teacher makes all the difference.

At Line on Bass, I offer an online lesson service where you send me a video of your playing, and I give you specific, detailed feedback — every single day if you want.

Students from around the world are using this to fix exactly these kinds of issues and steadily improve their jazz bass skills.
Check Out the Lesson Service →

Posted on Leave a comment

Triad Practice: A Concrete Method for Building Better Improvised Bass Lines

This article is by Toru Hoshino, a Tokyo-based upright and electric bassist and instructor (@jazzbassisttoru).

This article is for:
– Bassists who aren’t sure how to build a solo when improvising
– Players who want new ideas for their improvised solos
– Bassists who are just getting started with jazz bass

This time, I’ll share a concrete practice method using triads.

The Goal of This Practice

By consciously using triad tones with every chord change, you bring out the color of each chord

and you’re able to play improvised lines that feel like they “sing.”

That’s the goal here.

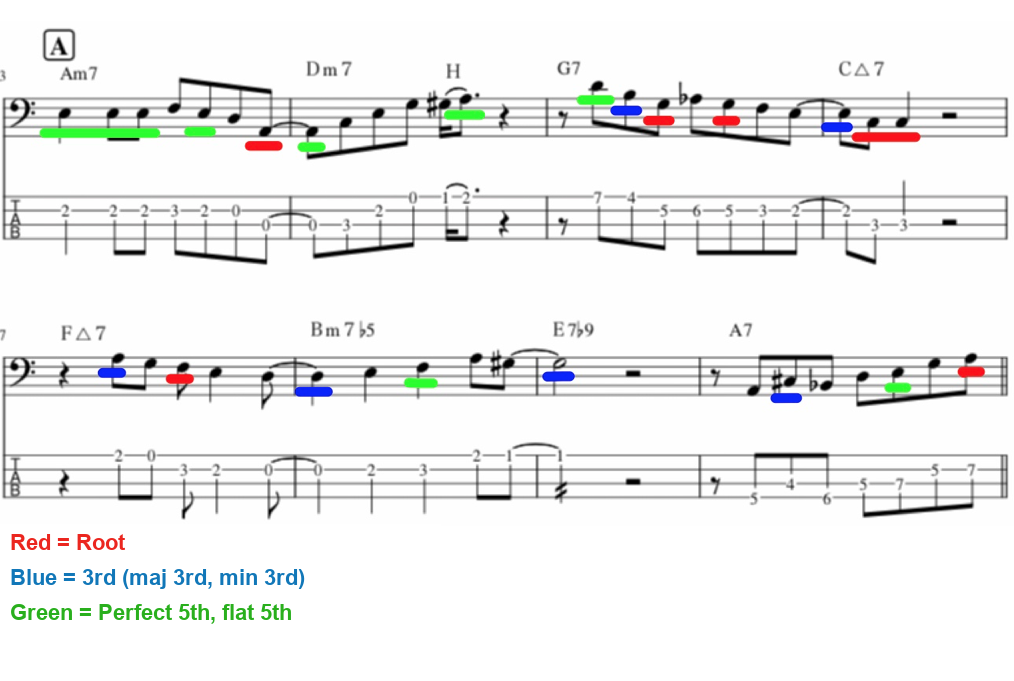
Here’s what it sounds like when you can do this:

Not every note in this example is strictly a triad tone, but the idea is to eventually be able to weave triads and scales together like this. (I’ll cover that part in a future article.)

To be able to follow chord changes this closely, though, you first need to train yourself to instantly call up triads in your head, almost mechanically.

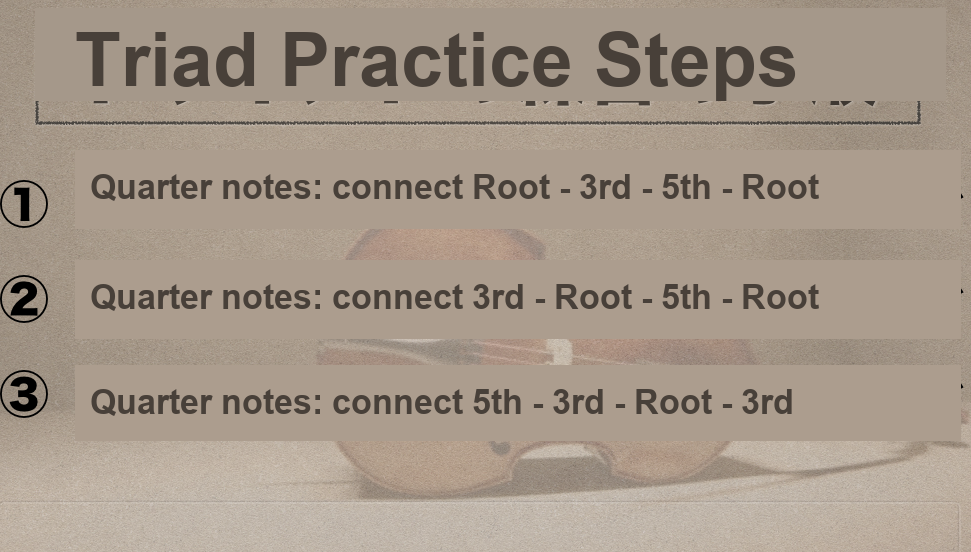
Steps for Triad Practice

Here’s how the practice routine goes:


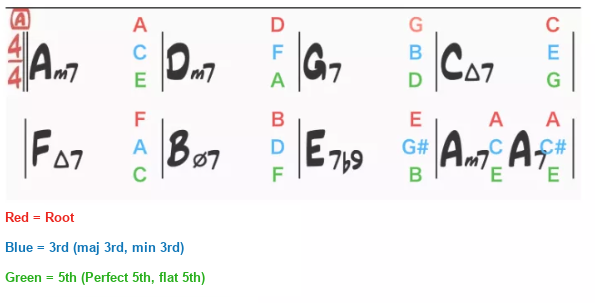
Can you picture the triads right away just by looking at this chart?

If you’re a beginner, I’d guess that’s pretty tough.

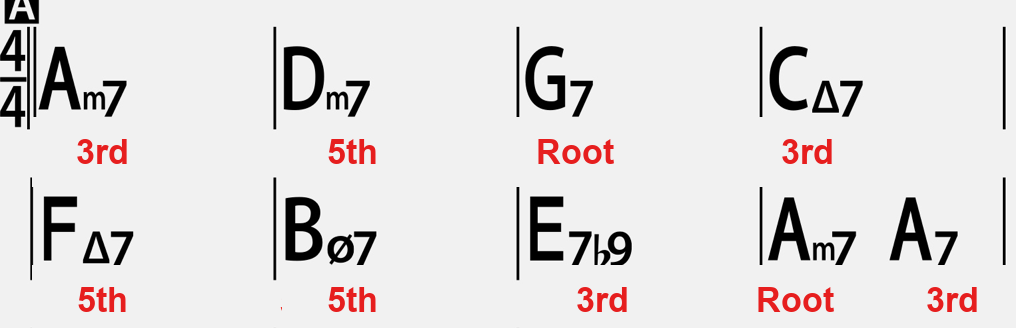
And it’s probably even harder when the line starts on the 3rd or the 5th instead of the root, like this:

Step 1: Try playing Root-3rd-5th-Root

While looking at the chart, think “Root, 3rd, 5th, Root” for each chord and play it in quarter notes.

Here’s the idea:

At first, most beginners won’t be able to picture the triad instantly, so it’s fine to skip the metronome for now.

Playing while mentally picturing each triad tone in your head is genuinely difficult.

So expect this stage to take a while.

Once you can play it as one quarter note per beat at 60 BPM, move on to the next step.

Step 2: Try playing 3rd-Root-5th-Root

Next, think “3rd, Root, 5th, Root” for each chord and play it in quarter notes.

This is harder than the first pattern. It’ll take time before you can play it in steady tempo, but once you can play this one too at quarter notes, 60 BPM, move on to the next step.

Step 3: Try playing 5th-3rd-Root-3rd

Now we’ll bring in lines that start on the 5th as well.

This one is also fairly hard. It takes time before you can play it in steady tempo, but the goal is to be able to play this at quarter notes, 60 BPM.


A Note on Practicing This

This kind of practice is tiring, and progress can feel slow.

When that happens, take a short break and just play loosely for a bit, without overthinking it.

If you do that, you’ll find that the playing you used to do by just running scales up and down on autopilot gradually starts to reflect the chord tones more and more, almost without trying.

Your brain won’t rewire itself after just a day or two of this.

But if you keep at this practice over time, your improvised lines will start to outline the chords much more clearly.

It’s a practice that takes a lot of concentration, so try to avoid doing it when you’re tired — ideally do it when you’re relaxed and can really focus.

Next time, I’ll cover a practice method that weaves these triads together with scales.

Thanks for reading.

Want Personalized Feedback on Your Playing?

This is exactly the kind of thing that’s hard to fix alone — and where having a teacher makes all the difference.

At Line on Bass, I offer an online lesson service where you send me a video of your playing, and I give you specific, detailed feedback — every single day if you want.

Students from around the world are using this to fix exactly these kinds of issues and steadily improve their jazz bass skills.
Check Out the Lesson Service →