This article is written by Toru Hoshino, an upright and electric bassist and instructor based in Tokyo.
✅ You want to get into jazz but aren’t sure where to start
✅ You’re a bassist who wants to try improvising
✅ You sort of understand diatonic chords, but you’re not sure what to actually do with them
✅ You bought a music theory book, gave up around page 3, and it’s been gathering dust in a closet ever since
This article is for you.
I’m going to walk through how to use diatonic chord theory to analyze a tune, and how that analysis feeds directly into your improvising.
• This is written with bassists in mind, but the ideas apply to any instrument.
Contents
A Quick Refresher on Diatonic Chords
I covered diatonic chords in detail in another article.
If anything here doesn’t quite click, or you find yourself wondering “wait, why is that?”, it’s worth circling back to that article and then coming back to this one.
• Why knowing your diatonic chords actually matters — the basics, explained
Why Bother Analyzing a Tune?
Say you’re in the key of C and you run into a progression like this. How would you think about improvising over it?

A typical first instinct: “Okay… it’s Am7, so I can use A. Then Dm7, so I can use D… but once you throw a ‘7’ on there, I’m not totally sure what’s safe anymore.”
That’s a completely normal way to feel. Since improvising happens in real time, wouldn’t it help to already have a rough sense of which notes work, ahead of time, before you even start playing?
Here’s the thing: in this particular 4-bar example, regardless of the chord changes, you can build everything entirely out of the plain major scale (do-re-mi-fa-sol-la-ti).
• Example of a phrase built entirely from the major scale
Notice how natural and easy that sounds on the ear, even though it’s that simple? Once you can see several bars at a time and know which notes work across all of them as a group, improvising gets a lot more approachable.
So with that in mind, let’s actually walk through how to analyze a tune to make improvising easier.
This time we’ll use a slightly altered version of the first 16 bars of a progression like the one used in “Fly Me to the Moon” as our example.
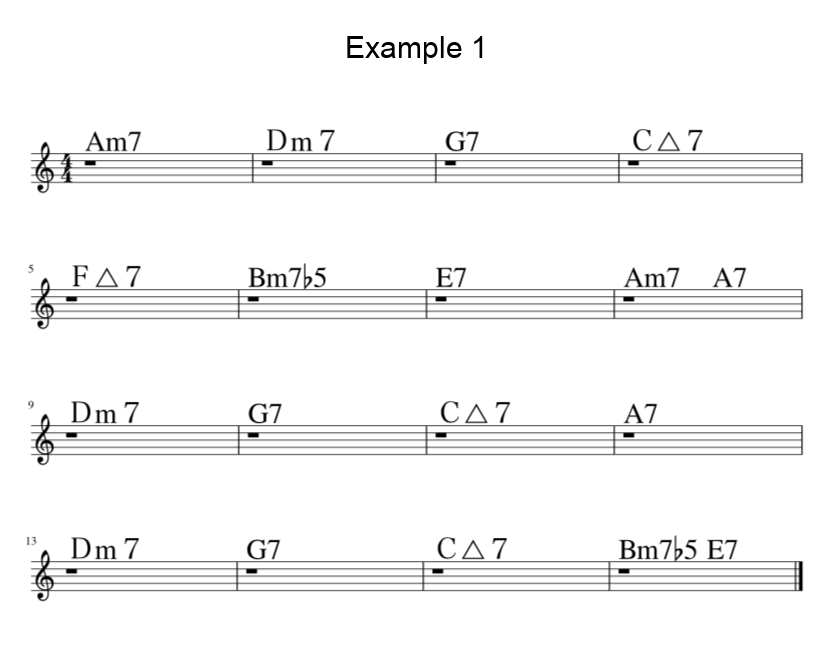
Steps for Analyzing a Tune
Here’s the process I use:
1. Figure out the key of the tune
2. Identify the diatonic chords and work out which notes are available
3. Identify the non-diatonic chords and work out which notes are available
Let’s go through this using a diatonic chord chart and a key signature chart as reference.
Diatonic Chord Chart
| Key | I△7 | IIm7 | IIIm7 | IV△7 | V7 | VIm7 | VIIm7(♭5) | Key Signature |
|---|---|---|---|---|---|---|---|---|
| C | C△7 | Dm7 | Em7 | F△7 | G7 | Am7 | Bm7(♭5) | None |
| G | G△7 | Am7 | Bm7 | C△7 | D7 | Em7 | F♯m7(♭5) | 1 sharp |
| D | D△7 | Em7 | F♯m7 | G△7 | A7 | Bm7 | C♯m7(♭5) | 2 sharps |
| A | A△7 | Bm7 | C♯m7 | D△7 | E7 | F♯m7 | G♯m7(♭5) | 3 sharps |
| E | E△7 | F♯m7 | G♯m7 | A△7 | B7 | C♯m7 | D♯m7(♭5) | 4 sharps |
| B | B△7 | C♯m7 | D♯m7 | E△7 | F♯7 | G♯m7 | A♯m7(♭5) | 5 sharps |
| F♯ | F♯△7 | G♯m7 | A♯m7 | B△7 | C♯7 | D♯m7 | E♯m7(♭5) | 6 sharps |
| C♯ | C♯△7 | D♯m7 | E♯m7 | F♯△7 | G♯7 | A♯m7 | B♯m7(♭5) | 7 sharps |
| F | F△7 | Gm7 | Am7 | B♭△7 | C7 | Dm7 | Em7(♭5) | 1 flat |
| B♭ | B♭△7 | Cm7 | Dm7 | E♭△7 | F7 | Gm7 | Am7(♭5) | 2 flats |
| E♭ | E♭△7 | Fm7 | Gm7 | A♭△7 | B♭7 | Cm7 | Dm7(♭5) | 3 flats |
| A♭ | A♭△7 | B♭m7 | Cm7 | D♭△7 | E♭7 | Fm7 | Gm7(♭5) | 4 flats |
| D♭ | D♭△7 | E♭m7 | Fm7 | G♭△7 | A♭7 | B♭m7 | Cm7(♭5) | 5 flats |
| G♭ | G♭△7 | A♭m7 | B♭m7 | C♭△7 | D♭7 | E♭m7 | Fm7(♭5) | 6 flats |
| C♭ | C♭△7 | D♭m7 | E♭m7 | F♭△7 | G♭7 | A♭m7 | B♭m7(♭5) | 7 flats |
Key Signature Chart
| Key Signature | Key (Major) | Key (Relative Minor) | |
|---|---|---|---|
| ♭ | None | C | Am |
| 1 | F | Dm | |
| 2 | B♭ | Gm | |
| 3 | E♭ | Cm | |
| 4 | A♭ | Fm | |
| 5 | D♭ | B♭m | |
| ♯ | 1 | G | Em |
| 2 | D | Bm | |
| 3 | A | F♯m | |
| 4 | E | C♯m | |
| 5 | B | G♯m | |
| 6 | F♯ | D♯m |
1. Figure Out the Key of the Tune
The key is determined by the key signature at the start of the tune — how many sharps or flats are written there.
Checking against the chart above, this tune has no sharps or flats in its key signature, so the key is C.

2. Identify the Diatonic Chords and Work Out Which Notes Are Available
Once you know the key, go back to the diatonic chord chart and find the row for that key.
For the key of C, the diatonic chords are the ones in this row of the chart:
C△7 – Dm7 – Em7 – F△7 – G7 – Am7 – Bm7(♭5)
Now let’s mark every chord in our progression that matches one of those — those are our diatonic chords, highlighted below in magenta:
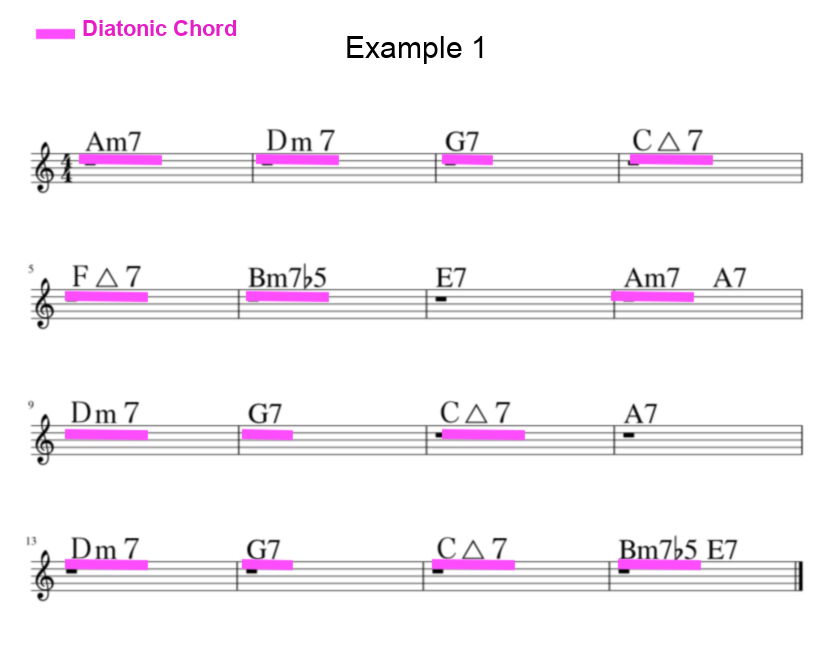
Regardless of which bar you’re in, anywhere you see a magenta highlight, you can use the diatonic scale for this key (here, the notes C–D–E–F–G–A–B) and it’ll sound “right at home.”
3. Identify the Non-Diatonic Chords and Work Out Which Notes Are Available
A chord that isn’t diatonic to the key is called a non-diatonic chord.
In this tune, the chords marked in cyan are the non-diatonic ones:
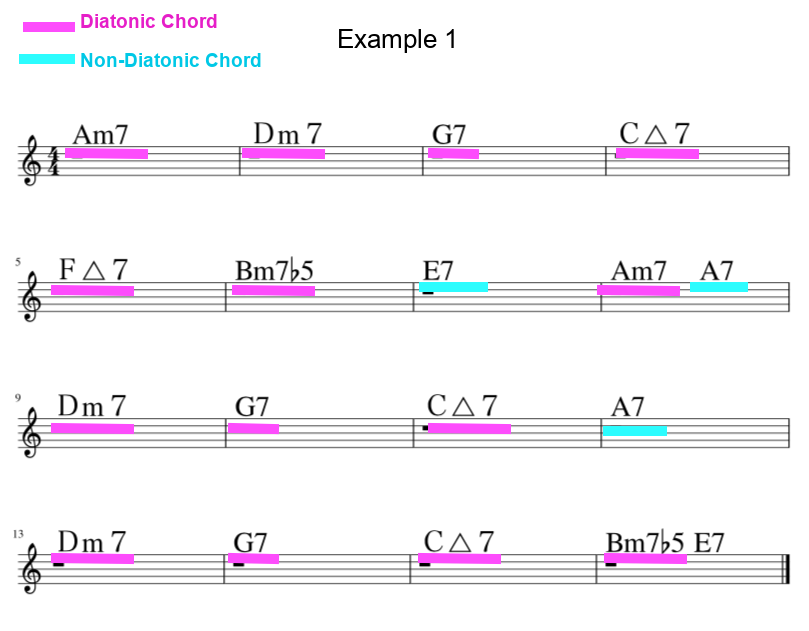
There are several ways to think about which scales work over non-diatonic chords, but for now, the simplest approach is: you can always use the notes of the chord’s own triad — the 1st, 3rd, and 5th.
For E7: E (root), G♯ (3rd), B (5th)
For A7: A (root), C♯ (3rd), E (5th)
Here’s the Key Point: The Note Choice Over Non-Diatonic Chords
Over the magenta diatonic chords: the notes C–D–E–F–G–A–B
Over the cyan non-diatonic chords: E (root)–G♯ (3rd)–B (5th) for E7, and A (root)–C♯ (3rd)–E (5th) for A7
What’s worth paying attention to here is that over the cyan chords, you’re reaching for notes that are different from the diatonic scale.
Specifically, the 3rd of E7, G♯, and the 3rd of A7, C♯.
By deliberately stepping outside the diatonic scale at these spots, you create a moment that stands out a bit from the rest of the progression.
And with that, we’ve got our analysis.
Now let’s actually improvise over it.
Improvising After the Analysis
Listen for how the note choice shifts over the non-diatonic chords.
Pattern 1 — Improvising Over the First 8 Bars

From 0:00–0:12, the phrase is built entirely from the plain major scale.
Around 0:13, I lean into the note G♯ (the 3rd of E7) for a moment — can you hear how that creates a little bit of contrast?
Pattern 2 — Improvising Over the Second 8 Bars

Around 0:06, I lean into C♯ (the 3rd of A7) for a moment — same idea, creating a bit of contrast.
Outside of that one spot, this phrase is also built almost entirely from the plain major scale.
So that’s the basic approach to analyzing a tune using diatonic chord theory.
I hope it’s useful for your own practice going forward.
On Church Modes
Once you’ve got a handle on diatonic chords and can make these rough note choices on the fly, the next step is to get more specific about exactly which notes work over each individual bar.
I go into “scales” and the church modes in detail in this article:
Want Personalized Feedback on Your Playing?
This is exactly the kind of thing that’s hard to fix alone — and where having a teacher makes all the difference.
At Line on Bass, I offer an online lesson service where you send me a video of your playing, and I give you specific, detailed feedback — every single day if you want.
Students from around the world are using this to fix exactly these kinds of issues and steadily improve their jazz bass skills.