This article is written by Toru Hoshino, a jazz and upright bassist and instructor based in Tokyo.
I built a walking bass line over the chord changes to the jazz standard “Fly Me to the Moon,” and this article breaks it down note by note, explaining the reasoning behind every single note.
It’s a very long, detailed breakdown, so feel free to bookmark this page and come back to it whenever you have time to read through it properly.
A Video with Notation for a Walking Bass Line You Can Use Over “Fly Me to the Moon”
Here’s a performance of the line first.
Characteristics of This Bass Line
For this bass line, I avoided things like ghost notes or high-position playing, and kept it to simple quarter notes.
I aimed for a flow that’s easy to use both for backing the melody and for backing improvisation, without getting in the way of the beautiful melody of “Fly Me to the Moon.”
I’ll walk through the A section note by note.
The chord changes are based mostly on the Jazz Standard Bible (a well-known Japanese fake book), with a few small adjustments to fit the line’s movement.
A Section (Bars 1–8)
Let’s start by going through the notes used in the A section (bars 1–8).

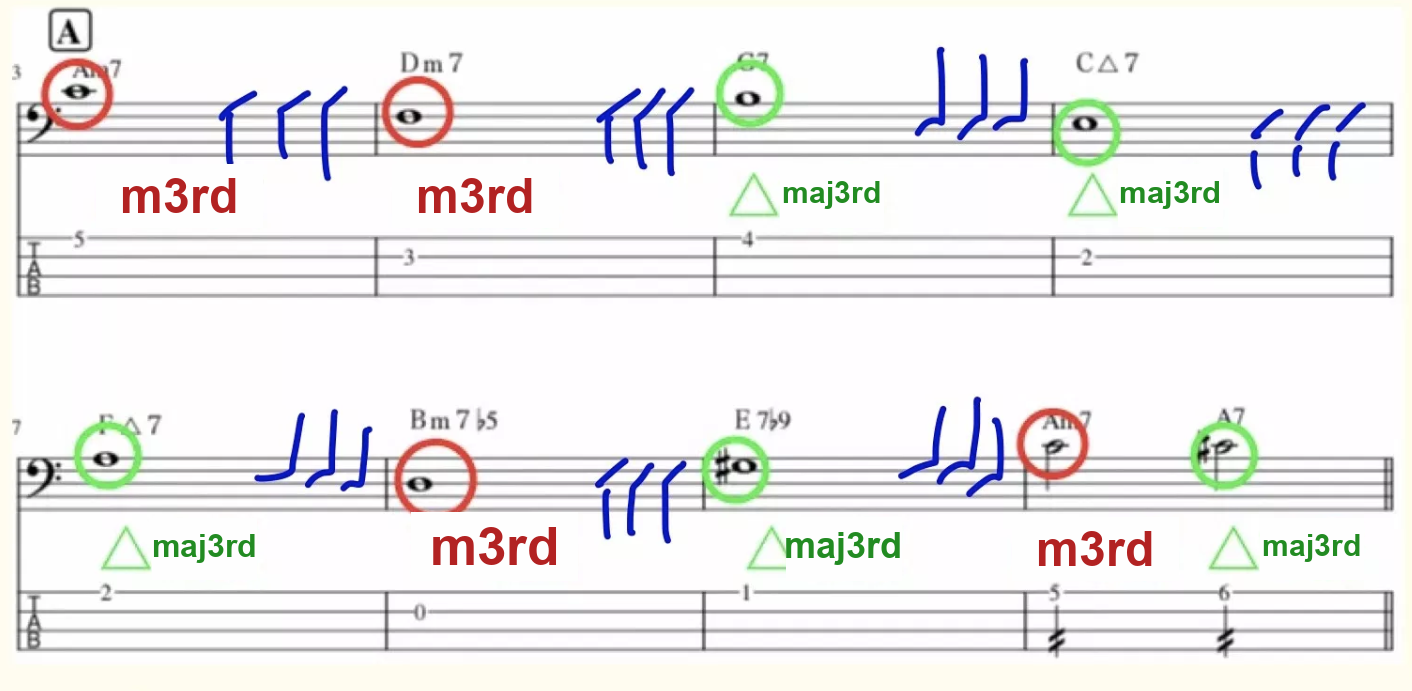
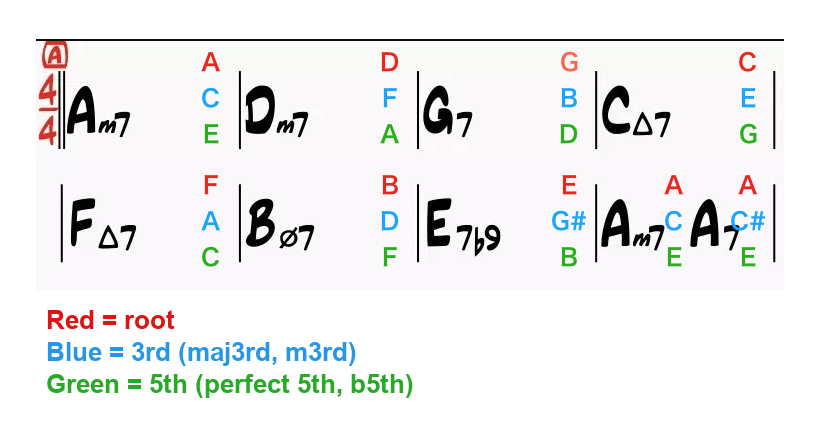
Bar 1

Over Am7:
- Note 1: A (the root of Am7)
- Note 2: B (the 2nd of Am7)
- Note 3: C (the minor 3rd of Am7)
- Note 4: E (the 5th of Am7)
Bar 2

Over Dm7:
- Note 1: D (the root of Dm7)
- Note 2: E (the 2nd of Dm7)
- Note 3: F (the minor 3rd of Dm7)
- Note 4: A (the 5th of Dm7)
Bar 3
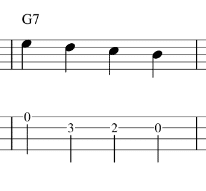
Over G7:
- Note 1: G (the root of G7)
- Note 2: F (the minor 7th of G7)
- Note 3: E (the 6th of G7)
- Note 4: D (the 5th of G7)
Bar 4

Over CΔ7, then C7:
- Note 1: C (the root of CΔ7)
- Note 2: E (the major 3rd of CΔ7)
- Note 3: C (the root of C7)
- Note 4: B♭ (the minor 7th of C7)
The Basic Rule: Start on the Root
Looking at the line so far, you’ll notice that, just like in pop or rock, the first note of each chord is generally the root.
When I first started learning jazz walking bass by ear, I honestly couldn’t tell at all which notes the bassist was playing on the recordings I was copying.
But the basic approach, most of the time, is to move with the root on the first beat of the bar.
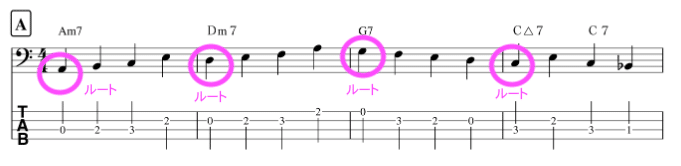
By placing the root on the first note and using chord tones or scale tones for the rest, you create a line that sits naturally with the harmony — one that just sounds “right” to the ear.
If you’re not sure what “the root” means, I’d recommend reading this article first. It’s a concept you can’t avoid when building bass lines in any genre, so make sure it’s solid.
Bar 5

Over FΔ7:
- Note 1: F (the root of FΔ7)
- Note 2: E (the major 7th of FΔ7)
- Note 3: D (the major 6th of FΔ7)
- Note 4: C (the 5th of FΔ7)
This one also falls nicely under the fingers.
Bar 6

Over Bm7(♭5):
- Note 1: B (the root of Bm7(♭5))
- Note 2: C (the minor 2nd of Bm7(♭5))
- Note 3: D (the minor 3rd of Bm7(♭5))
- Note 4: F (the ♭5 of Bm7(♭5))
Bar 7
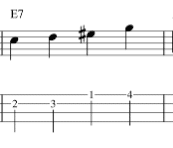
Over E7:
- Note 1: E (the root of E7)
- Note 2: F (the minor 2nd of E7)
- Note 3: G♯ (the major 3rd of E7)
- Note 4: B (the 5th of E7)
None of these notes are hard to play, but this particular movement can still feel a little unfamiliar at first.
The key note is the third one, G♯ — the major 3rd of E7. It has a very distinctive sound.
When you play this bass line, make a point of really bringing out that G♯ in bar 7’s E7 — it’s an important color tone for “Fly Me to the Moon.”
Bar 8
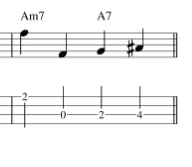
Over Am7, then A7:
- Note 1: A (the root of Am7)
- Note 2: C (the minor 3rd of Am7)
- Note 3: A (the root of A7)
- Note 4: C♯ (the major 3rd of A7)
That covers the full 8-bar A section.
B Section (Bars 9–16)

Next is the B section bass line.
The progression Dm7 → G7 → CΔ7 — a classic “two-five-one” — shows up twice here.
This Dm7 → G7 → CΔ7 movement, and ii–V–I progressions in general, come up constantly in jazz, so it’s worth being able to handle them smoothly.
Bar 1

Over Dm7:
- Note 1: D (the root of Dm7)
- Note 2: E (the 2nd of Dm7)
- Note 3: F (the minor 3rd of Dm7)
- Note 4: A (the 5th of Dm7)
An easy one to finger.
Bar 2
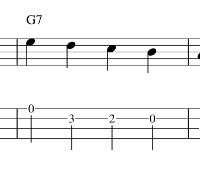
Over G7:
- Note 1: G (the root of G7)
- Note 2: F (the minor 7th of G7)
- Note 3: E (the 6th of G7)
- Note 4: D (the 5th of G7)
Bar 3

Over CΔ7:
- Note 1: C (the root of CΔ7)
- Note 2: B (the major 7th of CΔ7)
- Note 3: A (the 6th of CΔ7)
- Note 4: G (the 5th of CΔ7)
A smooth, gently descending line, moving in whole and half steps.
Bar 4
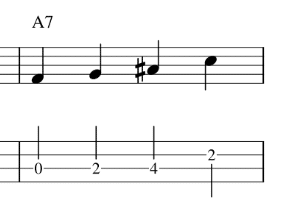
Over A7:
- Note 1: A (the root of A7)
- Note 2: B (the 2nd of A7)
- Note 3: C♯ (the major 3rd of A7)
- Note 4: E (the 5th of A7)
A7 here is a non-diatonic chord, so just like bar 8 of the A section, I made sure to use C♯.
Bars 5–7

I used the same notes here as in bars 1–3 of this section, so I won’t go through them again in detail.
As mentioned above, ii–V–I progressions like this Dm7 → G7 → CΔ7 come up constantly in jazz, so it really pays off to have a few go-to walking bass patterns for ii–V–I in your pocket — you can reuse them just like this.
Bar 8

Over Bm7♭5, then E7:
- Note 1: B (the root of Bm7♭5)
- Note 2: E (the root of E7)
- Note 3: E (the minor 2nd of E7)
- Note 4: G♯ (the 3rd of E7)
This one’s a bit unusual: only the first note follows Bm7♭5, and everything from the second note on follows E7.
That wraps up the B section.
A′ Section (Bars 17–24)

The A′ section uses exactly the same notes as the A section, so I’ll skip the detailed breakdown.
As I’ve mentioned in other song breakdowns, I sometimes get asked, “Is it really okay to repeat the same bass line pattern over and over?”
When you’re starting out, I think that’s completely fine.
In fact, if a beginner tries to force a different pattern every single time, you often can’t keep up — your picking falls behind the time and the rhythm starts to slip.
The point of this article is to give people who find it hard to build a line on the fly, just by looking at the changes, something they can simply play as written, so they can start developing a feel for “okay, so this is what a walking bass line is like.”
So until you have enough freedom to improvise your line by reading the chords, don’t worry too much about repeating patterns. Instead, focus on keeping a steady, consistent rhythm — a bass line the other musicians can lock into and play comfortably over — even if it’s simple or repetitive.
C Section (Bars 25–32)

This is the final 8 bars. Most of it is similar to what we’ve already covered, but bars 1–3 stand out for using a passing diminished chord — that’s the key point here.
The Passing Diminished Chord
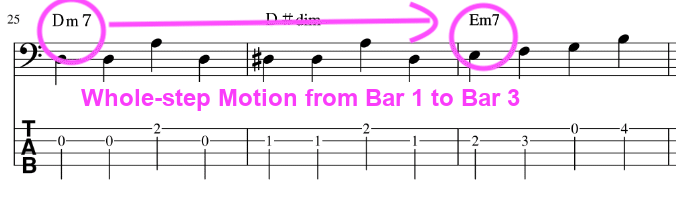
The progression here is Dm7 → D♯dim → Em7. Looking only at the roots:
D → D♯ → E
… moves in half steps.
You can think of this as a whole-step move from Dm7 in bar 1 to Em7 in bar 3 (see below):
To smooth out that whole-step movement, there’s a chord sitting right in the middle — a half step above Dm7 and a half step below Em7 — and that’s D♯dim (see below):
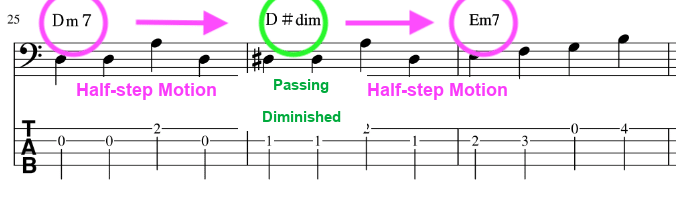
That’s the idea behind it.
A diminished chord that sits between two chords of a larger whole-step (or whole-tone) progression like this is called a “passing diminished” chord.
A diminished chord is built from the root, minor 3rd, ♭5, and 6th — which gives it a slightly eerie, unsettled sound on its own. But used as a passing diminished like this, it blends beautifully into the harmony.
Let’s build the bass line with all of this in mind.
Bar 1
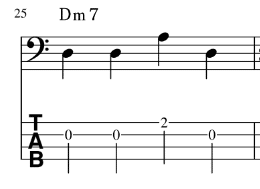
In bar 1, over Dm7, I only used:
- The root (D)
- The 5th (A)
Up to now, every quarter note in a 4-beat walking line used a different note. Here, I deliberately built the line with just these two notes instead.
The reason has to do with bar 2.
Bar 2
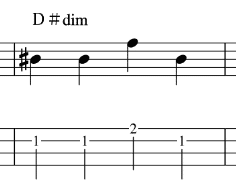
In bar 2, over D♯dim, it’s the same idea:
- The root (D♯)
- The ♭5 (A)
On its own that looks simple, but look at what happens when you combine bars 1 and 2:
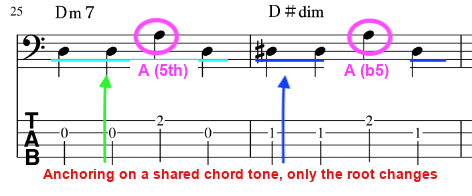
The A circled in the diagram is a chord tone (the 5th) shared by both chords. Here, across these two bars, the trick is to keep that shared note (A) fixed while only the root moves underneath it.
There’s nothing wrong with simply playing four different quarter notes through these two bars — but instead, I deliberately repeated the same note two or three times in a row like this. It’s a different kind of approach, and sometimes it just feels better musically.
That covers bars 1–2 of the C section.
Bars 3–8 of the C section reuse and build on ideas we’ve already covered, so I’ll leave those as an exercise — and that wraps up the note-by-note breakdown of this one chorus of “Fly Me to the Moon.”
This turned into a pretty long breakdown — thanks for reading all the way through.
I hope it helps with building your own bass lines going forward.
Want Personalized Feedback on Your Playing?
This is exactly the kind of thing that’s hard to fix alone — and where having a teacher makes all the difference.
At Line on Bass, I offer an online lesson service where you send me a video of your playing, and I give you specific, detailed feedback — every single day if you want.
Students from around the world are using this to fix exactly these kinds of issues and steadily improve their jazz bass skills.