Posted on Leave a comment

5 Essential Bassists Every Jazz and Walking Bass Player Should Know

This article is written by Toru Hoshino, a jazz bassist and instructor based in Japan who teaches online lessons to students worldwide. In this article, he shares five essential bassists every jazz and walking bass player should listen to.

There are countless great bassists out there, and picking favorites is genuinely an impossible task. But a student of mine recently asked me:

“If I’m going to get into jazz, walking bass, and upright bass, can you just give me five bassists to start with?”

I thought about it for a second, and here’s who I told them.

Ray Brown

Known as “King Ray,” Ray Brown is one of the all-time masters of the upright bass.

His style — driving solos and grooves almost entirely with his index finger — produced a tone and pitch accuracy that were absolutely top tier.

“Listen to Ray Brown closely.” “Think about a solid, centered tone on every single note of that 4-feel.” I heard those two pieces of advice constantly when I was learning. He left behind an enormous number of recordings, and honestly, every single one of them sounds incredible.

Paul Chambers

Paul Chambers’ name shows up on an enormous number of recordings considered essential jazz classics.

His bass solo style — endless eighth notes mostly in the low-to-middle register — is instantly recognizable, and I personally transcribed a huge amount of his playing.

The first time I heard “You’d Be So Nice to Come Home To” off his album Bass on Top, it genuinely blew me away.

Scott LaFaro

One of the legendary bassists whose presence in the Bill Evans Trio was simply overwhelming.

I love his bass solo on “Waltz for Debby” from the album of the same name — the way it keeps flowing right across the bar lines without ever settling into a predictable pattern.

I tried to transcribe it once and gave up halfway through. I’d still like to take another crack at it someday.

Christian McBride

I saw him live once at the Village Vanguard in the US, and the way every single note of his 4-feel seemed to dig into the ground gave me a kind of groove I’d genuinely never felt before.

He’s still active today and is, without question, one of the strongest bassists alive.

The opening arco passage on “Tell Me a Bedtime Story,” from his album Fingerpainting, completely melted me.

Esperanza Spalding

I’ve seen her live about four times. Both her singing and her bass playing are absolutely top tier. Apparently former President Obama was a regular at her shows too.

Her second album, simply titled Esperanza, is one I really love.

So, those are five artists I’d recommend if you’re getting into walking bass. Go listen to some genuinely great playing and let it fire you up.

Want Personalized Feedback on Your Playing?

Listening to these greats is a fantastic way to build your ear and your sense of what’s possible — but turning that inspiration into real progress in your own playing is a different process entirely, and that’s where outside feedback really helps.

This is exactly the kind of thing that’s hard to fix alone — and where having a teacher makes all the difference.

At Line on Bass, I offer an online lesson service where you send me a video of your playing, and I give you specific, detailed feedback — every single day if you want.

Students from around the world are using this to fix exactly these kinds of issues and steadily improve their jazz bass skills.

Check Out the Lesson Service →

Posted on Leave a comment

How to Make Notation Swing in MuseScore (Free Notation Software)

This article is written by Toru Hoshino, a jazz bassist and instructor based in Japan who teaches online lessons to students worldwide. In this article, he explains how to make your notation actually swing in MuseScore, the free notation software.

How to Create a Swing Rhythm in MuseScore

Let’s say you write out a phrase for jazz practice like this:

A straight eighth-note jazz phrase in notation

If it’s not swung, it ends up sounding a little flat and lifeless, like this:

Swing it, though, and it becomes a lot more usable:

How to Turn On Swing Mode

1. In MuseScore’s palette panel, find and click on “Swing.”

2. Drag the Swing marking onto the very first note of the passage you want to swing.

That’s it.

If you don’t like how the label looks once it’s placed, you can double-click the text and change it to whatever you’d like.

One thing to watch out for: if you delete the text completely, the passage will stop swinging altogether — so leave at least some label there, even if you customize the wording.

A Quick Lesson on Swing Rhythm

One of the things that makes a line actually sound like jazz is the swing rhythm. Listen to the difference between these two:

Version ② has a lot more bounce and forward motion to it, right? You can especially hear the difference in how the drummer’s ride cymbal swings.

Both versions are playing the exact same quarter notes shown below — the difference comes entirely from feel:

A simple quarter-note line used for the swing comparison

If you keep the classic “ding, ding-a-ding, ding-a-ding” cymbal pattern in your head while you play, it gets a lot easier to bring out that swing feel in your own lines.

MuseScore is a free, full-featured notation program, and it’s quite easy to pick up — well worth trying out if you write charts or practice material.

Want Personalized Feedback on Your Playing?

Notation can tell you where the swing marking goes, but actually nailing that bounce and forward motion in your own playing is something that’s much easier to dial in with outside ears listening.

This is exactly the kind of thing that’s hard to fix alone — and where having a teacher makes all the difference.

At Line on Bass, I offer an online lesson service where you send me a video of your playing, and I give you specific, detailed feedback — every single day if you want.

Students from around the world are using this to fix exactly these kinds of issues and steadily improve their jazz bass skills.

Check Out the Lesson Service →

Posted on Leave a comment

OneControl Crimson Bass Preamp Review: A Compact Pedal for an Upright Bass Tone

This article is written by Toru Hoshino, a jazz bassist and instructor based in Japan who teaches online lessons to students worldwide. In this article, he reviews a compact preamp pedal that gets surprisingly close to an upright bass tone on electric bass.

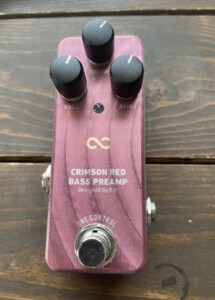
Today I want to talk about a pedal that gets you closer to an upright bass sound: the OneControl Crimson Red Bass Preamp.

The video I posted reviewing this pedal got an unusually large number of views in a short time — that’s never happened to me before — so I wanted to write it up properly here as well.

A Pedal That Gets You Closer to an Upright Bass Tone: OneControl Crimson Bass Preamp

After actually using this pedal for a while, there are three things I really liked about it:

1. It suits walking bass really well
2. It doesn’t make your tone sound cheap
3. It’s tiny and easy to carry around

Let me walk through each of these, and along the way I’ll also answer some questions I got from readers and viewers after the video went up.

1. It Suits Walking Bass Really Well

OneControl Crimson Red Bass Preamp pedal

I think this is a sound that’s genuinely well suited to walking bass.

A lot of people associate walking bass with upright bass specifically. Plenty of people play walking lines on electric bass these days too, of course — but if your strings sound too bright and modern, it can end up missing that “upright bass feel” people are often going for.

This pedal gives you a warm low end that really holds down the bottom, so the tone pairs really well with walking bass lines.

2. It Doesn’t Make Your Tone Sound Cheap

Another thing I like is that it doesn’t cheapen your sound.

I was a little worried going in that it might turn everything muddy and kill the definition in the tone. But in practice, it colors the sound without losing much of the original character.

The fact that it doesn’t sound cheap once you engage the effect is a real point in its favor.

3. It’s Tiny and Easy to Carry Around

Last point: the size.

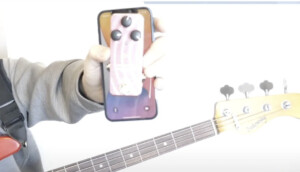
It’s genuinely small — smaller than a smartphone.

Size comparison between the pedal and a smartphone

That makes it easy to throw in a bag, and it’ll work great in a studio setting too.

It only has three knobs — VOLUME, GAIN, and BRILL — so it’s simple and easy to dial in.

That covers the review itself. Now let’s get into some questions I received from readers and viewers after the video went up.

Reader and Viewer Questions

Q: The design of the Crimson Bass Preamp I’m about to buy looks a little different from the one in your video. What’s going on there?

A: It’s probably just been redesigned since I filmed. Kaz Kawamura, the head of One Control, actually shared my video and mentioned it might be the first video out there featuring the new design — so I think the version I reviewed is the newer one, and other versions you might see online could be the earlier design.

Q: How does it sound through a silent upright bass?

A: It pairs really well with a silent upright too — you get a nice, rich low end out of it.

Q: Does it actually sound like a real upright bass?

A: Not exactly, no. An upright bass produces sound through its body, while an electric bass produces sound through an amp — so fundamentally, they’re never going to sound identical.

That said, what this pedal gives you is great in its own right. I did a quick before-and-after comparison playing through it in the video, which is worth checking out if you want to hear the difference for yourself.

So, that covers three things I really liked about this preamp pedal that gets you closer to an upright bass tone.

If you’re after that upright feel, there are other routes too — fret wraps, flatwound strings, and so on — but those change your sound pretty dramatically. A pedal like this is a much smaller commitment if you just want to dip a toe in. Worth giving a try.

Want Personalized Feedback on Your Playing?

Gear can get you part of the way to a great walking bass tone, but it’s your actual line construction and feel that does most of the work — and that’s much easier to dial in with outside feedback.

This is exactly the kind of thing that’s hard to fix alone — and where having a teacher makes all the difference.

At Line on Bass, I offer an online lesson service where you send me a video of your playing, and I give you specific, detailed feedback — every single day if you want.

Students from around the world are using this to fix exactly these kinds of issues and steadily improve their jazz bass skills.

Check Out the Lesson Service →

Posted on Leave a comment

Walking Bass Lines When One Chord Lasts Two Bars (With 3 Real Examples)

This article is written by Toru Hoshino, a jazz bassist and instructor based in Japan who teaches online lessons to students worldwide. In this article, he answers a student’s question: how do you build a walking bass line when the same chord lasts for two bars in a row?

I got this question from a student:

“When the same chord continues for two bars, how should I play over it?”

So I put this article together to answer it.

In jazz standards, you’ll often run into chord progressions where the same chord lasts two bars or more. A lot of people aren’t sure how to approach that, so let’s dig in.

Building a Bass Line When the Same Chord Lasts Two Bars

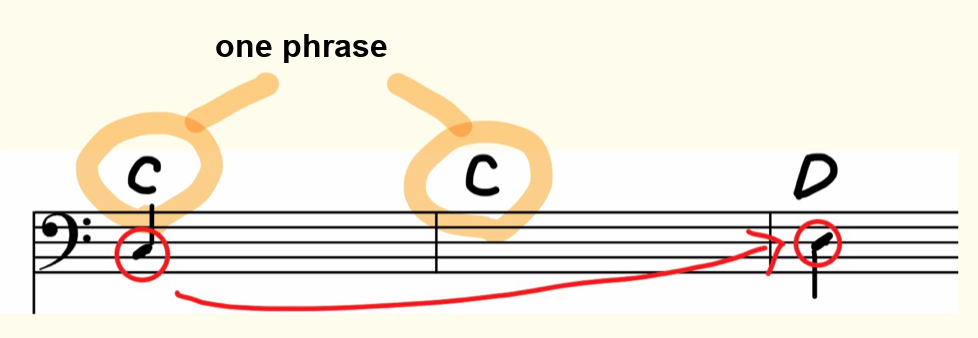
Say you’ve got a progression like C–C–D–D.

As a general rule, you want the first note of each bar to be the root. But if you do that here…

Bass line hitting the root on every bar over C-C-D-D


…it ends up sounding like this. And honestly, this doesn’t really show off what makes a walking bass line work.

In a case like this, it helps to think of the first two bars as one unit, and aim for:

connecting the first note of bar 1 to the root of bar 3, using all 8 notes across those two bars as one continuous line.

Thinking of it that way makes it much easier to create a smooth, flowing line.

Diagram showing two bars grouped together as one continuous phrase from C to D

So at this point you might be thinking: “okay, what about something like this instead?”

Bass line running straight up the C major scale from C to D

And yeah, in theory that’s exactly the idea. That said, running straight up “do-re-mi-fa-so-la-ti-do” like that is a little too plain and predictable, so let’s add a bit more flavor to it.

With that in mind, let’s pull a few real examples from actual jazz standards and see how this plays out in practice.

Three Real Examples of Two-Bar Chord Walking Lines

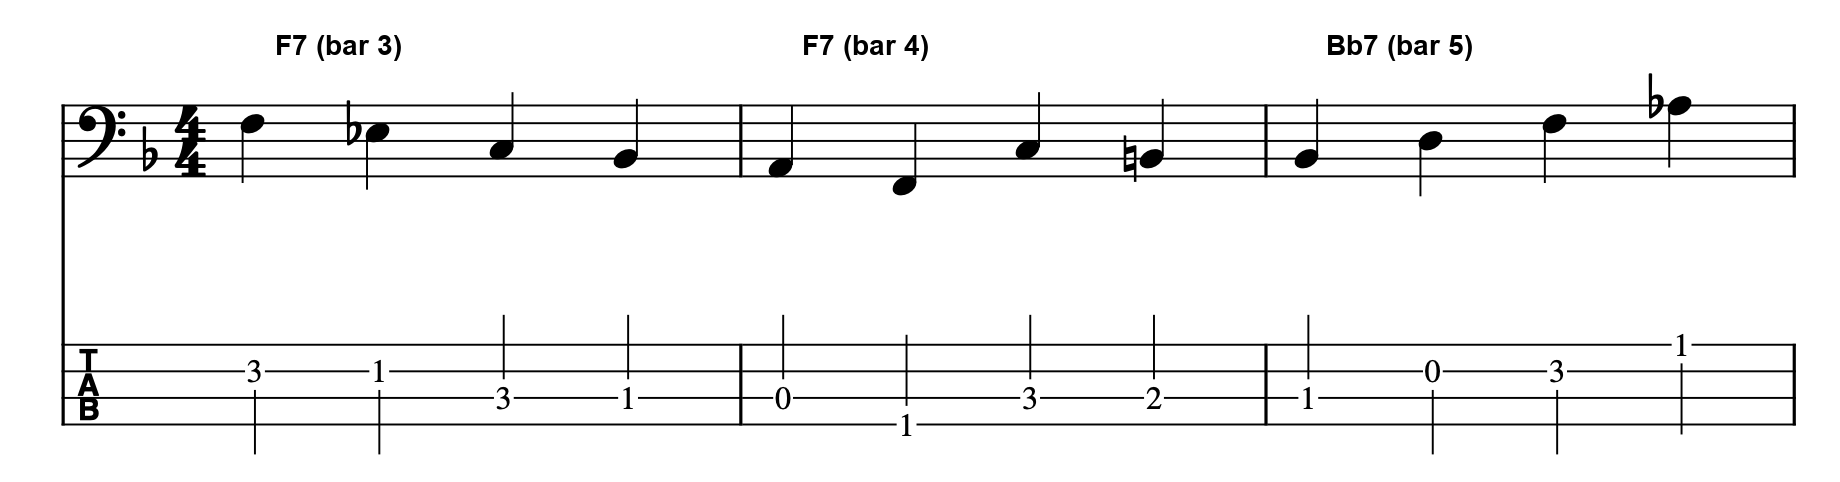
Bars 3–5 of an F Blues

Chord chart for an F blues

Bass line over F7 in bar 3 and bar 4 of an F blues

The Key Idea

F7 lasts through both bar 3 and bar 4 here. Rather than starting bar 4 on the root, F, I deliberately started it on the major 3rd, A.

The line is already descending from the F at the start of bar 3, and by not interrupting that descent, the motion carries smoothly straight through into bar 4.

The B Section of Autumn Leaves, Bars 3–5

Chord chart for Autumn Leaves with the B section highlighted

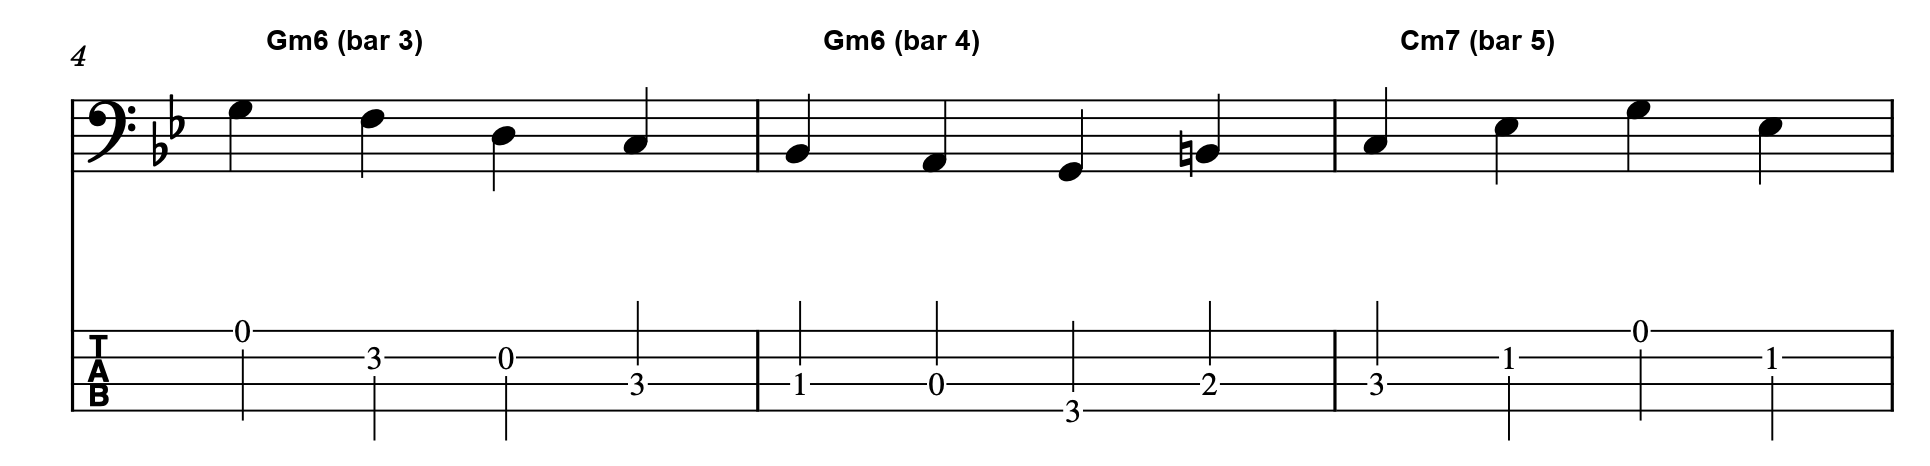
Bass line over Gm6 in bar 3 and bar 4, leading into Cm7 in bar 5

The Key Idea

Gm6 lasts through bar 3 and bar 4 of the B section here. Instead of starting bar 4 on the root, G, I started it on the minor 3rd, B♭.

The line is descending from the G on the first string in bar 3, and keeping that downward motion going lets it flow smoothly into bar 4 as well.

Bars 1–3 of All of Me

Chord chart for All of Me

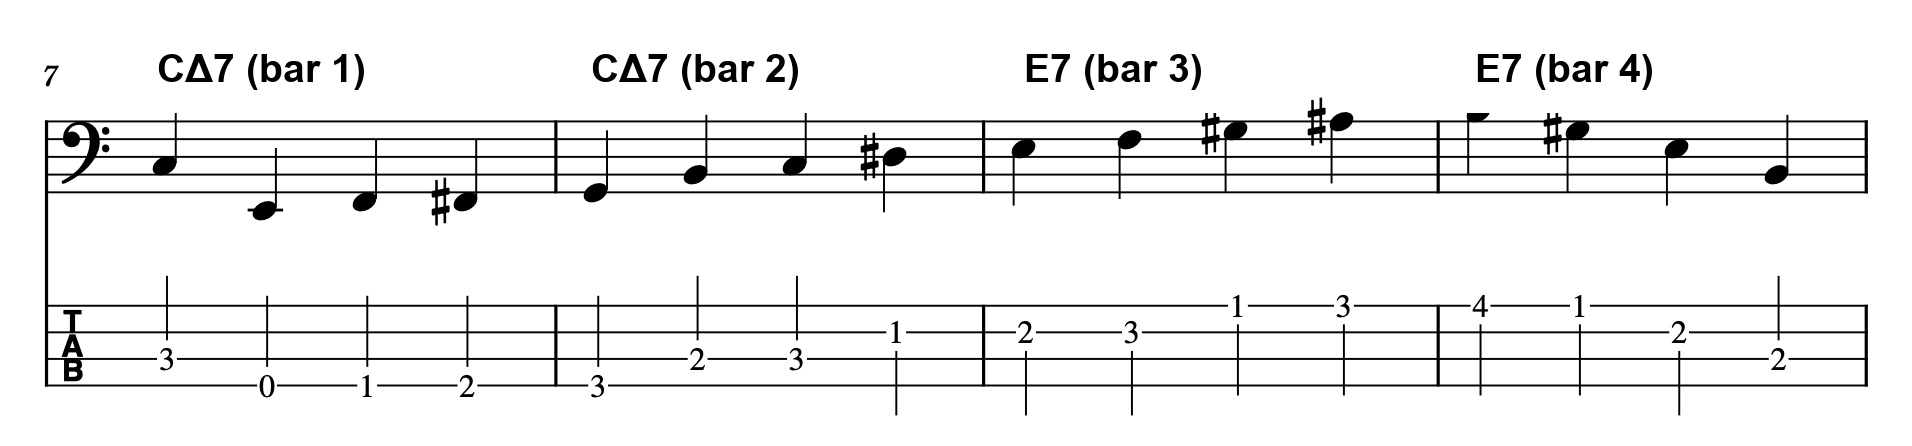
Bass line over C major 7 in bars 1 and 2, leading into E7 in bars 3 and 4

The Key Idea

Starting on C at the top of bar 1, I jump down to the open E string on the 4th string as the second note, then climb back up from there into the root, E, at the start of bar 3.

If you’ve ever been unsure how to build a bass line when the same chord sticks around for two bars or more, give this approach a try.

Want Personalized Feedback on Your Playing?

Figuring out which chord tone to land on at the start of a long static chord — and whether your line actually flows smoothly into it — is much easier to judge with a second pair of ears.

This is exactly the kind of thing that’s hard to fix alone — and where having a teacher makes all the difference.

At Line on Bass, I offer an online lesson service where you send me a video of your playing, and I give you specific, detailed feedback — every single day if you want.

Students from around the world are using this to fix exactly these kinds of issues and steadily improve their jazz bass skills.

Check Out the Lesson Service →

Posted on Leave a comment

Ghost Notes for Bass: A Beginner’s Guide to Adding Groove

This article is written by Toru Hoshino, a jazz bassist and instructor based in Japan who teaches online lessons to students worldwide. In this article, he introduces a beginner’s guide to ghost notes, with a video lesson included.

An Intro to Ghost Notes

I recently posted a video of myself playing a J-pop bass line with a vocalist, and that performance actually uses quite a few ghost notes.

A ghost note is a technique where you mute the string with your fretting hand instead of letting a note actually ring out.

On their own, ghost notes don’t sound very musical. But combine them with real, ringing notes, and they add a real sense of depth to your groove.

How to Fret a Ghost Note

There are a few different ways to fret a ghost note, but let’s start with what normal fretting looks like:

Normal fretting hand position on the bass

For a ghost note, lift your fretting hand slightly — but keep your fingers in contact with the strings.

Hand lifted slightly while still touching the strings, for a ghost note

If you lift your whole hand off the strings completely like this, the string isn’t muted anymore, so you won’t get a ghost note at all.

Hand lifted completely off the strings, which does not produce a ghost note

I’ve also put together a video walking through all of this, so check that out too if you want to see it in action.

Want Personalized Feedback on Your Playing?

Ghost notes are subtle — it’s easy to either mute too much (so nothing comes through) or not enough (so it just sounds like a missed note), and that’s a tricky balance to judge in your own playing.

This is exactly the kind of thing that’s hard to fix alone — and where having a teacher makes all the difference.

At Line on Bass, I offer an online lesson service where you send me a video of your playing, and I give you specific, detailed feedback — every single day if you want.

Students from around the world are using this to fix exactly these kinds of issues and steadily improve their jazz bass skills.

Check Out the Lesson Service →

Posted on Leave a comment

Bossa Nova Bass Lines: How to Add Movement Without Losing the Groove

This article is written by Toru Hoshino, a jazz bassist and instructor based in Japan who teaches online lessons to students worldwide. In this article, he answers a student question about how to add movement to a bossa nova bass line without it falling apart.

I got a question recently that I wanted to answer here:

“My bossa nova bass lines are mostly just root and 5th, root and 5th — I’d like to add a bit more movement. How should I approach that?”

This actually comes up a lot in lessons too.

Bossa lines can feel monotonous when they’re just root–fifth, root–fifth the whole way through — it gets boring fast.

Root-fifth bass line notation

A lot of people feel this way. The problem is, if you add movement carelessly, the sound can fall apart — so people often aren’t sure how to approach it.

Here’s the short version of the answer:

“When you want to add movement to a bossa bass line, the cleanest way to do it is to move the bass exactly where the melody isn’t moving. That tends to sound cool rather than cluttered.”

Today I’ll walk through this using the tune Blue Bossa as the example.

Moving the Bass Where the Melody Isn’t Moving

Let’s look at Blue Bossa. As I mentioned above, the idea is to move where the melody is staying still. Here’s what that looks like in practice.

Example 1 — bars 5 to 8

Bass line example over bars 5-8 of Blue Bossa


Example 2 — bars 9 to 12

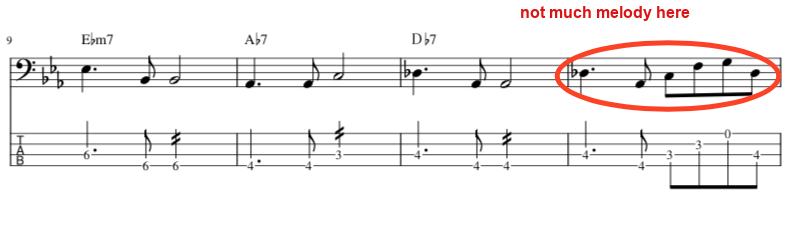
Bass line example over bars 9-12 of Blue Bossa, with the low-melody section circled

When the melody is moving, keep the bass simple — root, fifth, root, fifth.

When the melody is sitting on a whole note or a rest and isn’t moving much, that’s your cue to move the bass.

Playing with that kind of contrast — busy where the melody is still, simple where the melody is busy — is what gets rid of the monotony.

Things to Watch Out for When Moving a Bossa Bass Line

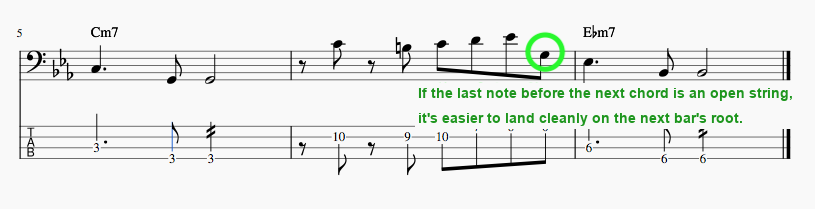
Adding movement to a bass line sounds great, but if you can’t land exactly on time on the root of the next chord, the whole thing falls apart.

One trick that helps a lot here: make the last note of your moving line an open string.

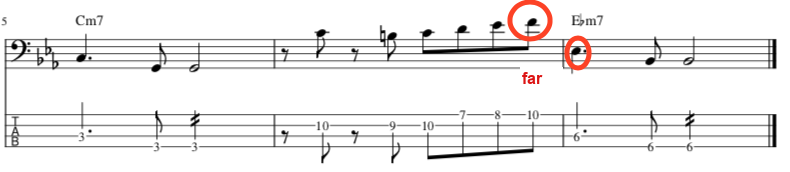
For example, take the Cm7 → E♭m7 progression in bars 8–9:

Bass line moving from Cm7 into Eb m7, with the awkward stretch back to the root circled

Try playing through that. Notice how, going from the last F at the end of bar 8, it’s a stretch to get back to the root of the next chord, E♭, in time.

That’s exactly the situation where you want to make the last note of the moving line an open string, like this:

Same bass line, but ending the moving phrase on an open string before landing on the root

Doing it this way frees up your left hand for a split second, which makes it much easier to land cleanly on the root of the next bar even after moving around.

It’s worth getting in the habit of using open strings strategically like this.

Want Personalized Feedback on Your Playing?

Knowing the theory behind where to move and where to stay still is one thing — actually hearing whether your own bossa lines land cleanly on the next root is much easier with a second set of ears.

This is exactly the kind of thing that’s hard to fix alone — and where having a teacher makes all the difference.

At Line on Bass, I offer an online lesson service where you send me a video of your playing, and I give you specific, detailed feedback — every single day if you want.

Students from around the world are using this to fix exactly these kinds of issues and steadily improve their jazz bass skills.

Check Out the Lesson Service →

Posted on Leave a comment

How to Transcribe Walking Bass Lines by Ear (Plus an App That Makes It Easier)

This article is written by Toru Hoshino, a jazz bassist and instructor based in Japan who teaches online lessons to students worldwide. In this article, he shares why transcribing walking bass lines by ear is one of the most old-school but effective ways to improve, and how to actually do it.

Transcribing Walking Bass Lines by Ear?

Listening to bass with earbuds

Transcribing by ear means listening to a recording or video of an artist playing, and writing out what you hear as notation.

You might be thinking “there’s no way I can do that,” or “I don’t have absolute pitch, so it’s impossible” — but I started out the exact same way, just transcribing by ear.

How to Transcribe a Walking Bass Line by Ear

1. Get a recording you like and your bass ready. (An electric bass is easier to work with for this — plug into an amp if you can.)

2. Listen to the track.

3. You don’t have to start from the beginning of the song — just start from whichever phrase you want to transcribe. Listen closely, note by note, and write down what you hear. (Tab notation works fine too.)

Writing bass notation on blank staff paper

One hour later…

Still blank staff paper after an hour

…total defeat.

Yeah, I know. It’s tough to do right away.

Bass sits in a low frequency range, so compared to other instruments it has a weaker attack on the ear, which makes it genuinely harder to pick out.

That said, the notes used on bass are exactly the same as the keys on a piano — 7 white keys and 5 black keys, 12 notes total — and every note in any walking bass line you’re listening to is one of those 12.

So even if you can’t immediately identify a note, you can work through the 12 options one at a time — C, C#, D, D#, E, F… — until you find it.

“Easy for You to Say — the Song Is Just Too Fast!”

Fair enough — a lot of tunes really are too fast to follow note by note at full speed.

For that, I recommend an app called SLOW PLAYER.

It lets you slow a track down to half speed and loop the same section over and over.

Using an app like this makes transcribing by ear a lot more manageable.

Why Transcribing by Ear Is Worth the Trouble

1. It trains your relative pitch.

2. Once you’ve copied a bass line, you can actually play it over the tune right away — so you immediately have something usable.

Beyond that, once you’ve got some lines under your fingers, your own playing can start to fall into the same handful of habits. Listening objectively to how other bassists approach a given chord is a great way to break out of that.

It can lead to moments like, “oh, I never thought of playing it that way.”

Transcribing walking bass lines by ear is genuinely hard work, but what you get out of it is worth just as much. If you’re not sure what to practice next, it’s worth giving a shot.

Want Personalized Feedback on Your Playing?

Transcribing by ear will train your pitch and vocabulary, but it can’t tell you whether what you’re playing back actually holds up rhythmically and stylistically — that’s where outside feedback becomes invaluable.

This is exactly the kind of thing that’s hard to fix alone — and where having a teacher makes all the difference.

At Line on Bass, I offer an online lesson service where you send me a video of your playing, and I give you specific, detailed feedback — every single day if you want.

Students from around the world are using this to fix exactly these kinds of issues and steadily improve their jazz bass skills.

Check Out the Lesson Service →

Posted on Leave a comment

Triads: How to Break Free From One-Scale Improv Soloing

This article is written by Toru Hoshino, a jazz bassist and instructor based in Japan who teaches online lessons to students worldwide. In this article, he shares how using triads — not just scales — can take your improvised bass solos to the next level.

This article is for you if:
✅️ You’re not sure how to structure an improvised solo
✅️ You want fresh ideas for building solo lines
✅️ You’re just getting started with jazz bass

Triad Soloing: The Big Picture

This time, we’re going to practice building improvised solos using triads.

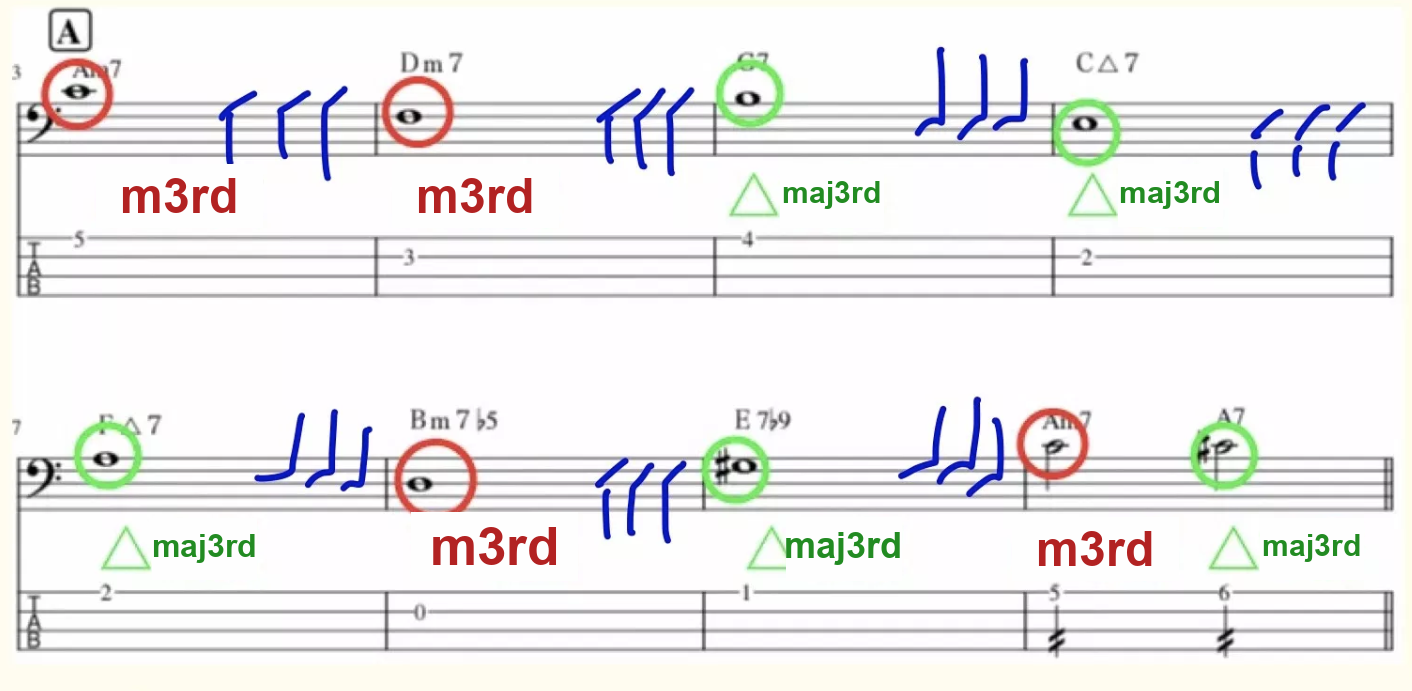
In a previous lesson, I explained that if you can instantly picture the 3rd of each chord as it goes by, and connect those 3rds together, your lines start to sound melodic.

But I never actually explained what notes you should use to connect those 3rds together. That’s what we’re covering today.

Notation showing minor 3rd and major 3rd connections between chords


↑ That’s the idea from last time — using the 3rd of each chord as an anchor point. This time, we’ll take it further: use the notes of the triad to connect one 3rd to the next.

What Is a Triad, and Why Does It Matter for Improvising?

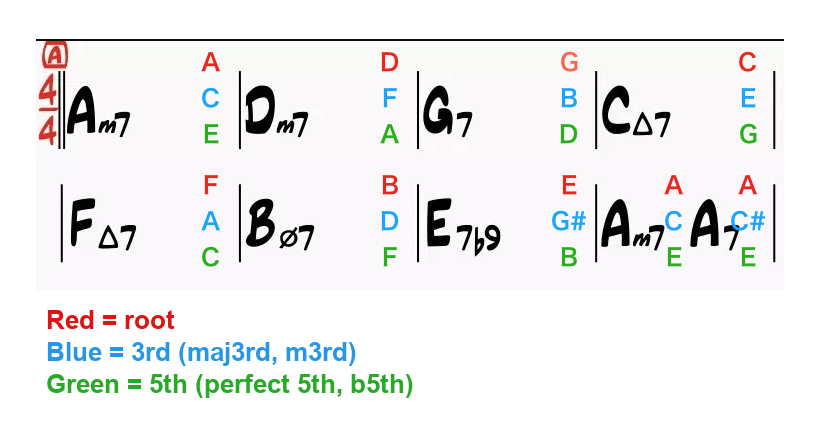
Chord tones are usually described as the root, 3rd, 5th, and 7th. From here on, we’ll focus specifically on the three notes that make up the basic triad: the 1st, 3rd, and 5th.

This three-note chord — root, 3rd, and 5th — is called a “triad.”

Here’s what the triad looks like for each chord in this progression:

Triad chart showing root, 3rd, and 5th for each chord

Now, start each bar on the 3rd of the chord, and connect those notes using the triad. It sounds like this:

(Example 1)

(Example 2)

As I mentioned last time, just connecting the 3rds and filling in the notes between them more or less freely will already sound reasonably good. But doesn’t it feel like the sound gets a lot more solid and intentional once you connect them specifically through the triad?

To be clear, an improvised solo doesn’t have to be built entirely out of triads. But being conscious of the triad really helps in situations like:

When you want to bring out the chord sound more clearly

When you want to weave in tension notes

When you want your solos to break free from the “one scale fits all” approach

Keeping the triad in mind matters for all of these.

The Skeleton of the Chord: What the Triad Does for You

Again — an improvised solo doesn’t have to be built only from triads.

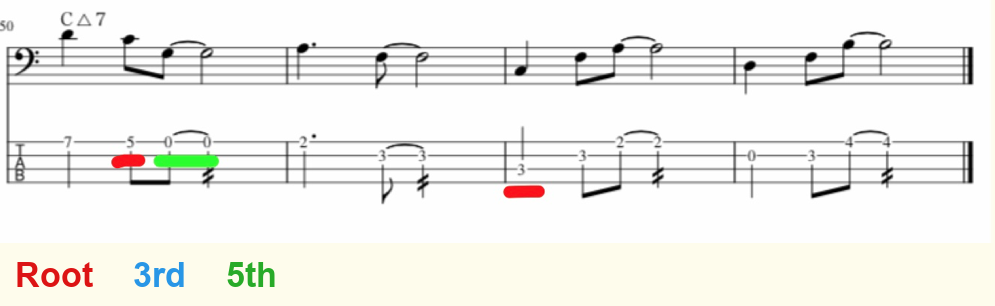
If you’ve got a C△7 chord, you might play the diatonic scale (do-re-mi-fa-so-la-ti-do), or you might play a pentatonic line (do-re-mi-so-la-do). Both are valid.

That said, the more your phrase leans on do-mi-so (the triad notes) and sticks close to the triad, the more clearly you bring out that chord’s sound.

Notation example leaning into the C major 7 triad, with root, 3rd, and 5th marked

On the other hand, the further you deliberately steer away from do-mi-so — avoiding the triad on purpose — the softer, hazier, or more “floating” the line will sound.

Notation example deliberately avoiding the C major 7 triad, with root, 3rd, and 5th marked

Which approach you prefer is really a matter of taste and expression — there’s no right answer. But either way, being aware of where the triad sits is what gives you control over that expression.

So the main point of this article is simply this: the triad is genuinely important when it comes to improvising.

Triads in Action: Real Jazz Tunes

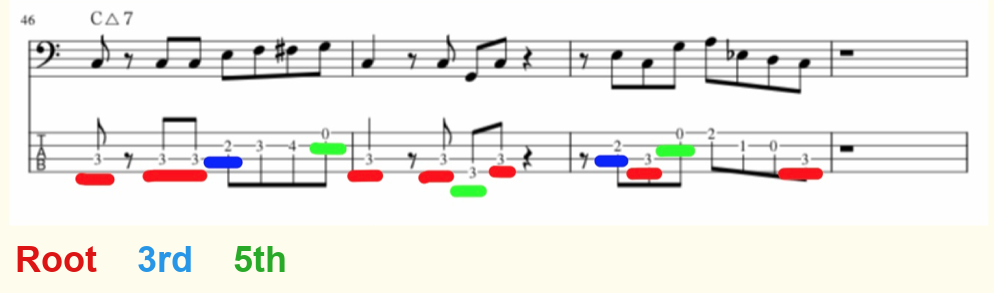
Plenty of jazz tunes use approaches built around triads. In the notation below:

Red lines mark the root (1st) of the chord
Blue lines mark the 3rd
Green lines mark the 5th

· I Mean You

· Confirmation

· Doxy

You’ve probably heard lines like these before without realizing it.

So, to sum up: being able to use triads confidently is a genuinely important skill when it comes to playing improvised solos. Next time, we’ll get into concrete practice methods for actually putting triads to use.

Want Personalized Feedback on Your Playing?

Hearing the difference between a triad-anchored line and a scale-only line is one thing — actually hearing it in your own playing and fixing it is a different challenge entirely, and it’s exactly where a second pair of ears makes the biggest difference.

This is exactly the kind of thing that’s hard to fix alone — and where having a teacher makes all the difference.

At Line on Bass, I offer an online lesson service where you send me a video of your playing, and I give you specific, detailed feedback — every single day if you want.

Students from around the world are using this to fix exactly these kinds of issues and steadily improve their jazz bass skills.

Check Out the Lesson Service →

Posted on Leave a comment

What Is a Jazz Jam Session? A Beginner’s Guide to Joining One

This article is written by Toru Hoshino, a jazz bassist and instructor based in Japan who teaches online lessons to students worldwide. In this article, he shares why jazz jam sessions are the single best way to stay motivated and keep improving your walking bass playing.

Sessions are, in my opinion, the best way to stay motivated while working on your walking bass. Once you feel like you’ve gotten reasonably comfortable, go find a session and join in.

What Is a “Session”?

A jazz trio performing at a session

When a band books studio time, it’s almost always for a rehearsal — everyone shows up having already practiced a set list of songs.

A jam session is different. There are no rules set in advance — musicians simply show up and play together, improvising from scratch.

Bass, drums, guitar, piano, horns — pretty much any instrumentalist can join in. Every night, in cities all over the world, sessions like this are happening somewhere.

Why Sessions Are Great

You Make Musical Friends

Musicians hanging out after a session

There’s only so much motivation you can sustain practicing walking bass alone. Unless you’re in a band or have a gig or recital to prepare for, practicing every day with no clear goal in sight is genuinely hard.

That’s where sessions come in — they’re the fastest way to build a network of musical friends. Showing up once won’t instantly make you friends with everyone, but if you keep going back to the same session regularly, you’ll start recognizing faces, and before long you’ll have a real circle of people you know.

I still keep in touch with people I met at a session bar I used to frequent back when I was a complete beginner — six or seven years later.

Everyone Secretly Thinks They’re “Not Good Enough”

Some people avoid sessions because they think, “I’m still not good enough to play with real musicians.”

But the people who do show up to sessions aren’t flawless either — plenty of them are thinking the exact same thing about themselves.

You might look at someone and think, “Wow, that person is incredible, they’d never want to talk to someone like me.” But if you work up the nerve to actually talk to them, you’ll often hear something like, “Oh, I’m still pretty rough around the edges too — what kind of practice routine do you do?” The players who are seriously working to improve tend to be the most humble.

You Can’t Quit Even When You Want To

Could you sit at home alone, set a metronome going, and play walking bass lines nonstop for 15 minutes straight without stopping? Maybe if you’re feeling energized, but it’s genuinely tough.

At a session, though, you can’t just stop — the other players keep going, so you have to keep up. Sometimes you’ll end up playing a single blues tune for 20 minutes or more. Being in an environment where “your hands have to keep moving no matter what” is exactly what makes you better.

You Can Record Yourself and Actually Listen Back

A session lets you hear how your sound fits into an ensemble with other musicians — something you simply can’t check on your own.

As long as it’s not an ear-blastingly loud rock show, the default voice recorder on your phone is more than good enough to capture a usable recording. You might think your playing was a disaster in the moment, only to listen back and realize it wasn’t half bad. Listening to your own playing objectively is one of the fastest ways to improve.

Sometimes Opportunities Find You

Bassists are a rare commodity in the jazz and blues session scene. In a major city it’s not so bad, but head out to a smaller town and you might find there’s no bass player around at all. Show up at sessions regularly, and you may well get approached with, “Hey, I’ve got a gig coming up — would you be up for playing bass for it?”

How to Find a Session

Search for “[your city] + jam session” and see what comes up. Even a single city can have close to a hundred regular sessions. Most don’t require a reservation — you can just show up with your instrument at the address listed on the venue’s website, and beginners are welcome to join in.

Some venues even keep a house bass — upright or electric — on hand, so you can stop by straight from work even without your own instrument. (Always check directly with the venue to confirm whether a house instrument is available.)

How a Typical Session Works

Most sessions charge a cover fee of around $7–15 USD just to walk in the door (sometimes that includes a drink, sometimes it doesn’t — it varies by venue).

You’ll usually write your name and instrument on a sign-up sheet, and then the staff or the “host” — typically a professional player handling the rhythm section — will call you up: “Okay, [your name], you’re up next.”

At a lot of venues, it’s entirely normal for every player on stage to be meeting each other for the very first time.

Advice for Beginners Joining a Jam Session

If you’re a beginner, don’t try to hide it.

Just say it plainly before the tune starts: “This is actually my first session,” or “I only know how to play this one tune.”

Every host and experienced player went through that exact same stage themselves at some point, so they understand exactly how nerve-wracking it feels to be a beginner walking in.

Often they’ll adjust the tempo or pick something easier to accommodate you. What doesn’t go well, on the other hand, is hiding the fact that you don’t know a tune and then having the whole thing fall apart once it actually starts. (Trust me — I’ve lived through that scenario more times than I’d like to admit.)

A closing thought

The first time I ever went to a session, I was 26 years old.

A musician friend took me to a session bar in Tokyo. At the time I was a pink-haired punk rocker who had never once played from a chord chart in my life. I’d lugged my bass all the way there, but once I got a look at what was happening, I had no idea what was going on — I never even opened the case.

I still remember a drunk older guy needling me: “You call yourself a musician and you can’t even play a blues?”

It stung, and facing that kind of moment head-on isn’t easy. But I still believe, even now, that there’s something real waiting for you on the other side of pushing through it.

Want Personalized Feedback on Your Playing?

Sessions will push you to keep your hands moving and your ears open, but knowing exactly what to fix in your own playing is a different challenge entirely — and that’s where outside feedback becomes invaluable.

This is exactly the kind of thing that’s hard to fix alone — and where having a teacher makes all the difference.

At Line on Bass, I offer an online lesson service where you send me a video of your playing, and I give you specific, detailed feedback — every single day if you want.

Students from around the world are using this to fix exactly these kinds of issues and steadily improve their jazz bass skills.

Check Out the Lesson Service →

Posted on Leave a comment

COMFORT Strapp Bass Strap Review: Why Its Memory-Foam Padding Feels So Good

This article is written by Toru Hoshino, a jazz bassist and instructor based in Japan who teaches online lessons to students worldwide. In this article, he shares his honest review of the COMFORT Strapp bass strap, including why its memory-foam padding makes such a noticeable difference for long playing sessions.

COMFORT Strapp bass strap on a Fender-style bass

The COMFORT Strapp

Close-up of the COMFORT Strapp padding

The padding is reportedly made from the same memory-foam material used in wetsuits. It molds nicely to the shape of your shoulder.

It genuinely feels great.

COMFORT Strapp in black, viewed diagonally on a red bass

The plain black color works with any genre or style. You can adjust the length to some extent, though the one I own doesn’t extend especially long.

Strap end with two holes for adjustment

There are two adjustment holes on both the front and back ends of the strap.

My Impressions After Using It

The clerk at the shop in Shinjuku where I bought it told me:

“I use this on my five-string too. It really takes the weight off your shoulder. A lot of people who try it can’t go back to anything else.”

It almost feels like the body of the bass is floating on its own.

That might be a bit of an exaggeration, but the strain on your shoulder really is minimal. You can feel the lightness right away — this one turned out to be a great find.

My Strap Setup

I keep my strap fairly short. The shortest distance from my shoulder to the body is probably around 20 cm (about 8 inches).

Toru Hoshino playing bass with a short strap setup

I aim for a form where the strap length feels the same whether I’m sitting or standing.

Back in my rock days I wore it much lower, but with walking bass — where your hand is constantly jumping between positions — I found that a strap that’s too long puts unnecessary strain on your fretting hand, so I shortened it.

There are plenty of good-quality straps out there, but I was specifically looking for one that was both well-made and could be shortened, so this one was a great fit.

As for the end pin, I’m using a locking pin, but only on the front side.

Locking end pin on the front strap button

If you’d like to pick one up, you can find it here:

COMFORT STRAPP BASS STRAPP SHORT
https://amzn.asia/d/3tei8su

Want Personalized Feedback on Your Playing?

Getting your gear setup right — including something as simple as strap length — can make a real difference in how relaxed and accurate your playing feels, but it’s often hard to know what’s actually holding you back without another set of eyes on your technique.

This is exactly the kind of thing that’s hard to fix alone — and where having a teacher makes all the difference.

At Line on Bass, I offer an online lesson service where you send me a video of your playing, and I give you specific, detailed feedback — every single day if you want.

Students from around the world are using this to fix exactly these kinds of issues and steadily improve their jazz bass skills.

Check Out the Lesson Service →