This article is written by Toru Hoshino, a jazz bassist and instructor based in Japan who teaches online lessons to students worldwide. In this article, he shares five jazz books and play-along collections from his own shelf that he expects to keep coming back to for the next ten years.
I was tidying my bookshelf today, and it got me thinking about which books and music collections I keep coming back to year after year.
These aren’t necessarily “easy beginner books you can read in one sitting.” They’re the kind of material that rewards you more and more as your own playing grows — every time you revisit them, you understand a little more than you did before.
If any of these catch your eye, I’d encourage you to check them out. Let’s get into the first one.
The Real Book (a.k.a. “The Black Book”)
This is the fake book that’s used at pretty much every jazz session on the planet. It has lead sheets for 227 standards that come up constantly in sessions, and just listening your way through the tunes in it is genuinely educational.
I personally use the handy/pocket-size edition — being able to keep it open flat on a stand makes it more practical day-to-day than the full A4-size version.
Bass Workbooks for Constant-Motion Practice
Another play-along/etude book. This one is packed wall-to-wall with eighth notes over blues progressions and jazz standard changes — no rests, just constant motion.
It would probably take years to actually play through the whole thing, but even just getting comfortable playing the lines that are written here will seriously build up your jazz vocabulary.
Analyzing Jazz Standards — Unlocking the Mysteries Behind How the Great Songs Were Written
This book was full of “wait, I never thought about it that way” moments for me. It looks at the melodies and chord progressions of jazz standards through the lens of harmony, lyrics, and compositional intent — explaining the reasoning behind why a melody was written the way it was.
I’ve borrowed a huge amount of what I learned from this book for my own lessons and YouTube videos. I’m genuinely glad I came across it.
Jazz Standard Theory
This is by the same author as the Real Book mentioned above, and it’s an analysis of the standards that appear in that book. Some of the trickier areas of jazz theory — subdominant minor, minor ii-V-i — finally clicked for me after reading this book multiple times; I got to the point where I could actually explain them to other people.
I still pull this one off the shelf whenever I think, “wait, how does that piece of theory work again?” or “how am I supposed to interpret this chord progression?”
A Guide to Blue Note’s Classic Recordings
This book introduces a huge number of classic jazz albums. I’ve read plenty of “essential albums” guides over the years, but this one focuses specifically on releases from Blue Note, jazz’s legendary label.
Just working your way through the recordings featured in this book will teach you a lot on its own.
If anything here caught your interest, I hope you’ll check it out. I hope these help with your daily practice.
Thanks for reading all the way through — if you made it this far, you’re clearly someone who’s serious about jazz.
Want Personalized Feedback on Your Playing?
Reading and listening will take you a long way, but knowing exactly which habits or weak spots to work on next is exactly the kind of thing that’s hard to fix alone — and where having a teacher makes all the difference.
At Line on Bass, I offer an online lesson service where you send me a video of your playing, and I give you specific, detailed feedback — every single day if you want.
Students from around the world are using this to fix exactly these kinds of issues and steadily improve their jazz bass skills.
This article is written by Toru Hoshino, a jazz bassist and instructor based in Japan who teaches online lessons to students worldwide. In this article, he breaks down how he fingers the low positions on the bass with his left hand, for anyone wondering how they should be fretting notes down there.
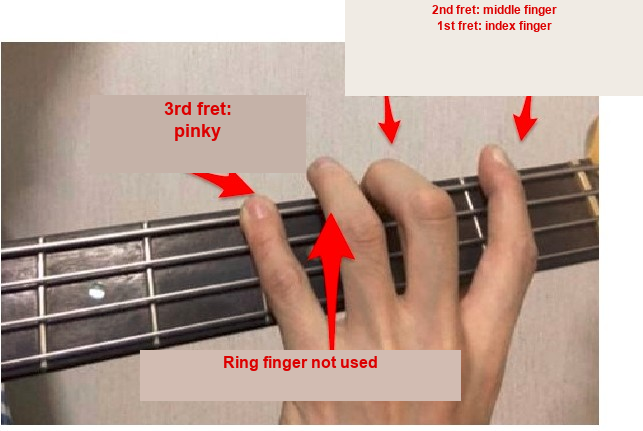
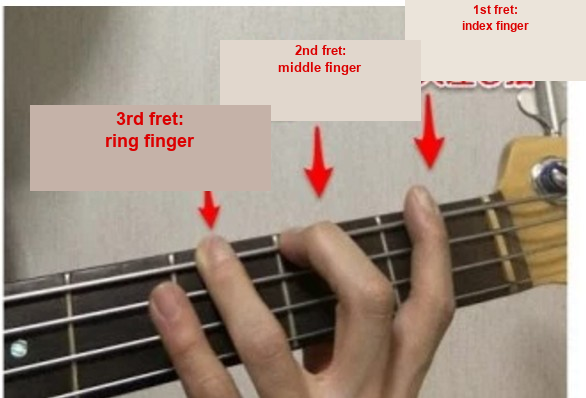
I don’t fret the 3rd fret with my ring finger, like this:
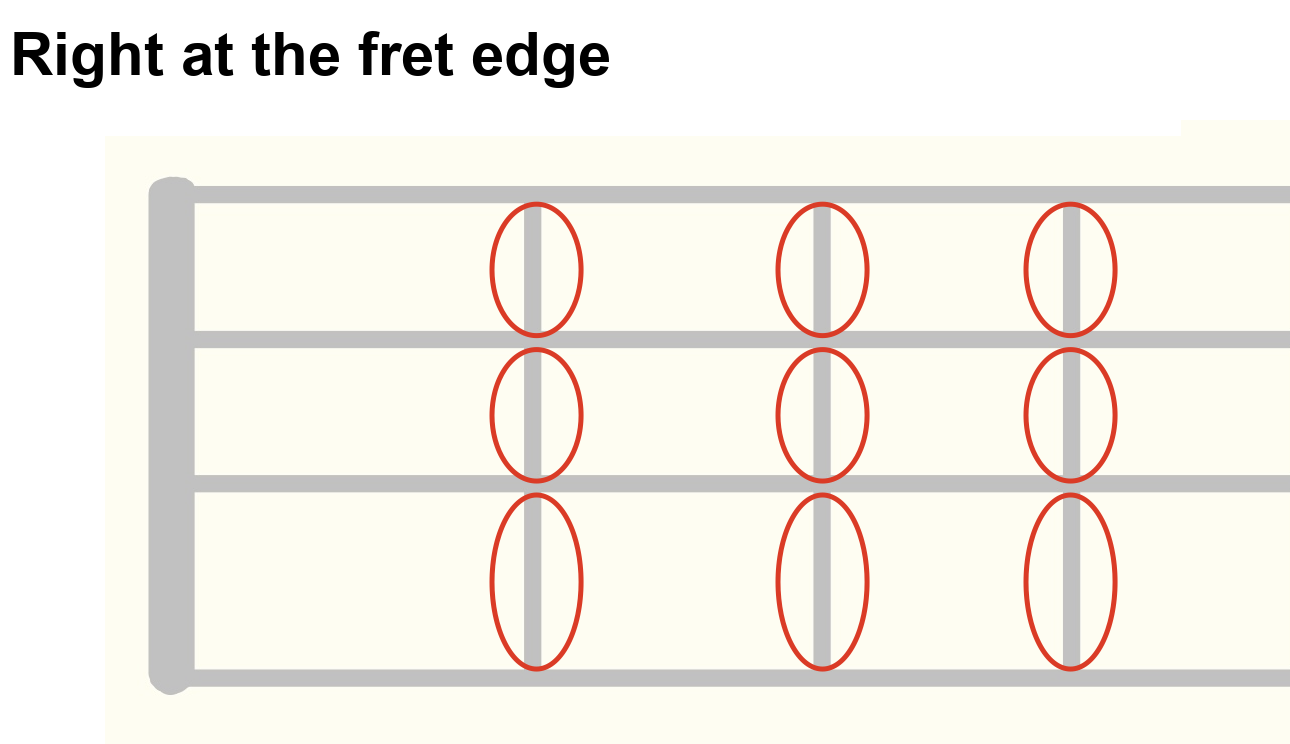
Here’s why. When I fret a note, I want to be pressing right at the edge of the fret — the part closest to the fret wire itself.
This is what I mean by the edge of the fret:
It’s not that you can’t reach that spot with your ring finger — it’s just that the pinky reaches that edge more comfortably.
So When Do I Use My Ring Finger?
There’s no hard rule for this, but I start bringing it in from around the 7th fret. From the 7th fret up into the higher positions, I switch to what’s usually called “one fret, one finger” — using all four fingers, one per fret.
Plenty of players use one-fret-one-finger even down in the low positions, and there’s no right or wrong answer here. But if your notes tend to buzz, or you want to take a fresh look at your fingering, this might be worth trying out.
I hope this gives you something useful to experiment with in your own playing — and ironing out a fingering habit like this is exactly the kind of thing that’s hard to catch on your own.
Want Personalized Feedback on Your Playing?
This is exactly the kind of thing that’s hard to fix alone — and where having a teacher makes all the difference.
At Line on Bass, I offer an online lesson service where you send me a video of your playing, and I give you specific, detailed feedback — every single day if you want.
Students from around the world are using this to fix exactly these kinds of issues and steadily improve their jazz bass skills.
This article is written by Toru Hoshino, a jazz bassist and instructor based in Japan who teaches online lessons to students worldwide. In this article, he breaks down where to rest your right-hand thumb when fingerpicking a 4-string bass.
Thumb Position
I think of thumb position as falling into five basic patterns:
Resting on the front pickup
Resting on the rear pickup
Resting at the base of the neck
Resting on a string
Not resting anywhere (floating)
I often get asked, “Is it better to rest my thumb on a string, or on the pickup?” Honestly, either works fine.
A Small Detail That Actually Matters
If you rest your thumb on the low E string, your index and middle fingers end up that much closer to the G string. Keep your thumb parked on the pickup the whole time, on the other hand, and the G string stays farther away.
That’s why I’ll often recommend resting the thumb on the low string to players with smaller hands. And if you’re on a 5- or 6-string bass, where the neck is wider, resting your thumb on a string might be the better call regardless.
Here’s how I’d weigh the pros and cons of each.
Resting Your Thumb on the Pickup: Pros
It gives you a stable anchor. Your thumb position stays fixed, which gives your picking hand a stable pivot point.
Resting Your Thumb on the Pickup: Cons
The G string is farther away.
Resting on the pickup puts a real gap between your thumb and the G string. If you have shorter fingers, that gap can be a struggle.
Resting Your Thumb on a String: Pros
The G string is close by.
Picking the G string becomes effortless this way — a good fit if you have shorter fingers.
Muting the low E string is easy. If you keep your thumb resting on the E string while you pick it, you get an easy, built-in ghost note. A lot of Motown-style and older R&B basslines use this kind of two-finger ghost note — different from the slap version — and resting your thumb on the string makes that sound much easier to produce.
Resting Your Thumb on a String: Cons
You have to lift your thumb off to play the low string normally.
If you want a normal picked tone out of the low E string, your thumb has to come off it. Depending on the situation, it might move up to the pickup or just float in the air — either way, your pivot point shifts.
Take a look at where the thumb moves:
From here —
— to here.
It’s a tiny distance, but getting that transition to feel smooth takes some getting used to.
Try a Few Approaches and Find What Works Best for You
As I said at the start — as long as you’re getting a good sound and playing well, your thumb position can really go anywhere. Plenty of players rest their thumb on a string, plenty of players don’t rest it anywhere at all. Listen to the music and bassists you love right now, and think about what’s working for your right hand too.
I Also Cover This in Video Form
I hope this gives you something useful to experiment with in your own playing — and figuring out exactly what’s holding your right hand back is exactly the kind of thing that’s hard to diagnose alone.
Want Personalized Feedback on Your Playing?
This is exactly the kind of thing that’s hard to fix alone — and where having a teacher makes all the difference.
At Line on Bass, I offer an online lesson service where you send me a video of your playing, and I give you specific, detailed feedback — every single day if you want.
Students from around the world are using this to fix exactly these kinds of issues and steadily improve their jazz bass skills.
This article is written by Toru Hoshino, a jazz bassist and instructor based in Japan who teaches online lessons to students worldwide. In this article, he shares three jazz standards perfect for spring listening.
It’s been getting warmer lately. At the live jazz gigs I play regularly, I often get requests from the audience, and this time of year, “something that feels like spring” comes up a lot.
So here are three songs I often play for exactly that request. They’re all beautiful tunes — I hope you’ll give them a listen.
1. Joy Spring
This is probably the tune that says “spring” the most to me. It’s got “Spring” right in the title, and it’s one I played often at jam sessions around this time of year.
That catchy melody always feels like it’s looking forward to the warm season ahead.
That said, catchy as it is, the tune modulates pretty aggressively, which makes both the bassline and the improvising genuinely challenging. But it’s such a great tune — definitely give it a listen.
2. It Might as Well Be Spring
Of all the “Spring” tunes, this is personally my favorite — and I’m especially fond of this particular recording.
The interplay between the organ and tenor sax here is gorgeous. It’s the kind of track I’d love to just sit in the sun and relax to.
3. You Must Believe in Spring
This one feels to me like spring with a little bit of winter’s chill still hanging on.
It’s not a tune I’ve personally played often at sessions, but it has “Spring” right there in the title, so I wanted to include it.
The bass solo right after the theme, from the very start, is wonderfully melodic and just sounds great.
I hope these give you something new to listen to this season — and listening closely to recordings like these is exactly the kind of ear-training that pays off when you’re trying to internalize a style.
Want Personalized Feedback on Your Playing?
This is exactly the kind of thing that’s hard to fix alone — and where having a teacher makes all the difference.
At Line on Bass, I offer an online lesson service where you send me a video of your playing, and I give you specific, detailed feedback — every single day if you want.
Students from around the world are using this to fix exactly these kinds of issues and steadily improve their jazz bass skills.
This article is written by Toru Hoshino, a jazz bassist and instructor based in Japan who teaches online lessons to students worldwide. In this article, he shares a little accessory tray he picked up for his music stand, and everything he ended up putting on it.
Everything I’ve Put on My Music Stand Tray
A stopwatch.
A metronome.
Rosin.
A pen.
My phone.
This setup also works fine if your phone has an AUX cable plugged in.
And a little reward for myself.
I eat it after I’m done practicing.
The Tray: A Dicon Audio MS-TRK Sheet-Music-Stand Tray
This is a small accessory tray, the Dicon Audio MS-TRK, that clips onto a folding music stand. It’s a plastic tray sized just right for the small things you need close at hand while practicing or performing — pens, a tuner, a metronome, guitar picks, maintenance gear, that kind of thing. The outer frame has a notch designed for a contact-mic tuner, so you can keep your tuner sitting level. If you use a metronome/tuner combo unit, this is a nice fit. You can also remove the outer frame if you don’t need it, and it comes with a non-slip sheet, so nothing’s at risk of sliding off. It’s a good fit for wind and string players too.
Product details
Body size: 14cm wide × 7cm deep (including mount) × 8cm tall
Tray size: 14cm wide × 4cm deep × 2cm tall (with frame attached)
Weight: approx. 60g
Includes a non-slip sheet
(Note: the music stand shown in the product photos isn’t included.)
If you just set a pen or metronome directly on a music stand, it tends to slide right off — so something like this is genuinely useful. It’s the kind of thing you’d think you could rig up yourself, but somehow never quite manage to.
This part clips onto the stand.
You don’t strictly need it, but it’s surprisingly handy once you have it. It’s unmistakably plastic, but it’s black, so it doesn’t look or feel cheap — it does the job you’d expect for the price.
Still, there’s something fun about a new piece of gear that gets you a little more fired up for practice. Hoping to bring that same energy to today’s practice session too.
Want Personalized Feedback on Your Playing?
Dialing in your practice setup is one piece of the puzzle — getting consistent feedback on your actual playing is the other, and that’s exactly the kind of thing that’s hard to do alone.
At Line on Bass, I offer an online lesson service where you send me a video of your playing, and I give you specific, detailed feedback — every single day if you want.
Students from around the world are using this to fix exactly these kinds of issues and steadily improve their jazz bass skills.
This article is written by Toru Hoshino, a jazz bassist and instructor based in Japan who teaches online lessons to students worldwide. In this article, he covers a common misunderstanding about how minor scales actually move on the bass — something he himself got wrong before he learned the theory behind it.
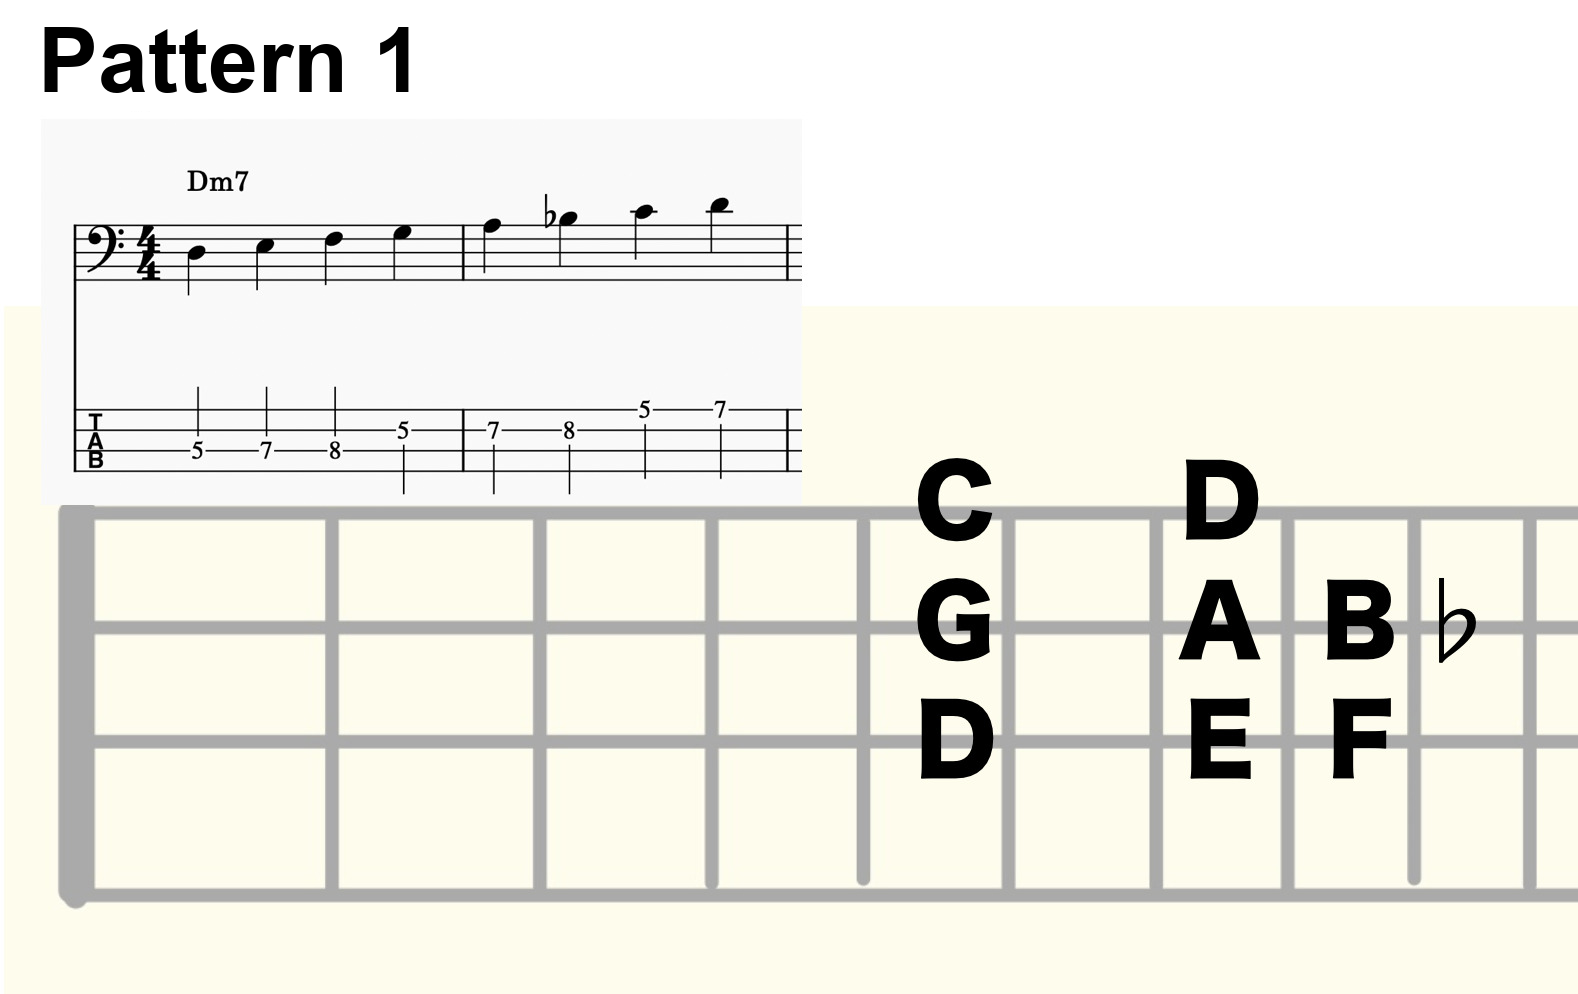
Minor Scale Pattern 1
You can play a D minor scale using a fingering pattern like this:
This is the shape I picked up by ear, self-taught, back when I was playing rock bass. But D minor isn’t limited to this one shape — there are other fingering patterns and ways the scale moves on the neck.
Minor Scale Pattern 2
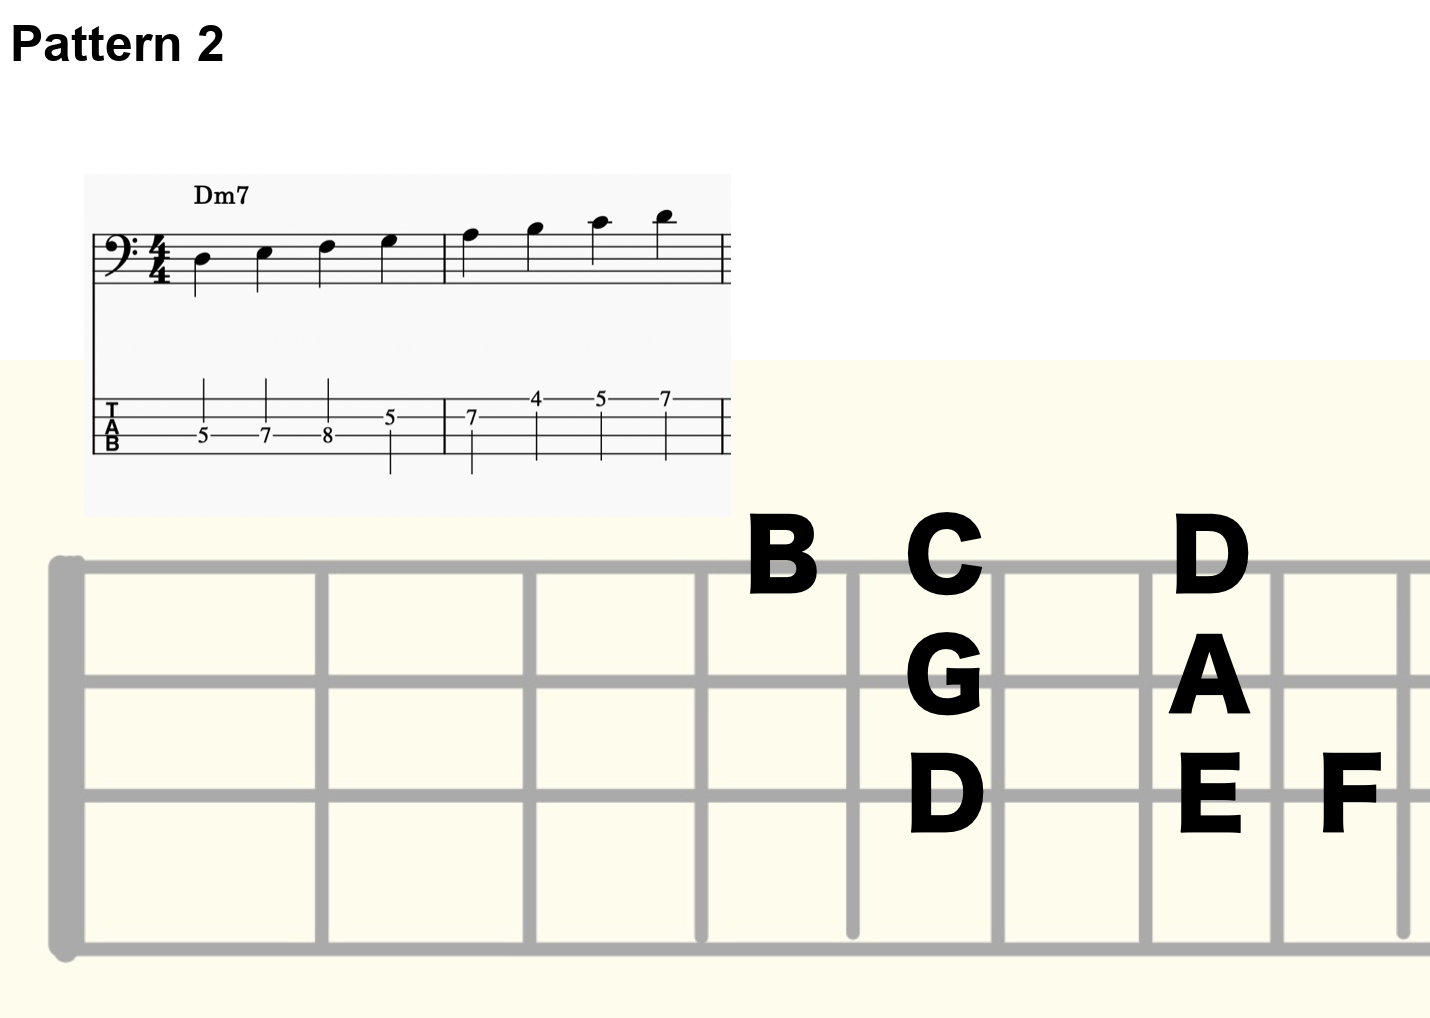
For example, it can also move like this:
Minor Scale Pattern 3
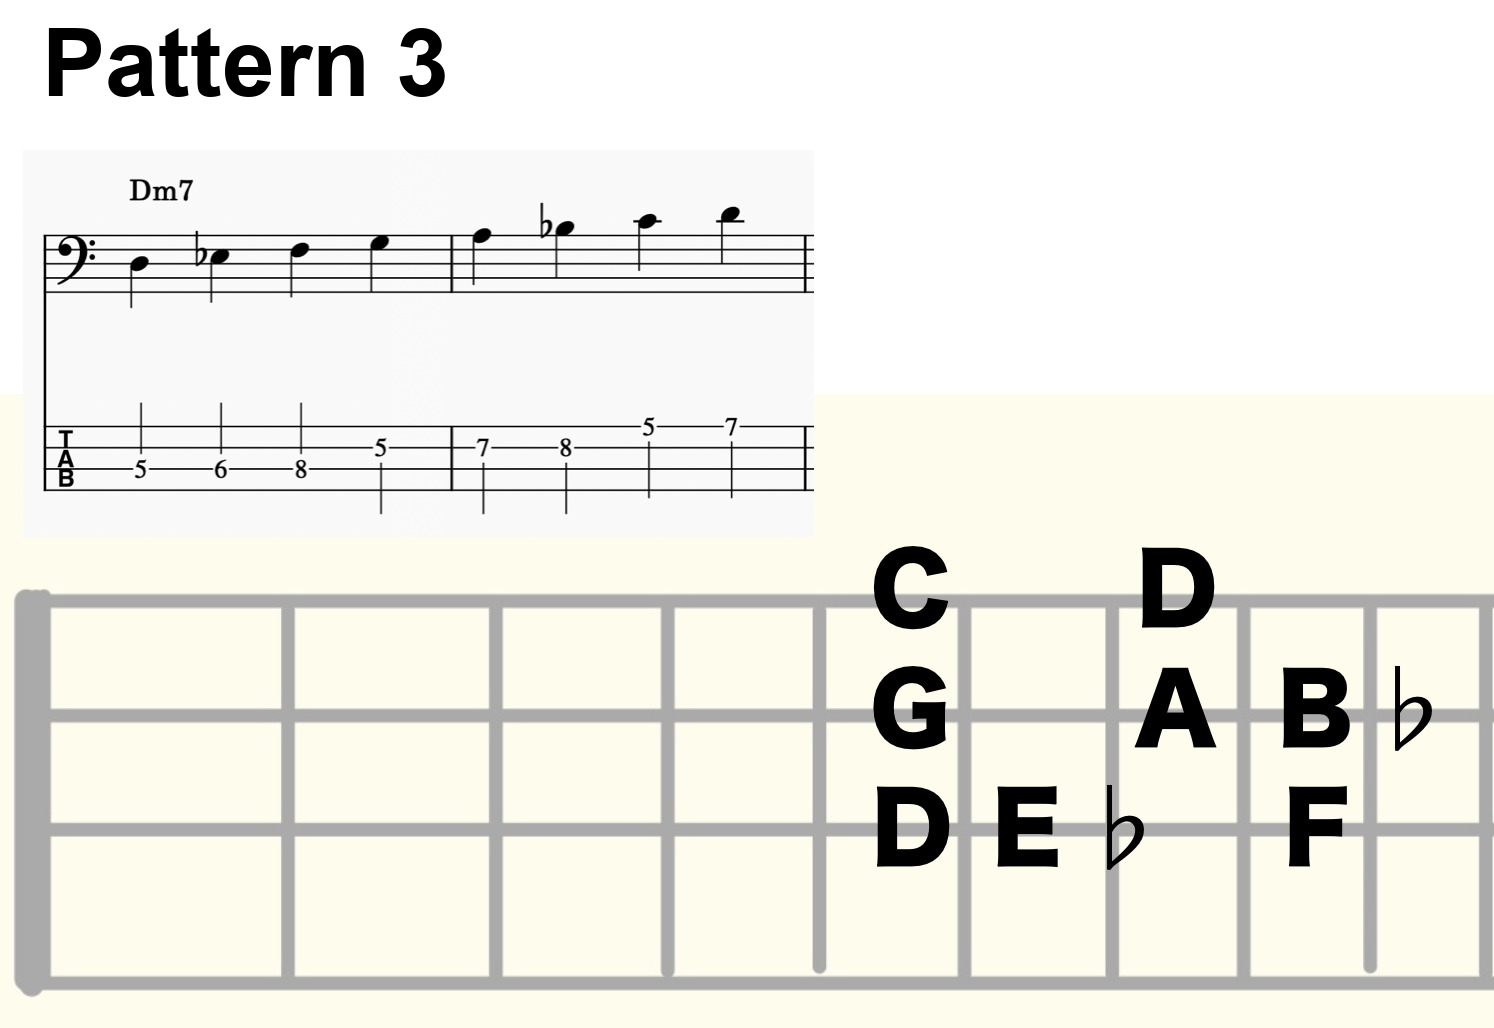
Or like this:
That’s probably a shape you don’t run into very often.
Why does the same D minor scale move differently like this? It’s because the scale you can use depends on the key (or more precisely, the chord) you’re playing over.
Because the minor scale shape is so easy to memorize visually on the fretboard, it’s easy to fall into the trap of thinking Pattern 1 is the only shape there is — which is a big mistake (I know, because that was exactly my mistake).
But I still vividly remember how it felt the first time this theory clicked for me after spending real time with it — like I’d leveled up, and my whole sense of the music had opened up.
For reference: Pattern 1 is the D Aeolian scale, Pattern 2 is the D Dorian scale, and Pattern 3 is the D Phrygian scale.
If this has caught your interest and you’re in the middle of studying scales and chord tones, getting comfortable moving between these shapes is well worth the time.
I hope this gives you something useful to think about in your own practice.
Want Personalized Feedback on Your Playing?
This is exactly the kind of thing that’s hard to fix alone — and where having a teacher makes all the difference.
At Line on Bass, I offer an online lesson service where you send me a video of your playing, and I give you specific, detailed feedback — every single day if you want.
Students from around the world are using this to fix exactly these kinds of issues and steadily improve their jazz bass skills.
This article is written by Toru Hoshino, a jazz bassist and instructor based in Japan who teaches online lessons to students worldwide. In this article, he lays out a step-by-step practice method for learning to improvise a walking bass line over an F blues, built specifically for players who can read a written bass line off a tab chart just fine, but freeze up the moment they’re given nothing but a chord chart.
You can play it fine if it’s written out in tab —
but hand you a chord chart and you’re completely lost.
If that’s you, this is a full training method for building the skill of improvising a walking bass line on the spot.
Fair warning: this is a genuinely long article. I’d recommend bookmarking it and working through it whenever you have time, rather than trying to get through it all in one sitting.
Step 1: Start With the Root
The first thing you need to be able to do is look at a chord and play that chord’s root. If you’re not confident with roots yet, make sure you’ve got that down first — if you already have, skip ahead.
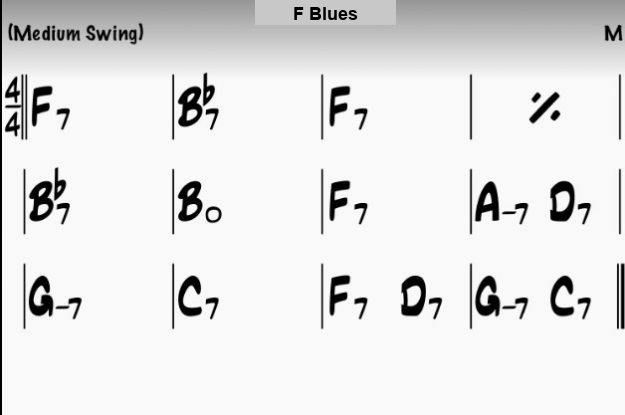
Let’s actually match roots to a chart. Here’s an F blues:
Start slow, with half notes (two notes per bar):
Once that feels comfortable, move up to quarter notes (four notes per bar):
iReal Pro is a great tool to use while practicing this.
Even when you’re only playing the root, thinking about which position to play it from widens what your bass line can do.
In the chart above, in bar 1 (F7) I’m playing the F on the 1st fret of the low E string, and in bar 2 (B♭7) I’m playing the B♭ on the 1st fret of the A string. But on the low frets alone, the F root is also available in these spots:
And the B♭ root is available here:
For Am7, you’ve also got the 5th fret of the low E string, the open A string, and the 2nd fret of the D string:
If playing only the root feels a little boring, try approaching the root from a different position on the neck. It might open up your bass line more than you’d expect.
Try Changing Up the Octave of the Root
Here’s an example. Every note here is still just the root — but simply changing the octave already shifts the feel quite a bit.
Of course, this alone still doesn’t sound very “jazz” yet — we’ll keep widening the range of approaches from here.
Step 3: Add the 5th
Once you can comfortably play the root alone, and the root moving across octaves, try adding the 5th.
Here’s what that gives you. Just adding one note to the root, but doesn’t it already feel like there’s more motion?
Understanding the 5th, and Where to Find It
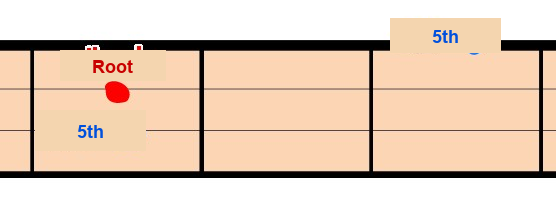
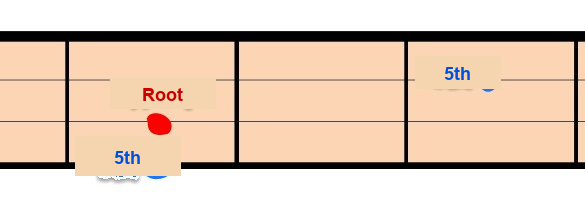
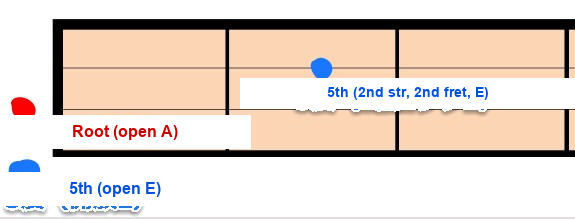
If the root is here, the 5th is the note shown in blue. If the root moves here, the 5th moves here:
The relationship between the two is easy to remember.
It’s a little less straightforward when open strings are involved, as shown above.
Still, when you just want some basic motion in a bass line without overthinking the theory, the 5th is a note that almost always fits comfortably.
Step 4: Root + 3rd
Here’s what that looks like:
That gives a pretty different impression from the 5th version, right?
Here’s the 3rd, relative to the chord’s root:
Just changing the octave the root sits in (Example 1), or moving where you place the quarter-note 3rd (Example 2), is enough to shift the feel on its own:
Example 1
Example 2
The 3rd Is What Gives a Chord Its Character
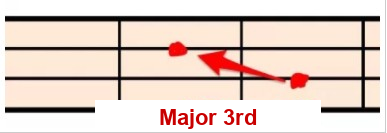
If you see a chord symbol like ●△7 or plain ●7, the 3rd is here — the major 3rd:
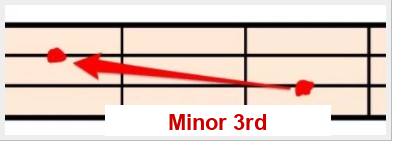
If you see ●m7, ●m7♭5, or ●dim, the 3rd is here instead — the minor 3rd:
Play both of those together with the root and you can really hear the difference in character.
With the 5th, the shape relative to the root stays the same whether the chord is major or minor:
But the 3rd shifts shape, as shown above. Major 3rds are generally described as sounding bright, and minor 3rds as sounding dark — it’s the note that conveys a chord’s emotional character.
When you’re building a walking bass line, you’ll want to be able to move freely between major and minor 3rds without having to think twice about it.
Step 5: Root + 3rd + 5th
That’s what it sounds like.
How to Practice This So Far — Part 1
You don’t need to follow this chart exactly — the goal is to use something like iReal Pro and be able to play a bass line built from the root, 3rd, and 5th at a steady tempo, on your own.
Also keep in mind that the 3rd and 5th can each be approached from above or below the root. Try mixing these up and see which combinations feel like they flow smoothly, are easy to play, and sound good to your ear.
Example 1: combining the 3rd approached from above and the 5th from above
Example 2: combining the 3rd approached from below and the 5th from below
Example 3: when a bar has two chords in it, rather than forcing in extra movement, just pick whatever’s easiest to finger
A slow tempo is fine — just experiment with different note choices.
Here are a couple of backing tracks I made for this (with a 4-count intro). Take it slow, and practice working in the octave, the 5th, and the 3rd around the root.
Tempo 60
Tempo 80
A Mindset for This Kind of Practice
This type of practice doesn’t have a clear finish line, the way nailing a transcription does — which makes it easy to lose motivation.
When you’re checking your note choices, do it without a metronome first. Once it starts to feel natural, bring in the metronome or a backing track.
This isn’t about memorizing fixed positions — it’s about training yourself to find these notes on the fly, in real time. That’s why it helps to keep visualizing where the root, 3rd, and 5th are as you play, rather than relying on muscle memory alone.
It takes real concentration, so if you do it properly, you’ll tire out fast. When you’re tired, stop. What matters is doing a little bit of this every single day.
Step 6: Root + Passing Tone
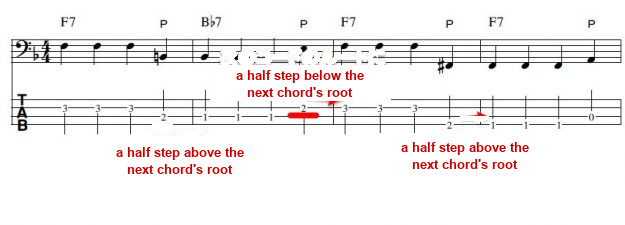
Here’s what that sounds like. Anywhere you see a “P” marked is a passing tone — “P” for “passing.”
What Is a Passing Tone?
Let’s set the 3rd and 5th aside for a moment and bring in passing tones instead. If you already know how passing tones work, feel free to skip ahead.
The basic idea: when you’re playing a steady quarter-note, four-beats-per-bar line, you place the last note of a given bar a half step above or below the root of the next bar’s chord. That’s what gives a bass line its smooth, connected feel.
This technique shows up across all kinds of music, but it’s used especially heavily in jazz.
A Passing Tone Isn’t Always a Chord Tone
A passing tone isn’t necessarily a note from that bar’s chord scale, or even a chord tone at all — its job is purely to act as a connector between two notes.
For example, compare this version, which sticks strictly to chord tones —
— to this version. Doesn’t this one feel smoother?
I go into passing tones in a lot more depth in this article:
Step 7: A Walking Bass Line Built From Root + 3rd + 5th + Passing Tones
That’s how it comes together. I think it’s starting to sound a lot more “jazz” at this point.
(Passing tones are marked with a “P” throughout.)
Step 8: A Smoother Walking Bass Line
Building on the previous bass line, here’s a smoother version.
The Trick Behind Making the Line Smoother
I added the 7th into the mix of chord tones, on top of the root, 3rd, and 5th.
I also brought in scale tones beyond the chord tones — the 2nd, 4th, 6th, and so on — wherever they made for easier fingering, which opened things up even more.
Those are the two ideas behind this version.
Notes From the Chord Scale
Root + 3rd + 5th + 7th together are what’s called the chord tones, but thinking in terms of the full scale opens up your options even further.
For example, thinking in scale terms, here’s what you get for the F7 that comes up so often in this progression:
And for B♭, this position works well for a blues:
(Depending on the feel and tempo of the tune, positions without the red dots shown above can sometimes work too, but I won’t get into that here.)
How to Practice This So Far — Part 2
Keep chord tones as your anchor, weave in scale tones wherever they make the fingering easier, and try moving the root around to different positions as you work through the progression.
In the example chart, bars 1–2 start from the 1st fret of the low E string and move like this:
Here’s the same two bars starting instead from the 3rd fret of the A string:
In the example chart, bars 9–10 start from the open D string and move like this:
And here’s that same passage starting instead from the 3rd fret of the low E string.
The goal of this kind of practice isn’t to drill your fingers into memorizing one fixed path — it’s to train yourself to picture the next note in real time, so you can actually improvise.
It’s fine to make mistakes constantly while you practice. When you’re able to focus, work through it slowly while consciously naming each note in your head as you play it.
Step 9: A Walking Bass Line With Varied Rhythms
Once it’s not just a steady stream of quarter notes anymore, triplets and eighth notes start working as nice accents.
An example using a triplet accent:
An example using an eighth-note accent:
An example using a tied-note accent:
How to Practice This So Far — Part 3
You don’t need to follow the chart exactly — just practice deliberately placing accents where you choose.
Example using a triplet accent:
Example using an eighth-note accent:
Example using a tied-note accent:
(This one’s a bit tricky, I’ll admit ^^;)
Overdoing it can get repetitive, but if you don’t drill this in ahead of time, you won’t be able to drop an eighth-note or triplet accent exactly where you want it in the moment. Practice it deliberately, starting at a slow tempo.
Here’s a backing track at tempo 70 — feel free to use it for practice.
How to Think About Accents: Drilling vs. Real Playing
You drill accents on their own like this so they’re in your toolkit, but in actual performance, I don’t use them anywhere near this often.
There’s no fixed rule for how much you should use accents, but when a steady stream of quarter notes suddenly gets punctuated by one well-placed accent at exactly the right moment, that’s what makes a bass line sound genuinely cool.
That turned into a long one — thanks for sticking with it all the way through.
If you’ve read all the way down here, you’re clearly someone who’s genuinely interested in walking bass — and that’s exactly the kind of dedication that’s hard to keep building on without outside feedback.
Want Personalized Feedback on Your Playing?
This is exactly the kind of thing that’s hard to fix alone — and where having a teacher makes all the difference.
At Line on Bass, I offer an online lesson service where you send me a video of your playing, and I give you specific, detailed feedback — every single day if you want.
Students from around the world are using this to fix exactly these kinds of issues and steadily improve their jazz bass skills.
This article is written by Toru Hoshino, a jazz bassist and instructor based in Japan who teaches online lessons to students worldwide. In this article, he breaks down how to build a walking bass line over the chord progression to “Isn’t She Lovely,” a tune that comes up often at jam sessions.
A Walking Bass Line for “Isn’t She Lovely”
Here’s a walking bass line that works well over the “Isn’t She Lovely” chord progression, with a full play-through video.
The tabbed performance starts at 2:14.
There are three things I focused on when building this line.
1. Building Around Chord Tones
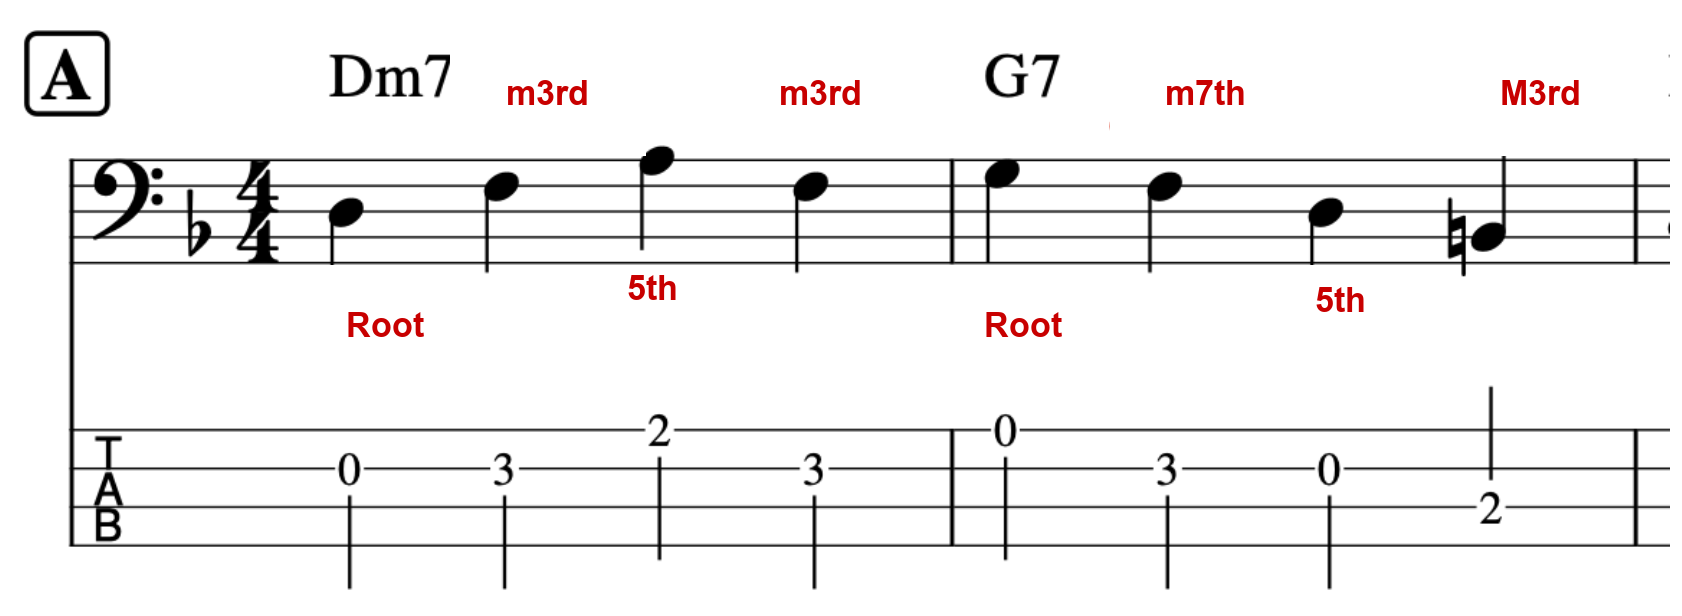
This line is built mainly around chord tones — the root (1st), 3rd, 5th, and 7th of each chord.
There are countless ways to choose notes when building a walking bass line, but when you build around the chord tones that anchor each chord, the line locks in naturally with the rest of the backing without ever feeling out of place.
2. Using Chromatic Passing Tones
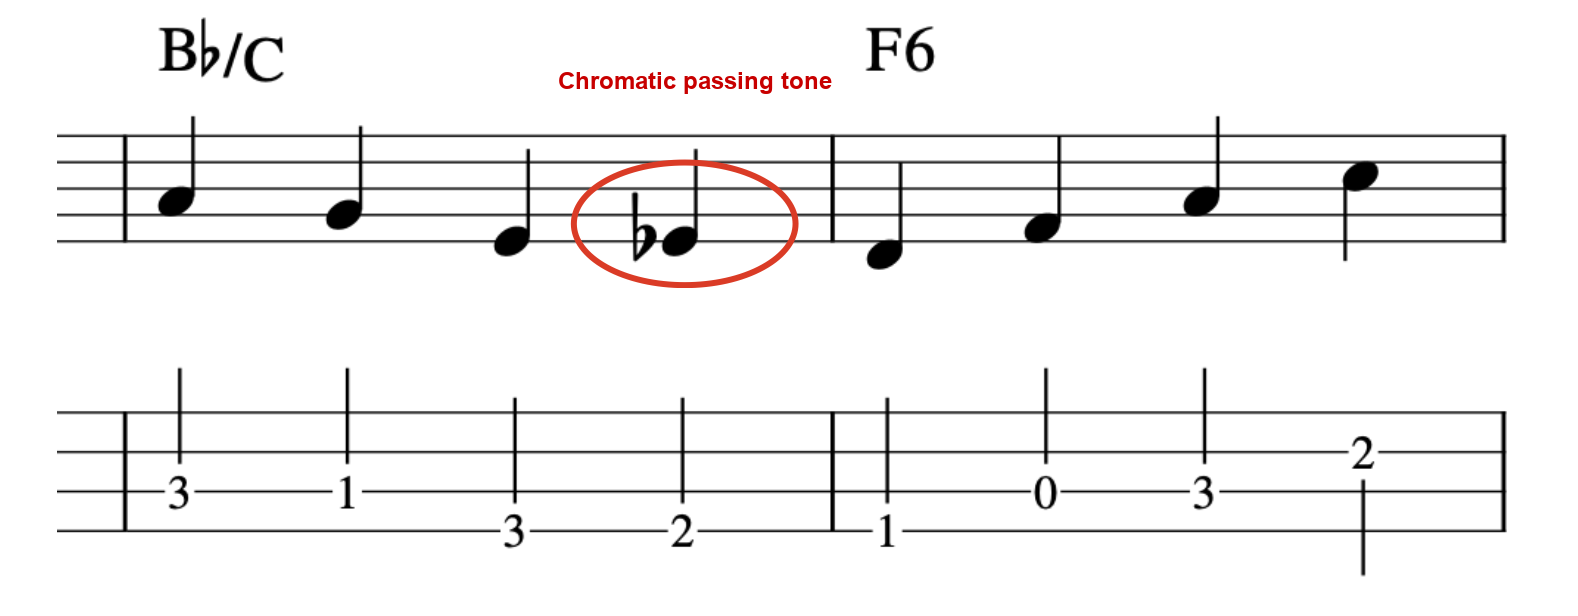
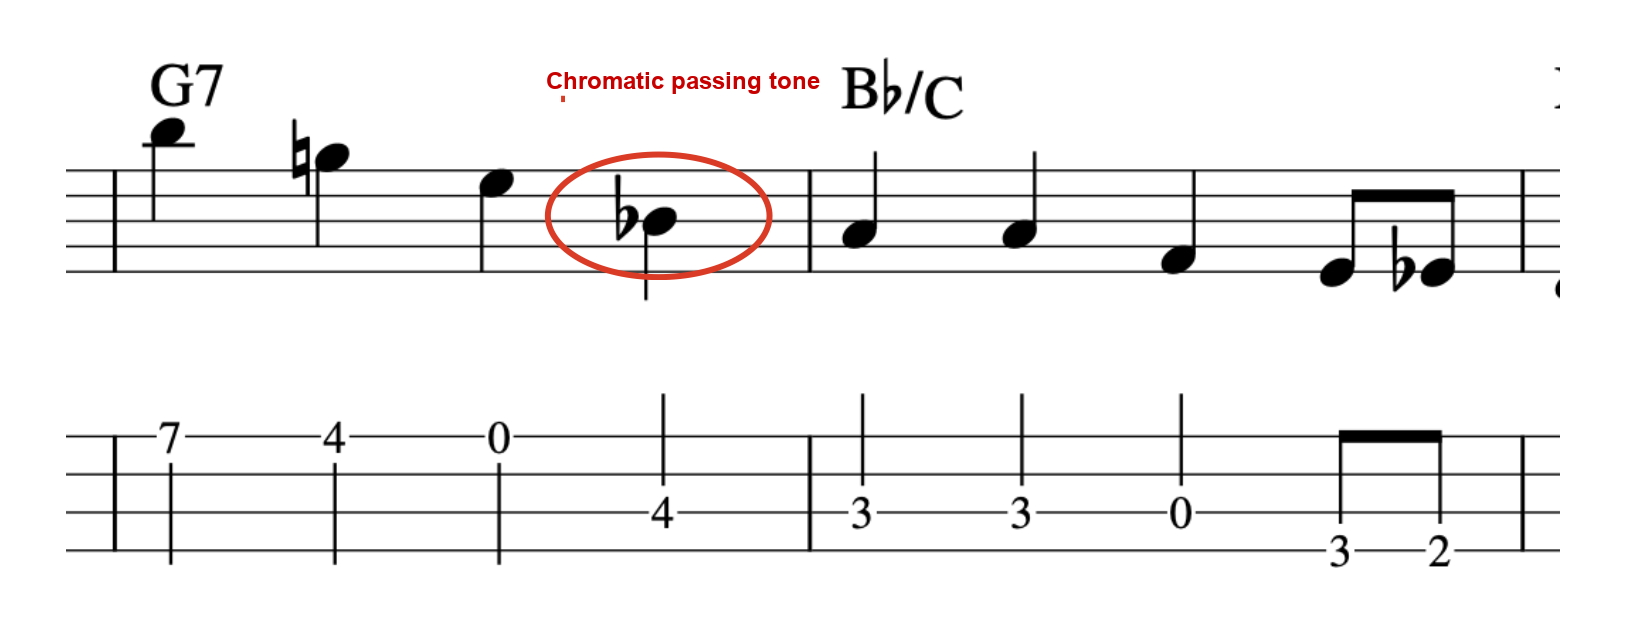
On beat 4, a note a half step below or above the root of the next chord is called a chromatic passing tone.
Example using a chromatic passing tone in bars 3–4
Example using a chromatic passing tone in bars 22–23
This is a very commonly used technique for smoothly connecting one chord to the next in a walking bass line.
3. Using Ghost Notes
I also worked in some ghost notes here and there throughout this line. They’re more often associated with slap playing, but adding ghost notes here and there in a walking bass line gives it a stronger rhythmic feel — a more “percussive” quality.
Example using ghost notes in bars 13–16
Example using ghost notes in bars 29–30
Practicing “Isn’t She Lovely” with iReal Pro
“Isn’t She Lovely” isn’t included in iReal Pro’s “JAZZ 1400” playlist, but you’ll find it inside the app’s “Stevie Wonder 30” song set. From the Forums tab inside the app, go to POP, ROCK, BLUES, then select Stevie Wonder, and tap Stevie Wonder 30 to add the whole set. It also includes “You Are the Sunshine of My Life,” “Overjoyed,” and “Superstition,” among others.
That covers how I approached building a walking bass line over the “Isn’t She Lovely” chord progression. I hope it gives you something useful for your own practice.
If you’ve read this far, building strong walking bass lines is clearly something you care about — and getting feedback on your own lines is exactly the kind of thing that’s hard to fix alone.
Want Personalized Feedback on Your Playing?
This is exactly the kind of thing that’s hard to fix alone — and where having a teacher makes all the difference.
At Line on Bass, I offer an online lesson service where you send me a video of your playing, and I give you specific, detailed feedback — every single day if you want.
Students from around the world are using this to fix exactly these kinds of issues and steadily improve their jazz bass skills.
This article is written by Toru Hoshino, a jazz bassist and instructor based in Japan who teaches online lessons to students worldwide. In this article, he rounds up bass solo performances and breakdowns over several famous jazz standards.
This is a roundup of videos and articles where I play and break down bass improv solos over well-known jazz standards.
Whether you have no idea where to even start with a jazz bass solo, or you’re just looking for fresh phrase ideas, hopefully there’s something useful here.
A Bass Solo Over an F Blues Progression
This one walks through a beginner-friendly way to build a solo using the minor pentatonic scale — it’s a breakdown of the construction, not a polished performance.
Difficulty: ★☆☆☆☆
A Bass Solo Over “Autumn Leaves”
One chorus of improv over the chord progression of this jazz standard staple.
Difficulty: ★★☆☆☆
A Bass Solo Over “All of Me”
A bass improv solo over the progression of this popular jazz standard.
Difficulty: ★★★☆☆
A Bass Solo Over “Fly Me to the Moon”
Another staple tune — one chorus of solo, plus a breakdown of how the solo was put together.
Bassists Get Called On to Solo at Jazz Sessions Too
A lot of bassists have never soloed at all — I was exactly the same before I started going to jazz sessions.
But back when I could barely keep up playing roots and 5ths, let alone anything prepared, getting told “alright, take a solo” was genuinely rough.
Soloing obviously isn’t something you pick up overnight, and it takes real practice — but branching out into practice beyond just bass lines is what deepened my chord vocabulary and understanding, and made playing music a lot more fun along the way.
Breaking a solo down on paper gets you only so far — getting real-time feedback on whether your own phrasing choices actually land is exactly where a teacher accelerates things.
Want Personalized Feedback on Your Playing?
This is exactly the kind of thing that’s hard to fix alone — and where having a teacher makes all the difference.
At Line on Bass, I offer an online lesson service where you send me a video of your playing, and I give you specific, detailed feedback — every single day if you want.
Students from around the world are using this to fix exactly these kinds of issues and steadily improve their jazz bass skills.
This article is written by Toru Hoshino, a jazz bassist and instructor based in Japan who teaches online lessons to students worldwide. In this article, he recommends his favorite practice app, iReal Pro, and walks through how to use it for walking bass practice.
I love this app so much that I switched from a basic flip phone to a smartphone just so I could use it: iReal Pro.
What Is iReal Pro?
Used by everyone from total beginners to working professionals, this app is great for walking bass line practice, and just as useful if you’re into jazz, blues, improvising, or composing.
Here’s an example of practicing a bass line over an iReal Pro backing track — it generates remarkably realistic drum and piano accompaniment.
It’s the ideal app for practicing bass lines you’ve written yourself.
What Makes iReal Pro So Powerful
A Huge Song Library
Over 1,300 jazz standards alone.
On top of that, you can install Latin and Brazilian standards, well-known pop and rock tunes, Stevie Wonder songs, and more, all for free (installation steps below).
Transposing on the Fly
You can transpose into any of the 12 keys.
If you’re playing with a vocalist, the default key in a songbook or chart doesn’t always work for their range. iReal Pro lets you change keys instantly and apply that directly to your practice.
Tempo Control
Any tune can be played anywhere from tempo 40 to 360.
Organizing Songs Into Folders
I keep my songs organized into folders like:
· Tunes I didn’t know at a session
· Fundamentals practice tunes
· Jazz standards worth memorizing
· Set list for an upcoming gig
· Demo songs for my next lesson
Keeping everything organized like this means I never have to wonder what to practice next.
Changing Rhythm Patterns
You can switch between swing, Latin, bossa nova, funk, rock, 3/4 time, and more — a huge range of rhythmic feels. That means you can match your practice to whatever style the tune you’re working on, or your current band, actually calls for.
How to Install It
Here’s a quick rundown of how to get set up:
1. Get the app from the App Store — it’s around $5, and genuinely worth it for years of use.
2. Open the app and tap “Import Playlist from Forum.”
3. Tap “JAZZ.”
4. Tap “JAZZ 1400 STANDARDS.”
5. Tap the blue link next to “Click on Link to import.”
6. Tap “Import Playlist.”
7. Confirm “JAZZ 1400” now appears on your main screen.
8. Open it up — you’ll find well-known standards like “Autumn Leaves” right there in the list. Tap any song title to bring up its chord chart, then hit the play button to start the backing track.
iReal Pro is a genuinely incredible training tool for the price — make it part of your daily practice routine.
An app like this is great for solo practice — but knowing whether your bass line is actually landing well against the chords in real time is exactly where a teacher’s ear matters.
Want Personalized Feedback on Your Playing?
This is exactly the kind of thing that’s hard to fix alone — and where having a teacher makes all the difference.
At Line on Bass, I offer an online lesson service where you send me a video of your playing, and I give you specific, detailed feedback — every single day if you want.
Students from around the world are using this to fix exactly these kinds of issues and steadily improve their jazz bass skills.