Posted on Leave a comment

Should You Practice Scales in All 12 Keys?

This article is written by Toru Hoshino, a jazz bassist and instructor based in Japan who teaches online lessons to students worldwide. In this article, he answers a common question: should you practice scale fingerings in all 12 keys?

I get this question a lot: “Should I be practicing scale fingerings in all 12 keys?”

It genuinely matters a lot. But trying to cover all 12 keys is endless, so my usual advice is:

Focus intensively on the scales actually used in whatever tune you’re currently working on.

Should You Practice Scale Fingerings in All 12 Keys?

Take the C major scale, for example:

C D E F G A B C C D E F G A B C…

You’d play C major starting from the C at the 3rd fret of the 3rd string, all the way up to the C at the 17th fret of the 1st string, then back down. Then move on to D♭ major:

D♭ E♭ F G♭ A♭ B♭ C D♭ D♭ E♭ F G♭ A♭ B♭ C D♭…

D E F♯ G A B C♯ D D E F♯ G A B C♯ D…

And so on, repeating the same process all the way through B major — the question is whether you actually need to grind through all 12 keys like that.

It’d be great if you could, sure, but it’s genuinely endless. So my advice is:

Focus intensively on the scales that actually show up in the tune you’re working on right now.

A fretboard diagram showing note positions

Why Focusing on the Scales a Tune Actually Uses Makes More Sense

It’s Not Just Major Scales

Scales aren’t limited to major scale patterns — there are minor scale patterns too. And within minor, there are several different types: half-diminished, diminished, melodic minor, harmonic minor, Dorian, Phrygian… the list goes on endlessly.

You’d Also Need to Cover Every Possible Tempo

There are countless tempos to consider. And if you start factoring in playing on the beat versus behind it, triplet feels, and other subtle timing choices, that multiplies out infinitely too.

There Are Endless Possible Fingering Routes Too

Even just a low-position C major scale has countless possible ways to finger your way up the neck, like these:

Multiple fingering routes for a C major scale in low position

An alternate fingering route
Another alternate fingering route

It really is endless. Practicing every combination of tempo and key would require an enormous amount of time you don’t have.

So again: focus intensively on the scales that actually show up in the tune you’re working on.

Focus on the Scales the Actual Tune Uses

Scale practice is dry and easy to get bored of, but it’s still genuinely important. That’s exactly why I tell students:

“Start by practicing the fingering for the scale your current tune actually calls for.”

Take “Autumn Leaves,” for example — it’s in the key of G minor. Using the diatonic scale, you’ll mostly be working with the notes G, A, B♭, C, D, E♭, and F.

Even within just that one progression, there’s a wide range of possible movement:

A fingering pattern for the B flat major scale An alternate B flat fingering pattern Another B flat fingering pattern

Knowing a range of fingering variations and progression styles like this pays off both when soloing and when building walking bass lines.

My Own Failed Attempt at 12-Key Practice

When I was in the US, I had some free time, so I tried practicing major 7th and natural minor scales in all 12 keys every day, from tempo 60 up to 240, working out different fingering routes along the way. I gave up almost immediately.

Like I keep saying — it’s genuinely endless. And on top of that, scale practice isn’t the only thing you need to work on.

Jazz theory, rhythm training, solo analysis, and applying everything to real tunes — each of these deserves serious, focused practice time in its own right.

There’s a lot to work on, but you’ve also got a life, a job, family, and friends. Rather than cramming everything in, I think it’s more important to keep asking: “given the time I actually have — 10 minutes, an hour, whatever it is — what can I realistically get done?”

Working out which scales actually matter for your current repertoire, and getting honest feedback on your fingering choices, is exactly the kind of thing a teacher helps cut through.

Want Personalized Feedback on Your Playing?

This is exactly the kind of thing that’s hard to fix alone — and where having a teacher makes all the difference.

At Line on Bass, I offer an online lesson service where you send me a video of your playing, and I give you specific, detailed feedback — every single day if you want.

Students from around the world are using this to fix exactly these kinds of issues and steadily improve their jazz bass skills.

Check Out the Lesson Service →

Posted on Leave a comment

iReal Pro: The App I Use Constantly for Bass Practice

This article is written by Toru Hoshino, a jazz bassist and instructor based in Japan who teaches online lessons to students worldwide. In this article, he recommends his favorite practice app, iReal Pro, and walks through how to use it for walking bass practice.

I love this app so much that I switched from a basic flip phone to a smartphone just so I could use it: iReal Pro.

What Is iReal Pro?

Used by everyone from total beginners to working professionals, this app is great for walking bass line practice, and just as useful if you’re into jazz, blues, improvising, or composing.

I use it constantly in my own practice too.

The iReal Pro app icon

→ Available on the App Store

Practicing Bass With iReal Pro’s Backing Tracks

Here’s an example of practicing a bass line over an iReal Pro backing track — it generates remarkably realistic drum and piano accompaniment.

It’s the ideal app for practicing bass lines you’ve written yourself.

What Makes iReal Pro So Powerful

A Huge Song Library

Over 1,300 jazz standards alone.

On top of that, you can install Latin and Brazilian standards, well-known pop and rock tunes, Stevie Wonder songs, and more, all for free (installation steps below).

Transposing on the Fly

You can transpose into any of the 12 keys.

If you’re playing with a vocalist, the default key in a songbook or chart doesn’t always work for their range. iReal Pro lets you change keys instantly and apply that directly to your practice.

Tempo Control

Any tune can be played anywhere from tempo 40 to 360.

Organizing Songs Into Folders

I keep my songs organized into folders like:

· Tunes I didn’t know at a session
· Fundamentals practice tunes
· Jazz standards worth memorizing
· Set list for an upcoming gig
· Demo songs for my next lesson

Keeping everything organized like this means I never have to wonder what to practice next.

Changing Rhythm Patterns

You can switch between swing, Latin, bossa nova, funk, rock, 3/4 time, and more — a huge range of rhythmic feels. That means you can match your practice to whatever style the tune you’re working on, or your current band, actually calls for.

How to Install It

Here’s a quick rundown of how to get set up:

1. Get the app from the App Store — it’s around $5, and genuinely worth it for years of use.

2. Open the app and tap “Import Playlist from Forum.”

3. Tap “JAZZ.”

4. Tap “JAZZ 1400 STANDARDS.”

5. Tap the blue link next to “Click on Link to import.”

6. Tap “Import Playlist.”

7. Confirm “JAZZ 1400” now appears on your main screen.

8. Open it up — you’ll find well-known standards like “Autumn Leaves” right there in the list. Tap any song title to bring up its chord chart, then hit the play button to start the backing track.

iReal Pro is a genuinely incredible training tool for the price — make it part of your daily practice routine.

The iReal Pro app icon

→ Available on the App Store

An app like this is great for solo practice — but knowing whether your bass line is actually landing well against the chords in real time is exactly where a teacher’s ear matters.

Want Personalized Feedback on Your Playing?

This is exactly the kind of thing that’s hard to fix alone — and where having a teacher makes all the difference.

At Line on Bass, I offer an online lesson service where you send me a video of your playing, and I give you specific, detailed feedback — every single day if you want.

Students from around the world are using this to fix exactly these kinds of issues and steadily improve their jazz bass skills.
Check Out the Lesson Service →

Posted on Leave a comment

The Girl from Ipanema: A Bossa Nova Bass Line Breakdown

This article is written by Toru Hoshino, a jazz bassist and instructor based in Japan who teaches online lessons to students worldwide. In this article, he breaks down the bass line approach for “The Girl from Ipanema” and other bossa nova tunes commonly played at sessions.

This is a tune that comes up constantly at sessions, so it’s well worth having in your back pocket.

“The Girl from Ipanema” — Bass Line

Here’s a run-through.

Characteristics of the Bass Line

Mostly Root and 5th

Unlike a walking bass line, bossa nova bass lines don’t lean much on passing tones or tensions. The foundation is mostly just the root and the 5th.

The Bossa Nova Rhythm

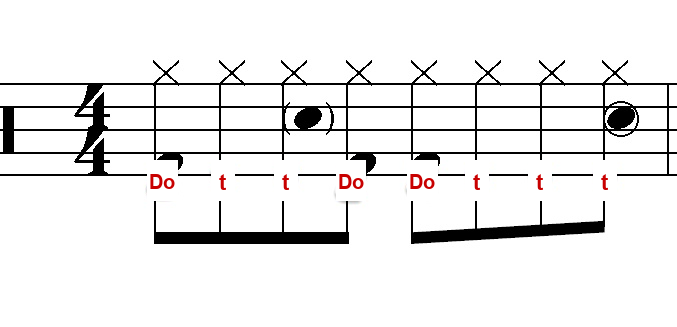
The drum rhythm looks like this:

A bossa nova drum rhythm pattern with attacks marked Do and ghost notes marked t

“Do-t-t-Do / Do-t-t-t” per bar — a steady, repeating rhythm that the bass locks into.

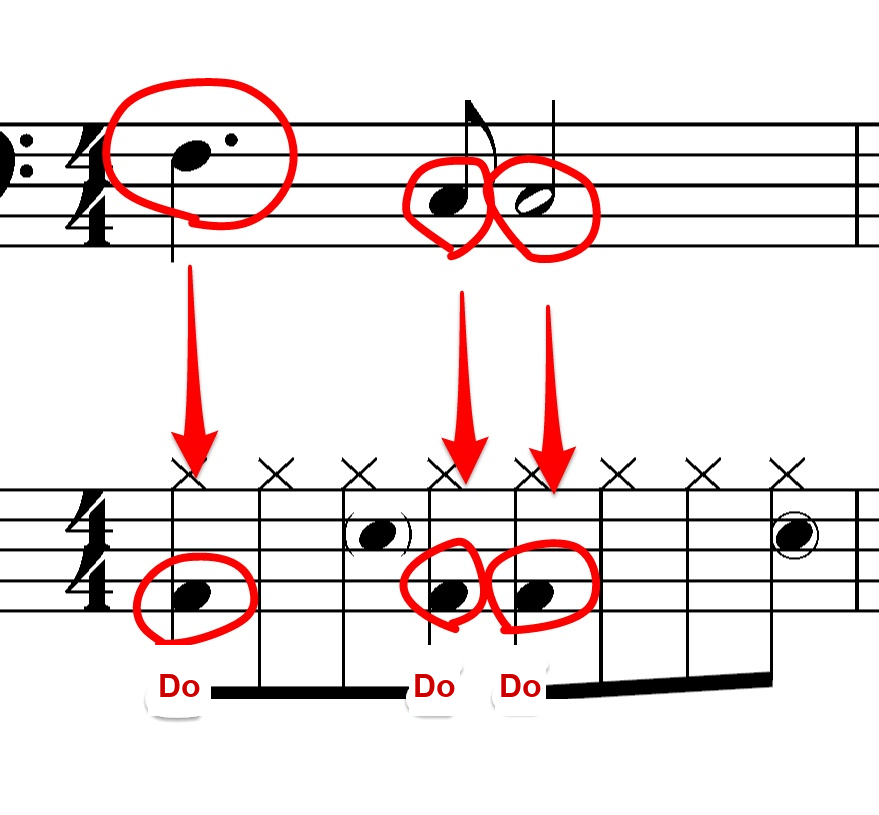
Bossa Nova Drums and Bass Together

The bossa nova drum rhythm aligned with the bass line, root on the downbeat and 5th following

Do-t-t-Do / Do-t-t-t (one bar)
F– –F / C– – – (one bar)
1– –1 / 5– – – (one bar)

That’s the feel you’re going for. Start by being able to sing the rhythm out loud before you try playing it.

Be Conscious of the Difference Between Swing and Bossa Nova Rhythm

Bossa nova tunes come up a lot at sessions. The chord changes tend to be just as improv-friendly as straight-ahead jazz, and plenty of these tunes work great with a sax or piano out front.

That said, the way you play bass — and the rhythmic feel you should be locking into — is genuinely different between jazz and bossa nova.

The Rhythmic Difference Between Jazz and Bossa Nova Drums

Here’s a “jazz-style swing” feel.

Now with a swing-style bass line laid on top:

And here’s a tight, “bossa nova-style” rhythm.

Now laying a similar line on top of that:

How does that sound? Not exactly wrong, but…

Compared to the jazz feel, it has a noticeably tighter, more locked-in character. Something more like this tends to fit better:

Playing the attacks at consistent, even intervals like this makes up for the absence of drums and helps lock in the time feel.

Simple Is Best — Focus on Locking the Rhythm In

A bass line built from just root and 5th might feel almost too simple, but the simpler a bass line is, the harder it actually is to play it with zero unevenness.

I was often told myself: “before you go adding flashy little fills, make sure you’re nailing the root and holding the time down.”

Even with simple note choices, when the bass and drums are genuinely locked together, it feels great for everyone else in the band to play over.

Start by getting comfortable with a simple line built from just the root and the 5th.

Bossa Nova Tunes I’ve Played a Lot at Sessions This Past Year

Blue Bossa
Black Orpheus
The Girl from Ipanema
Fly Me to the Moon
Here’s That Rainy Day
How Insensitive
One Note Samba
The Shadow of Your Smile
Wave
Corcovado
Água de Beber
O Grande Amor
Desafinado

I’ve also played tunes like these as bossa nova arrangements:

Candy
Come Rain or Come Shine
Days of Wine and Roses
I Remember You
What a Difference a Day Made
Over the Rainbow

What Is Bossa Nova?

It’s a genre distinct from jazz, with a smooth, stylish sound that you’ll hear constantly in cafés. Here’s some background, summarized from Wikipedia:

In Portuguese, “Nova” means “new,” and “Bossa” roughly means “knack” or “bump.” (…) It emerged in the late 1950s among middle-class students and musicians living in beachside neighborhoods of Rio de Janeiro like Copacabana and Ipanema. The genre’s breakthrough hit in Brazil was the 1958 single “Chega de Saudade,” written by Antônio Carlos Jobim with lyrics by Vinícius de Moraes, sung and played by João Gilberto on guitar. (…)

Pinning down exactly when your attack lands against the rhythm is something you really need a second set of ears for — that’s exactly where a teacher’s feedback makes the biggest difference.

Want Personalized Feedback on Your Playing?

This is exactly the kind of thing that’s hard to fix alone — and where having a teacher makes all the difference.

At Line on Bass, I offer an online lesson service where you send me a video of your playing, and I give you specific, detailed feedback — every single day if you want.

Students from around the world are using this to fix exactly these kinds of issues and steadily improve their jazz bass skills.

Check Out the Lesson Service →

Posted on Leave a comment

3 Things I Wish I’d Known Back in My Rock Band Days

This article is written by Toru Hoshino, a jazz bassist and instructor based in Japan who teaches online lessons to students worldwide. In this article, he shares 3 things he wishes he’d known back in his rock band days.

It’s been about 10 years since I quit playing in rock bands, and looking back, here are 3 things I wish I’d known at the time.

This one’s especially for anyone currently in a rock band wondering, “is there some new approach I could be taking?” — hopefully it gives you something useful.

3 Things I Wish I’d Known Back in My Rock Band Days

I Wish I’d Played in an Acoustic Band

A bass guitar

In a loud band, everything around you is loud too, so — for better or worse — the bass tends to get buried in the mix, and you can get away with a lot of sloppy playing.

Acoustic and jazz bands are different: the bass is way more exposed, so you get a much clearer, more visceral sense of what your actual role is.

In fact, I distinctly remember that after spending some time in acoustic and jazz bands and then going back to a rock band, my own bass tone suddenly felt a lot more three-dimensional.

Back then I was completely consumed by my own band, but I wish I’d had the bandwidth to peek into genres outside of rock.

I Wish I’d Worked on 16th-Note Feel

Once you can really feel the smaller subdivisions, your phrasing vocabulary opens up, and your sense of sustain sharpens too.

I wasn’t exactly playing slap-funk back then, but I wish I’d spent even a little time training a 16th-note feel and brought it into my rock playing at the time.

I Wish I’d Understood What Melody Was Riding on Top of the Chords

Back in my band days, I’d come up with a melody humming to myself on a walk and just slap power chords underneath it. I wish I’d thought more about things like:

Is the melody riding on top of the chord a chord tone?

Or is it a tension note?

And exactly what scale degree is it, relative to the chord?

If I’d been thinking about that while writing, I think I could’ve written deeper songs.

No point dwelling on regrets, and honestly, “all gas, no overthinking” is a perfectly valid way to be in your 20s as a band member. But skills like this are also exactly the kind of thing that makes you easy to pick up by another band if yours ever breaks up.

“I’m not exactly planning on my band breaking up!” — fair, but having more tools in your kit rarely hurts. Hopefully this gives you something useful to chew on.

Hearing about these ideas is one thing — actually being able to apply them in real time on your instrument is exactly where a teacher’s feedback speeds up the process.

Want Personalized Feedback on Your Playing?

This is exactly the kind of thing that’s hard to fix alone — and where having a teacher makes all the difference.

At Line on Bass, I offer an online lesson service where you send me a video of your playing, and I give you specific, detailed feedback — every single day if you want.

Students from around the world are using this to fix exactly these kinds of issues and steadily improve their jazz bass skills.

Check Out the Lesson Service →

Posted on Leave a comment

Passing Tones: A Key Building Block for Jazz Bass Lines

This article is written by Toru Hoshino, a jazz bassist and instructor based in Japan who teaches online lessons to students worldwide. In this article, he explains passing tones — one of the most common approaches used in jazz walking bass lines.

Who this is for

・Anyone interested in jazz bass lines
・Anyone who wants to build smoother, more stylish bass lines
・Anyone who wants to try walking bass
・Anyone who wants to bring jazzy flavor into their band’s bass lines

Passing tones smooth out the flow between notes, and they show up constantly in blues and jazz — definitely worth mastering.

Adding Passing Tones to a Bass Line

Here’s an F blues progression with passing tones added in.

An F blues chord chart

Listen to the comparison below.

Bass line without passing tones:

A bass line without passing tones


Bass line with passing tones:

A bass line with passing tones added

What do you think? Doesn’t the version with passing tones feel a lot smoother?

Where the Passing Tones Are Used

The passing tones are at the spots marked in red below.

Passing tones marked in red on the bass line

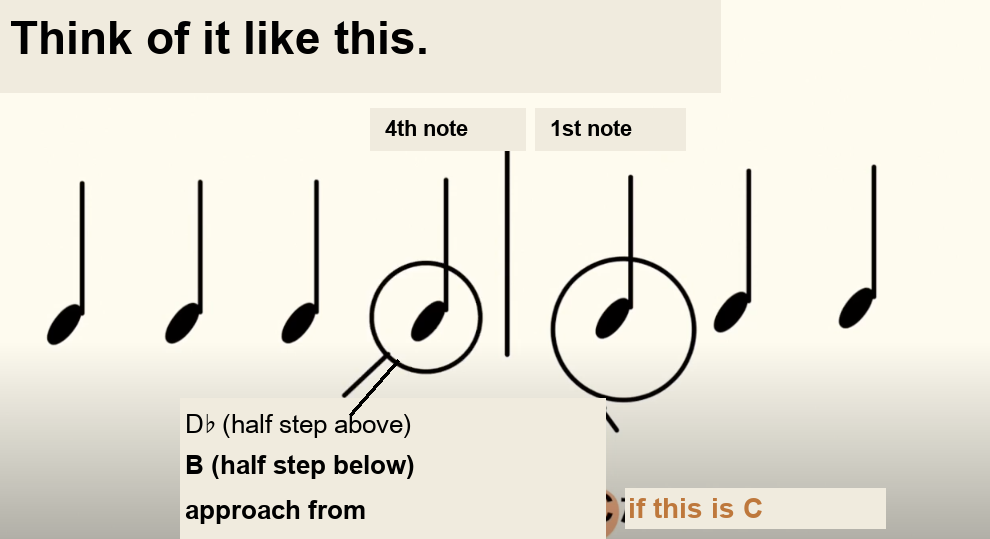
There’s no hard rule for exactly what counts as a passing tone, but most often, it’s a note a half step or whole step above or below the root of the chord that’s coming up next.

For example: if the root of the next chord is B♭, you’d approach it with a passing tone a half step above — B (bars 1–2).

A passing tone approaching B flat from a half step above

In bar 5, the note C is used (approaching B from a half step above) (bars 5–6).

A passing tone approaching B from a half step above using C

And here’s an approach to C from a half step below, using B (bars 9–10).

A passing tone approaching C from a half step below using B

Thinking in note names can get a little overwhelming, so it helps to picture it more simply, like this:

A diagram showing a passing tone approaching the 1st note of the next chord from a half step above or below

This is a genuinely beginner-friendly approach, so if you want to bring some jazzy flavor into your everyday playing, give it a try.

Knowing the theory behind passing tones is one thing — hearing in real time whether your specific choice of approach note actually worked is exactly where a teacher’s ear helps.

Want Personalized Feedback on Your Playing?

This is exactly the kind of thing that’s hard to fix alone — and where having a teacher makes all the difference.

At Line on Bass, I offer an online lesson service where you send me a video of your playing, and I give you specific, detailed feedback — every single day if you want.

Students from around the world are using this to fix exactly these kinds of issues and steadily improve their jazz bass skills.

Check Out the Lesson Service →

Posted on Leave a comment

Breaking Down a Bass Solo Over ‘Days of Wine and Roses’

This article is written by Toru Hoshino, a jazz bassist and instructor based in Japan who teaches online lessons to students worldwide. In this article, he breaks down a bass solo he played over “Days of Wine and Roses,” focusing on the trickiest transition in the tune.

I played a bass improv solo over the chord progression of “Days of Wine and Roses” (with notation, and a performance video included).

Breaking down the whole chart would make this way too long, so this time I’m covering two things: roughly what mindset I played the whole solo with, and a closer look at the trickiest transition in the tune — bar 1 into bar 2, F△7 into E♭7.

A Bass Solo Over “Days of Wine and Roses”

Keeping “Space” in Mind Throughout

The main thing I focused on was leaving room — space over phrasing. The idea is that even a fairly plain phrase can sound great as long as there’s real space around it.

I was especially deliberate about not filling every moment with notes, particularly at the start of the solo.

Breaking Down the F△7 → E♭7 Transition

Chorus 1, Pass 1 — around 0:23

I’m barely playing anything here — this is exactly the “space” idea from above in action. That said, I’m still keeping the E♭ chord tones in mind the whole time. Since the F△7 diatonic color is so dominant overall, I wanted to make the non-diatonic E♭7 color stand out clearly by contrast.

Bass line emphasizing E flat chord tones over the F major 7 to E flat 7 transition

Chorus 1, Pass 2 — around 0:31

Here I’m using the 3rd of F△7, the note A, as the motif. Approaching A from a half step below — G♯ — was meant to add a touch of bittersweet sweetness to the line.

A phrase approaching the 3rd of F major 7 from a half step below

Chorus 2, Pass 1 — around 1:01

This one’s inspired by the opening of Paul Chambers’ solo on “Straight, No Chaser.” It’s not a direct copy though — bar 2 leans into the E♭ chord color instead.

A phrase inspired by Paul Chambers' solo on Straight No Chaser

For reference, check out this recording around the 8:03 mark.

Chorus 2, Pass 2 — around 1:50

This is almost entirely an E♭7 chord-tone approach. Beyond just the E♭ itself, the 6th of the chord, D♭, really brings out this chord’s distinct character too.

An E flat 7 chord-tone phrase emphasizing the 6th

Hopefully this is useful for your own daily practice.

Hearing a tricky transition broken down on paper is one thing — actually getting it to land convincingly in real time is exactly where a teacher’s ear speeds things up.

Want Personalized Feedback on Your Playing?

This is exactly the kind of thing that’s hard to fix alone — and where having a teacher makes all the difference.

At Line on Bass, I offer an online lesson service where you send me a video of your playing, and I give you specific, detailed feedback — every single day if you want.

Students from around the world are using this to fix exactly these kinds of issues and steadily improve their jazz bass skills.

Check Out the Lesson Service →

Posted on Leave a comment

Is It Okay to Play Prepared Phrases at a Jam Session?

This article is written by Toru Hoshino, a jazz bassist and instructor based in Japan who teaches online lessons to students worldwide. In this article, he answers a common question: is it okay to play phrases you wrote out and prepared in advance at a jam session?

Here’s a question I get a lot: “Is it okay to play phrases I wrote out and prepared ahead of time at a session?”

People who are working on improvising often ask something like: “I can’t come up with phrases on the spot at all, so I’ve been playing lines I wrote out on paper beforehand — is it okay to play those at a session? Doesn’t that defeat the whole point of improvising?”

It’s true that playing something you wrote out in advance isn’t, strictly speaking, improvising in the purest sense. But as a practice method — writing out phrases and training yourself to release them naturally within a chord progression — that’s completely fine.

“Does this note actually fit over this chord?”
— deliberately checking that is genuinely valuable.

Sure, it’d be great if cool phrases just came out of nowhere with zero thought. But that’s not realistic starting out, so when you’re working on this on your own, really listen to how each note sounds against the chord — trust your own ear, even if it’s just “I like how that sounds” or “hm, not so much” — and once you land on something that feels good, repeat it until it’s second nature, then practice it in different keys so it gradually becomes part of your vocabulary.

When you’re just starting this process, the cool phrasing you’re imagining won’t come easily. But by steadily grinding through this process, your ability to respond to chords on the fly builds up bit by bit. So if you’ve ever felt like “I have no idea what to play when I’m improvising,” try writing out phrases specifically for the spots that aren’t working yet — it’s a genuinely effective approach.

A Recommended App

If you’re working on improvising on your own, the app iReal Pro is incredibly useful.

It lets you play backing tracks for over 1,400 jazz standards, in any tempo or key you want.

Definitely worth checking out.

Writing out phrases is a great way to build vocabulary on your own — but knowing which of those phrases are actually worth keeping is exactly the kind of judgment a teacher can speed up.

Want Personalized Feedback on Your Playing?

This is exactly the kind of thing that’s hard to fix alone — and where having a teacher makes all the difference.

At Line on Bass, I offer an online lesson service where you send me a video of your playing, and I give you specific, detailed feedback — every single day if you want.

Students from around the world are using this to fix exactly these kinds of issues and steadily improve their jazz bass skills.

Check Out the Lesson Service →

Posted on Leave a comment

Stuck in One-Pattern Pentatonic Phrasing? Try This

This article is written by Toru Hoshino, a jazz bassist and instructor based in Japan who teaches online lessons to students worldwide. In this article, he shares a few ideas for breaking out of repetitive, one-pattern pentatonic phrasing.

“Whenever a major pentatonic scale comes up, I get stuck playing the same shape and end up with phrases like C-D-E-G-A-C going up, or C-A-G-E-D-C coming back down — and that’s it. Got any ideas for breaking out of that?”

This article is for anyone who’s run into that exact wall.

Where Phrase Ideas Tend to Get Stuck

When you’re stuck for phrase ideas, it’s often because you’re only thinking about movement in one direction.

Example 1

C-D-E-G-A-C — just moving steadily upward.

What if you took everything from the 3rd note onward — E, G, A, C — and dropped it down an octave, like this?

Completely different feel, right?

Example 2

C-A-G-E-D-C — just moving steadily downward.

Now try dropping just the final C down by a whole step:

The descending pentatonic phrase with the final note lowered a whole step

Again — totally different character.

Here’s an applied phrase built on that idea — could work nicely over a tune like “All of Me”:

An applied pentatonic phrase for All of Me

How to Think About It Once Phrasing Starts Feeling Repetitive

E shows up in more than one place on the neck.

Multiple positions for the note E on the fretboard

So does A.

Multiple positions for the note A on the fretboard

“Yeah, obviously” — you might be thinking. But here’s the thing: once you’ve got a handful of notes lined up in your head, it’s surprisingly easy to forget that those other positions even exist.

When you’re still getting your bearings, it’s important to learn fixed, go-to shapes first. But:

Important

Once you’re more comfortable, start paying attention to “what note am I actually playing right now”

and when things start feeling repetitive, ask yourself:

“What if I played that same note an octave away?” or “What if I played that same note on a different string?”

Keeping that in mind is a reliable way to break out of one-pattern phrasing.

Recognizing in the moment which alternate position would actually sound better is exactly the kind of real-time decision a teacher can help sharpen.

Want Personalized Feedback on Your Playing?

This is exactly the kind of thing that’s hard to fix alone — and where having a teacher makes all the difference.

At Line on Bass, I offer an online lesson service where you send me a video of your playing, and I give you specific, detailed feedback — every single day if you want.

Students from around the world are using this to fix exactly these kinds of issues and steadily improve their jazz bass skills.

Check Out the Lesson Service →

Posted on Leave a comment

Bass Basics #5: Learning the Fretboard with the C Major Scale

This article is written by Toru Hoshino, a jazz bassist and instructor based in Japan who teaches online lessons to students worldwide. In this article, he covers a beginner exercise for learning the note names across the fretboard using a simple C-major scale.

For anyone picking up a bass for the first time
For anyone about to start learning bass
For anyone who wants to revisit the basics or rethink their playing style

For installment #5, we’re going to play through a major scale to learn the note names across the fretboard. This is commonly called “scale practice,” and it builds several skills at once — fingering, knowing where notes live on the neck, and rhythmic timing.

The Bass Has a Scale Too

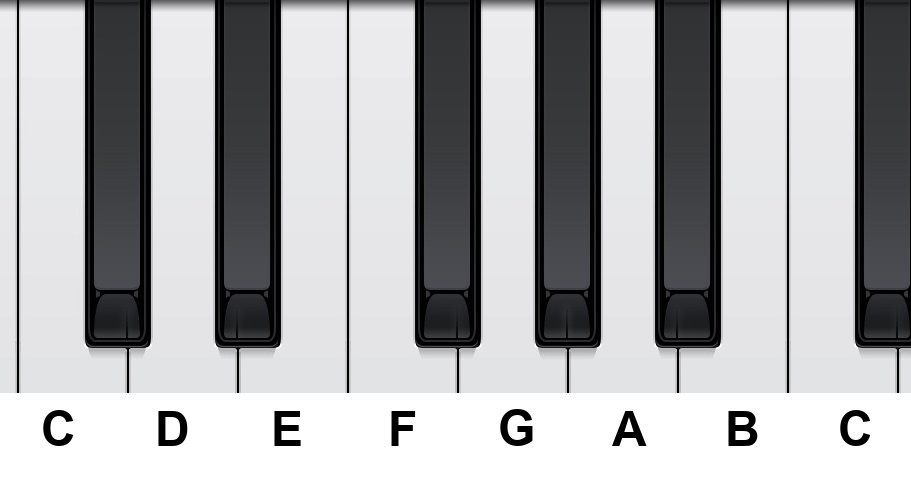
Just like a piano keyboard has note names:

A piano keyboard showing the note names C D E F G A B C

The bass has note names too.

Bass fretboard with note names

This is the C-major scale, and in the context of popular music, rock, and similar styles, it’s typically referred to by its letter names: C D E F G A B C.

Today, we’re going to learn to play this C-D-E-F-G-A-B-C scale on the bass.

Scale Pattern 1

First, the position for C: fret the 3rd fret of the 3rd string with your index finger.

Fretting C with the index finger

Next, the position for D: play the 5th fret of the 3rd string with your pinky.

Fretting D with the pinky finger

Next, the position for E: play the 2nd fret of the 2nd string with your index finger.

Fretting E with the index finger

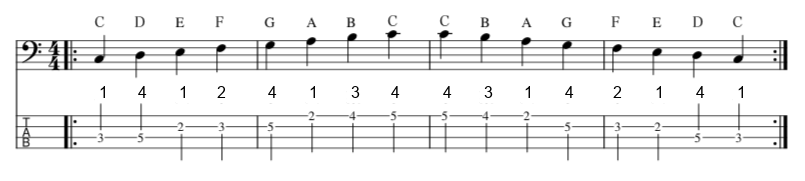
Following this same logic, try playing through the full pattern shown below:

Fingering pattern for the C major scale ascending and descending, numbered 1 (index), 2 (middle), 3 (ring), 4 (pinky)

Once you’re comfortable, try playing along with the audio below.

(Note: this is played at a tempo of 60, going up and back down the scale twice.)


Scale Pattern 2

The C-major scale isn’t limited to just the one fingering pattern above — there’s another shape too.

For example, D is also available as an open string on the 2nd string, and G as an open string on the 1st string, so the same scale can also be played like this:

An alternate fingering for the C major scale using open strings

Which one’s better depends on the tune you’re playing, but being comfortable with both will widen your playing range, so work toward learning both eventually.

Try this one too once the hand shape starts to feel natural.

Applied Practice With C-D-E-F-G-A-B-C

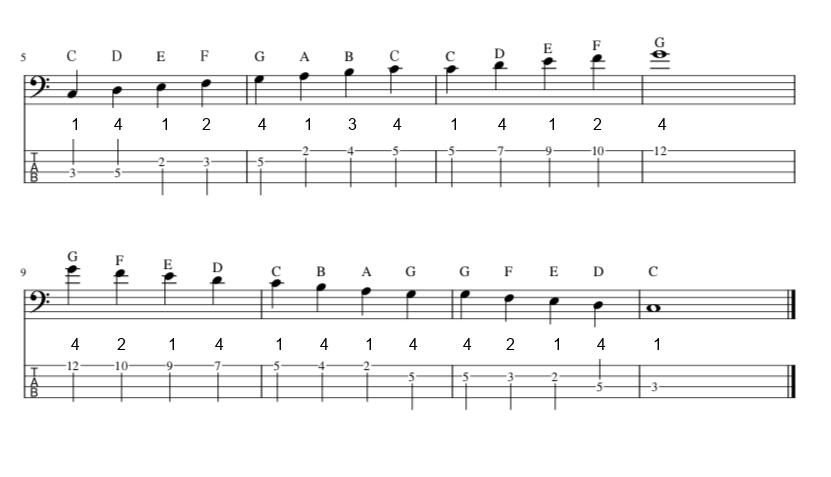
Once you’re comfortable with the above, here’s a bit of an applied exercise. Play the scale up, and keep going past the octave into the notes above.

Extending the scale beyond the octave

And here’s an efficient fingering pattern I worked out for it:

An extended scale fingering pattern going up past the octave and back down

Play up through C-D-E-F-G-A-B-C-D-E-F-G, reaching the higher notes, then come back down:

G-F-E-D-C-B-A-G-F-E-D-C

back to where you started.

Playing through a fixed sequence of notes like this is what’s called “scale practice.”

Once you’re comfortable, try playing along.

Make a Point of Learning C-D-E-F-G-A-B-C

You can absolutely play bass reading only tab notation. But the longer you stick with bass, the more often you’ll find yourself reading chord symbols instead.

Chord symbols written above a staff

Learning your note names as C-D-E-F-G-A-B-C will pay off down the line by making chord symbols much easier to work with — so make a habit of learning the letter names of your notes.

Connecting note names to actual fretboard positions in real time, without having to think about it, is exactly the kind of thing that’s faster to build with a teacher watching and correcting you.

Want Personalized Feedback on Your Playing?

This is exactly the kind of thing that’s hard to fix alone — and where having a teacher makes all the difference.

At Line on Bass, I offer an online lesson service where you send me a video of your playing, and I give you specific, detailed feedback — every single day if you want.

Students from around the world are using this to fix exactly these kinds of issues and steadily improve their jazz bass skills.

Check Out the Lesson Service →

Posted on Leave a comment

Should You Use Your Ring Finger in the Low Position on Electric Bass?

This article is written by Toru Hoshino, a jazz bassist and instructor based in Japan who teaches online lessons to students worldwide. In this article, he answers a question about whether to use the ring finger in the low position on electric bass.

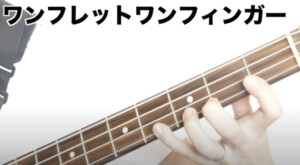
I recently got a question from an electric bass player that went something like this: “I found one method book that shows the low position fretted like this” —

One-finger-per-fret technique using the index, middle, ring, and pinky fingers

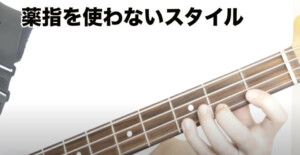
— “using a one-finger-per-fret approach with the index, middle, ring, and pinky all spread out. But another book shows the low position fretted like this instead” —

A three-finger technique using only the index, middle, and pinky

— “using only the index, middle, and pinky, skipping the ring finger entirely. Which one should I actually trust?

My honest answer to this: it depends on the playing style you’re going for.

Personally, I go with the second approach — skipping the ring finger and fretting the low position with just index, middle, and pinky. There are 2 reasons why:

1. Because I also play upright bass
2. Because the one-finger-per-fret approach doesn’t reach the very edge of the fret as comfortably for me

1. Because I Also Play Upright Bass

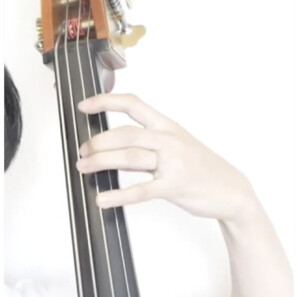
On upright bass, the low position is typically fretted using just the index, middle, and pinky fingers. Here’s what that hand shape looks like:

Upright bass low-position hand shape using index, middle, and pinky

I used to use my ring finger in the low position on electric bass too, but once I started playing upright, my electric bass fingering naturally lined up with my upright technique instead.

2. Because the One-Finger-Per-Fret Approach Doesn’t Reach the Edge of the Fret as Well

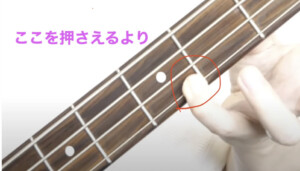
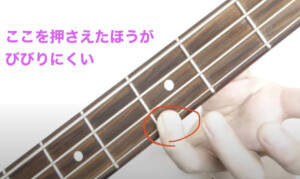
Here’s a shot of fretting the 3rd fret on the 1st string. This is pressing down right at the edge closest to the headstock, which tends to cause fret buzz.

Fretting near the headstock-side edge of the fret, which can cause buzzing

Whereas fretting closer to the body-side edge, like this, tends to buzz less.

Fretting near the body-side edge of the fret, which produces a cleaner note

Personally, I find it harder for my left-hand fingers to comfortably reach that body-side edge when I’m locked into one-finger-per-fret. So I use the index/middle/pinky approach instead, since it makes that cleaner fretting position easier to reach consistently.

That’s the reasoning behind why I personally play the low position on electric bass using just three fingers — index, middle, and pinky.

In lessons, for students who eventually want to pick up upright bass, I often recommend starting with this index/middle/pinky approach on electric bass. For students without that goal who find one-finger-per-fret more comfortable, I’m just as happy to have them stick with that instead.

Genuinely opposite opinions like this come up a lot in instrumental technique — strap length, string height (action), you name it: some swear “longer/higher is better,” others swear the exact opposite.

In the end, I think the real answer always comes down to: what style are you going for, what tone do you want, and what do the players you admire actually do? That’s usually what resolves the contradiction.

Hopefully this gives you a useful way to think it through next time you run into two pieces of conflicting advice.

Working out which approach actually fits your hand and your goals is exactly the kind of judgment call that’s easier to make with a second pair of eyes watching you play.

Want Personalized Feedback on Your Playing?

This is exactly the kind of thing that’s hard to fix alone — and where having a teacher makes all the difference.

At Line on Bass, I offer an online lesson service where you send me a video of your playing, and I give you specific, detailed feedback — every single day if you want.

Students from around the world are using this to fix exactly these kinds of issues and steadily improve their jazz bass skills.

Check Out the Lesson Service →