Posted on Leave a comment

Why 10 Minutes a Day Beats One Long Weekly Practice Session

This article is written by Toru Hoshino, a jazz bassist and instructor based in Japan who teaches online lessons to students worldwide. In this article, he shares his thinking on why practicing 10 minutes a day beats one long weekly session, even when the total time is the same.

Here’s the question I want to dig into: 10 minutes of practice, 6 days a week — or one 60-minute session, once a week? Both add up to the same 60 minutes total. Which one actually gets you better results?

Short answer up front: the first one wins.

A Student’s Example

A student practicing

One of my students is a high schooler. Between schoolwork, volleyball club, and cram school, her schedule is packed. She’s on a competitive team in the city, so she’s up at 4am for practice from 6 to 8am every day, plus club after school. With a tournament roughly every two months, she barely gets a day off from volleyball, and on top of that she’s at cram school several times a week preparing for university entrance exams.

That extremely busy student still takes lessons with me twice a month — and every single lesson, her improvement is noticeable.

She’s got youth and drive on her side, sure, but she’s not someone with extraordinary natural musical talent, and she’s not aiming to go pro on bass either.

What she does have is this: she’s committed to practicing for just 10 minutes a day.

Let’s compare what that actually looks like on a calendar, against doing one 60-minute session a week.

Comparing the Two Schedules

Example: One 60-Minute Practice Session a Week
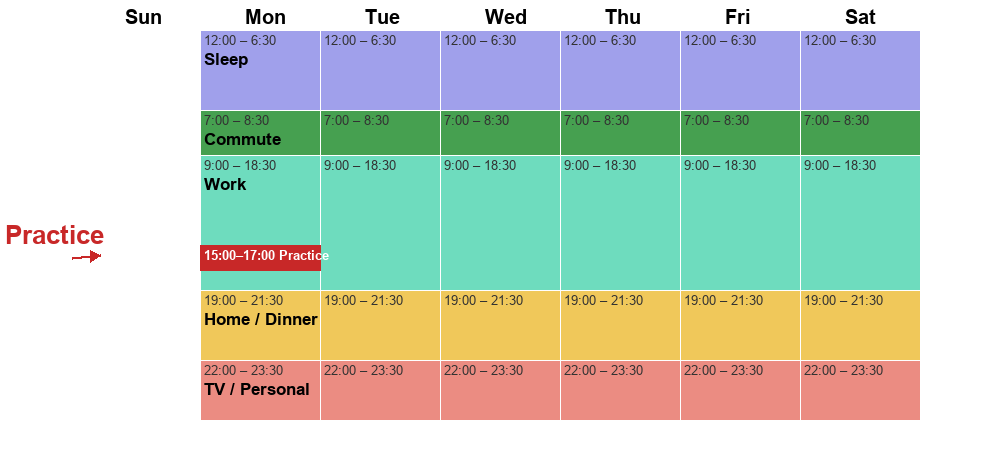
A weekly schedule with one 60-minute bass practice session on Monday only

Weekdays
Wake at 6:30
Commute at 7:30
Work from 9:00 to 18:30
Home by 7:00pm: dinner, family time
9:00–11:00pm: TV, bath, personal time
Lights out at midnight

Sunday
Free time — head to the studio and practice for an hour.

10 Minutes a Day, 6 Days a Week
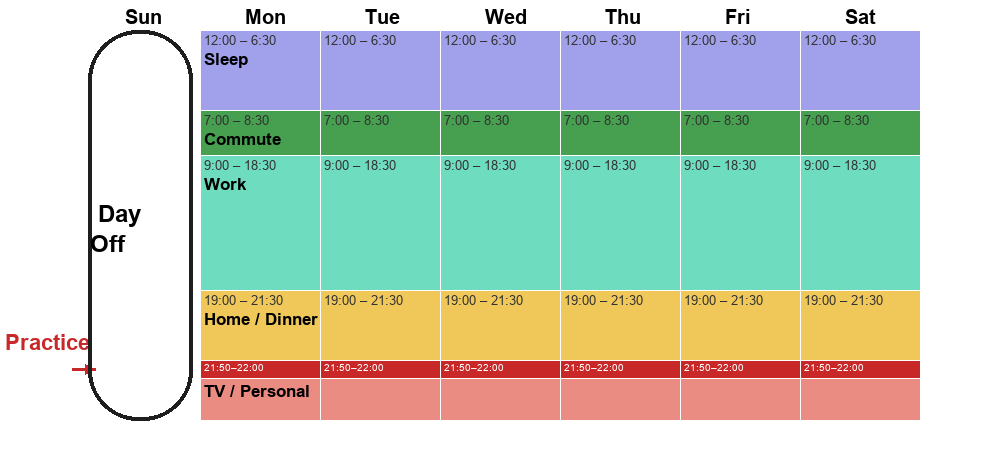
A weekly schedule with 10 minutes of bass practice every weekday evening and Sunday off

Weekdays
6:30: Wake
7:30: Commute
9:00–18:30: Work
7:00pm: Home, dinner, family time
7:50–8:00pm: Practice
9:00–11:00pm: TV, bath, personal time
12:00: Lights out

Sunday
A backup practice day, or just free time to relax or go out.

Same total of 60 minutes a week, but the second schedule is far more likely to produce real improvement.

That’s because the second version is built around thinking about bass every single day.

In other words, it’s a schedule built around actual improvement. Six days a week, your calendar is quietly reminding you, “I want to get better at bass.”

A bass guitar

If something unexpected comes up and you miss a day, that mindset of “I want to get better at bass” hasn’t gone anywhere — you’ve still got six chances a week reinforcing it.

And having one fully free day on Sunday means you get a real mental reset, plus a built-in makeup day if you missed a session during the week.

With the once-a-week version, on the other hand, there’s only a single day where you’re even thinking about getting better.

And worse: if you happen to catch a cold or have something come up that one Sunday, you could go a full two weeks without touching the bass. Two weeks without playing makes real improvement genuinely difficult.

Make Practice a Habit, Like Brushing Your Teeth

Brushing teeth as a daily habit

Nobody skips brushing their teeth before bed — it just feels gross not to. Practice can become that same kind of automatic habit.

How do you get there? Just keep doing a little bit every day, and the habit builds itself — assuming you actually enjoy playing bass, of course.

Once you start thinking, “I haven’t practiced today and it’s bugging me a little,” you’ve already crossed into a place where you’ll keep improving from here on out.

If 10 Minutes Feels Like Too Much…

A bass player practicing

At first, even 10 minutes can feel long if it’s not yet a habit.

If that’s the case, start with 5 minutes. Or even just 2–3 minutes — that’s fine too.

The chromatic scale exercise I recommend to beginners, for instance, only takes about 3 minutes. The high schooler I mentioned earlier built her habit over her first two months on exactly that kind of short chromatic exercise.

Once a habit like that takes hold, finding a little time for it every day stops feeling like an effort.

When practice feels like it’s not going anywhere, my advice is always the same: don’t try to do it all in one sitting — just chip away at it a little every day.

Building a habit is the hard part to do alone — having someone check in on your progress regularly is exactly what keeps a daily practice habit from quietly fading out.

Want Personalized Feedback on Your Playing?

This is exactly the kind of thing that’s hard to fix alone — and where having a teacher makes all the difference.

At Line on Bass, I offer an online lesson service where you send me a video of your playing, and I give you specific, detailed feedback — every single day if you want.

Students from around the world are using this to fix exactly these kinds of issues and steadily improve their jazz bass skills.

Check Out the Lesson Service →

Posted on Leave a comment

A Method Book That Breaks Down Paul Chambers’ Walking Bass Lines

This article is written by Toru Hoshino, a jazz bassist and instructor based in Japan who teaches online lessons to students worldwide. In this article, he recommends a method book that breaks down the walking bass lines of jazz legend Paul Chambers.

The Method Book: “The Music of Paul Chambers”

The Music of Paul Chambers method book

This is a book that analyzes the walking bass lines played by jazz bassist Paul Chambers — one of the most influential upright bassists in jazz history, best known for his work in Miles Davis’s classic quintet.

It covers 7 real tunes, including:

“So What”
“If I Were a Bell”
“My Funny Valentine”
a 12-bar blues

For each tune, it breaks down exactly how Chambers approached the walking line in detail — plus genuinely deep-dive analysis, like the percentage of each bass line that starts from the root, the 3rd, the 5th, or a tension note.

It also includes a list of albums Chambers recorded on, along with background on his life and career.

One heads-up: it’s entirely in English, and there’s no tab notation — standard notation only.

So it’s a bit of an advanced pick, but if you’re a fan of Paul Chambers’ lines, or want to get a feel for the bass sound underneath Miles Davis’s “Kind of Blue” or “Relaxin’,” this book is well worth tracking down.

A book like this gives you the analysis — but actually absorbing that vocabulary into your own playing in real time is exactly the kind of thing a teacher can help speed up.

Want Personalized Feedback on Your Playing?

This is exactly the kind of thing that’s hard to fix alone — and where having a teacher makes all the difference.

At Line on Bass, I offer an online lesson service where you send me a video of your playing, and I give you specific, detailed feedback — every single day if you want.

Students from around the world are using this to fix exactly these kinds of issues and steadily improve their jazz bass skills.

Check Out the Lesson Service →

Posted on Leave a comment

Bass Basics #2: Tuning and How to Read Tab Notation

This article is written by Toru Hoshino, a jazz bassist and instructor based in Japan who teaches online lessons to students worldwide. In this article, he covers the basics of tuning and reading tab notation for complete beginners.

For anyone picking up a bass for the first time
For anyone about to start learning bass
For anyone who wants to revisit the basics or rethink their playing style

This article covers tuning and how to read tab notation.

Tuning Your Bass

Before tuning, let’s learn the names of the strings. Looking at the bass from the front, from thinnest to thickest, they’re called the 1st, 2nd, 3rd, and 4th strings.

Bass strings viewed from the front

Here’s the view from above. When you’re holding the bass, the string closest to your face is the 4th string.

Bass strings viewed from above

When tuning, the standard pitches are:

4th string = E
3rd string = A
2nd string = D
1st string = G

Adjust each string’s open-string pitch to match these notes.

For example, on the 4th string:

Tuner reading showing the pitch too low

↑ This is too low, so tighten the tuning peg (the part being turned here) to bring the needle toward center.

Tuner reading showing the pitch too high

↑ This, on the other hand, is too high, so loosen the peg instead.

Tuner reading showing the pitch correctly centered

↑ This is what you’re aiming for. Once the needle’s centered, do the same for the rest of the strings.

It doesn’t matter whether you start tuning from the 1st string or the 4th. Experienced players can tune in a few seconds, but when you’re just starting out, even one string can take a while. It gets faster the more you do it.

A Recommended Tuner

A clip-on tuner is the easiest option for a beginner — affordable, quick to respond, and reliable. Many beginner bass packages even come with one included.

Why Bother Tuning?

Just like a piano, the bass has a fixed scale (a sequence of pitches). Listen to the difference:

Piano:


Bass:

On a bass, you adjust the pitch by turning the tuning pegs shown here:

Bass tuning pegs

During transport, or after long playing sessions, the pegs can shift slightly and throw the pitch off without you noticing.

So make it a habit to tune every time before you practice or head into a rehearsal space.

Once You’re Tuned, Try Some Practice Phrases

Once you’re tuned up, let’s get into some practice phrases. As a beginner, learning to read tab notation will serve you well.

Most people aren’t comfortable with standard notation at first.

That’s exactly what tab notation is for. Here’s what it looks like.

An example of tab notation

Tab notation tells you exactly which string and which fret to play, using numbers — making it easy for beginners to read.

The bottom line of the tab represents the thickest string, the 4th string. The top line represents the thinnest, the 1st string.

Let’s Try Playing Some Tab

Let’s play through a few tab examples.

Tab Pattern 1

Tab pattern 1

Here, you’re playing:

The open 4th string, 4 times
The open 3rd string, 4 times
The open 2nd string, 4 times
The open 1st string, 4 times

Tab Pattern 2

Tab pattern 2

Here, you’re playing:

4th string, 3rd fret, 4 times
3rd string, 2nd fret, 4 times
3rd string, 3rd fret, 4 times
The open 2nd string, 4 times

Tab Pattern 3

Tab pattern 3

Here, you’re playing:

4th string, 2nd fret, 4 times
2nd string, 4th fret, 4 times
1st string, 2nd fret, 4 times
2nd string, 2nd fret, 4 times

Try actually playing through these yourself!

Use the Position Markers

Tab notation is convenient, but early on, it can still be tricky to connect the numbers on the page to actual fret positions. That’s where the position markers (the dots inlaid on the neck) come in handy.

Fretboard position markers

As mentioned earlier, most basses have position markers at the 3rd, 5th, and 7th frets counting from the headstock. There are more further up the neck too — use these as landmarks while reading tab, and it becomes much more efficient.

That covers the basics — next time, we’ll get into fundamental practice routines.

Getting your hands to actually find these positions cleanly and consistently is exactly the kind of thing real-time feedback speeds up.

Want Personalized Feedback on Your Playing?

This is exactly the kind of thing that’s hard to fix alone — and where having a teacher makes all the difference.

At Line on Bass, I offer an online lesson service where you send me a video of your playing, and I give you specific, detailed feedback — every single day if you want.

Students from around the world are using this to fix exactly these kinds of issues and steadily improve their jazz bass skills.

Check Out the Lesson Service →

Posted on Leave a comment

A Bass Solo Over ‘The Girl from Ipanema’, Broken Down

This article is written by Toru Hoshino, a jazz bassist and instructor based in Japan who teaches online lessons to students worldwide. In this article, he breaks down a bass improv solo he played over one chorus of “The Girl from Ipanema.”

“The Girl from Ipanema” comes up constantly at jam sessions, so here’s a breakdown of a bass solo I played over one chorus of its chord progression.

When you search for improv solos online, you’ll find tons of players doing insanely fast runs and high-register fireworks — amazing to watch, but honestly, “too good to copy” for a lot of players. So for this one, I deliberately kept the approach simple and accessible, even for someone relatively early in their playing.

A Bass Solo Over “The Girl from Ipanema”

Here are 2 things I focused on overall.

1. Using a Unified Rhythm Pattern Built From Chord Tones (e.g. Section A, bars 9–12 / Section B, bars 1–4)

Here are bars 9–12 of section A. The rhythm pattern in bars 9 and 10 is identical, and the same goes for bars 11 and 12.

A repeated chord-tone rhythm pattern over a ii-V progression

Only the actual notes change — they’re simply the chord tones of whatever chord is underneath at that moment.

2. Adding Occasional 16th Notes for a Sense of Speed (e.g. Section A, bar 5 / Section B, bar 5)

When soloing, it’s easy to fall into a rut of just quarter notes and eighth notes. So I deliberately worked in some 16th notes throughout — it adds a real sense of forward motion.

A 16th-note run added for a sense of speed

Hopefully this is useful as a reference for your own playing.

Breaking down a solo on paper is one thing — getting that same rhythmic confidence into your own playing in real time is exactly where a second set of ears helps the most.

Want Personalized Feedback on Your Playing?

This is exactly the kind of thing that’s hard to fix alone — and where having a teacher makes all the difference.

At Line on Bass, I offer an online lesson service where you send me a video of your playing, and I give you specific, detailed feedback — every single day if you want.

Students from around the world are using this to fix exactly these kinds of issues and steadily improve their jazz bass skills.

Check Out the Lesson Service →

Posted on Leave a comment

The Guy Who Showed Up to a Jam Session After One Day of Jazz

This article is written by Toru Hoshino, a jazz bassist and instructor based in Japan who teaches online lessons to students worldwide. In this article, he shares a true story from 2016 about a guy who showed up to a jam session after exactly one day of playing jazz.

The setting: a neighborhood bar near my place. I was sitting alone with a drink, reading a manga, when a young guy sat down at the counter nearby.

One Night

Young guy: “What are you reading?”

Me: “Oh, this? It’s called ‘Kids on the Slope.’ Ever heard of it?”

Young guy: “Nope, never heard of it.”

Me: “It’s about jazz. You know jazz?”

Young guy: “Oh yeah! I know that! Super cool stuff, jazz!”

Me (thinking): Wow, he’s really into this. Wish he were a girl.

Me: “Oh, I just finished it actually — want to borrow it?”

Young guy: “Really? Can I? Awesome! Actually, I do music too — I’m a guitarist/singer, just moved here from Okinawa. Starting at a music school here in Tokyo this spring.”

Me: “No kidding? That’s some serious commitment.”

We hit it off and kept talking. Since we lived nearby, I lent him the whole series — all 10-ish volumes — and we said goodnight.

The Next Afternoon

The next afternoon: “Toru! I finished the whole series! It was amazing! I’m bringing it back right now!”

Whoa — already?! He came by.

“Man, I got so into it, I actually cried. And the songs in the manga are real songs, so I looked them up and listened — ‘Moanin”, ‘Lullaby of Birdland.’ So cool!”

“Oh nice, got into jazz, huh? Love that.”

“What else is out there?”

“Alright, let me give you the rundown.”

Miles Davis, Charlie Parker, Bill Evans, John Coltrane, Bud Powell, Keith Jarrett. And since you play guitar — Wes Montgomery, Joe Pass, Jim Hall, George Benson. And personally, I’d throw in the incredible bassist Esperanza Spalding too.

I scribbled it all down on a sheet of paper and handed it to him.

Then — oh, right!

“Hey, you know what a ‘jam session’ is?”

“What’s that?”

“It’s where a bunch of musicians who’ve never met just bring their instruments and improvise together on the spot. It’s a classic jazz tradition.”

“No way! That’s so cool!”

“There’s actually one tomorrow — I’m playing bass for the house rhythm section. Want to come?”

“I’m in!”

What an enthusiastic kid. I don’t think I’d ever met anyone who said “I’m in!” to a jam session with zero hesitation like that.

The Day After That

The day after that — February 18th, a jam session at a venue in the western Tokyo suburbs. We met at the station at 6:30 and headed over together.

“You ever played jazz before?”

“Nope. But I did practice something called the ‘blues pentatonic’ today!”

“Huh. Huh!”

One day of jazz experience.

One day. There’s something almost poetic about that.

How many days have I logged at this point? Probably past 2,000 by now.

But then again — Christian McBride, Avishai Cohen, Paul Chambers — they all had a “day one” too.

We got to the venue, and I introduced him to everyone.

“This is a guy who just moved here from Okinawa, chasing a music career. One day of jazz experience.”

Everyone’s jaws dropped.

“So, what should we play?”

“Let’s do an F blues. Just solo — don’t worry about anything else. Stick to these notes and you’ll be fine.”

Just F, A♭, and C — that’s all he was told to hang onto.

And he played it exactly like someone with one day of jazz experience. But he had a huge smile on his face the whole time, clearly having a blast.

I remember my own first session — pure nerves and cold sweat the entire time.

Is this kid crazy? Or is he going to turn into something incredible?

It had been a while since I’d thought that about someone.

It was a cold, windy February night. We grabbed ramen on the way home.

“Oh, let me get my share—”

“Don’t worry about it. You came out tonight — this one’s on me.”

“I feel bad taking it…”

“Just promise me one thing — when you book your first real gig, let me know. Put together a band you’re genuinely proud of, and write some great songs.”

“Got it! Thank you so much!”

Somewhere along the way, I’d turned into the kind of person who says things like that. Guess I’d better live up to it myself.

March’s almost here.

Watching someone improvise on three notes with zero experience but total joy is a reminder that the fundamentals — chords, time, structure — are exactly what a teacher helps you turn that joy into real skill.

Want Personalized Feedback on Your Playing?

This is exactly the kind of thing that’s hard to fix alone — and where having a teacher makes all the difference.

At Line on Bass, I offer an online lesson service where you send me a video of your playing, and I give you specific, detailed feedback — every single day if you want.

Students from around the world are using this to fix exactly these kinds of issues and steadily improve their jazz bass skills.

Check Out the Lesson Service →

Posted on Leave a comment

A Method Book Worth Knowing for Authentic Latin Bass

This article is written by Toru Hoshino, a jazz bassist and instructor based in Japan who teaches online lessons to students worldwide. In this article, he recommends a method book for getting serious about Latin bass.

The Latin Bass Book

The Latin Bass Book, by Oscar Stagnaro and Chuck Sher, is a great pick if you want to get a genuinely authentic handle on Latin rhythms — tumbao, Afro-Cuban grooves, Brazilian styles, Caribbean styles, and more.

“Latin” music as it’s commonly played outside of Latin America often differs quite a bit in playing style from the real thing back home — sometimes getting good-naturedly ribbed as a watered-down, “jazz-ified” version of Latin music. Written by an actual South American bass player from Peru, this book distills genuinely authentic Latin bass playing, rather than the more familiar, simplified version most non-Latin players pick up.

Latin Tunes I’ve Played Recently at Jazz Sessions

Latin-style tunes come up often even at straight-ahead jazz sessions. Some I’ve played recently:

On Green Dolphin Street
My Little Suede Shoes
I’ll Remember April
The Night Has a Thousand Eyes
Nica’s Dream
Blue Bossa
Recuerdame

A Latin Bass Line

A common rhythmic building block is a pair of dotted quarter notes followed by a quarter note, played like this:

A Latin bass line pattern using two dotted quarter notes followed by a quarter note, with the root landing on beat 1

That said, this is exactly the kind of line that gets called the “jazz-ified” version mentioned above. In more authentic Latin playing, the root doesn’t always land on beat 1:

A more authentic Latin bass line pattern where the root does not land on beat 1

When it locks in, it sounds great — but since the root isn’t landing on beat 1, the whole groove can fall apart unless every player in the band is genuinely experienced with the style.

Because of that, the first version — with the root anchored on beat 1 — holds together more reliably and is easier to sustain through a long session. That’s the version I lean on myself most of the time at sessions, but if you want to really dig into authentic Latin bass playing, the second approach is well worth exploring.

Reading about authentic Latin phrasing is one thing — actually locking it in with a band in real time is exactly the kind of feel a teacher can help you build.

Want Personalized Feedback on Your Playing?

This is exactly the kind of thing that’s hard to fix alone — and where having a teacher makes all the difference.

At Line on Bass, I offer an online lesson service where you send me a video of your playing, and I give you specific, detailed feedback — every single day if you want.

Students from around the world are using this to fix exactly these kinds of issues and steadily improve their jazz bass skills.

Check Out the Lesson Service →

Posted on Leave a comment

A Rhythm Drill for Tightening Up Your Bossa Nova Bass Line

This article is written by Toru Hoshino, a jazz bassist and instructor based in Japan who teaches online lessons to students worldwide. In this article, he shares a rhythm drill for tightening up the precision of a bossa nova bass line.

This drill is a little involved, but it’s genuinely effective for training non-swung, straight-eighth-note feels — bossa nova, eighth-note-driven rock, pop, and similar styles. (There’s also a video walkthrough linked near the bottom if you’d rather watch than read.)

A Slightly Tricky Rhythm Drill

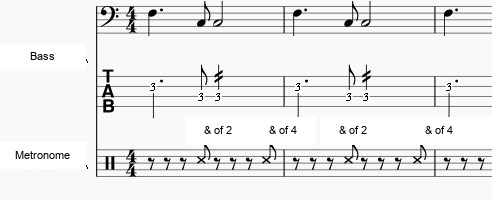
This is a drill I come back to myself on a regular basis. Set your metronome to click only on the “&” of beat 2 and the “&” of beat 4, using F and C as your two notes. Set the tempo to around 60 bpm, and try playing exactly that.

…and you’ll probably find it’s genuinely hard to lock in.

If You Can’t Quite Land It

First, get a feel for what “the & of beat 2 and the & of beat 4” actually means. Here’s the idea:

A diagram showing the bass line and metronome clicks landing on the off-beats of beats 2 and 4

Even once you understand the mechanics, actually keeping up with it in real time is still genuinely difficult. When you’re struggling to lock in, try singing it out loud first to get a feel for it.

Use these syllables: sing “da” on beat 1, “da” again on the “&” of beat 1, “dee” on beat 2, and then “DIT” exactly where the metronome clicks, on the “&” of beat 2 — then repeat the same “da-da-dee-DIT” pattern for beats 3 and 4, landing the second “DIT” on the “&” of beat 4 where the metronome clicks again.

Once You’ve Got That, Try Playing It

Using just F and C, try this:

1st note attacks on “da” (dotted quarter note)
held through “da”
held through “dee”
2nd note attacks on “DIT” (eighth note — this is where the metronome clicks)

1st note attacks on “da” (half note)
held through “da”
held through “dee”
held through “DIT” (this is where the metronome clicks)

Give that a try.

What This Drill Trains

By deliberately attacking notes in the silent gaps between clicks and making the metronome “catch up to you” instead of the other way around, your rhythmic precision gets a real workout. It’s especially effective for sharpening eighth-note accuracy, which makes it great practice for eighth-note rock, pop, and bossa nova alike.

How to Practice It

Start with just two notes, as shown above. Early on, you genuinely won’t be able to lock in without singing it first — if you can’t sing it, that’s a sign you haven’t internalized it yet, and you won’t be able to translate it to your hands either.

Once you can hold that for a stretch, move on to phrases that actually show up in real tunes. In “The Girl from Ipanema,” for example, a bass line like this comes up often. Once you can play a line like that cleanly for 3 or 4 choruses, starting from nothing, your sense of rhythm will have genuinely sharpened.

Hopefully this is a useful addition to your practice routine.

Getting these off-beat attacks to actually lock in takes real-time feedback that’s hard to give yourself — a teacher can tell immediately whether you’re really landing the click or just close to it.

Want Personalized Feedback on Your Playing?

This is exactly the kind of thing that’s hard to fix alone — and where having a teacher makes all the difference.

At Line on Bass, I offer an online lesson service where you send me a video of your playing, and I give you specific, detailed feedback — every single day if you want.

Students from around the world are using this to fix exactly these kinds of issues and steadily improve their jazz bass skills.

Check Out the Lesson Service →

Posted on Leave a comment

5 Reasons Teaching Yourself Upright Bass From Scratch Is Genuinely Hard

This article is written by Toru Hoshino, a jazz bassist and instructor based in Japan who teaches online lessons to students worldwide. In this article, he shares 5 reasons why teaching yourself upright bass from zero is genuinely difficult.

As the title says: picking up upright bass entirely from scratch on your own is genuinely tough. This isn’t really a pitch for my own lesson service — it’s a direct answer to a question I got recently: “I just bought an upright bass, and I don’t know how to start practicing. I managed to get it tuned since that part’s the same as electric bass, but what do I do from there?”

Honestly, taking lessons is the fastest route — but jumping straight into paid lessons can feel like a big step, so let’s first walk through exactly why self-teaching is so difficult in the first place.

5 Reasons Self-Teaching Upright Bass Isn’t Recommended

1. It’s huge
2. It’s hard to judge the right distance between your body and the instrument
3. It’s hard to know where to place your left and right hands
4. The strings are thick and long
5. There are no frets

1. It’s Huge

It’s simply a massive instrument, so how to actually produce sound, how to hold it, even how to carry it around — it’s a mystery on every front. You genuinely have no reference point for how to even handle the thing.

2. It’s Hard to Judge the Right Distance Between Your Body and the Instrument

With upright bass, you stand the instrument up and lean it against your body — but figuring out exactly where that “right” position even is takes real trial and error. Finding the sweet spot where your left hand can fret properly and your right hand can produce a good sound is genuinely difficult.

3. It’s Hard to Know Where to Place Your Left and Right Hands

You hold your left hand up around face height and your right hand down around hip height — it’s a strange, unintuitive stance. Figuring out the right spot to produce a good sound in that somewhat awkward position is hard enough, and on top of that, the height of your left elbow and the motion of your right hand are complex enough that it takes a while before any of it feels intuitive.

4. The Strings Are Thick and Long

The strings are thicker and longer than on a guitar or electric bass. That’s part of what gives the instrument such a satisfying acoustic tone, but it also means there’s real weight and resistance — pressing firmly enough to get a clean, non-buzzing note takes real effort.

5. There Are No Frets

Without frets like a guitar or electric bass has, it’s genuinely hard to tell where one pitch ends and the next begins. That means you need dedicated practice just to train your intonation — and figuring out how to actually structure that practice is its own challenge on top of everything else.

I taught myself guitar and electric bass from scratch, eventually to the point of playing live shows — but upright bass was a different story entirely; I couldn’t pull it off the same way.

So, as I mentioned up top: if you’re serious about learning it, taking lessons really is the faster path.

Sorting out your posture, hand position, intonation, and reading all at once is a lot to figure out alone — having a teacher watch and correct each of these in real time is exactly where the self-taught route runs out of road.

Want Personalized Feedback on Your Playing?

This is exactly the kind of thing that’s hard to fix alone — and where having a teacher makes all the difference.

At Line on Bass, I offer an online lesson service where you send me a video of your playing, and I give you specific, detailed feedback — every single day if you want.

Students from around the world are using this to fix exactly these kinds of issues and steadily improve their jazz bass skills.

Check Out the Lesson Service →

Posted on Leave a comment

A Walking Bass Line That Doesn’t Always Start on the Root

This article is written by Toru Hoshino, a jazz bassist and instructor based in Japan who teaches online lessons to students worldwide. In this article, he shares a more advanced walking bass technique: building lines that don’t always start each bar on the root.

This one’s for anyone who’s thought, “my approach to building bass lines feels a little one-note.” Today we’re covering a more advanced way to construct a walking bass line: deliberately not playing the root as the first note of the bar.

A Bass Line That Deliberately Skips the Root on Beat 1

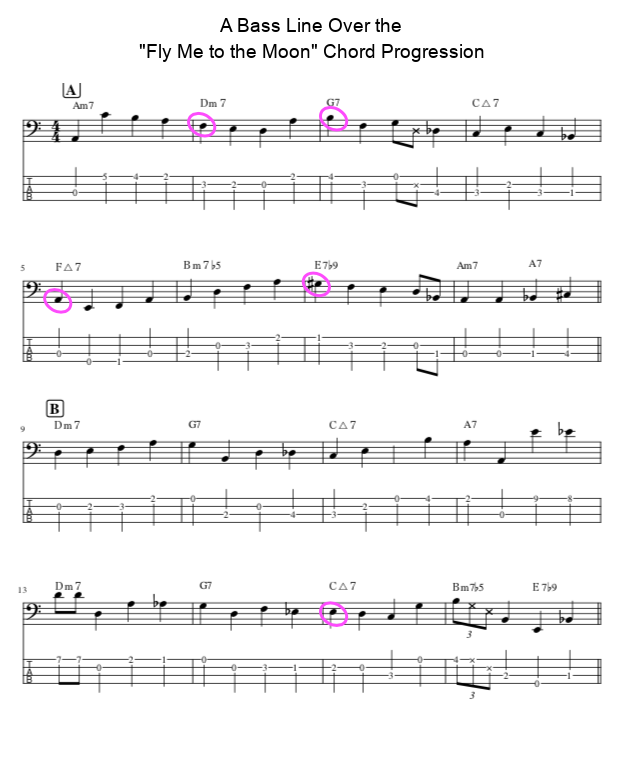
Here’s a bass line over the first 16 bars of “Fly Me to the Moon.”

A bass line over the first 16 bars of Fly Me to the Moon, with several bars deliberately not starting on the root

Give it a listen — does it sound natural to you, with no real sense of anything “off”?

Here are 3 things I kept in mind while building this line, plus 3 things to watch out for.

3 Things I Kept in Mind

1. Keeping the Flow Smooth

Take bar 2: starting on F (the minor 3rd of Dm7), the line moves F (m3rd) → E (9th) → D (root) → A (5th).

Looking back from the previous bar, the Am bar’s 2nd through 4th notes form a smooth descending line: C → B → A. Rather than awkwardly forcing a jump from that 4th note, A, straight to D (the root of the upcoming Dm7), I deliberately landed instead on F (the m3rd of Dm7) — to keep that smooth descending motion intact.

2. Landing on the 3rd

As in bar 2, I land on the 3rd a lot throughout this line. The 3rd is the note that splits major from minor in character, which makes it a great note for projecting a chord’s distinct flavor. In short: when you’re not leading with the root, leading with the 3rd instead is a solid, reliable choice.

3. Mixing in the Root Too

Even after landing on the 3rd, I make a point of working the root in shortly after — doing this gives the whole bar a clear sense of the underlying chord. One detail: if the root shows up as the 2nd note right after a 3rd-note start, it can sound like the root landed a beat late by mistake. So I deliberately placed the root as the 3rd note of the bar instead.

3 Things to Watch Out For

Don’t Overdo It

As a baseline, it’s still ideal for the first note of a bar to be the root, most of the time. Use a non-root opening note here and there, as more of an occasional accent. In this example, only 5 bars out of 16 open on a note other than the root.

This Works Better During Improvising Than During the Melody

During the melody (the “head”), the actual tune’s melody is often written assuming the bass is anchoring the chord’s root underneath it. “Fly Me to the Moon,” for instance, often has its main melody starting on the 3rd of the chord. If the bass also starts every line on the 3rd while that’s happening, the two can clash. So save non-root opening notes mainly for when you’re improvising, not for when you’re backing the melody.

Be Careful Around Section Changes

A tune typically has an A section, B section, C section, and so on — and those section boundaries are important moments of change. If you use a non-root note right where a new section begins, that shift can be harder for the listener (and the rest of the band) to feel clearly. So it’s best to stick with the root specifically at section boundaries.

Hopefully this gives you a useful next step beyond always opening a bar with the root.

Added later: I also covered this non-root-opening approach in a video, using a Paul Chambers performance as a reference point — well worth checking out if you want to hear how a legend approached the same idea.

Knowing when it’s the right moment to break from the root is a judgment call that’s hard to make reliably on your own — a teacher can tell you in real time whether a given choice actually landed well.

Want Personalized Feedback on Your Playing?

This is exactly the kind of thing that’s hard to fix alone — and where having a teacher makes all the difference.

At Line on Bass, I offer an online lesson service where you send me a video of your playing, and I give you specific, detailed feedback — every single day if you want.

Students from around the world are using this to fix exactly these kinds of issues and steadily improve their jazz bass skills.

Check Out the Lesson Service →

Posted on Leave a comment

2 Things I Look for When Arranging a Pop Song Into Jazz

This article is written by Toru Hoshino, a jazz bassist and instructor based in Japan who teaches online lessons to students worldwide. In this article, he shares two things he looks for when arranging a pop song into a jazz version.

It’s cool to take a famous song and turn it into a jazz arrangement, but the truth is, not every song actually works as a jazz arrangement. When I’m arranging a pop song into jazz, I personally make the call based on two things:

Does it have a ii-V progression?
What’s the section structure?

Let’s get into what that actually means.

Does It Have a ii-V Progression?

A ii-V (or ii-V-I) progression has some real advantages:

It’s easy to lay a jazz-sounding melody over it
It’s easy to lay tension chords over it
It’s easy to lay a walking bass line over it

Since most readers here are bassists, let’s focus on that last point — how easy it is to build a walking bass line over it.

Here’s an example of a ii-V-I progression:

An example ii-V-I bass line over Dm7-G7-Cmaj7

Play through it and you’ll see — it’s incredibly easy to build a walking bass line over this. Compare that to a common pop chord movement, the IV-V-I progression (not usually called that, but bear with me):

An example bass line over an F-G-C (IV-V-I) progression

This kind of progression just doesn’t pair as naturally with a walking bass line. Play through it and you’ll notice — it’s not necessarily wrong, but it’s genuinely hard to build a smooth, connected flow.

So: when arranging a pop song into jazz, it’s worth checking whether the chord progression contains a ii-V movement somewhere in it.

The Section Structure

Chord tones

“Section” here just means things like the verse or the chorus. Pop songs commonly follow a flow like:

Intro → Verse → Pre-chorus → Chorus

Jazz tunes, on the other hand, tend to follow forms like:

ABAC
(e.g. “Fly Me to the Moon,” “All of Me”)

or

AABC
(e.g. “Autumn Leaves”)

AABA
(e.g. “It’s Only a Paper Moon,” “Take the ‘A’ Train”)

In other words, I tend to gravitate toward pop songs that happen to follow one of these jazz-friendly structural formats.

Spotting these structural cues in theory is one thing — actually getting a walking bass line to flow naturally through an arrangement like this is exactly where a teacher’s feedback speeds up the process.

Want Personalized Feedback on Your Playing?

This is exactly the kind of thing that’s hard to fix alone — and where having a teacher makes all the difference.

At Line on Bass, I offer an online lesson service where you send me a video of your playing, and I give you specific, detailed feedback — every single day if you want.

Students from around the world are using this to fix exactly these kinds of issues and steadily improve their jazz bass skills.

Check Out the Lesson Service →