Posted on Leave a comment

My Journey Shortening My Bass Strap: What I Was Thinking at Every Stage

Hi, I’m Toru Hoshino, a bass instructor (@jazzbassisttoru).

This article shares my own take on strap length, based on years of playing bass across rock and jazz.

If you’ve ever found yourself thinking “I’m not sure how long my strap should be,” I hope this helps.

A Common Struggle

A lot of students who come to me for lessons have a long background in rock and want to move into jazz or more technical styles of music.

When that happens, strap length is something many of them get stuck on.

Jazz / sessions / technical playing = a shorter strap = easier to play, but it doesn’t look cool.

So in the end, they can never settle on a length.

I get it completely — guys especially tend to worry about this.

So I want to walk through how I gradually shortened my own strap over the years, and what I was thinking at each stage.

My Strap Length at Age 19-24

This was my strap length back in my full-on punk days.

I was a big fan of Namba from Hi-Standard and J from LUNA SEA, so I kept my strap around the same length they did.

Back then, I had a strong belief that a short strap meant “uncool” or “looking like an old guy.”

My Strap Length at Age 25-27

I joined a fairly technical rock band, and found high-fret playing harder with my strap that low, so I raised it a bit.

You might look at this photo and think it’s not all that different from the last one, but in rocker circles, this counts as a fairly big difference.

It’s roughly the difference between a perfect 5th and a flat 5th (laughs).

Honestly, at the time I felt like it was “too high,” and it took a while before I got used to this length.

Or maybe it’s more accurate to say I had to get used to the visual of myself playing at that height.

Age 28 to Now

This is my current strap height.

As I’ve written elsewhere, I keep this same height whether I’m playing standing up or sitting down.

Of course, I felt resistance to this height at first too. But once I started going to jam sessions and seeing how most jazz bassists set up, I noticed nearly everyone played around this height, and my resistance gradually faded.

If anything, I once met a bassist at a session who wore his strap noticeably longer, wasn’t playing all that well, and said, “Well, this length is just my thing — I don’t want to change it.” Hearing that actually struck me as the less cool choice.

On Strap Length in General

There’s no rule that says “your strap has to be this exact length.”

So what should you base it on? I think most people choose based on either

playability

or

how it looks.

When people choose based on looks, most seem to land on “I don’t want to go from a longer strap to a shorter one.”

Part of that might simply be because they’re not often around other players wearing their strap at an “old-guy height.”

For me, being around other players with shorter straps gradually made me stop worrying about my own strap length, and now I’ve fully embraced — and even like — how short mine is.

That said, I’ll say it again: there’s no rule that your strap has to be a certain length, so in the end, the length is entirely up to you.

Thinking about your strap length can also be a sign that you’re searching for ways to make your playing better.


These days, even in rock, more and more bass heroes are wearing their straps higher, so it might be worth experimenting with a different length yourself.

By the way, a couple of rock players I personally think nail a great in-between height — not too high, not too low — are JIRO from GLAY and Taiji, formerly of X Japan.

Want Personalized Feedback on Your Playing?

This is exactly the kind of thing that’s hard to fix alone — and where having a teacher makes all the difference.

At Line on Bass, I offer an online lesson service where you send me a video of your playing, and I give you specific, detailed feedback — every single day if you want.

Students from around the world are using this to fix exactly these kinds of issues and steadily improve their jazz bass skills.
Check Out the Lesson Service →

Posted on Leave a comment

Triad Practice: A Concrete Method for Building Better Improvised Bass Lines

This article is by Toru Hoshino, a Tokyo-based upright and electric bassist and instructor (@jazzbassisttoru).

This article is for:
– Bassists who aren’t sure how to build a solo when improvising
– Players who want new ideas for their improvised solos
– Bassists who are just getting started with jazz bass

This time, I’ll share a concrete practice method using triads.

The Goal of This Practice

By consciously using triad tones with every chord change, you bring out the color of each chord

and you’re able to play improvised lines that feel like they “sing.”

That’s the goal here.

Here’s what it sounds like when you can do this:

Not every note in this example is strictly a triad tone, but the idea is to eventually be able to weave triads and scales together like this. (I’ll cover that part in a future article.)

To be able to follow chord changes this closely, though, you first need to train yourself to instantly call up triads in your head, almost mechanically.

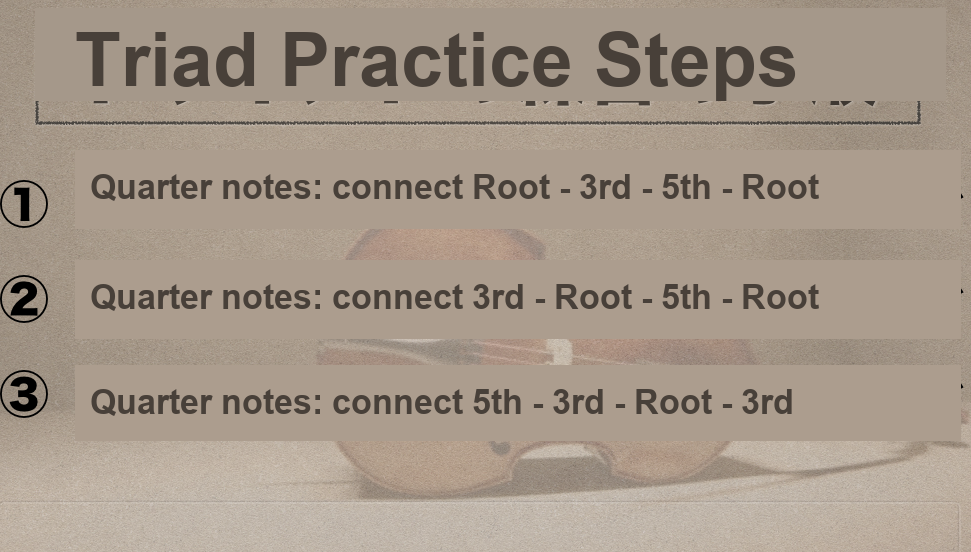
Steps for Triad Practice

Here’s how the practice routine goes:


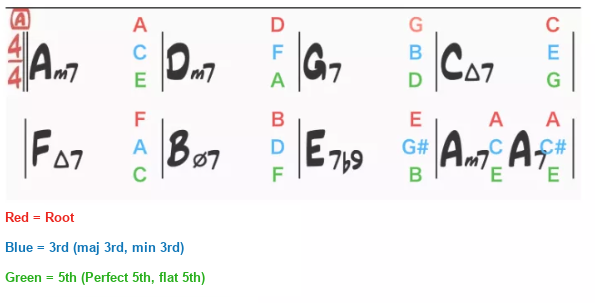
Can you picture the triads right away just by looking at this chart?

If you’re a beginner, I’d guess that’s pretty tough.

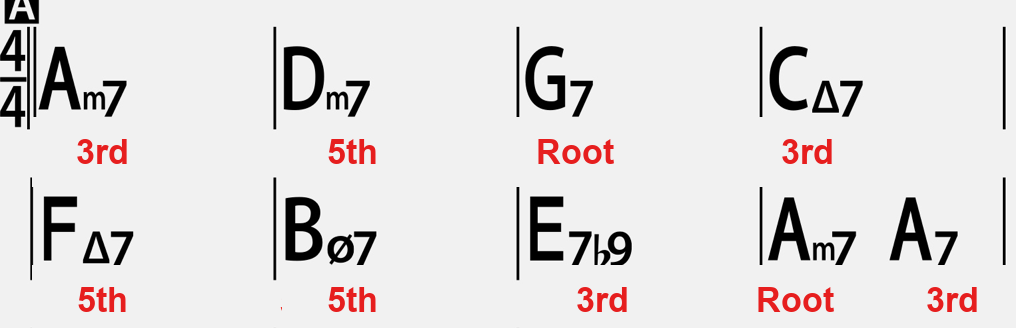
And it’s probably even harder when the line starts on the 3rd or the 5th instead of the root, like this:

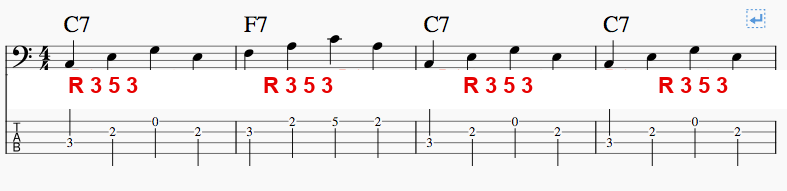
Step 1: Try playing Root-3rd-5th-Root

While looking at the chart, think “Root, 3rd, 5th, Root” for each chord and play it in quarter notes.

Here’s the idea:

At first, most beginners won’t be able to picture the triad instantly, so it’s fine to skip the metronome for now.

Playing while mentally picturing each triad tone in your head is genuinely difficult.

So expect this stage to take a while.

Once you can play it as one quarter note per beat at 60 BPM, move on to the next step.

Step 2: Try playing 3rd-Root-5th-Root

Next, think “3rd, Root, 5th, Root” for each chord and play it in quarter notes.

This is harder than the first pattern. It’ll take time before you can play it in steady tempo, but once you can play this one too at quarter notes, 60 BPM, move on to the next step.

Step 3: Try playing 5th-3rd-Root-3rd

Now we’ll bring in lines that start on the 5th as well.

This one is also fairly hard. It takes time before you can play it in steady tempo, but the goal is to be able to play this at quarter notes, 60 BPM.


A Note on Practicing This

This kind of practice is tiring, and progress can feel slow.

When that happens, take a short break and just play loosely for a bit, without overthinking it.

If you do that, you’ll find that the playing you used to do by just running scales up and down on autopilot gradually starts to reflect the chord tones more and more, almost without trying.

Your brain won’t rewire itself after just a day or two of this.

But if you keep at this practice over time, your improvised lines will start to outline the chords much more clearly.

It’s a practice that takes a lot of concentration, so try to avoid doing it when you’re tired — ideally do it when you’re relaxed and can really focus.

Next time, I’ll cover a practice method that weaves these triads together with scales.

Thanks for reading.

Want Personalized Feedback on Your Playing?

This is exactly the kind of thing that’s hard to fix alone — and where having a teacher makes all the difference.

At Line on Bass, I offer an online lesson service where you send me a video of your playing, and I give you specific, detailed feedback — every single day if you want.

Students from around the world are using this to fix exactly these kinds of issues and steadily improve their jazz bass skills.

Check Out the Lesson Service →

Posted on Leave a comment

What’s the Difference Between C△7 and C7? A Common Mistake with Seventh Chords in Bass Lines

This article is written for bassists who play walking bass lines without being fully clear on the difference between a dominant seventh chord and a major seventh chord — by Toru Hoshino, a Tokyo-based jazz bassist and instructor (@jazzbassisttoru).

Here’s a mistake that comes up often in walking bass lines when a chord has a “7” attached to it.

Bass Lines That Mistakenly Use a Major Seventh Note Over a Dominant Seventh Chord

Example 1

The first two bars of a progression often used in tunes like “Autumn Leaves”:

What do you think? Depending on how you listen to it, it might not sound wrong, but…

This version sounds more natural, I think. (The note marked in red has been corrected.)

Example 2

The first four bars of an F blues:

What do you think? Depending on how you listen to it, it might not sound wrong, but…

This version sounds more natural, I think. (The note marked in red has been corrected.)

Here’s the Key Point!

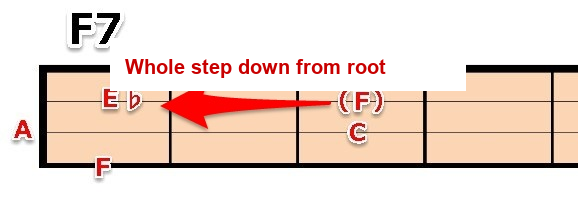
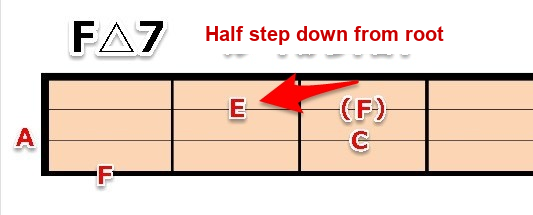
A dominant seventh chord (“◯7”) and a major seventh chord (“◯△7”) are different.

On a dominant seventh chord, the 7th is a whole step below the root.

On a major seventh chord, the 7th is a half step below the root.

Going back to the progression at the start of the article: if you want to use the note E as the second note of the second bar, then theoretically it’s more accurate to write it as F△7.

That said, a Cm7 → F△7 progression isn’t something you see very often.

From the root, it’s only the difference of a half step versus a whole step, but small details like this can change the nuance quite a bit.

This is a point beginners often get wrong, so it’s worth paying attention to.

Want Personalized Feedback on Your Playing?

This is exactly the kind of thing that’s hard to fix alone — and where having a teacher makes all the difference.

At Line on Bass, I offer an online lesson service where you send me a video of your playing, and I give you specific, detailed feedback — every single day if you want.

Students from around the world are using this to fix exactly these kinds of issues and steadily improve their jazz bass skills.
Check Out the Lesson Service →

Posted on Leave a comment

How to Read Bass TAB

This article is by Toru Hoshino, founder of the online bass school Line on Bass (@jazzbassisttoru). It explains how to read bass TAB notation.

How to Read Bass TAB

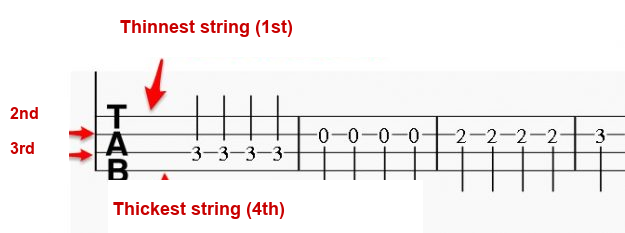
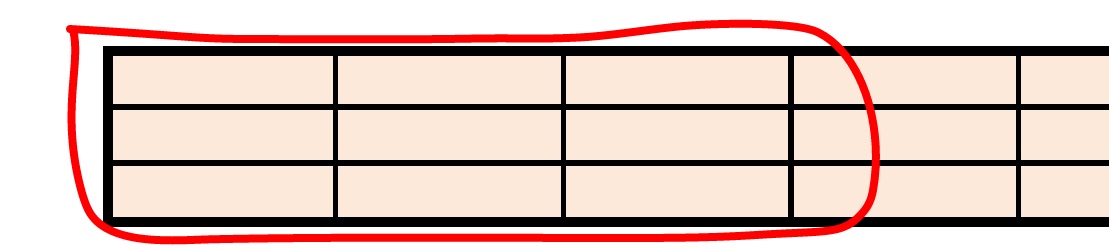
For 4-string bass, TAB notation has four horizontal lines, like this:


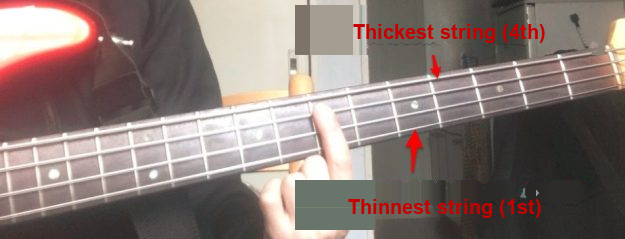
The top line represents the thinnest string (the 1st string).

The bottom line represents the thickest string (the 4th string).

Here’s what that looks like on the actual instrument:

If you see a “1” written on the bottom line, that means play here (4th string, 1st fret):

If you see a “2” written on the top line, that means play here (1st string, 2nd fret):

If you see a “3” written on the third line from the top, play this note (3rd string, 7th fret):


Putting It Into Practice

Example 1

If you see TAB like this, play the notes in this order:

Example 2

This TAB…

…is played like this. (Note: “6” means open string.)


It’s certainly better to be able to read standard notation, but reading notes and instantly translating them into finger positions is hard at first, and takes practice.

I’ve been playing since high school myself, and in the beginning I couldn’t read standard notation, so I relied on TAB.

Reading TAB is far easier than reading standard notation.

If you’re just starting out on bass, I think it’s perfectly fine to start by learning to read TAB. 🙂

Here’s an F blues — a progression that comes up a lot in jazz — played with TAB notation included. Feel free to use it as a reference.


Want Personalized Feedback on Your Playing?

This is exactly the kind of thing that’s hard to fix alone — and where having a teacher makes all the difference.

At Line on Bass, I offer an online lesson service where you send me a video of your playing, and I give you specific, detailed feedback — every single day if you want.

Students from around the world are using this to fix exactly these kinds of issues and steadily improve their jazz bass skills.
Check Out the Lesson Service →

Posted on Leave a comment

The Harmonic Minor Scale on Bass, Explained

This article is written by Toru Hoshino, a jazz bassist and instructor based in Japan who teaches online lessons to students worldwide. In this article, he breaks down how to play the harmonic minor scale on bass.

You may have come across the terms “harmonic minor” or “melodic minor” in a method book, but a lot of players aren’t quite sure what they actually are or where you’re supposed to use them.

Let’s get into the details.

An Overview of the Harmonic Minor Scale

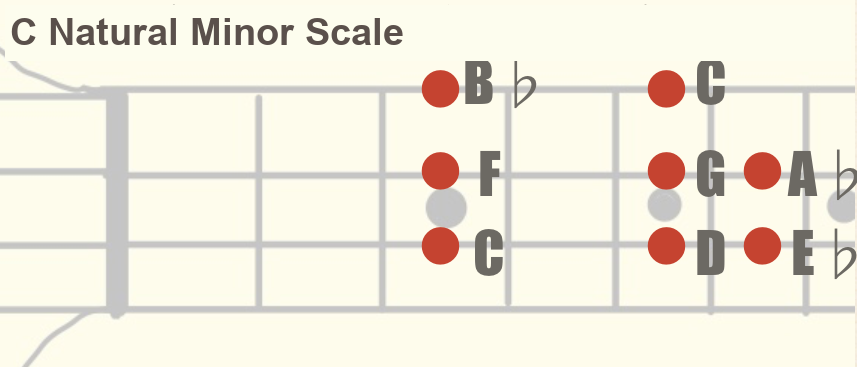
This shape here is what’s called the “natural minor scale” — your standard minor scale.

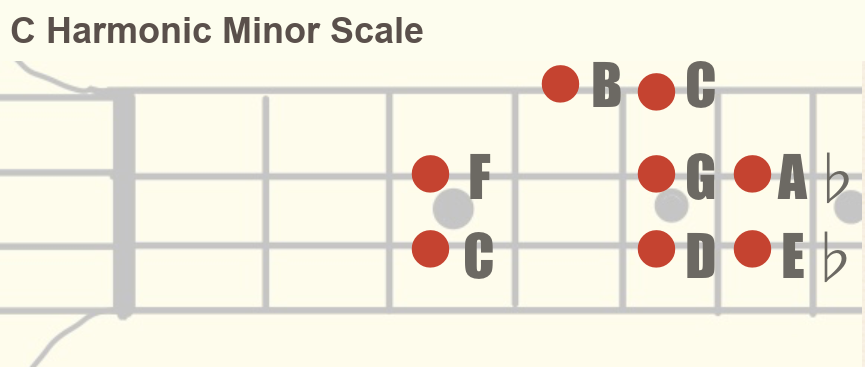
Raise the 7th note of the natural minor by a half step, and you get the harmonic minor scale.

What makes this harmonic minor scale distinctive is the sound created between B and A♭.

Here’s what it sounds like when I emphasize the B and A♭:

Try playing this scale yourself and really listen for that A♭-to-B sound.

At this point you might be thinking: “Okay, that’s what the book says, and I get how the shape differs from the natural minor scale — but where would I actually use harmonic minor?”

Let’s get into that.

How to Think About Using Harmonic Minor

Let’s try playing harmonic minor over a static Cm progression — a single minor chord with no other chord changes.

Here’s an approach that emphasizes the A♭ and B notes while moving up and down the scale.

That really locks in with the chord, doesn’t it?

When You Think “Harmonic Minor Might Fit This Tune”

Harmonic minor is an approach I personally reach for a lot whenever I run into a chord that’s basically just “one minor chord held for a while” like this — and it’s a common device in jazz improvisation generally.

It’s rare to see harmonic minor explicitly written into a chart (like a “Cm△7” symbol) — it’s really more a matter of:

“This tune feels like it could take harmonic minor,” and then just going for it on your own judgment.

From a theory standpoint: thinking of C natural minor as a four-note chord gives you C, E♭, G, B♭. Thinking of C harmonic minor as a four-note chord gives you C, E♭, G, B — and you might assume that clashes. But that clash is actually considered part of its character.

That said, harmonic minor is a strong-flavored scale. Using it well requires understanding its sound and judging for yourself whether it actually fits the tune.

If it sounds good to you, go ahead and use it freely.

For reference, jazz standards where I personally reach for it a lot include:

“Softly, as in a Morning Sunrise”
“Blue Bossa”
“You’d Be So Nice to Come Home To”

Lastly, here’s harmonic minor played over a progression like the one used in “Softly, as in a Morning Sunrise.” The earlier example packed notes in pretty mechanically, so this time I focused more on leaving space.

Listen for that A♭-and-B sound as a reference point.

I hope this gives you a useful new color to reach for in your solos — and once the sound feels familiar, getting feedback on how you’re actually applying it is the natural next step.

Want Personalized Feedback on Your Playing?

This is exactly the kind of thing that’s hard to fix alone — and where having a teacher makes all the difference.

At Line on Bass, I offer an online lesson service where you send me a video of your playing, and I give you specific, detailed feedback — every single day if you want.

Students from around the world are using this to fix exactly these kinds of issues and steadily improve their jazz bass skills.

Check Out the Lesson Service →

Posted on Leave a comment

Why You Should Wear a Strap Even During Solo Bass Practice

This article is written by Toru Hoshino, a jazz bassist and instructor based in Japan who teaches online lessons to students worldwide. In this article, he writes about using a strap on bass.

The content here is exactly what the title says: I wear a strap even during solo practice at home, and I tell my students they should too.

Why You Should Wear a Strap Even During Solo Practice

The reasons to wear a strap even during solo practice include:

✅️ It stops the instrument from wobbling
✅️ It’s easier to play
✅️ It lets you simulate a real performance

…among others.

It Stops the Instrument from Wobbling

Without a strap, the balance is off. And when the balance is off, part of your attention goes toward just keeping the instrument stable.

What you actually want is to focus entirely on playing — but if your attention keeps drifting toward stabilizing the instrument, you can’t fully focus on your playing.

With a strap on, there’s no wobbling, so you’re free to focus on what you’re actually trying to play.

It’s Easier to Play

This is similar to the point above, but playing with a strap on is simply easier than playing without one.

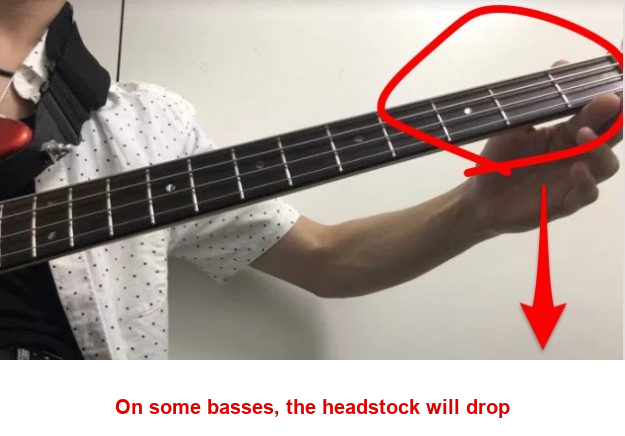
Depending on the instrument, some basses have a heavy headstock and will “neck-dive.”

But even with an instrument heavy enough to neck-dive like that, a properly fitted strap lets you play with the instrument sitting exactly where you want it.

It Lets You Simulate a Real Performance

At an actual gig, you’re usually standing while you play.

If you get used to wearing a strap during practice at home, that same feeling carries over naturally when you’re performing live.

Strap length comes down to personal preference and genre, and there’s no single right answer, but personally, I adjust mine so the bass sits in the same position whether I’m sitting or standing.

Back when I was playing punk rock, I had my strap set long, so I’d practice standing even at home.

The strap is a genuinely important part of the instrument. It’s worth thinking carefully about how you work with yours in order to play your best.

The Strap I’m Currently Using

The one I’m using right now is from a brand called COMFORT.

I wrote up a full review of it here: COMFORT Strap Bass Strap Review: Why Its Memory-Foam Padding Feels So Good

It’s well-built, plush, and genuinely comfortable. If you’re on the fence about which strap to get, give it a try.

I hope this gives you a reason to rethink how you practice — and once your setup feels solid, getting feedback on how it actually translates to your playing is the next step.

Want Personalized Feedback on Your Playing?

This is exactly the kind of thing that’s hard to fix alone — and where having a teacher makes all the difference.

At Line on Bass, I offer an online lesson service where you send me a video of your playing, and I give you specific, detailed feedback — every single day if you want.

Students from around the world are using this to fix exactly these kinds of issues and steadily improve their jazz bass skills.

Check Out the Lesson Service →

Posted on Leave a comment

An Easy F Blues Bass Solo Using the Minor Pentatonic

This article is written by Toru Hoshino, a jazz bassist and instructor based in Japan who teaches online lessons to students worldwide.

Have you ever gone to a jam session and gotten called on for a bass solo you had no idea how to play?

When you’re just starting out, you really have no idea what you’re even supposed to do during a bass solo.

This article is for:

  • Anyone playing jazz for the first time
  • Anyone just starting out on jazz bass
  • Anyone who has absolutely no idea how to approach a bass solo

This time, I want to introduce a note set that lets you sound convincingly “bluesy” with very little effort, over an F blues chord progression: the minor pentatonic.

An F Blues Bass Solo Using “Minor Pentatonic + ♭5”

Here’s an F blues solo I played using this approach.

Doesn’t that have a bit of a “bluesy” sound to it?

This is a scale (a set of notes) that makes a blues tune sound the part.

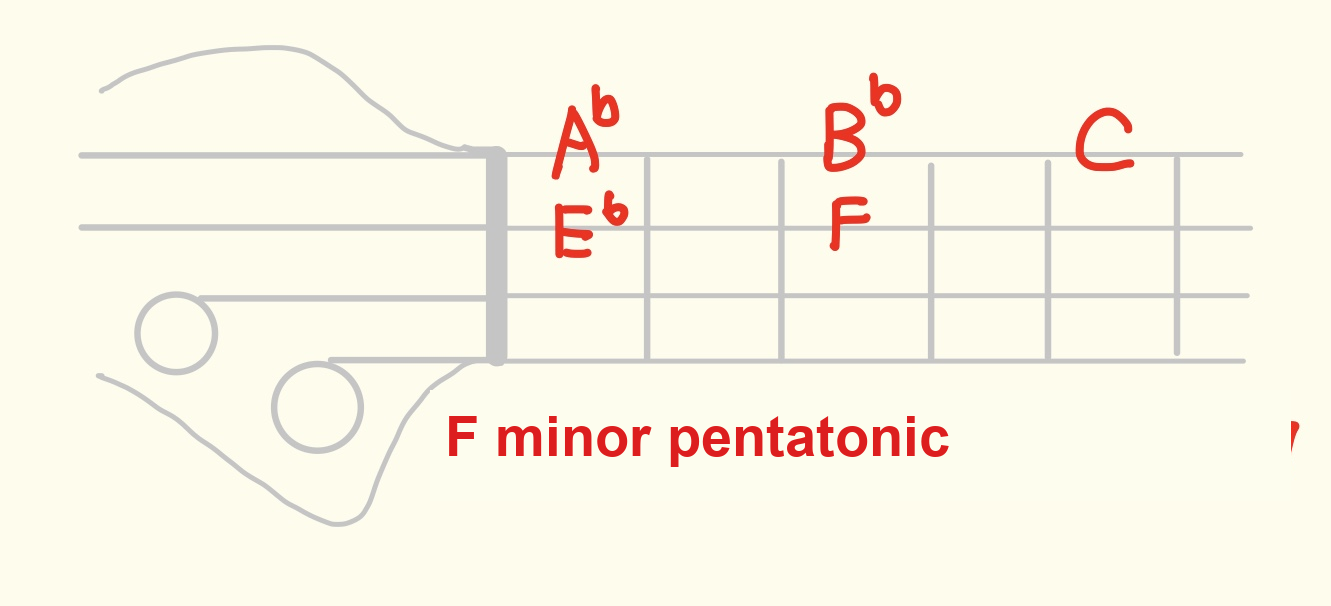
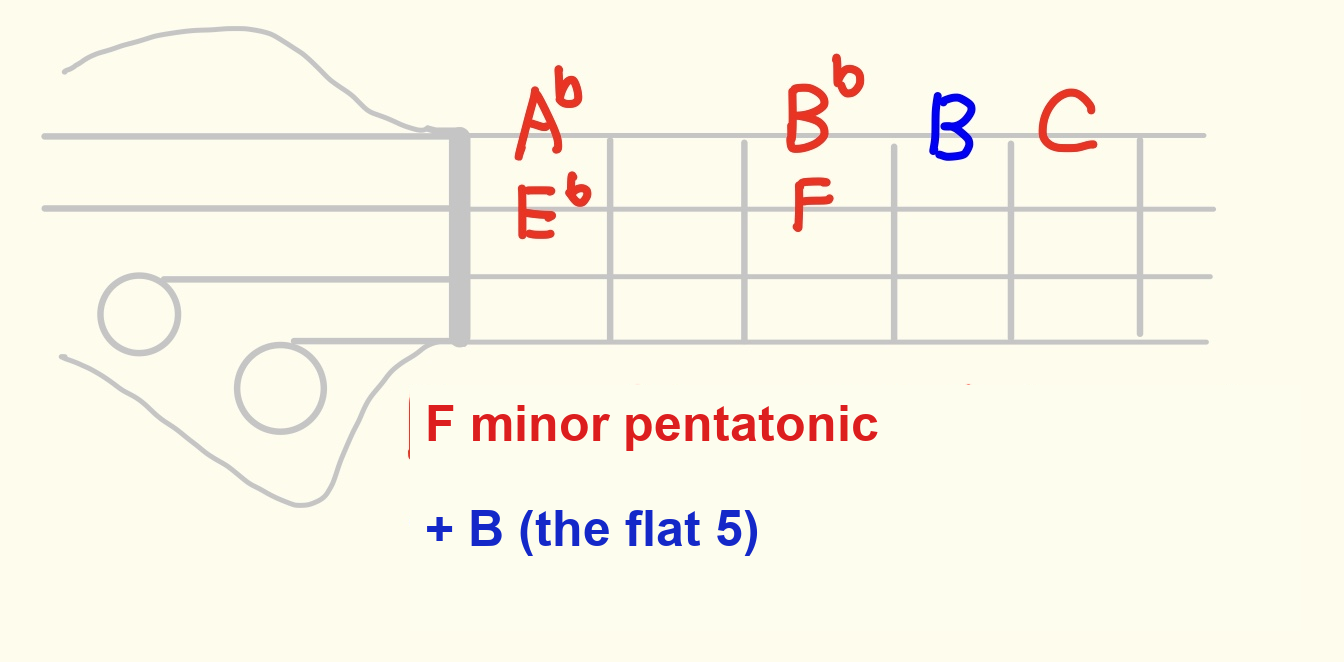
The notes I’m playing are just these six:

F (root)
A♭ (minor 3rd)
B♭ (4th)
B (♭5)
C (5th)
E♭ (minor 7th)

That’s it.

F’s minor pentatonic scale is:

F (root)
A♭ (minor 3rd)
B♭ (4th)
C (5th)
E♭ (minor 7th)

— those 5 notes. Mix in:

the note B (F’s ♭5), and you get that bluesy sound.

The full name is something like “minor pentatonic scale plus flat 5,” but that’s a mouthful, so I’ll just call it the “minor pentatonic” here.

The defining feature of this minor pentatonic is:

It sounds convincingly “bluesy” no matter where you start or stop.

Example: Phrases You Can Use

I built some phrases by combining these six notes.

• Starting on B:

Moving: B → B♭ → A♭ → F.

• Holding the B note:

Moving: F → A♭ → B♭ → B.

• Starting on A♭:

Moving: A♭ → F → E♭ → F.

• Holding the A♭ note:

Moving: F → B → B♭ → A♭.

And just combining those four phrases together gets you this:

— and it already sounds convincingly “bluesy.”

Taking It Further

From here on is the advanced section.

Blues bass solos often go on for several choruses.

Staying in just one position the whole time takes a fair amount of rhythmic variation to keep interesting, so let’s expand your options by adding positions an octave below and an octave above.

The Pentatonic Scale, an Octave Down and an Octave Up

If you broaden your view like this, here’s how many positions become available to you:

Memorizing all of it is a lot, so personally, I mostly rely on the range highlighted in yellow here:

How to Add Variation Using Register

Let’s try adding variation by changing register.

For example, play around the 3rd and 4th strings in the low frets for the first chorus.

For the second chorus, move to the low frets on the 1st and 2nd strings.

For the third chorus, play slightly higher notes on the 1st and 2nd strings.

Also keep your note density lower toward the beginning and build it up toward the end.

Shaping the dynamics this way makes the whole thing sound a lot more polished.

Notes That Sound Distinctly “Bluesy”

Looking at the fretboard below, which spots do you think sound like a distinctly “bluesy” color?

I ask this in lessons fairly often, and most people point to these two circled notes.

Relative to the root F, these two circled notes are called “blue notes” (yes, as in the name of the famous jazz club).

Using these blue notes makes it much easier to get that gritty, “bluesy” feeling into your sound.

Some F blues tunes that come up often at sessions include:

“Now’s the Time”
“Straight, No Chaser”
“Bags’ Groove”
“Billie’s Bounce”
“Au Privave”

“Bags’ Groove” in particular has a tempo that isn’t too fast, and plenty of phrasing worth studying, so definitely give it a listen.

I hope this gives you a solid starting point for your next blues solo — and once the minor pentatonic feels comfortable, getting feedback on how you’re actually applying it is the natural next step.

Want Personalized Feedback on Your Playing?

This is exactly the kind of thing that’s hard to fix alone — and where having a teacher makes all the difference.

At Line on Bass, I offer an online lesson service where you send me a video of your playing, and I give you specific, detailed feedback — every single day if you want.

Students from around the world are using this to fix exactly these kinds of issues and steadily improve their jazz bass skills.

Check Out the Lesson Service →

Posted on Leave a comment

What Does the Ideal Left-Hand Shape Look Like on Bass?

This article is written by Toru Hoshino, a jazz bassist and instructor based in Japan who teaches online lessons to students worldwide. In this article, he talks about what the ideal left-hand shape looks like on bass.

Keep Your Left Hand Curled

A curled shape like this is the ideal form for your left hand.

Keep your hand resting in that curled position at all times.

For example, say your ring finger is currently fretting the 5th fret, and your next note requires your index finger to play the 3rd fret.

If your hand is already curled, your index finger is sitting right there, ready to land on the 3rd fret instantly.

A Bad Example

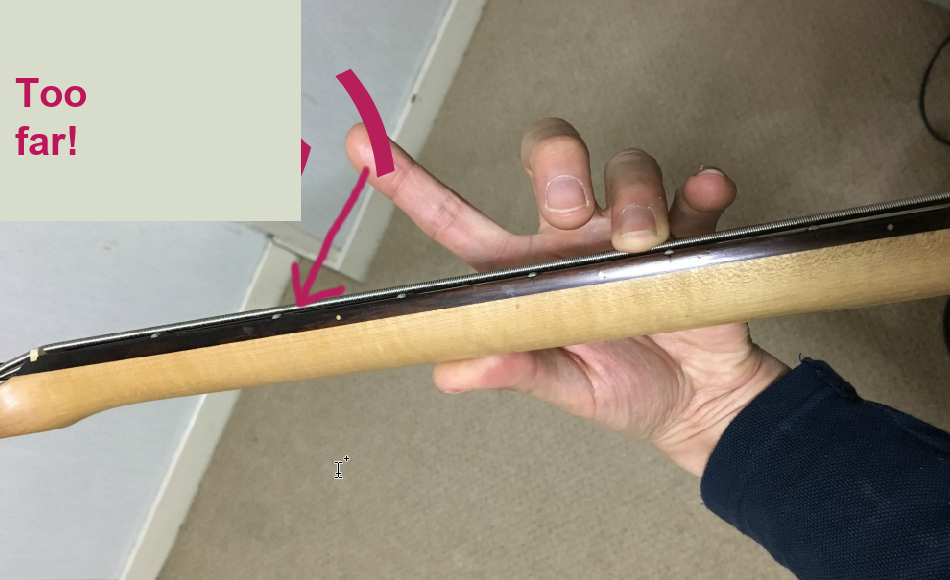
↑ This is a bad example.

The index finger is way too far off the fretboard, right?

When your hand sits like this, it takes noticeably longer to actually fret the note.

If your fingers stay right at the edge of the strings, every single fretting motion becomes much easier.

Make a conscious habit of keeping that “left-hand curl” in mind.

Curled vs. Uncurled

Here’s a roughly 18-second comparison: with the left hand kept curled, fretting a simple major scale takes noticeably less movement and feels far more efficient than the uncurled version — which one looks easier to play is obvious at a glance.

That said, it’s genuinely difficult for a beginner to build a curled-hand habit right from the start.

Staying Curled All the Time Is Hard

I’ve made it sound simple, but keeping your fingers curled at all times is genuinely difficult.

So here’s a practice you can build into your daily routine, focused on developing that curl gradually: hold a relaxed, curled hand shape over the fretboard and walk it slowly up and down each string, fret by fret, keeping every finger hovering just above the strings instead of letting it drift away after each note.

If you work on this daily while staying mindful of the curl, your left hand stops flailing around within about a month.

It also works great as a warm-up before practice, so give it a try.

I hope this gives you something useful for your daily practice.

Once your left hand starts holding that curled shape naturally, getting a second pair of eyes on your actual playing is the next step toward locking it in for good.

Want Personalized Feedback on Your Playing?

This is exactly the kind of thing that’s hard to fix alone — and where having a teacher makes all the difference.

At Line on Bass, I offer an online lesson service where you send me a video of your playing, and I give you specific, detailed feedback — every single day if you want.

Students from around the world are using this to fix exactly these kinds of issues and steadily improve their jazz bass skills.

Check Out the Lesson Service →

Posted on Leave a comment

A Bass Line Over a C Blues Chord Progression

This article is written by Toru Hoshino, a jazz bassist and instructor based in Japan who teaches online lessons to students worldwide. In this article, he breaks down a bass line approach over the chord progression to a C blues.

This comes up a lot at jam sessions, so it’s well worth having in your back pocket.

A Bass Line Over a C Blues Progression

I built this out as three choruses (12 bars × 3 times through), centered mostly around the low frets.

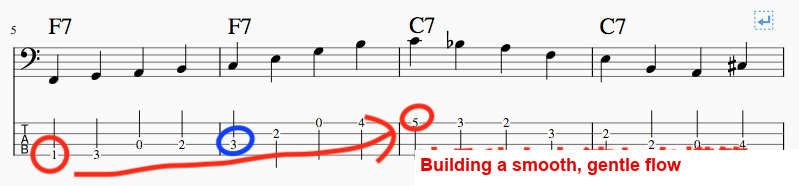
The theme I was going for was “don’t let it sound like rock” — I built it with an overall emphasis on a smooth, connected flow. Let me walk through a few of the choices I made.

A Smooth, Flowing Bass Line That Avoids a Rock Feel

If you’re new to walking bass, this is the kind of approach you tend to gravitate toward:

It uses solid chord tones, and it’s not bad exactly, but it has a somewhat one-note feel to it — honestly, an eighth-note rock groove would probably suit this approach better.

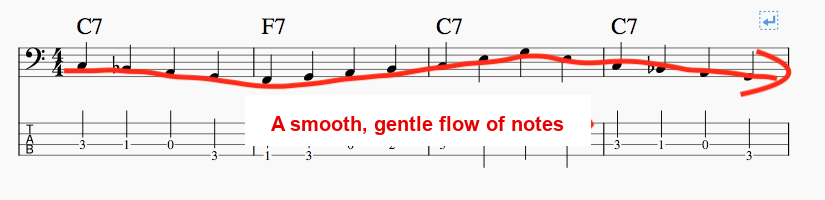
This time, I built the bass line around a more relaxed, flowing sense of note movement instead, like this:

This kind of approach fits a jazz four-feel much more naturally.

How to Approach a Chord That Holds for Several Bars

Having the same chord hold for several bars in a row is something that comes up constantly in jazz, and it’s a spot a lot of players aren’t sure how to approach.

The thing to keep in mind here is still “flow.”

Take the section below, starting around 0:07:

The idea is to build a sense of motion from the red circle toward the next red circle.

If you land back on the root at the blue circle’s position, the flow breaks, and it ends up feeling like things have stalled out.

So — and I say this a lot on this blog —

When the same chord holds for two or more bars, you don’t actually need to start every single bar on the root.

Just keep that in the back of your mind.

Leaning Heavily on Chromatic Movement

Take the approach in bars 1–3 of the third and final chorus.

I’m approaching the root of the next chord chromatically pretty much the whole way through.

Here, you might find it a little confusing that, say, over a C7 you’ll see both E♭ (the minor 3rd) and E (the major 3rd), or over an F7 both A♭ (the minor 3rd) and A (the major 3rd), happening within the same bar.

If you’re newer to jazz, this kind of movement might not sit comfortably with your ear at first.

But in a blues like this, it’s a completely valid approach.

Blues, at its core, has this quality of not being clearly major or minor — and deliberately building a line around that same kind of chromatic ambiguity is a very common move.

That covers the breakdown.

A Recommended Recording

The Red Garland Trio’s album “Groovy.”

True to its name, it’s incredibly groovy.

The bass line from this article works over the chord progression to “C Jam Blues” on this album, so once you’re comfortable with it, it’s worth trying to play along.

I hope this gives you something useful for your daily practice — and once you’ve got the concept down, getting feedback on how it actually sounds when you play it is the natural next step.

Want Personalized Feedback on Your Playing?

This is exactly the kind of thing that’s hard to fix alone — and where having a teacher makes all the difference.

At Line on Bass, I offer an online lesson service where you send me a video of your playing, and I give you specific, detailed feedback — every single day if you want.

Students from around the world are using this to fix exactly these kinds of issues and steadily improve their jazz bass skills.

Check Out the Lesson Service →

Posted on Leave a comment

Walking Bass Lines Built on Open Strings + the First Three Frets

This article is written by Toru Hoshino, a jazz bassist and instructor based in Japan who teaches online lessons to students worldwide.

This one’s for anyone who’s noticed:

“My fingering never quite comes together.”

“My bass lines don’t have that light, swinging feel.”

This time, the topic is: building your walking bass lines around open strings plus the first three frets can make your fingering dramatically more efficient.

Efficient Fingering: The Case for Open Strings

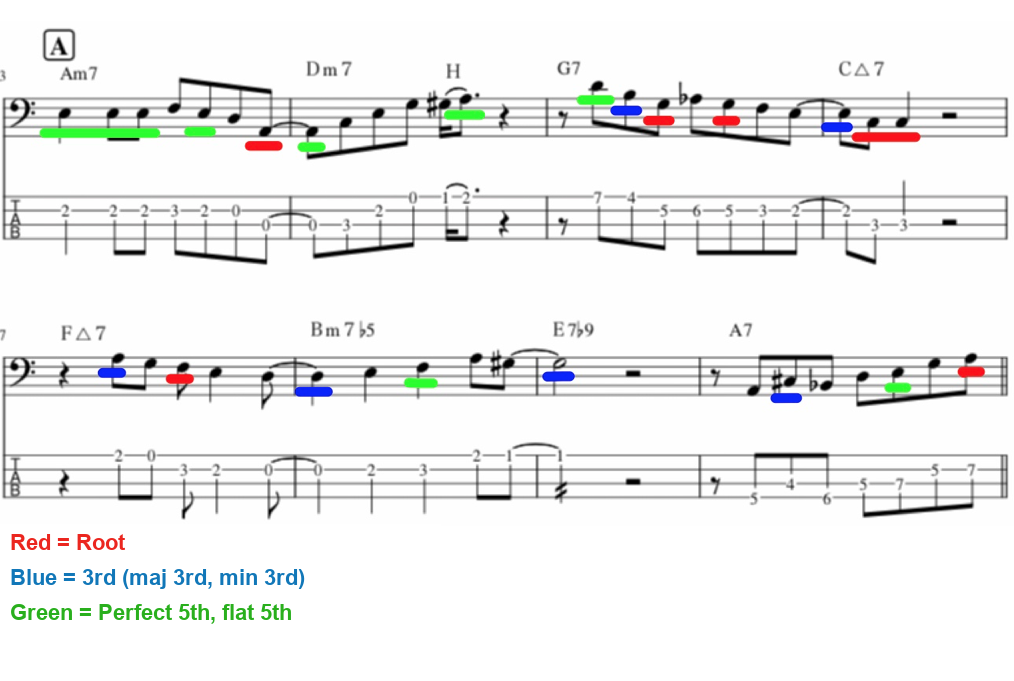
Let’s start with something to look at. This is a chord progression you could use over “Autumn Leaves,” and notice that the left hand never shifts position at all.

Because the hand stays completely fixed within this one position, with zero shifting, you’re free to focus on reading the music and listening to what’s happening around you.

And what I’m doing deliberately here is using open strings.

Let’s Try Using Open Strings

Example 1

Here’s the same notes as above, played without using any open strings.

(The pink lines mark spots where I deliberately fretted a note instead of playing it as an open string.)

If you try playing it, you’ll notice it feels pretty cluttered and awkward.

Here’s the version that uses open strings instead.

Example 2

Doesn’t that look a lot easier to play?

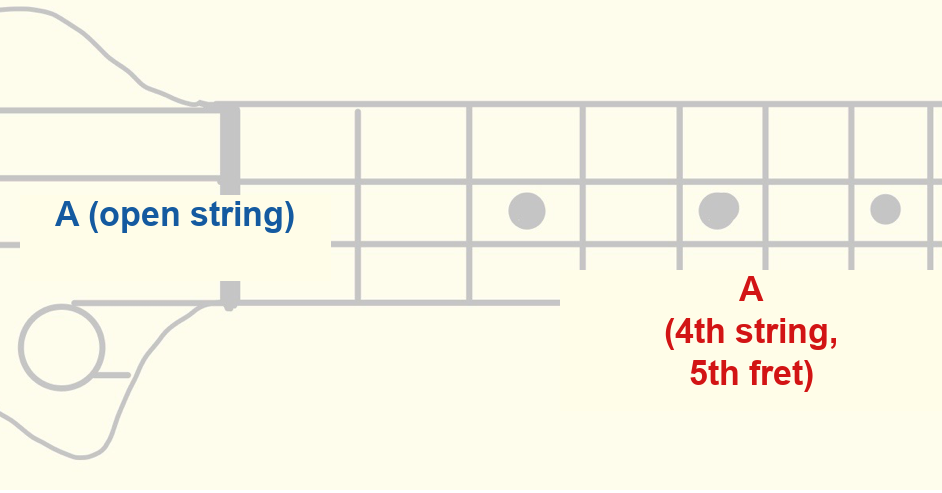
For an A, Use the Open A String Instead of the 5th Fret on the E String

One of the things that makes jazz-style walking bass sound so stylish is that it almost never repeats the same pitch on consecutive quarter notes.

Making efficient fingering choices is key to playing that kind of walking line with a light touch.

It depends on the situation, but as one example: if you need to play an A, being able to use the open A string instead of the 5th fret on the E string leads to much more efficient fingering.

Compare the fretted version of bars 5–6 below…

…with the version using an open string for the same bars.

The difference in playability is night and day.

If you’re playing rock, where the root note often holds steady for a long stretch, fretting that A solidly on the E string can actually add more feeling to the note — and that’s a perfectly valid choice in that context.

But when you’re aiming for a light, swinging walking bass line, make a conscious habit of reaching for open strings.

More Reasons to Love Open Strings

They Help With Double Bass Fingering

A lot of players currently on electric bass tell me they’re thinking about eventually picking up the double bass.

If you try playing that earlier example — the one without open strings — on a double bass, nailing the intonation becomes seriously difficult.

On double bass especially, fingering within what’s called the “half position” (roughly equivalent to frets 1–3 on an electric bass) is critical, so if you’re hoping to try double bass down the line, get comfortable using open strings now.

Preventing Your Left Hand From Flailing

Jazz-style walking bass, where you’re often playing a different note on every single quarter note, keeps your left hand constantly busy.

When the fingering gets that busy, your left hand can end up flailing around more than it should.

A flailing left hand makes it much harder to nail fast passages or play with a light, swinging feel.

To avoid that, regularly resetting your busy fretting hand with an open string makes your fingering noticeably more manageable — and that in turn helps you nail those fast, light passages.

So that’s the case for using open strings to make your fingering more efficient. I hope this helps if you’ve been struggling with fingering, or feel like your bass lines are missing that light, swinging quality.

I hope this gives your walking bass lines a noticeably lighter feel — and once your fingering is cleaner, getting feedback on how it actually translates when you play is the natural next step.

Want Personalized Feedback on Your Playing?

This is exactly the kind of thing that’s hard to fix alone — and where having a teacher makes all the difference.

At Line on Bass, I offer an online lesson service where you send me a video of your playing, and I give you specific, detailed feedback — every single day if you want.

Students from around the world are using this to fix exactly these kinds of issues and steadily improve their jazz bass skills.

Check Out the Lesson Service →