Posted on Leave a comment

Electric Bass vs. Upright Bass: Weighing the Pros and Cons

Among jazz bassists and walking bass players, you’ll find both electric bass players and upright bass players.

So which one is better? I get asked that sometimes.

The short answer is that neither one is better or worse — both instruments can cover a fair range of genres —

but as someone who plays both, I want to walk through the pros and cons of each from my own experience.

You currently play electric bass but want to try upright

or

You currently play upright bass but want to try electric

This article is for either of those readers.

The Pros and Cons of Electric Bass

Compared to upright bass, here’s how I’d sum up the pros and cons of electric bass.

◊ Pros of Electric Bass

· Easy to carry
· Pitch doesn’t drift
· You can play with a pick
· You’re not limited on where you can practice

◊ Cons of Electric Bass

· You always need an amp
· Some die-hard acoustic-jazz purists don’t love it

Let’s go through these in more detail.

Pros of Electric Bass

Easy to Carry

Compared to an upright bass, an electric bass is much easier to carry around.

With a backpack-style gig bag, you can even carry it on a bike.

Pitch Doesn’t Drift

On upright bass, there are no frets like this, which makes landing your pitch difficult. But on electric bass —

if you tune up properly and play with the frets as your guide, your pitch won’t drift.

You Can Play With a Pick

I’ve never seen anyone play upright bass with a pick.

Pick-style bass playing has that distinctive punchy attack that rock players in particular tend to love.

You’re Not Limited on Where You Can Practice

You can practice at home without booking a studio.

And if you use something like a headphone amp, you can play at full intensity without bothering your neighbors.

Cons of Electric Bass

You Always Need an Amp

You’ll never perform electric bass for an audience without running it through an amp.

The unplugged sound of an electric bass is far too quiet on its own, so an amp is a must.

Some Die-Hard Acoustic-Jazz Purists Don’t Love It

Among players of acoustic instruments that prioritize natural tone — grand piano being the classic example —

you’ll occasionally run into someone who insists the bass has to be upright! — partly for the sound, and partly for the look.

Instruments That Pair Well With Electric Bass

Keys: organ or electric piano rather than grand piano
Guitar: electric guitar rather than gut-string or electro-acoustic
Drums: thicker cymbals rather than thin ones

These combinations tend to pair especially well.

The Pros and Cons of Upright Bass

Compared to electric bass, here’s how I’d sum up the pros and cons of upright bass.

◊ Pros of Upright Bass

· Demand is high since fewer people play it
· No amp needed (in smaller venues)
· It tends to make a strong visual impression
· You can play arco (with a bow)

◊ Cons of Upright Bass

· Pitch is genuinely difficult
· You’re limited on where you can practice
· It’s a hassle to carry

Let’s go through these in more detail.

Pros of Upright Bass

Demand Is High Since Fewer People Play It

Compared to electric bass, far fewer people play upright.

Because of that, just being an upright player is sometimes enough to get bands calling you for gigs.

No Amp Needed (in Smaller Venues)

Its natural acoustic volume is large enough that in smaller rooms or venues, you can sometimes play completely unplugged.

It Tends to Make a Strong Visual Impression

“Wow, that’s huge,” “that looks so cool” — I hear that constantly.

It’s not even me they’re complimenting (laughs), but it still makes me happy.

You Can Play Arco

“Arco” means playing with a bow.

It’s a seriously difficult technique to develop, but being able to bow the instrument like a cello or violin is one of the defining features of the upright bass.

Cons of Upright Bass

Pitch Is Genuinely Difficult

The position layout is the same idea as on electric bass, but there are no frets to mark where each note sits.

Getting your pitch to land where you intend takes real time and real practice.

You’re Limited on Where You Can Practice

Its natural acoustic volume is loud enough that it’s easy to bother your neighbors.

These days I’m able to practice at home, but earlier on I used to practice in a public park, in summer and in winter alike.

It’s a Hassle to Carry

Getting caught in a packed rush-hour train with this thing is its own special kind of misery.

You’re constantly worried the bridge might get knocked loose. “You’re in the way,” “move it,” the occasional irritated sigh — I’ve heard it all more times than I can count.

It wears on you.

On long-distance trains you usually can’t get a seat either — on tour, I’ve spent entire rides standing in the area by the doors.

Instruments That Pair Well With Upright Bass

Keys: grand piano or upright piano rather than organ or electric piano
Guitar: gut-string or electro-acoustic rather than electric guitar
Drums: thinner cymbals, brushes, or even no drums at all

These combinations tend to pair especially well.

Electric vs. Upright — Which Should You Choose? Wrapping Up

Each instrument has its own appeal, and being able to play both is never a bad thing.

That said, things like

· what kind of music you want to get good at
· which players you admire
· what genres you want to play in
· what color you want your band to have

will all shape whether upright or electric makes more sense for you.

In the end, it comes down to which one you want to play — or whether you want to play both.

Some players narrow their focus to one style or genre — “rock is all I need, I’m only interested in slap, jazz bass is all I’ll ever need” — while others want to be all-around players who can handle pop, rock, funk, and jazz alike.

Personally, I love the sound of both upright and electric bass. That’s why I play both.

Doing both is more work. But it’s also more rewarding.

So, with that in mind:

If upright looks cool to you, go upright.

If electric feels right, go electric.

If you want both, go for both.

Give it a try. ^^

Want Personalized Feedback on Your Playing?

This is exactly the kind of thing that’s hard to fix alone — and where having a teacher makes all the difference.

At Line on Bass, I offer an online lesson service where you send me a video of your playing, and I give you specific, detailed feedback — every single day if you want.

Students from around the world are using this to fix exactly these kinds of issues and steadily improve their jazz bass skills.

Check Out the Lesson Service →

Posted on Leave a comment

Double Bass Case Review: Carlo Giordano BSC-300 and What I Always Carry With It

The double bass case I use is the Carlo Giordano BSC-300.

Here’s a rundown of how it holds up in daily use, plus what I always carry along with it.

The Carlo Giordano BSC-300 Double Bass Case

If you search for “double bass case” or “upright bass gig bag,” this one tends to show up near the top of the results pretty consistently.

It sits in the mid-price range for a padded bass case — not the cheapest option out there, but far from the most expensive either.

Here’s the single biggest pro and the single biggest con, in plain terms:

Incredibly sturdy! (Pro)
Seriously heavy!! (Con)

Let’s go through the details.

The Upside of the BSC-300

It’s Sturdy

The padding inside the case is just thick, period. The area around the bridge and bottom of the bass especially feels solidly held in place, which is reassuring. It also holds up fine in light rain — water doesn’t soak through to the inside.

Plenty of Handles

Going from the head down to the end pin, there are four handles along the front, three on the side, and a shoulder strap with a carabiner clip is also included. Since the case is heavy, having a lot of places to grab it really helps.

Big Pockets

There are two back pockets, one above the other. They’re roomy enough to fit around four A4-sized sheet music binders. There’s also storage up front.

A small pocket near the bottom front fits about the bottom half of a water bottle.

There’s a bow pocket too.

The Downside of the BSC-300

It’s Heavy

Plain and simple, it’s heavy.

In summer, just getting to a gig with it leaves you as drenched in sweat as if you’d already played the set. It’s tough going for a lot of players, frankly.

It’s Bulky

At train station ticket gates, you can only fit through the wider lanes, and for narrower gates you have to turn the case sideways to get through.

How I Transport It

I use a dedicated set of wheels called a bass buggy.

It’s a real investment on its own, and you might balk at paying that much just for a set of wheels. But the cheaper carts sold at general hardware stores tend to be wobbly and break quickly, so in the long run a dedicated bass buggy isn’t actually expensive — it just pays for itself over time.

Tips for Choosing a Double Bass Case

Lightness vs. Durability

The lighter the case, the easier it is to carry, but you give up some durability. The heavier it is, the harder things like stairs become.

If You Use It Often

If you’re hauling your bass around a lot, I’d lean toward durability even if it costs you some weight. You never know what might happen while you’re out and about — it’s a bit like driving: accidents tend to happen right when you’ve let your guard down, often not long after you’ve gotten comfortable with something new.

That said, it really is heavy, so it’s a real tradeoff. (laughs)

Buy In Person If You Can

Same idea as trying out an amp or an instrument before buying — if at all possible, bring your own bass to the shop and actually test how it fits and handles in the case. You can also get advice from the staff on the spot.

Want Personalized Feedback on Your Playing?

This is exactly the kind of thing that’s hard to fix alone — and where having a teacher makes all the difference.

At Line on Bass, I offer an online lesson service where you send me a video of your playing, and I give you specific, detailed feedback — every single day if you want.

Students from around the world are using this to fix exactly these kinds of issues and steadily improve their jazz bass skills.

Check Out the Lesson Service →

Posted on Leave a comment

How to Build a 16-Feel Bassline: Playing the Bassline for “Feel Like Makin’ Love”

This article walks through a performance video of the bassline for “Feel Like Makin’ Love” — a classic 16-feel tune — along with an explanation of how to build a 16-feel bassline.

The Bassline for “Feel Like Makin’ Love”

Key Points for Building a 16-Feel Bassline

When you’re starting out, it’s hard to know how to put together a tight, funky 16-feel bassline.

The foundation is something like sixteen notes (sixteenth notes) packed into a single bar, as shown below.

That said, this is too busy on its own, so let’s try dropping in a couple of rests.

Still feels a bit busy.

So I added a few more rests.

I figured I could push the rests even further, so I went ahead and turned the back half of the bar into a half rest.

This is the kind of thing to think about when placing rests in a 16-feel bassline.

At first it’s hard to know where a rest will land naturally, so use the video above as a reference.

A Classic 16-Feel Tune: “Feel Like Makin’ Love”

This is a funk tune that comes up a lot at jam sessions.

Basslines that demand this kind of sharp, punchy articulation present a different kind of challenge than jazz walking basslines.

Here’s the track I was told is essential listening if you’re going to play this tune.

It’s often performed as a vocal tune, and a female vocal pairs especially well with its soul feel.

Hopefully this gives you something useful for your daily practice.

Want Personalized Feedback on Your Playing?

This is exactly the kind of thing that’s hard to fix alone — and where having a teacher makes all the difference.

At Line on Bass, I offer an online lesson service where you send me a video of your playing, and I give you specific, detailed feedback — every single day if you want.

Students from around the world are using this to fix exactly these kinds of issues and steadily improve their jazz bass skills.

Check Out the Lesson Service →

Posted on Leave a comment

Bass Basics: Quarter Notes, Eighth Notes, Triplets, and Sixteenth Notes

“I’m just not great at reading rhythms.”

This article is for exactly that. I’ll cover

the basics of quarter notes, eighth notes, triplets, and sixteenth notes,

and

a practice video you can play along with right away to drill all of them.

The Difference Between Quarter Notes and Eighth Notes

Quarter Notes

For every single metronome click, you play one pick stroke. That’s a quarter note.

If the metronome clicks four times, you play four notes — one per click. That’s the effect of a quarter note.

Here’s how quarter notes are written. (The “x” marks below the staff represent the metronome click.)

Jazz 4-feel basslines are built almost entirely out of quarter notes.

Eighth Notes

For every single metronome click, you play two pick strokes. That’s an eighth note.

If the metronome clicks four times, you play eight notes — two per click. That’s the effect of an eighth note.

Here’s how eighth notes are written.

A steady stream of eighth notes is very common in rock 8-feel grooves.

Triplets and Sixteenth Notes Are Worth Knowing Too

Triplets

For every single metronome click, you play three even pick strokes. That’s a triplet.

The key is keeping all three notes evenly spaced within that one click.

This rhythm shows up a lot in shuffle grooves.

Sixteenth Notes

For every single metronome click, you play four pick strokes. That’s a sixteenth note.

If the metronome clicks four times, you play sixteen notes — four per click. That’s the effect of a sixteenth note.

Here’s how a 16-feel is written. It’s commonly used in funk 16-feel grooves.

A Practice Video to Drill All These Note Values Right Away

This video lets you practice quarter notes, eighth notes, triplets, and sixteenth notes.

Use it as part of your daily practice routine.

· Things to watch out for

Try not to let your note volume become uneven, and keep your rhythm steady without drifting.

Just five minutes of this a day. It’s simple enough that you won’t notice much change in the moment, but stick with it seriously for a month and your sense of rhythm will improve substantially.

Hopefully this gives you something useful for your practice.

Want Personalized Feedback on Your Playing?

This is exactly the kind of thing that’s hard to fix alone — and where having a teacher makes all the difference.

At Line on Bass, I offer an online lesson service where you send me a video of your playing, and I give you specific, detailed feedback — every single day if you want.

Students from around the world are using this to fix exactly these kinds of issues and steadily improve their jazz bass skills.

Check Out the Lesson Service →

Posted on Leave a comment

Jazz Ballads That Come Up Most Often at Jam Sessions

Today I played through some jazz ballads that come up often at jam sessions.

Jazz Ballads That Come Up Often at Jam Sessions, Pulled From a Standard Fake Book

My criteria for “comes up often” is simple: over roughly the last year of jam sessions, did I either play it myself, or hear another player call it?

· Body and Soul

· A Child Is Born

· Everything Happens to Me

· I Fall in Love Too Easily

· Left Alone
· Misty

· My One and Only Love

· Polka Dots and Moonbeams

· When I Fall in Love
· When You Wish Upon a Star

Those were the ones that came up the most.

I Played a Jazz Ballad Bassline

Here’s the bassline for “When You Wish Upon a Star.”

Walking Bass on Jazz Ballads

The main thing to keep in mind when playing a ballad is:

stick mostly to solid root playing, with the image of really letting each note ring out and sustain.

Ballads tend to be slow, and it’s tempting to add a lot of movement, but try not to disturb the mood of the tune — let the melody stay front and center.

Other Things to Keep in Mind for Ballads

Always Use the Same Chart as the Other Players

If you’re reading off a chart, make sure you’re using the same edition as the other players.

Different publishers can have different chords here and there, even within the same tune. It’s not unusual for a Real Book and an app like iReal Pro to disagree on the changes in a few spots.

Ballads are, by nature, slow.

Because you’re often holding down the root for a full bar at a time, any clash caused by a chord discrepancy is going to stick out a lot more than it would at a faster tempo.

Knowing When Not to Play Is Also a Skill

When a ballad opens with just piano comping under a sax quartet or similar, the bass doesn’t necessarily need to come in right away.

For example, on an A-A-B-A tune, you might leave the first two A sections to piano and the front line only, and have the bass enter at the B section instead. That kind of restraint can add real dynamics to the performance.

And if you happen to miss your entrance on the first A, don’t panic and don’t make a face about it — just hold steady and wait calmly for the next A or B section. (Speaking from experience. More than once.)

Hopefully this gives you something useful for your daily practice.

Want Personalized Feedback on Your Playing?

This is exactly the kind of thing that’s hard to fix alone — and where having a teacher makes all the difference.

At Line on Bass, I offer an online lesson service where you send me a video of your playing, and I give you specific, detailed feedback — every single day if you want.

Students from around the world are using this to fix exactly these kinds of issues and steadily improve their jazz bass skills.

Check Out the Lesson Service →

Posted on Leave a comment

Play a Full F Blues Walking Bassline From Memory (With Score & Tab)

“What’s a good way to practice walking bass?”

“I want to learn walking bass, but I don’t know where to start.”

This article is for exactly that — and the answer is, start by copying a full chorus note-for-note!

So here’s a full walkthrough with a free tab transcription included.

Full F Blues Transcription

Here’s a full chorus transcription over an F blues.

If you’re into jazz, it’s easy to get caught up thinking everything has to be about improvisation and theory.

But if you genuinely don’t know where to start, just being able to play something that sounds the part is valuable in itself.

It’s a short 12-bar form, so it shouldn’t take long to memorize.

For now, just look at the score and play through it a few times until you can get through the whole thing.

Once You’ve Got the Transcription Down

Once you’ve memorized the transcription, try playing it along with an actual tune.

As for which tune to use,

“Bags’ Groove” is a great choice. (There are plenty of blues tunes out there, but this one’s relatively easy to play along with.)

If you listen closely to the bass, you’ll notice it’s moving around quite a bit, and it doesn’t stick to the transcription above at all. As you’ll hear, the track runs over 12 minutes.

That said, since it’s an F blues, you can loop the transcription above as many times as you like and it’ll still basically work.

You can keep playing the same bassline through the improvised solo sections after the head, too — give it a try along with the recording.

Don’t Have the CD? Looking for a Good App?

If you don’t have the recording, or you’re looking for a good app for this —

there is one.

You can start using it right now if you have a smartphone.

It’s called iReal Pro, a backing-track app that gives you drum and piano accompaniment while letting you freely adjust the tempo as you practice.

Here’s what the backing sounds like. Playing bass over this lets you practice in something close to a real ensemble setting.

Tempo 80

Tempo 100

Tempo 120

It’s incredibly useful, and I use it for my own daily practice too.

The video at the top of this article was also recorded over this app’s backing track.

Once You’ve Played Through It a Few Times, Try Real Improvisation!

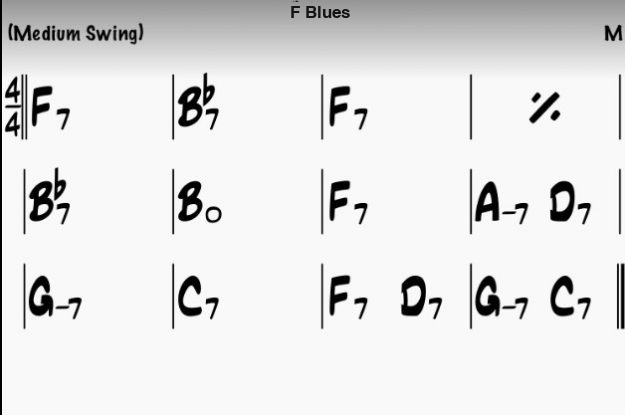
Once you’ve played through the transcription enough times to get a feel for it, I’d love for you to try building your own walking bassline by ear from a chord chart like the one below.

F Blues

It’s not always obvious how to actually approach that at first, but it’s a skill you can build step by step with the right practice routine.

Thanks for reading today!

Want Personalized Feedback on Your Playing?

This is exactly the kind of thing that’s hard to fix alone — and where having a teacher makes all the difference.

At Line on Bass, I offer an online lesson service where you send me a video of your playing, and I give you specific, detailed feedback — every single day if you want.

Students from around the world are using this to fix exactly these kinds of issues and steadily improve their jazz bass skills.

Check Out the Lesson Service →

Posted on Leave a comment

Upright Bass Left-Hand Form: How to Press the Strings and Practice the Half Position

· Anyone picking up upright bass for the first time

· Anyone about to start learning upright bass

· Anyone who wants to rethink their upright bass posture

Note: teaching approaches for upright bass vary quite a bit depending on the school of thought or background of the teacher, so please treat what’s written here as one reference point among others.

The Shape of the Left Hand on Upright Bass

This is the basic shape of the left hand on upright bass.

On electric bass, it’s common to use “one fret, one finger” — pressing down each fret with a separate finger.

But on upright bass, the frets (or fret-equivalent spacing) are much wider.

They’re wide enough that it’s genuinely hard to stretch your fingers far enough to use one finger per fret.

That’s why we bring the middle and ring fingers together to act as a single finger — effectively giving you three fingers to work with. This makes it much easier to cover the distance between positions.

Here’s the hand relaxed and open:

How to Press the Strings With the Left Hand on Upright Bass

The zone that corresponds to the open string through the 3rd fret on electric bass —

— is called the “half position” on upright bass.

Just within this half position alone, there are already this many notes available. Once you can move freely around this position and know the note names, you’ll be able to handle a much wider range of tunes.

So the first goal is to get comfortable playing this half position, since it’s the foundation everything else builds on.

Let’s Practice the Half Position on Upright Bass

Now let’s actually practice playing the half position on upright bass.

Something like that…

The problem is, when you’re just starting out, you can’t tell by ear whether your pitch in the half position is actually correct.

So I made a reference track just for the half position. Playing along with an actual piano makes it much easier to tell whether you’re in tune.

This is the piano-only reference track. Use it to check your pitch while practicing.
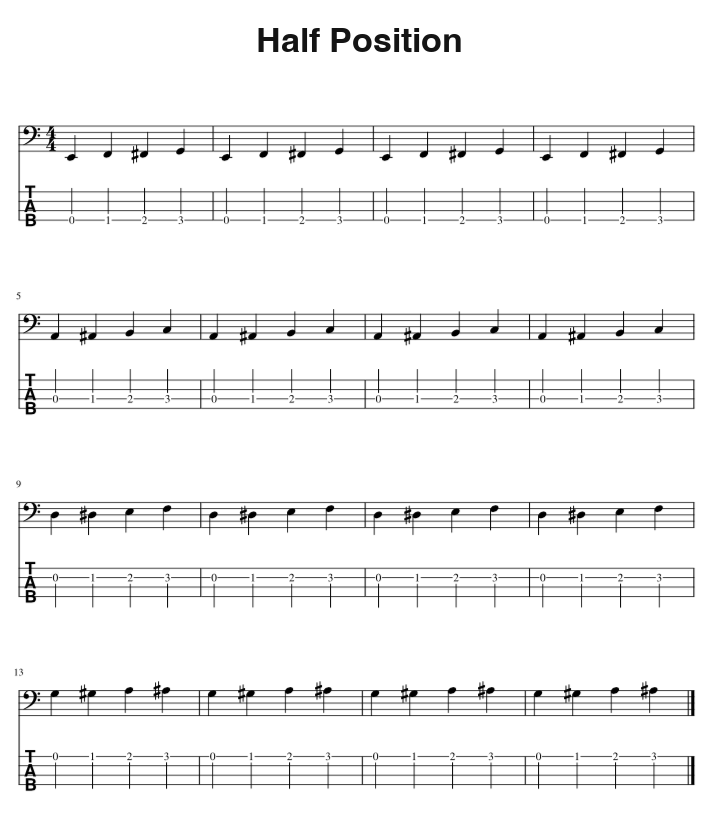
Open E string → frets 1, 2, 3, four times through
Open A string → frets 1, 2, 3, four times through
Open D string → frets 1, 2, 3, four times through
Open G string → frets 1, 2, 3, four times through

Half Position

The tempo is quarter note = 60, with one pick stroke per two notes.

How to Practice

If you don’t already have a practice habit in place, pair this with the picking exercise from the previous article, and

start with one lap a day. Once it feels comfortable, work up to two laps, then three — try to do it daily as much as you can.

Doing it every day will gradually open up your left hand, and along with your picking, you’ll get more comfortable on upright bass bit by bit.

Going from the E string to the G string at tempo 60 takes about two minutes. Even three laps is only about six minutes.

Doing a lot of reps matters, but

go slowly and carefully, checking whether your pitch is accurate and whether your hand shape is holding up.

Want Personalized Feedback on Your Playing?

This is exactly the kind of thing that’s hard to fix alone — and where having a teacher makes all the difference.

At Line on Bass, I offer an online lesson service where you send me a video of your playing, and I give you specific, detailed feedback — every single day if you want.

Students from around the world are using this to fix exactly these kinds of issues and steadily improve their jazz bass skills.

Check Out the Lesson Service →

Posted on Leave a comment

How to Use the “3rd” to Escape Root-Only Basslines (Beginner Chord Theory)

This article explains how to use the “3rd” on bass.

Playing the root note will always get a bassline to work, but holding down the root for an entire song gets boring fast.

Just a small tweak to the notes you choose can make a bassline much more expressive.

This time, we’re focusing on the “3rd.”

I’ll walk through how major and minor 3rds work and how to use them, both here and in the video below.

· Anyone wondering what a “3rd” (or “degree”) even means

· Anyone wanting to study music theory

· Anyone wanting to rethink how they build basslines

First, a Quick Bit of Chord Theory

Chords break down broadly into two types:

minor chords

and

major chords.

In general, a chord is built from the 1st, 3rd, and 5th of a scale (for a basic triad).

If a chord is written as “C,” it’s built from “C E G.”

If a chord is written as “G,” it’s built from “G B D.”

If a chord is written as “Cm,” it’s built from “C E♭ G.”

If a chord is written as “Gm,” it’s built from “G B♭ D.”

The Key to Telling Major and Minor Apart

The 3rd is what tells major and minor apart.

The two clips below are both a “C” chord — the only difference is whether the 3rd is “E” or “E♭.” Give them a listen.

This one is “C-E-G” (the major sound):

This one is “C-E♭-G” (the minor sound):

Don’t they give a really different impression?

Generally, minor sounds darker, and major sounds brighter.

That’s enough theory for now — let’s put this to use in practice.

Comparing to Root-Only: A 3rd-Based Bassline Approach

Let’s work through the chord progression C → Am → Dm → G7 as an example.

First, the root-only approach:

Next, here’s an approach using the 3rd. Out of the four quarter notes in each measure, I swapped just one note for the 3rd.

Doesn’t the bassline feel like it has more dimension now?

Use the 3rd Just Above the Root

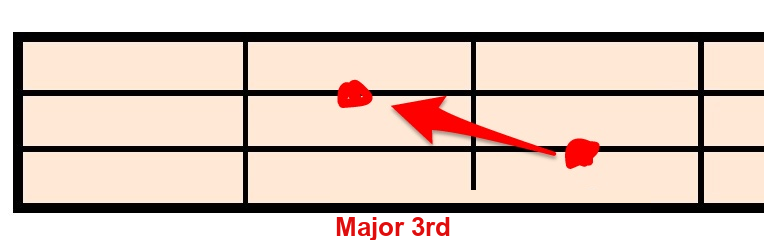
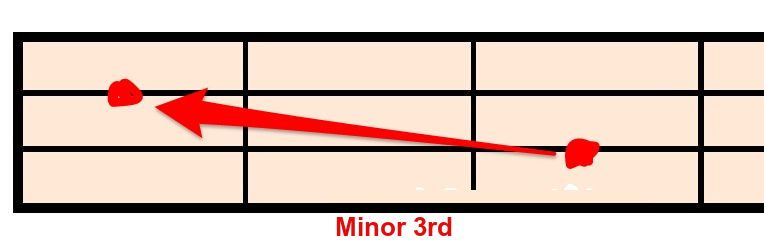
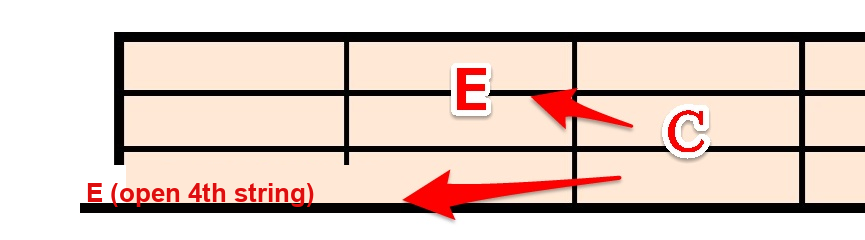
The “3rd just above” refers to a 3rd that sits in the fretboard position shown below. Early on, using a 3rd in this position makes it much easier to actually hear that you’re “making it sound right.”

· Major 3rd

Major 3rd

· Minor 3rd

Minor 3rd

For example, take the note C: technically, both the 3rd fret on the 2nd string and the open 4th string count as a “3rd.” But that lower 3rd tends to get buried in the bass’s tone.

E (open 4th string)

Compare the two below.

· Bassline using the lower 3rd

↑ I wrote this one on a 5-string bass because of the fret positions involved. You can hear the accent, but the light/dark contrast you get from root-to-upper-3rd is harder to feel here. (There’s nothing wrong with this — it’s totally fine if it’s intentional.)

· Bassline using the upper 3rd

↑ This one has a clear outline and a more distinctly upbeat feel.

Using the 3rd in a Bassline

Once you get comfortable using the 3rd, it’ll help your bass improvisation too.

Want Personalized Feedback on Your Playing?

This is exactly the kind of thing that’s hard to fix alone — and where having a teacher makes all the difference.

At Line on Bass, I offer an online lesson service where you send me a video of your playing, and I give you specific, detailed feedback — every single day if you want.

Students from around the world are using this to fix exactly these kinds of issues and steadily improve their jazz bass skills.

Check Out the Lesson Service →

Posted on Leave a comment

What Is the “Root” Note on Bass?

“What even is the ‘root’ on bass?”

This article (and accompanying video) is for anyone asking that question.

The root note comes up no matter what you’re playing — pop, rock, jazz, you name it — so make sure you get comfortable with it.

What Is the Root?

Take the sheet music above, for example:

The root note of measure 1 is “C”

The root note of measure 2 is “D”

The root note of measure 3 is “F”

The root note of measure 4 is “G”

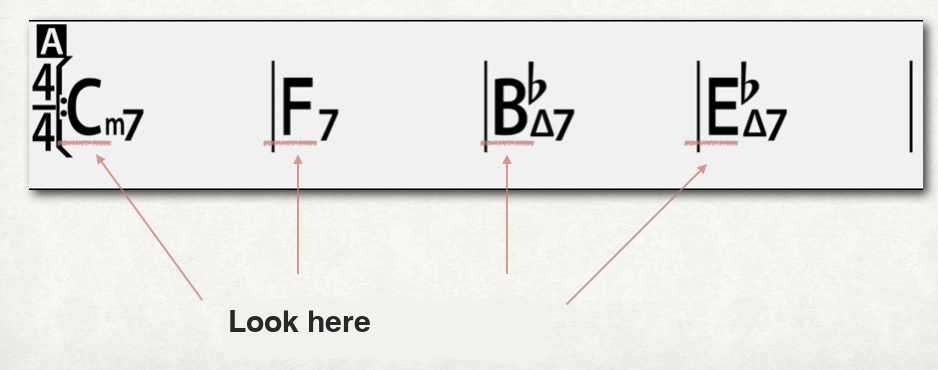
At the top of each measure, you’ll see a “chord” symbol written.

A chord is what’s called a “harmony” — a symbol that represents several stacked notes. The symbols underlined in red below — Cmaj7, Dm7, Fmaj7, G7, and so on — are chords.

Chords have all kinds of symbols attached on the right — maj7, 7, m7, and so on.

If you strip all of those away, you’re left with just C, D, F, and G.

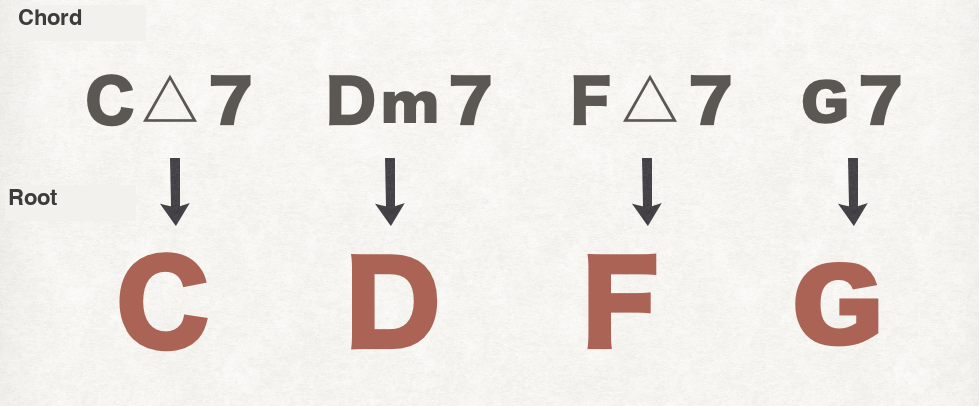
Chord to root note

That’s the root note.

When you see Cmaj7 written, think of it as

C maj7 — in other words, “C” is the root note.

When you see G7 written, think of it as

G 7 — in other words, “G” is the root note.

Going Deeper: More on Bass Roots

Let’s say you’ve got a chord progression like this, and you want to play just the root notes.

The backing track here is just a piano playing these chords.

On bass, each fret position corresponds to a fixed note, like this:

Now back to the chords. With a progression like this, look at the chord symbols on the left.

Chord progression with root focus

Now back to the fretboard. Find the root notes — you’ll find them right where the arrows point.

Those are the root notes. Let’s try playing each one four times.

Playing the root note is what makes a bassline feel like it “fits” with the harmony.

If that’s hard to hear, try listening to what happens when I deliberately avoid the root. It feels off, right?

Just Changing the Root Changes Everything!

Let’s run an experiment to show how much the root note alone can change the feel of a piece.

I played the same Do-Re-Mi-Fa-Sol-La-Ti-Do melody on piano, and created two versions that differ only in the root note.

· Pattern 1

· Pattern 2

Notice how different they feel?

Pattern 1 sounds bright and catchy.

Pattern 2 sounds dark and a bit sad.

But all I changed was the bassline:

Pattern 1’s bassline is just “C-C-C-C” (the root held on C).

Pattern 2’s bassline is just “A-A-A-A” (the root held on A).

That’s how much the bass root note can shape the mood of a piece of music.

That said, when you’re just starting out, don’t overthink it — it’s fine to simply go with:

When you see Cmaj7 written, think of it as

C maj7 — “C.”

When you see G7 written, think of it as

G 7 — “G.”

That’s a perfectly good starting interpretation.

Want Personalized Feedback on Your Playing?

This is exactly the kind of thing that’s hard to fix alone — and where having a teacher makes all the difference.

At Line on Bass, I offer an online lesson service where you send me a video of your playing, and I give you specific, detailed feedback — every single day if you want.

Students from around the world are using this to fix exactly these kinds of issues and steadily improve their jazz bass skills.

Check Out the Lesson Service →

Posted on Leave a comment

What Are Diatonic Chords? #2 — How They Are Built (With Reference Tables)

This article is for:

· Bassists who want to play jazz but don’t know where to start

· Bassists who want to try improvising

· Anyone who bought a music theory book, gave up, and now has it gathering dust in a closet

Quick Recap

Last time, I explained that:

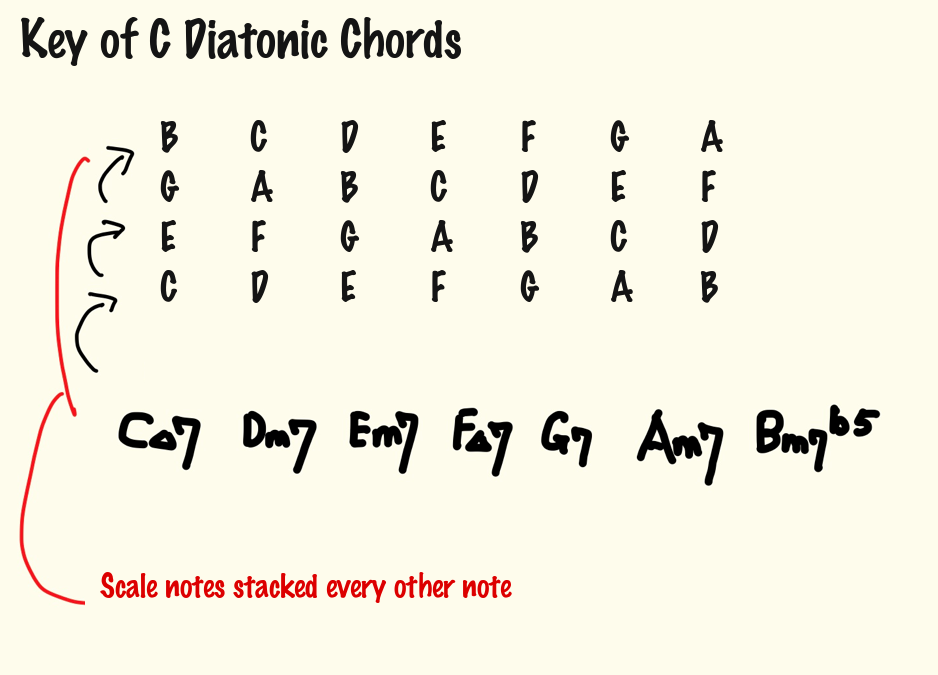
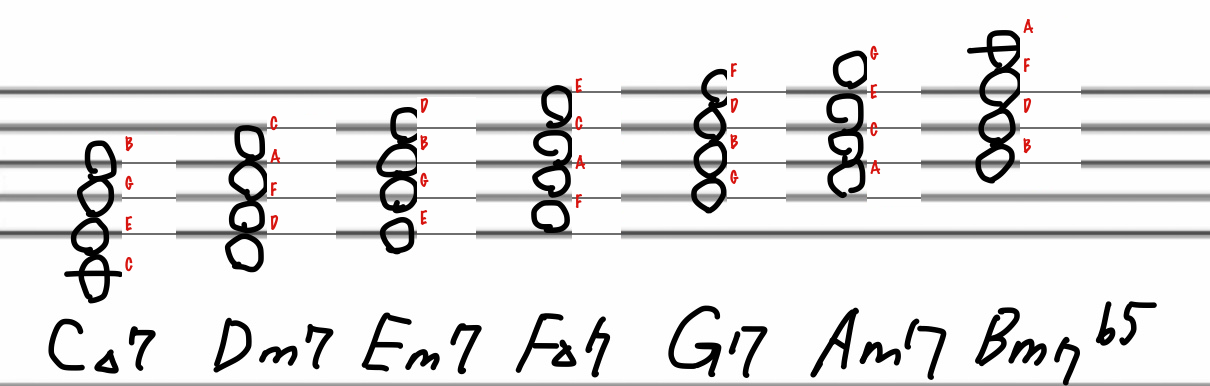
Diatonic chords are useful for improvising and copying solos by ear. Here are the diatonic chords in the key of C — when you solo, you can use the notes Do Re Mi Fa Sol La Ti Do.

Key of C diatonic chords

…but that was a pretty rough explanation, and I didn’t go into the detailed structure behind it.

This time, I’ll explain more specifically how diatonic chords are actually built.

Understanding this will take some time, but once you get it, you’ll be able to use diatonic chords freely for improvising, copying solos by ear, and building basslines — giving you much more freedom in your playing.

You can find the previous article in this series, “What Are Diatonic Chords? #1,” on this site once it’s translated — for now, here’s a quick recap above to get you up to speed.

How Diatonic Chords Are Built

A diatonic chord is simply a chord built from a diatonic scale.

This time, I’ll explain both the “diatonic scale” and the “chord” side of that equation.

What Is a Diatonic Scale?

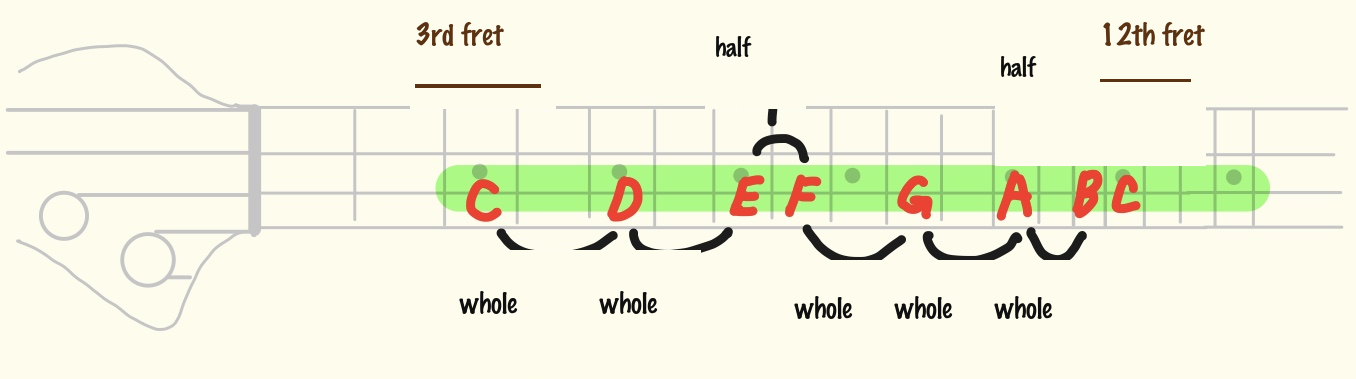
A diatonic scale is, within one octave, a scale made up of five whole-step intervals and two half-step intervals.

For example, here’s a well-known one. To keep it simple, I’ve written it out on a single string.

Example 1

Whole — Whole — Half — Whole — Whole — Whole — Half

This pattern of intervals is called the major scale.

Major scale whole and half steps on the fretboard

Starting from C at the 3rd fret of the 3rd string: C D E F G A B C. In other words, Do Re Mi Fa Sol La Ti Do.

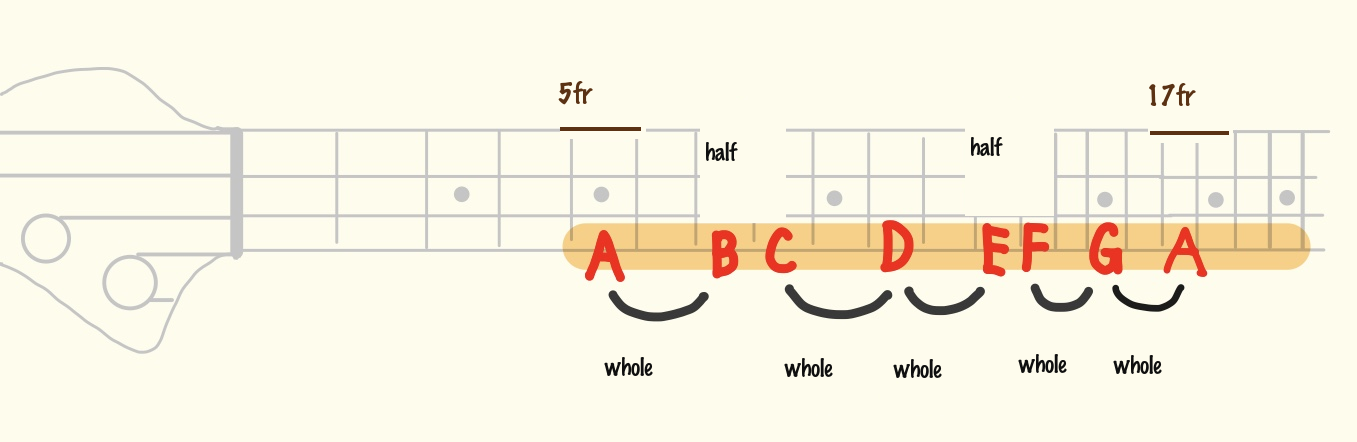
There’s another common pattern too.

Example 2

Whole — Half — Whole — Whole — Half — Whole — Whole

This is called the minor scale. It’s also a type of diatonic scale.

Minor scale whole and half steps on the fretboard

For this article, I’ll use the major scale as the main example going forward.

What Is a Chord?

A chord is essentially a symbol that represents a stack of notes.

Generally this is called a “harmony,” and there are countless possible combinations.

For example, take this progression:

C / a chord made of C, E, G
Am / a chord made of A, C, E
Dm / a chord made of D, F, A
G7 / a chord made of G, B, D, F

You could stack any notes, in any way, and technically call it a “chord” —

…but as you can hear, that doesn’t exactly sound pleasant to the ear!

That’s where a stacking pattern that’s generally considered pleasant to the ear comes in.

What Makes a Stack of Notes Sound “Pleasant”?

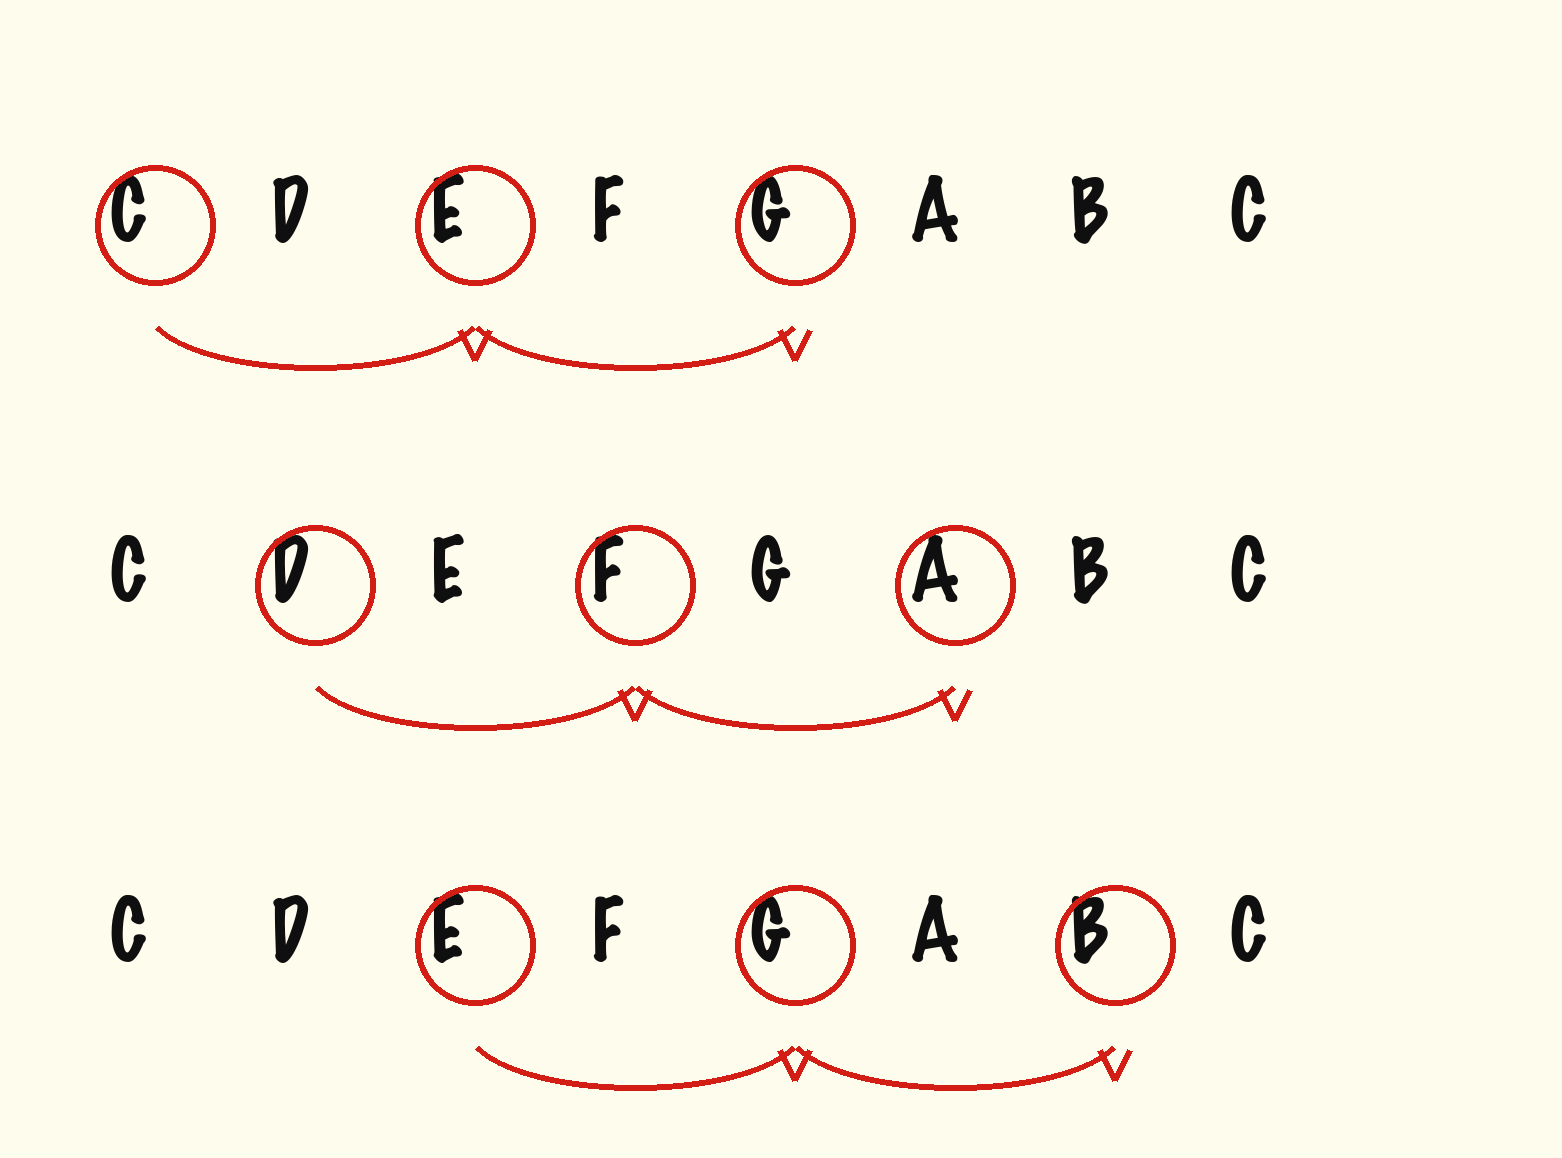
Take that diatonic scale from before, and stack the notes by skipping every other one, like this:

Stacking diatonic scale notes every other note

This “skip one note at a time” stacking is generally considered to sound pleasant to the ear.

This is exactly what a diatonic chord is: a chord built by stacking the notes of a scale, skipping every other note.

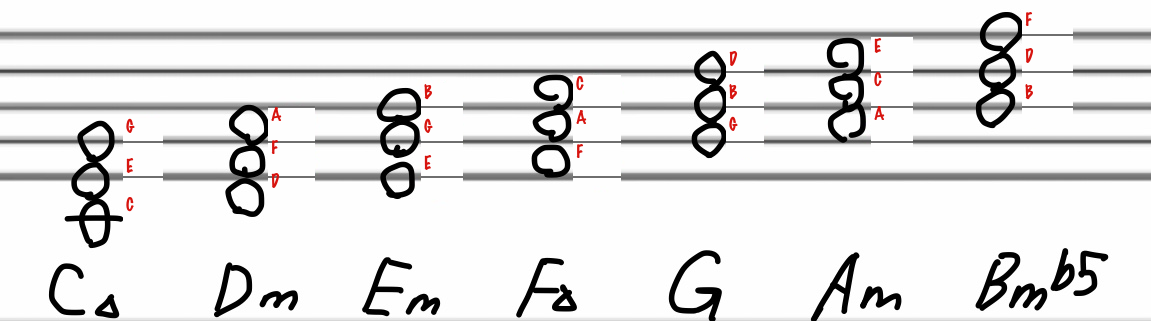
Pop and rock songs are often written using these as 3-note chords (triads):

Diatonic triads in the key of C

In jazz and other styles that use a wider harmonic palette — seventh chords, tension notes, and so on — chords are more often written as these 4-note chords:

Diatonic seventh chords in the key of C

Diatonic Chords and Transposition

Now, say you have a chord progression like this, and your vocalist says:

“This is hard to sing in the key of C — can you bump it up a whole step? (Make it key of D?)”

What happens to the diatonic chords in that case?

If you’re just playing root notes, you could simply shift your hand position — but let’s actually think it through theoretically, since we’re here.

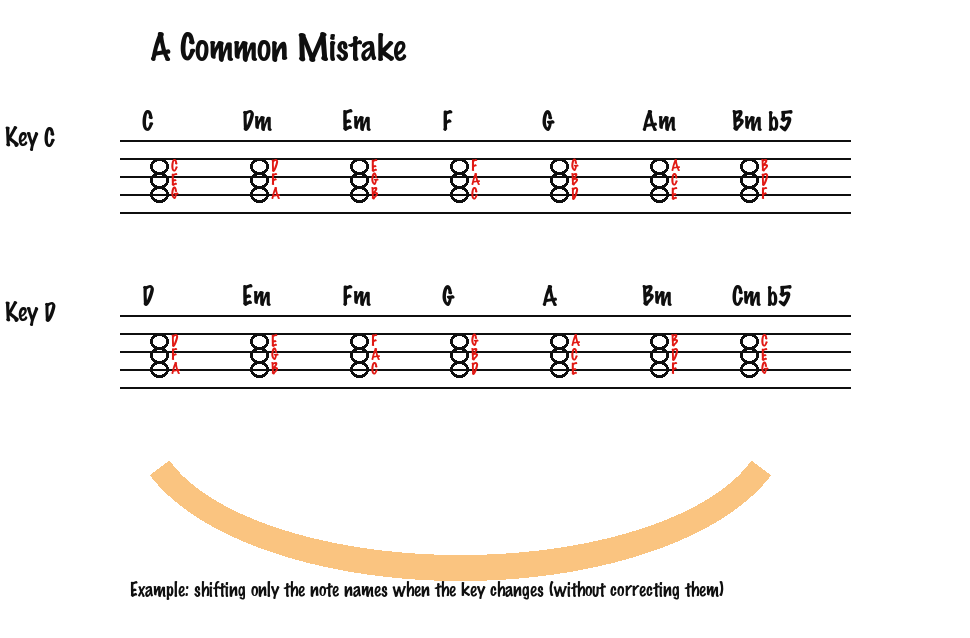
If in the key of C, Do Re Mi Fa Sol La Ti Do is the diatonic scale, then wouldn’t the diatonic chords in the key of D be built from Re Mi Fa Sol La Ti Do Re?

If you think about it that way… you’d be wrong.

A common mistake: shifting only the note names

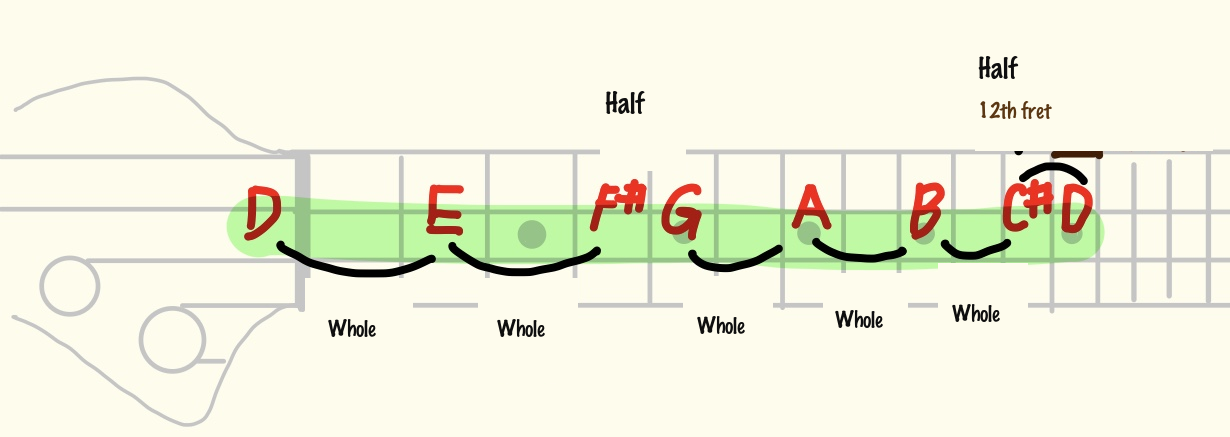
Let’s look at it the same way as before, using Whole — Whole — Half — Whole — Whole — Whole — Half.

Key of D major scale whole and half steps on the fretboard

Oh, I see — F and C both have sharps.

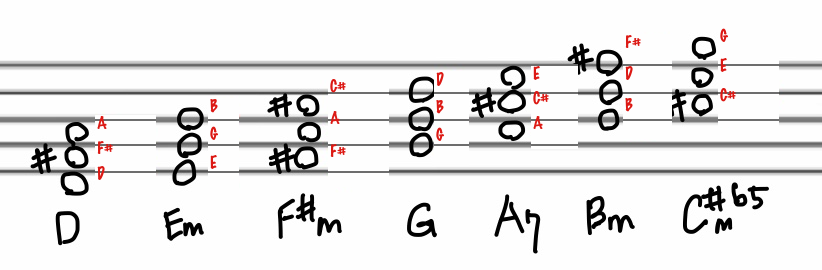
Exactly right, good catch. Now let’s stack these notes again, skipping every other one, to find the “pleasant-sounding” chords.

In terms of diatonic chords, here’s how that breaks down (as triads):

Diatonic triads in the key of D

So, raising the key by a whole step gives you these diatonic chords:

Key Point

When you change keys, the diatonic chords change too — sharps and flats may appear.

But no matter what key you’re in, the diatonic scale’s interval pattern of

Whole — Whole — Half — Whole — Whole — Whole — Half

never changes.

For this article, it’s enough to get a general sense of this. Your understanding will deepen as you apply it to real songs going forward.

Finally, here’s a reference table and summary.

Key & Diatonic Chord Reference Tables

A song’s key is determined by the number of sharps or flats written at the start of the sheet music.

For example:

Key of D has two sharps in the key signature

Key of F has one flat in the key signature

Key of C has no key signature

…and so on. It’s all fixed and predictable.

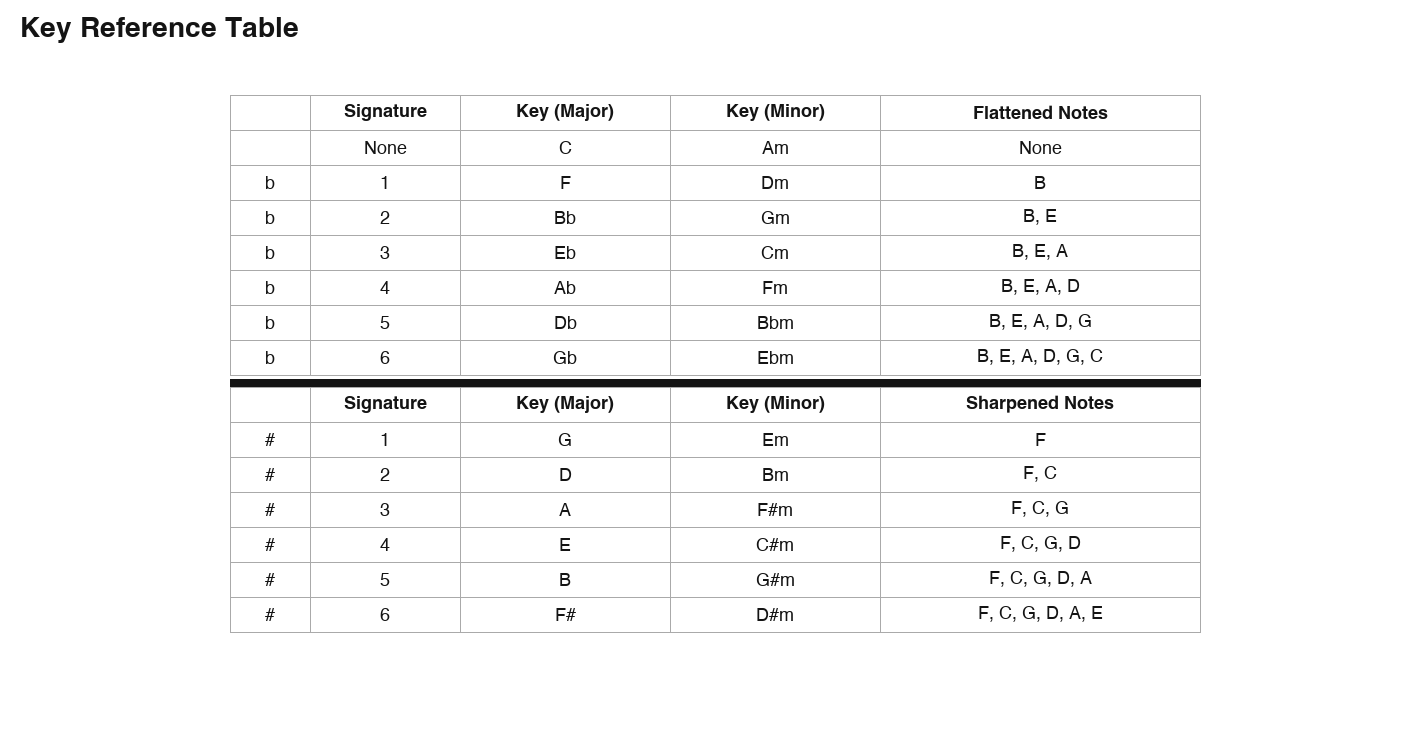
Here’s a reference table of key signatures and keys.

Key reference table

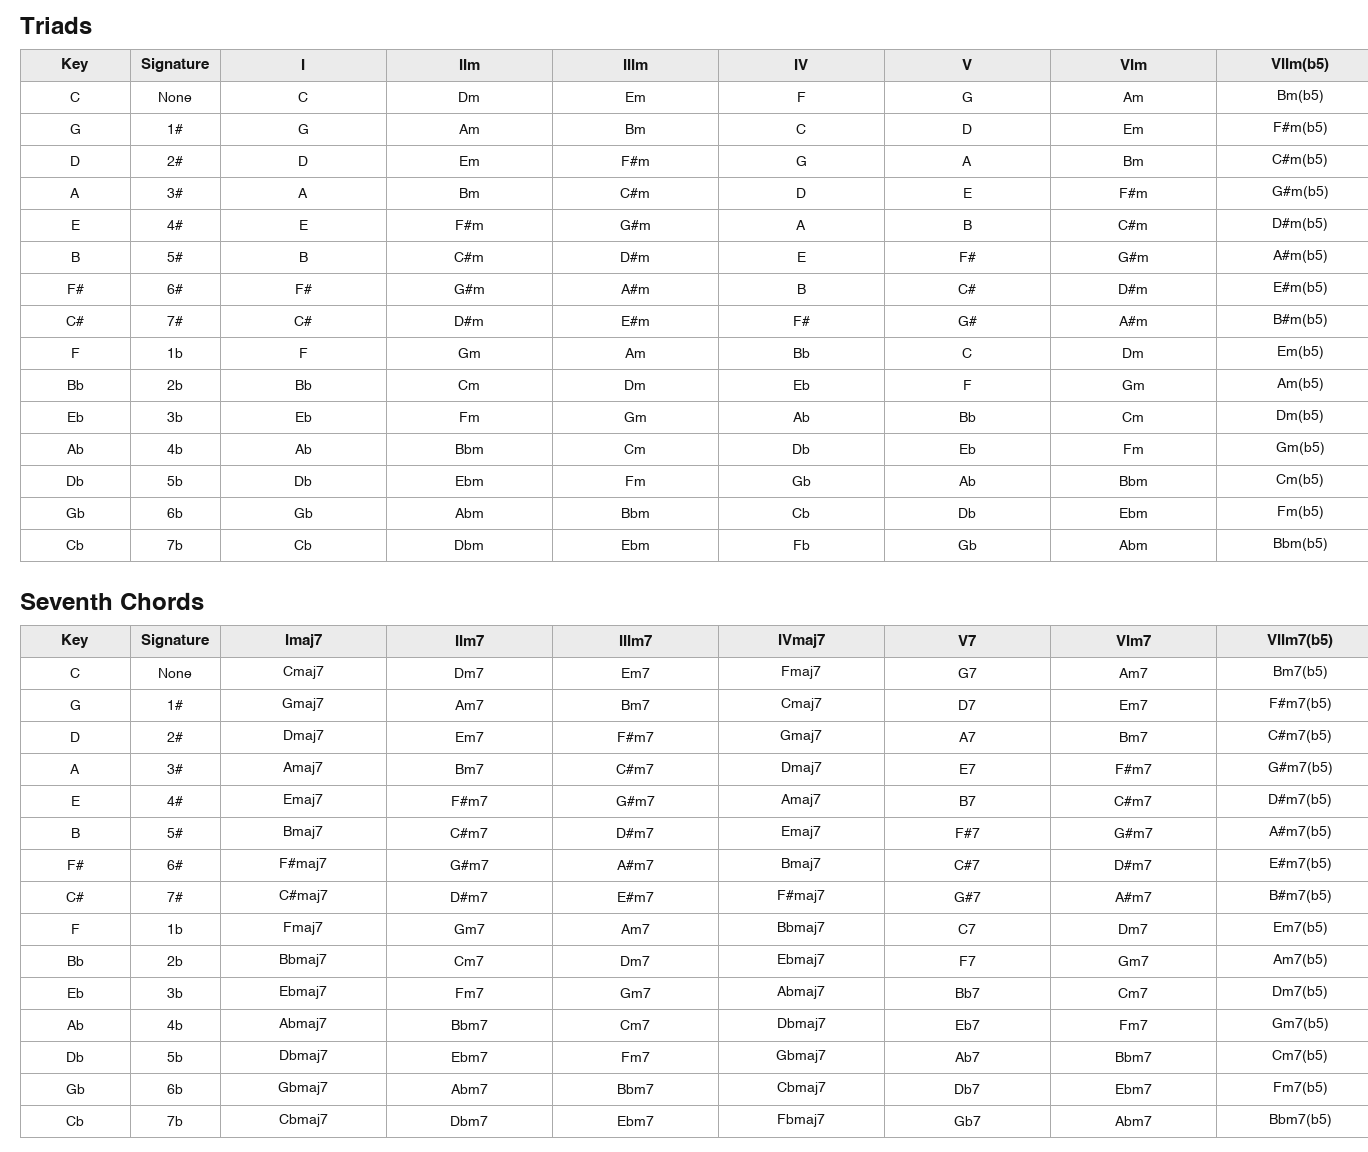
And here’s a reference table of key signatures and diatonic chords.

Diatonic chord reference table

You probably won’t be able to recall key signatures and their diatonic chords instantly — keep these tables handy as a reference.

As you apply this to real songs — analyzing tunes and writing your own — you’ll gradually get more comfortable with diatonic chords.

When a bassist has this knowledge, it helps in all kinds of ways:

· You can analyze songs
· You can improvise, including bass solos
· It’s easier to build moving basslines
· It opens up your range as a songwriter
· You’ll get faster at learning songs and copying parts by ear

Next time, I’ll apply diatonic chords to a real song.

Want Personalized Feedback on Your Playing?

This is exactly the kind of thing that’s hard to fix alone — and where having a teacher makes all the difference.

At Line on Bass, I offer an online lesson service where you send me a video of your playing, and I give you specific, detailed feedback — every single day if you want.

Students from around the world are using this to fix exactly these kinds of issues and steadily improve their jazz bass skills.

Check Out the Lesson Service →