· Anyone picking up upright bass for the first time
· Anyone about to start learning upright bass
· Anyone who wants to rethink their upright bass posture
Note: teaching approaches for upright bass vary quite a bit depending on the school of thought or background of the teacher, so please treat what’s written here as one reference point among others.
Contents
The Shape of the Left Hand on Upright Bass

This is the basic shape of the left hand on upright bass.
On electric bass, it’s common to use “one fret, one finger” — pressing down each fret with a separate finger.

But on upright bass, the frets (or fret-equivalent spacing) are much wider.
They’re wide enough that it’s genuinely hard to stretch your fingers far enough to use one finger per fret.

That’s why we bring the middle and ring fingers together to act as a single finger — effectively giving you three fingers to work with. This makes it much easier to cover the distance between positions.

Here’s the hand relaxed and open:

How to Press the Strings With the Left Hand on Upright Bass
The zone that corresponds to the open string through the 3rd fret on electric bass —

— is called the “half position” on upright bass.
Just within this half position alone, there are already this many notes available. Once you can move freely around this position and know the note names, you’ll be able to handle a much wider range of tunes.

So the first goal is to get comfortable playing this half position, since it’s the foundation everything else builds on.
Let’s Practice the Half Position on Upright Bass
Now let’s actually practice playing the half position on upright bass.

Something like that…
The problem is, when you’re just starting out, you can’t tell by ear whether your pitch in the half position is actually correct.
So I made a reference track just for the half position. Playing along with an actual piano makes it much easier to tell whether you’re in tune.
Open A string → frets 1, 2, 3, four times through
Open D string → frets 1, 2, 3, four times through
Open G string → frets 1, 2, 3, four times through
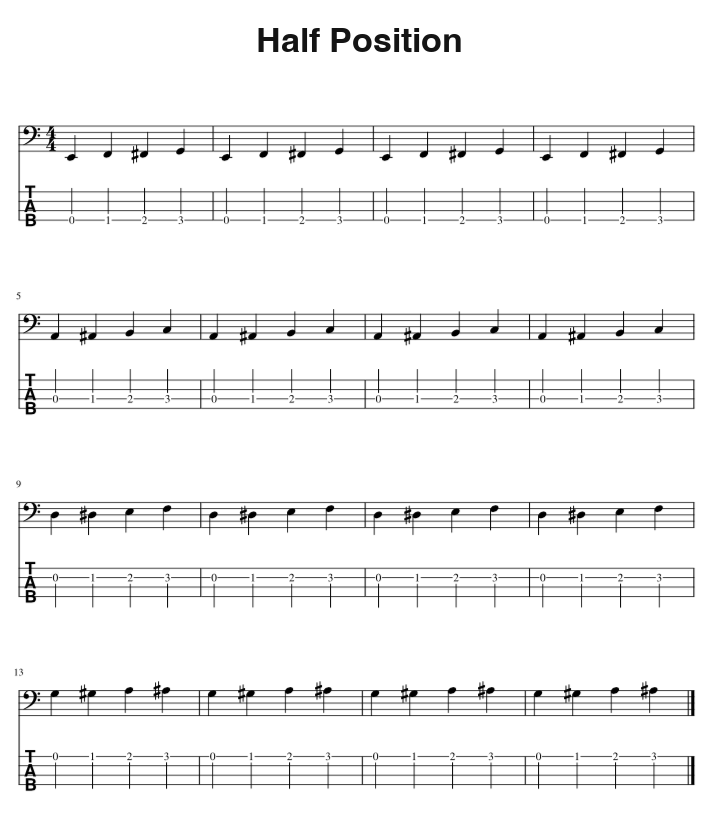
The tempo is quarter note = 60, with one pick stroke per two notes.
How to Practice
If you don’t already have a practice habit in place, pair this with the picking exercise from the previous article, and
start with one lap a day. Once it feels comfortable, work up to two laps, then three — try to do it daily as much as you can.
Doing it every day will gradually open up your left hand, and along with your picking, you’ll get more comfortable on upright bass bit by bit.
Going from the E string to the G string at tempo 60 takes about two minutes. Even three laps is only about six minutes.
Doing a lot of reps matters, but
go slowly and carefully, checking whether your pitch is accurate and whether your hand shape is holding up.
Want Personalized Feedback on Your Playing?
This is exactly the kind of thing that’s hard to fix alone — and where having a teacher makes all the difference.
At Line on Bass, I offer an online lesson service where you send me a video of your playing, and I give you specific, detailed feedback — every single day if you want.
Students from around the world are using this to fix exactly these kinds of issues and steadily improve their jazz bass skills.