Posted on Leave a comment

What Does a Chord Symbol Like “C△7” Actually Mean for a Bassist?

This article is written by Toru Hoshino, a jazz bassist and instructor based in Japan who teaches online lessons to students worldwide. In this article, he explains what a chord symbol like “C△7” or “Dm7” actually means for a bass player, in plain language with no jargon.

This article is for anyone who’s ever wondered:

  • What exactly is a chord like “C△7” or “Dm7”?
  • What does that even mean for the bass?
  • Does a bassist even need to think about chords?

Here’s a no-jargon breakdown of how a bass player should actually interpret a chord symbol.

What Are These Symbols Like “△7” or “m7” Actually Saying?

Most music isn’t made of single, isolated notes played one at a time — it’s made of several notes stacked together at once. That stack of notes is what creates the actual harmony you hear underneath a melody.

But spelling out every single note in that stack every time would get unwieldy fast. So instead, music uses a shorthand: a chord symbol.

A symbol like C△7 or G7 is really just shorthand that says “these specific notes are available to use here.” That’s what a chord is — a defined, named stack of notes.

What Should a Bassist Actually Do When They See a Chord Symbol?

There are an enormous number of possible chords out there. But there’s a simple way bass players can cut through that complexity: focus on the letter on the left-hand side of the chord symbol.

That letter is called the root note. Playing along to that root note is called “playing the root.”

There are exceptions, but when a bassist is playing along with a chord progression, the first and most important thing is simply being able to find and play that root note by reading the chord symbol.

A Quick Example

Say you see:

C△7
Dm7
F△7
G7

If a bassist plays the root note of each — C, then D, then F, then G — that’s already enough to make the music work, regardless of everything else written to the right of each letter.

Understanding the “Root Note”

In chords like:

C△7
Dm7
F△7
G7

the bolded letter on the left — C, D, F, G — is what’s called the root note. Playing the root note that matches each chord is called “playing the root,” or a “root-note bass line.”

Exceptions aside, when a bass player is told to “play along with the chords,” the single most important skill is being able to look at a chord chart and play its root notes.

Chord-Reading Summary

Whether you see:

C[ ] ← where [ ] might be △7, m7, dim, etc.
D[ ] ← where [ ] might be △7, m7, dim, etc.
E♭[ ] ← where [ ] might be △7, m7, dim, etc.

what matters first is the letter on the left — the root — regardless of what symbol follows it on the right.

If you’re told to “play along with the chords” on bass, simply playing the root notes is enough to make the music work.

Root Note Reference Chart

Here are the root notes from the open string up through the 4th fret.

A reference chart of root notes on the bass fretboard from open string to the 4th fret

If someone says “play an F,” you want to be able to instantly land on either the 3rd fret of the 2nd string or the 1st fret of the 4th string. If they say “play a B♭,” you want the 3rd fret of the 1st string or the 1st fret of the 3rd string to come just as naturally. Memorizing this chart is well worth the effort.

Hopefully this article is a useful addition to your daily practice.

Root notes are the foundation, but actually locking those roots into a tight, in-the-pocket groove with a band is exactly the kind of thing a teacher’s ear can fine-tune fast.

Want Personalized Feedback on Your Playing?

This is exactly the kind of thing that’s hard to fix alone — and where having a teacher makes all the difference.

At Line on Bass, I offer an online lesson service where you send me a video of your playing, and I give you specific, detailed feedback — every single day if you want.

Students from around the world are using this to fix exactly these kinds of issues and steadily improve their jazz bass skills.
Check Out the Lesson Service →

Posted on Leave a comment

A Bluesy Minor Pentatonic Trick That Works Surprisingly Well Over “Fly Me to the Moon”

This article is written by Toru Hoshino, a jazz bassist and instructor based in Japan who teaches online lessons to students worldwide. In this article, he shares a bluesy minor pentatonic approach that works surprisingly well over “Fly Me to the Moon.”

This article is for anyone who’s thought, “I’m not sure how to actually use the minor pentatonic scale” or “I want a fresh idea for my improvised solos.” It’s a handy scale that works well over:

  • Tunes in the key of A minor
  • A Dm7 → G7 → C△7 ii-V-I progression
  • An F blues

The A Minor Pentatonic Scale

Let’s use the A minor pentatonic scale as our example here. This is the well-known shape a lot of players already learned this scale in.

To give that familiar shape a bluesier flavor, I add in the ♭5th of A minor — E♭.

I also shift the lowest note from A to E♭ on the 7th fret of the 3rd string, turning it into an inversion of the same scale.

I use this scale a lot when improvising over “Fly Me to the Moon” — and in particular, I lean heavily on emphasizing that ♭5th.

Here’s a quick demo of it in action — hopefully you can hear how it locks in with the harmony.

Why a Bluesy Minor Pentatonic Works So Well Over “Fly Me to the Moon”

The notes in this A minor pentatonic scale are:

A (root), C (m3rd), D (11th), E♭ (♭5th), E (5th), G (7th)

The reason it works so well is that these notes overlap heavily with the actual chord tones of each chord in the progression.

For Example

Am7 (Bar 1)

A (root), C (m3rd), E (5th), G (7th) are chord tones; D (11th) and E♭ (♭5th) are tensions.

Dm7 (Bar 2)

D (root), A (5th), C (♭7th) are chord tones.

G7 (Bar 3)

G (root), D (5th) are chord tones.

C△7 (Bar 4)

C (root), E (3rd), G (5th) are chord tones.

F△7 (Bar 5)

C (5th), A (3rd), E (△7th) are chord tones.

Because the scale overlaps so heavily with chord tones across the progression, even playing it fairly freely tends to land “in the pocket” sound-wise.

Using It With Restraint

That said, if you go too random with it the way the opening demo did, it stops sounding musical. So it’s worth being deliberate about leaving space and dropping in the bluesy minor pentatonic only at select moments, rather than constantly. Try working it in piece by piece, wherever it feels like it fits.

Hopefully this gives you something useful for your own improvising.

Knowing which notes overlap with the chord tones in theory is one thing — actually hearing whether your placement of them sounds musical or just random is exactly the kind of judgment a teacher sharpens fastest.

Want Personalized Feedback on Your Playing?

This is exactly the kind of thing that’s hard to fix alone — and where having a teacher makes all the difference.

At Line on Bass, I offer an online lesson service where you send me a video of your playing, and I give you specific, detailed feedback — every single day if you want.

Students from around the world are using this to fix exactly these kinds of issues and steadily improve their jazz bass skills.
Check Out the Lesson Service →

Posted on Leave a comment

40 Jazz Standards Worth Knowing Before You Walk Into a Jam Session

This article is written by Toru Hoshino, a jazz bassist and instructor based in Japan who teaches online lessons to students worldwide. In this article, he shares 40 jazz standards that have personally come up again and again at sessions over the years — useful both as a practice checklist and as a listening list.

Here are 40 tunes that, in my own experience playing sessions over the past several years, have come up especially often. Even if you’re not a player and just want to get into the music, listening through this list is a great way to deepen your appreciation for jazz.

40 Jazz Standards (Tunes I’ve Personally Played a Lot at Sessions)

All The Things You Are
Alone Together
Au Privave
Autumn Leaves
Beatrice
Beautiful Love
Billie’s Bounce
Black Nile
Blue Bossa
Body and Soul
Bye Bye Blackbird
But Not For Me
Candy
Confirmation
The Days of Wine and Roses
Fly Me to the Moon
Feel Like Making Love
Four
Girl From Ipanema
Have You Met Miss Jones?
If I Were a Bell
I’ll Close My Eyes
In Your Own Sweet Way
It Could Happen to You
Just Friends
Mr. P.C.
Night and Day
On Green Dolphin Street
Oleo
Satin Doll
Softly as in a Morning Sunrise
Someday My Prince Will Come
St. Thomas
Stella by Starlight
Speak Low
Take the “A” Train
There Is No Greater Love
There Will Never Be Another You
Wave
You’d Be So Nice to Come Home To

This list draws from a well-known jazz fake book widely used at sessions, covering a set of enduring standards.

Note: this is purely a personal list, based on my own experience.

Tips for Practicing to Get Session-Ready

Get the Melody to Where You Can Hum It

The “melody” here means the tune’s main theme — for “Autumn Leaves,” that’s the opening “G, A, B♭, E♭…” line.

Being able to actually play the melody is ideal, but being able to hum it means you actually have the tune memorized. Knowing a tune well reduces your odds of getting lost while improvising.

Get to Where You Can Build a Walking Bass Line Just by Looking at the Chords

Being able to build a walking bass line just from reading the chord symbols is genuinely important. That said, it’s tough when you’re starting out — that’s exactly the kind of thing this site covers in depth, so feel free to dig into other articles here on how to construct walking bass lines and improvise on bass.

Get Comfortable Playing Along With a Real Recording

Once you can build a walking bass line just by reading the chords, try playing along with an actual recording. A practice app like iReal Pro is a great tool for this.

How Many Tunes Do You Need to Know Before Going to a Jam Session?

I get asked this a lot — “how many tunes do I need to know before I can go to a jam session?” Honestly, there’s no clean cutoff here. There’s no rule like “5 tunes and you’re good to go, but 4 and you’re not ready.”

When I was starting out, I couldn’t quickly build a bass line just by looking at chords either. But my mindset was basically “just go for it” — I crammed one full chorus of a walking bass line for “Autumn Leaves” and one for an F blues into my head, and went to a session with just that.

Honestly, it was pretty terrifying. I used to think “I’ll go once I know 10 tunes,” but if you keep chasing that bar, there’s no end to it — and even if you can barely play anything, you get more out of actually showing up and feeling the room’s energy and flow firsthand than you’d ever get from more solo practice.

So even with a small repertoire, I think the moment you think “maybe I’ll just go for it now” is exactly the right moment to go. Hopefully this is useful if you’re thinking about checking out a session soon.

Knowing the chords is one thing — actually hearing whether your walking bass line holds up against a real rhythm section is exactly where a teacher’s ear catches what you can’t hear on your own.

Want Personalized Feedback on Your Playing?

This is exactly the kind of thing that’s hard to fix alone — and where having a teacher makes all the difference.

At Line on Bass, I offer an online lesson service where you send me a video of your playing, and I give you specific, detailed feedback — every single day if you want.

Students from around the world are using this to fix exactly these kinds of issues and steadily improve their jazz bass skills.
Check Out the Lesson Service →

Posted on Leave a comment

Useful iReal Pro Features You Might Not Know About

This article is written by Toru Hoshino, a jazz bassist and instructor based in Japan who teaches online lessons to students worldwide. In this article, he rounds up several lesser-known but genuinely useful features of the practice app iReal Pro.

iReal Pro is a practice app loved by musicians across every genre, and as a jazz player myself, I rely on it constantly — the built-in “Jazz 1450” tune set in particular gets a lot of use in my own routine. It’s a fantastic tool for practicing tunes, but it also has a handful of useful features that don’t get talked about much. Here’s a roundup.

Useful Features You Might Not Know About

Changing the Count-In

You can start a tune with no count-in, a 4-beat count-in, or an 8-beat count-in. This is adjustable in the song settings — I personally keep mine set to an 8-count.

Starting Playback Partway Through a Tune

Press and hold on any bar to start playback from that exact point. Great for drilling a specific section.

Looping a Section

Press and hold the bar where you want the loop to start, then drag to extend the selection to where you want it to end. The app will then loop just that highlighted range — another great way to drill a tricky passage.

Estimating a Song’s Tempo

If you’re listening to a track and want a rough sense of its tempo without looking it up, you can tap along to the beat on the app’s metronome-tap feature, and it’ll estimate the BPM for you. It won’t be perfectly precise, but it’s a handy way to get in the right ballpark.

Gradually Increasing the Tempo

In a tune’s tempo settings, there’s an option to automatically speed up over the course of playback — for example, setting “+10 bpm” will play the first chorus at 100 bpm, then bump it up to 110 bpm for the second chorus, and so on. Great for building speed gradually without having to keep manually adjusting the tempo yourself.

Creating Your Own Backing Track

You can also build your own chart from scratch: open a new blank chart, enter the chords bar by bar (letters for the chord, “-” for minor, “△” for major, “%” for a repeat symbol), set up barlines, repeat signs, and endings, and give it a title, composer, rhythm style, and key. Once it’s set, the app will generate a full backing track for it — and you can apply any rhythm/genre style to it, not just jazz.

Changing the Rhythm Style

Any chart can be played back in a wide range of rhythm styles — swing, Latin, bossa nova, funk, rock, 3/4 time, and more. This lets you practice the tune you’re working on, or a tune your current band is playing, in whatever feel actually matches the gig. Jazz standards like “Fly Me to the Moon” often get arranged in a 4-beat swing, a bossa nova, or 3/4 time depending on the situation, so it’s worth experimenting with different rhythm styles for whatever tune you’re working on.

Muting the Drums and Bass

You can mute the drums and bass tracks individually, leaving just the piano or guitar comping. Since the comping often doesn’t land squarely on beat 1, this is great practice for keeping solid time on your own.

Turning Off the Playback Indicator

The moving on-screen marker that shows your current position in the chart is a great visual guide, but relying on it too heavily can mean your actual chart-reading skills don’t get the workout they need — and in a real performance, you obviously won’t have it. You can turn this indicator off in the chord chart settings, which makes for a noticeably harder but more realistic practice session.

There’s a lot more depth to get out of this app than most people realize — hopefully a few of these tips are useful for your own practice.

Squeezing every feature out of a practice app is great, but it can only take you so far — getting a teacher’s read on how your timing and chart-reading actually hold up in real time is where the rest of the progress comes from.

Want Personalized Feedback on Your Playing?

This is exactly the kind of thing that’s hard to fix alone — and where having a teacher makes all the difference.

At Line on Bass, I offer an online lesson service where you send me a video of your playing, and I give you specific, detailed feedback — every single day if you want.

Students from around the world are using this to fix exactly these kinds of issues and steadily improve their jazz bass skills.

Check Out the Lesson Service →

Posted on Leave a comment

A Simple Fix for Thumb Pain at the Base of Your Left Hand

This article is written by Toru Hoshino, a jazz bassist and instructor based in Japan who teaches online lessons to students worldwide. In this article, he offers a simple fix for pain at the base of the left thumb when fretting.

Pain at the base of your left thumb while fretting is a common issue for players just starting out. Here’s a fix worth trying.

Try Fretting Without Using Your Thumb at All

Try fretting without using your thumb at all, and play do-re-mi-fa-sol-la-ti-do starting from the 3rd fret of the 3rd string.

It’ll feel really awkward — but notice where the effort is concentrated while you’re fretting.

If you’re relying on the strength of your fingers alone rather than the strength of your whole arm to do the pressing, try shifting to using the strength of your entire arm instead. Doing this, you can usually manage to fret the notes even without your thumb.

Now, Bring the Thumb Back — Just “Resting” It

That said, playing with no thumb at all is awkward. So bring the thumb back in, but with the image of just “resting” it in place.

Think of it as “resting” the thumb against the neck, not “clamping” it.

This takes a lot of the load off your thumb.

It’ll feel clumsy and a little difficult at first, but you should be able to feel a real reduction in strain on your thumb. Try to keep this image in mind as a general habit during practice.

If the base of your thumb keeps hurting, it can develop into tendinitis. The author has actually dealt with this himself — there was a stretch where overworking with a bad form caught up with me. If something hurts, that’s usually a sign something’s off, and it may be worth reconsidering your form and how you’re using your body.

A subtle shift like “clamping” versus “resting” the thumb is genuinely hard to self-diagnose — having a teacher watch your hand directly is the fastest way to catch it before it becomes an injury.

Want Personalized Feedback on Your Playing?

This is exactly the kind of thing that’s hard to fix alone — and where having a teacher makes all the difference.

At Line on Bass, I offer an online lesson service where you send me a video of your playing, and I give you specific, detailed feedback — every single day if you want.

Students from around the world are using this to fix exactly these kinds of issues and steadily improve their jazz bass skills.

Check Out the Lesson Service →

Posted on Leave a comment

One Move That Instantly Adds a Jazz Flavor to a ii-V-I Phrase

This article is written by Toru Hoshino, a jazz bassist and instructor based in Japan who teaches online lessons to students worldwide. In this article, he shares one move that instantly adds a jazz flavor to phrases over a ii-V-I progression.

The “ii-V-I” progression is one of the most common chord movements in jazz — things like:

Dm7 → G7 → C△7
Cm7 → F7 → B♭△7
Fm7 → B♭7 → E♭△7

It comes up constantly, so it’s worth having a variety of go-to moves over it. Here’s one approach that instantly gives a phrase that “jazz” quality:

  • Use the ♭9th over the dominant chord
  • Land on the 3rd over the tonic chord

Here’s a phrase I built around exactly that idea:

A ii-V-I phrase over Dm7-G7-Cmaj7 using the b9th on the dominant and landing on the 3rd over the tonic

A Quick Word on “Dominant” and “Tonic”

Before getting into the specific notes, a quick word on “dominant” and “tonic” — these refer to a chord’s harmonic function. In a progression like Dm7 → G7 → C△7 (in the key of C), G7 is the dominant and C△7 is the tonic.

Using the ♭9th Over the Dominant

In the phrase above, the circled note is the “♭9th.”

“♭9th” sounds complicated, but it’s simply the note a half step above the chord’s root.

Working this ♭9th note into a dominant chord is what gives a phrase that distinctly “jazz” edge.

Landing on the 3rd Over the Tonic

After creating that edge over the dominant, if you then land your phrase on the 3rd of the tonic chord, the tension built up over the dominant resolves, and the phrase wraps up with a clean, pleasing harmony.

Building up your freedom to weave moves like “use the ♭9th over the dominant” and “land on the 3rd over the tonic” into your improvising is a great way to expand your vocabulary.

Hearing exactly where to place a ♭9th so it lands with intention rather than just sounding off is the kind of judgment that’s hard to self-assess — a teacher catches it instantly.

Want Personalized Feedback on Your Playing?

This is exactly the kind of thing that’s hard to fix alone — and where having a teacher makes all the difference.

At Line on Bass, I offer an online lesson service where you send me a video of your playing, and I give you specific, detailed feedback — every single day if you want.

Students from around the world are using this to fix exactly these kinds of issues and steadily improve their jazz bass skills.
Check Out the Lesson Service →

Posted on Leave a comment

What Changed in My Playing After Switching to 5-String Bass

This article is written by Toru Hoshino, a jazz bassist and instructor based in Japan who teaches online lessons to students worldwide. In this article, he shares what actually changed in his playing style after switching to 5-string bass.

If you’ve only ever played a 4-string bass, you’ve probably wondered what a 5-string is actually like to play — I was right there too.

I haven’t been playing 5-string for all that long myself, but it’s been about five years since I started using one regularly. And in that time, one thing about my playing style changed significantly compared to my 4-string days: my right hand.

Specifically, when finger-picking, I stopped resting my right hand on top of the pickup. That’s the single biggest change.

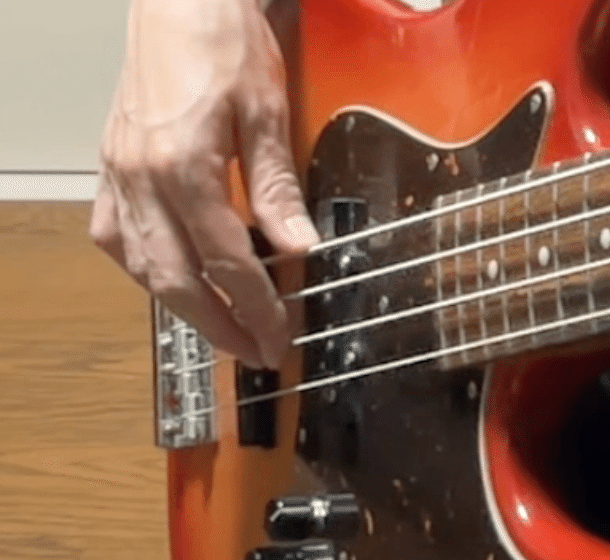
Back when I only played 4-string, my approach was:

Playing the 3rd/4th strings → right hand resting on the pickup

Right hand resting on the pickup while playing the lower strings

Playing the 1st/2nd strings → right hand resting on the 4th string

Right hand resting on the lower string while playing the higher strings

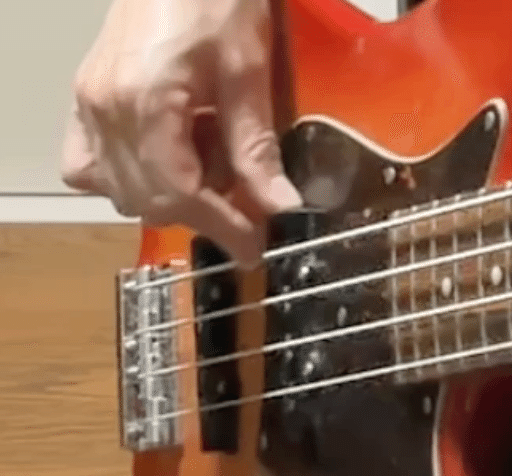
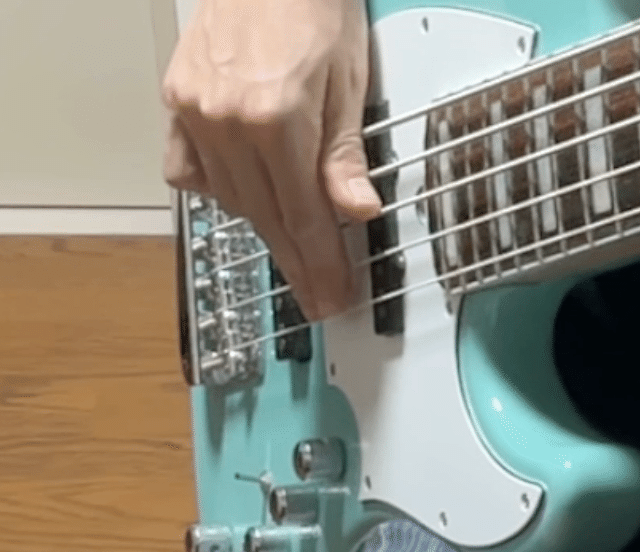
That was roughly my style. But since picking up the 5-string, I now keep my thumb off both the strings and the pickup entirely, resting it lightly against the strings instead.

Here’s roughly what that looks like:

A floating right-hand thumb position used on 5-string bass

The reason I landed on this form is that my old approach made muting genuinely difficult on a 5-string.

With 5 strings, resting your hand on the pickup puts you a long way from the 1st string, and there are more strings you need to mute at any given time — which meant I was constantly relying on my right thumb for muting, and before I knew it, I’d drifted away from the pickup entirely.

These days, I find myself lifting my thumb off the pickup even on 4-string basses fairly often too (depending on the phrase). But this new approach has genuinely made muting easier than it used to be.

I originally picked up the 5-string simply because more of my students were playing one, but it turned into an unexpected discovery, and I’m having a lot of fun with 5-string bass these days.

For what it’s worth, I barely ever actually play that 5th string itself!

A shift like this in your right-hand form is hard to evaluate just by feel — having a teacher watch your hand position directly is the fastest way to tell if it’s actually working for you.

Want Personalized Feedback on Your Playing?

This is exactly the kind of thing that’s hard to fix alone — and where having a teacher makes all the difference.

At Line on Bass, I offer an online lesson service where you send me a video of your playing, and I give you specific, detailed feedback — every single day if you want.

Students from around the world are using this to fix exactly these kinds of issues and steadily improve their jazz bass skills.
Check Out the Lesson Service →

Posted on Leave a comment

The 3rd, 5th, and 7th in Walking Bass: 3 Commonly Confused Points

This article is written by Toru Hoshino, a jazz bassist and instructor based in Japan who teaches online lessons to students worldwide. In this article, he clears up three commonly confused points about the 3rd, 5th, and 7th in walking bass.

The 3rd, 5th, and 7th are critical degrees for walking bass, but a lot of players end up holding onto a slightly mistaken understanding of them. This article cleans up three points where I see confusion come up often. Use it as a refresher on the underlying theory.

Here’s what we’ll cover:

  1. The 3rd is the key note separating major chords from minor chords
  2. Some chords have a flatted 5th
  3. Watch the difference between “△7” and “7”

1. The 3rd Is the Key Note Separating Major and Minor Chords

Let’s start with the basics of the 3rd. Chords broadly fall into two camps: “minor-type” chords and “major-type” chords.

Minor-type chords are the ones with a lowercase “m” next to the letter — “Cm,” “Cm7,” “Cm7(♭5),” and so on.

The chord symbols Cm, Cm7, and Cm7(b5)

Major-type chords are the ones without that “m” — “C,” “C△7,” “C7,” and so on.

The chord symbols C, C-triangle-7, and C7

What actually creates that “m”-or-not difference is the 3rd.

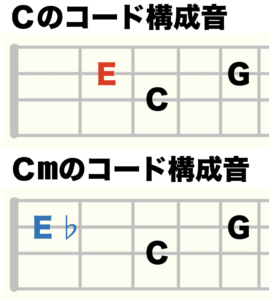
Comparing C and Cm: C is built from C, E, G, while Cm is built from C, E♭, G — the 3rd is the note that’s different.

Fretboard diagrams comparing the chord tones of C major versus C minor
Top: the chord tones of C major. Bottom: the chord tones of C minor — note the E vs. E♭.

Play C and Cm as a chord on a piano, and they sound completely different in character. So when you’re building a bass line around a chord, choosing the right note while staying clear on major versus minor really matters.

2. Some Chords Have a Flatted 5th

One thing that comes up often in jazz: chords with a flatted 5th.

The 5th is easy to visualize and use even if you don’t fully understand the theory behind it — for C, the 5th is G; for D, it’s A.

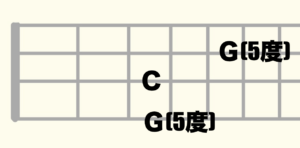
It’s the note two strings over (toward the thinner strings) and two frets up, or the same fret on the neighboring thicker string.

A fretboard diagram showing the root and 5th of a C chord
The 5th (G) of a C chord on the fretboard.

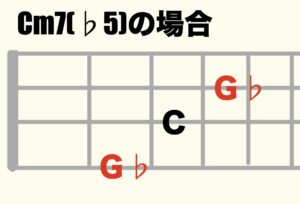
But every once in a while, you’ll run into a chord where the 5th is flatted. This is called a “minor seventh flat five” chord, written as “m7(♭5).”

For Cm7(♭5), the 5th becomes G♭ — a half step down from the usual 5th.

A fretboard diagram showing the flatted 5th in a Cm7(b5) chord
The flatted 5th (G♭) in a Cm7(♭5) chord.

It’s easy to assume the 5th always lives in the same spot, but jazz tunes are full of (♭5) chords like this, so it’s something to watch closely when building a walking bass line.

3. Watch the Difference Between “△7” and “7”

Last up: the difference between “△7” and plain “7.” This is a point I correct often in lessons, and a lot of players mix the two up.

What separates a triangle-7 from a plain 7 is the 7th.

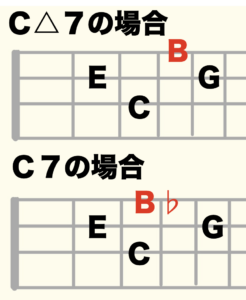
C△7 is built from C, E, G, B. C7 is built from C, E, G, B♭. The 7th is the note that’s different.

Fretboard diagrams comparing C-triangle-7 and C7
Top: C△7, with B as the 7th. Bottom: C7, with B♭ as the 7th.

It’s just the difference between B and B♭, but a small difference like that has a major effect on the sound — so understanding the △7-versus-7 distinction matters.

That wraps up “the 3rd, 5th, and 7th” — three things well worth knowing if you’re working on walking bass. If you’re just getting into theory, keep this in the back of your mind; it’ll come in handy.

Hopefully this is useful for your daily practice.

These degree-by-degree distinctions are exactly the kind of thing that’s easy to get backwards in your own playing without realizing it — having a teacher check your bass lines catches it fast.

Want Personalized Feedback on Your Playing?

This is exactly the kind of thing that’s hard to fix alone — and where having a teacher makes all the difference.

At Line on Bass, I offer an online lesson service where you send me a video of your playing, and I give you specific, detailed feedback — every single day if you want.

Students from around the world are using this to fix exactly these kinds of issues and steadily improve their jazz bass skills.
Check Out the Lesson Service →

Posted on Leave a comment

Note Duration Is the Secret to Groove — Just Evening Out Your Note Lengths Changes Everything

This article is written by Toru Hoshino, a jazz bassist and instructor based in Japan who teaches online lessons to students worldwide. In this article, he explains why “note duration” matters so much, and how just evening it out can change the quality of your playing.

In lessons, I often tell students to “hold that note out fully” — and that comment is really about note duration: how long each note actually lasts, not just which note you’re playing or when you start it.

What Is “Note Duration”?

Put simply, note duration is just how long a note actually lasts.

Written out, it looks roughly like:

An eighth note: “ta”
A quarter note: “taa”
A half note: “taaaa”
A whole note: “taaaaaaa”

What I Often Point Out in Lessons

Most of my students are working on walking bass, so this is a comment I make constantly:

“Pay attention to keeping your note durations even in your walking bass line.”

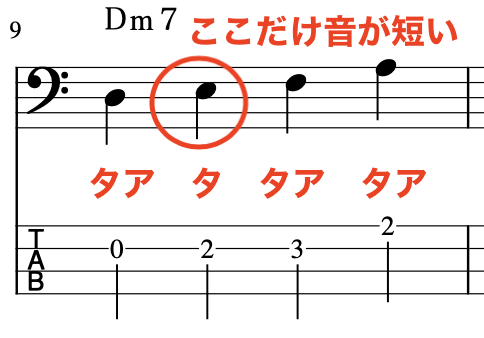
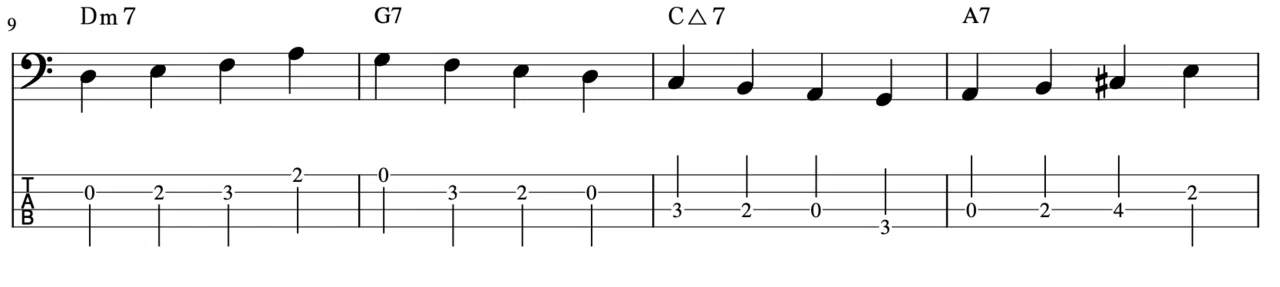
A walking bass line is typically four quarter notes per bar — “taa, taa, taa, taa.” But once a position shift or a leap enters the picture:

A walking bass line over Dm7-G7-Cmaj7-A7

You’ll sometimes hear:

“taa, ‘ta‘, taa, taa”

The second note cut short during a position shift, annotated 'this note alone is short'
The note circled in red gets cut short during the position shift.

or:

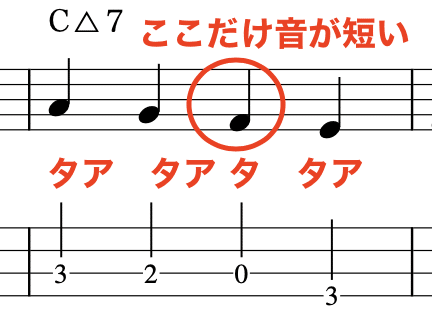
“taa, taa, ‘ta‘, taa”

A note cut short during a different position shift, with the same 'this note alone is short' annotation
Again, the circled note ends up clipped short — this time on a different beat.

where one single note in the middle of an otherwise even quarter-note flow gets cut noticeably short.

When that happens, the evenness of the note durations breaks down, and that can directly hurt your sense of groove.

So paying attention to whether your note durations stay even is genuinely important.

How Do You Fix It?

Fixing uneven note durations really does require dedicated practice, but more than anything else, I think awareness is what matters most.

Just holding a strong mental intention of “I’m going to play this evenly” while you practice will change your results.

Hearing whether your own note durations are actually even is surprisingly hard to judge by ear alone — it’s exactly the kind of thing a teacher catches instantly from the outside.

Want Personalized Feedback on Your Playing?

This is exactly the kind of thing that’s hard to fix alone — and where having a teacher makes all the difference.

At Line on Bass, I offer an online lesson service where you send me a video of your playing, and I give you specific, detailed feedback — every single day if you want.

Students from around the world are using this to fix exactly these kinds of issues and steadily improve their jazz bass skills.
Check Out the Lesson Service →

Posted on Leave a comment

Building a Bass Solo Over “Fly Me to the Moon”: 7 Things I Kept in Mind

This article is written by Toru Hoshino, a jazz bassist and instructor based in Japan who teaches online lessons to students worldwide. In this article, he breaks down seven things he kept in mind while improvising a bass solo over the chord progression of “Fly Me to the Moon.”

This article is for:

  • Bassists who aren’t sure how to actually structure an improvised solo
  • Bassists who want fresh ideas for their improvised solos
  • Bassists who are just getting started with jazz bass

Soloing Over “Fly Me to the Moon” (Performance)

Here’s the performance — give it a watch first.

What I Kept in Mind While Soloing

Here’s what I was focused on while building this solo:

  1. Not overcrowding the phrase with notes
  2. Working in triplets deliberately
  3. Leaning on chord tones with intention
  4. A go-to dominant phrase
  5. A Paul Chambers–style phrase
  6. Quoting the melody
  7. Closing it out with a walking bass line

1. Not Overcrowding the Phrase with Notes

In the A section (bars 1–8), I deliberately used a lot of rests and long tones, keeping the note density low right from the start.

If you cram in too many phrases right out of the gate, you tend to run out of ideas later on, and the solo as a whole ends up sounding flat with no dynamic shape.

So here, I deliberately kept the early note count low, to build in some light-and-shade across the whole solo.

2. Working in Triplets Deliberately

In bar 2 of the B section, I deliberately worked in an eighth-note triplet rhythm.

Triplets can feel a bit awkward fingering-wise at first, but a solo built only out of quarter notes and eighth notes tends to feel flat no matter what.

Adding triplets brings rhythmic ups and downs and real groove to a phrase, making for a much more memorable solo. I’d really encourage working them in deliberately.

3. Leaning on Chord Tones with Intention

In bars 1–4 of the A section (second time through), I set a chord tone — the root, 3rd, or 5th — on the first beat of every bar, and built each phrase so it moves toward that target note.

Doing this gives your improvisation a natural, “singing” quality. That said, staying constantly aware of chord tones throughout a performance isn’t easy.

4. A Go-To Dominant Phrase

In bar 4 of the C section, I used a stock phrase built on a dominant motion.

Specifically, over the A7 → Dm7 movement, I used C# (the major 3rd of A7) and B♭ (the altered ♭9 tension) to create that unmistakably “jazz” sound.

Phrases like this — the “go-to” ones — are a powerful weapon for instantly adding a jazz flavor to your playing.

5. A Paul Chambers–Style Phrase

In bar 5 of the A section (second time through), I took on a phrase combining triplets with wide leaps.

This phrase draws on one I picked up from jazz bass legend Paul Chambers, from his playing on his landmark album “Visitation.” It’s on the harder side, but it’s the kind of thing that genuinely pays off once you’ve got it under your fingers.

6. Quoting the Melody

In bars 5–7 of the A section (second time through), I quoted part of the tune’s actual melody.

Quoting the theme like this is a common technique, not just in jazz but in rock solos too. It makes the “oh, that’s the tune!” connection click for the listener and brings a sense of familiarity and unity to the performance.

Keeping the melody in your back pocket is a genuinely powerful tool when you’re building an improvised solo.

7. Closing It Out with a Walking Bass Line

In bars 7–8 of the C section in the second chorus, I switched into a walking bass line right from the top of bar 31, signaling clearly to the listener that the solo is wrapping up.

This approach gets used constantly at real sessions — it also makes it much easier for the next soloist to come in cleanly. It’s a closing technique well worth keeping in your back pocket.

Building a solo with this much intentional structure takes time to internalize — having someone point out exactly which of these seven elements is missing from your own playing is where a teacher’s feedback speeds things up enormously.

Want Personalized Feedback on Your Playing?

This is exactly the kind of thing that’s hard to fix alone — and where having a teacher makes all the difference.

At Line on Bass, I offer an online lesson service where you send me a video of your playing, and I give you specific, detailed feedback — every single day if you want.

Students from around the world are using this to fix exactly these kinds of issues and steadily improve their jazz bass skills.
Check Out the Lesson Service →