Posted on Leave a comment

One Thing to Watch For When Using Position Markers on Upright Bass

This article is written by Toru Hoshino, a jazz bassist and instructor based in Japan who teaches online lessons to students worldwide. In this article, he shares one important thing to watch for when using position markers (fingerboard tape) on upright bass.

Upright bass has no frets like an electric bass does, so the boundaries between pitches are hard to feel, and intonation is genuinely difficult to nail down when you’re just starting out.
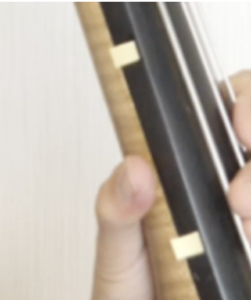
Position marker tape applied to the upright bass fingerboard

Because of that, I often get asked: “Is it okay to put stickers or tape on the fingerboard as position markers?”

Opinions vary on this, but personally, I think it’s fine. In fact, I used position markers myself for my first few years.

That said, here’s the thing to watch out for: don’t stare directly at the markers.

If you get into the habit of staring straight at the position marker, you end up having to turn your head every single time you play —

Look left at the position marker

Looking left to check the position marker

Look forward at the sheet music
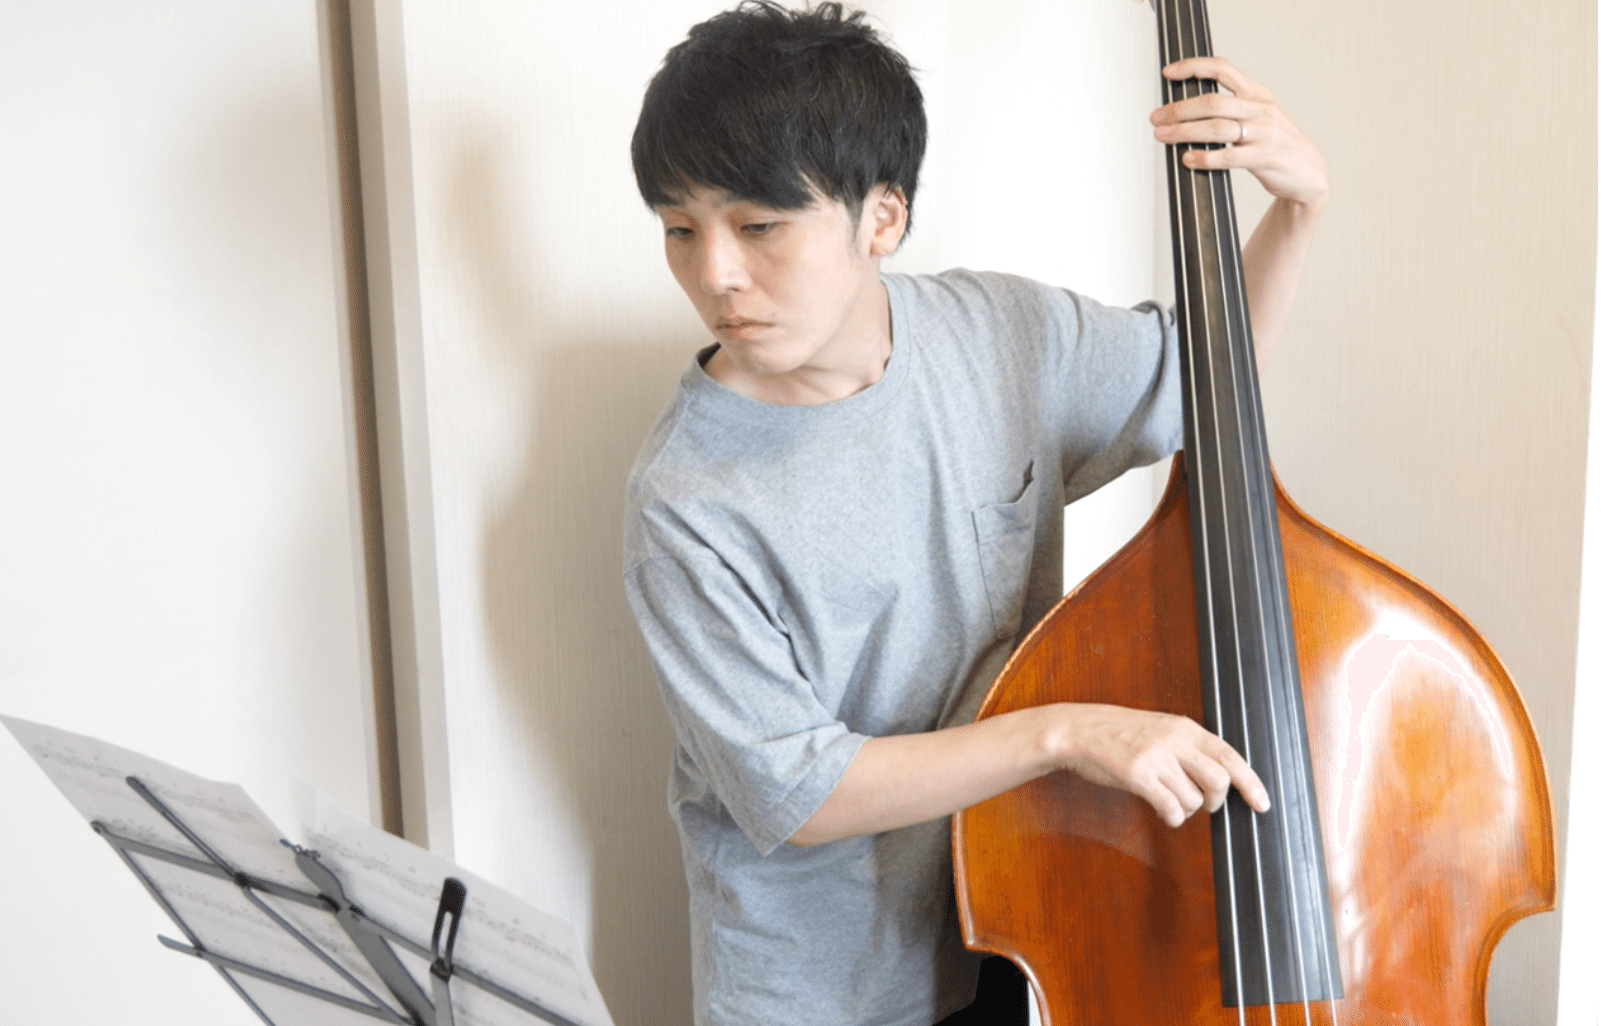
Looking forward at the sheet music

Look left at the position marker, look forward at the sheet music, look left at the position marker, look forward at the sheet music…

…which means turning your head left, forward, left, forward, over and over throughout a performance — and I think that’s wasted motion.

So instead, try to catch the position marker at the edge of your vision as much as possible.

Keeping your head as still as possible, with both the position marker and the sheet music sitting in your field of view at the same time, will make performing noticeably easier.
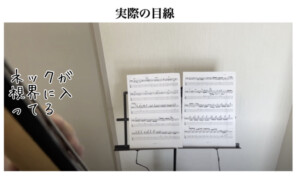
A point-of-view photo showing the bass neck caught at the edge of vision while reading sheet music
The neck stays at the edge of your field of view while the sheet music stays in front.

Hopefully this gives you a useful tip if you’re using position markers.

Training your eyes to catch the fingerboard at the edge of your vision instead of staring at it is a subtle habit — a teacher watching you play can usually spot whether you’re doing it within seconds.

Want Personalized Feedback on Your Playing?

This is exactly the kind of thing that’s hard to fix alone — and where having a teacher makes all the difference.

At Line on Bass, I offer an online lesson service where you send me a video of your playing, and I give you specific, detailed feedback — every single day if you want.

Students from around the world are using this to fix exactly these kinds of issues and steadily improve their jazz bass skills.

Check Out the Lesson Service →

Posted on Leave a comment

What It Actually Takes to Play Solo Bass

This article is written by Toru Hoshino, a jazz bassist and instructor based in Japan who teaches online lessons to students worldwide. In this article, he answers a question about what actually matters most when learning solo bass.

I recently uploaded a video of myself playing the jazz standard “Summertime” as a solo bass arrangement, and it got a great response — I received several questions along the lines of “how do you actually do this?”

The single most important thing is, unsurprisingly: repetition. Honestly though, that’s true of pretty much everything, so let me also share the next thing I prioritize, which is more specific: song selection.

More specifically, I pay close attention to one particular question: can this song be played using open strings?

Why Open Strings Matter

Practicing a solo bass arrangement on upright bass

When playing solo bass, you’re typically playing the melody on the 1st and 2nd strings (D and G) while playing the bass line on the 3rd and 4th strings (E and A).

The 1st and 2nd strings inevitably need your left hand actively moving to play the melody. If the 3rd and 4th strings also require your left hand at the same time, your left-hand fingering gets overloaded, and it becomes genuinely difficult to pull off a one-person ensemble.

“Summertime” is in the key of A minor, so it can largely be played using the open 3rd string as the bass note, and the open 4th string’s E and open 2nd string’s D are also easy to use harmonically within that key.

So my recommendation, especially when starting out, is to work with keys that let you lean heavily on open strings — A minor, D minor, and similar keys. On the flip side, I don’t really recommend starting with keys loaded with key signatures, like G♭ or D♭ — your left hand ends up overworked.

Hopefully this gives you a useful way to think about taking on solo bass.

The Solo Bass Performance

Here’s my take on “Summertime.”

Picking the right key gets you most of the way there — but actually balancing melody and bass line with two independent hands is exactly where having a teacher’s ear catches what you can’t hear yourself.

Want Personalized Feedback on Your Playing?

This is exactly the kind of thing that’s hard to fix alone — and where having a teacher makes all the difference.

At Line on Bass, I offer an online lesson service where you send me a video of your playing, and I give you specific, detailed feedback — every single day if you want.

Students from around the world are using this to fix exactly these kinds of issues and steadily improve their jazz bass skills.
Check Out the Lesson Service →

Posted on Leave a comment

How Playing Upright Bass Made Me a Better Electric Bass Player

This article is written by Toru Hoshino, a jazz bassist and instructor based in Japan who teaches online lessons to students worldwide. In this article, he shares one genuinely positive effect that upright bass had on his electric bass playing.

There are plenty of good side effects from playing upright bass that carry over to electric bass, but one of the biggest is this: I became able to actually think in note names.

Coming up as a band kid, I grew up entirely on tab notation, so I’d built a habit of memorizing pitches as numbers — “C is the 3 (3rd string, 3rd fret),” “F# is the 4 (2nd string, 4th fret),” and so on.

But upright bass has no frets, and method books for it don’t use tab at all. So instead of “C is the 3,” I had to relearn it as “C is the note you fret with your pinky in half position on the A string,” and “F# is the note you fret with your pinky in first position on the D string.”

Practicing upright bass

Getting comfortable reading bass clef, which I wasn’t used to at all, was genuinely tough. But the single biggest benefit of learning to think in note names instead of tab numbers was that my ability to handle chords on the fly improved enormously.

For example, if there’s a Dm chord and I want to build an improvised phrase on the spot, having the chord tones — D (root), F (3rd), A (5th) — come to mind instantly lets me build a phrase right then and there. And when they come up instantly like that, the resulting phrase naturally fits the harmony of the chord backing being played underneath.

If you’re stuck thinking only in tab the whole time, chord tones like these don’t come to mind quickly either.

In that sense, I’m glad picking up upright bass gave me this new perspective. It really does broaden your view as a musician — if you’re at all curious about upright or double bass, I’d genuinely encourage you to give it a try.

Switching to thinking in note names is the kind of internal shift that’s hard to confirm you’ve actually made on your own — having someone listen and quiz you on the spot is the fastest way to know it’s sticking.

Want Personalized Feedback on Your Playing?

This is exactly the kind of thing that’s hard to fix alone — and where having a teacher makes all the difference.

At Line on Bass, I offer an online lesson service where you send me a video of your playing, and I give you specific, detailed feedback — every single day if you want.

Students from around the world are using this to fix exactly these kinds of issues and steadily improve their jazz bass skills.
Check Out the Lesson Service →

Posted on Leave a comment

Why Does My Pinky Keep Popping Up? A Left-Hand Drill to Fix It

This article is written by Toru Hoshino, a jazz bassist and instructor based in Japan who teaches online lessons to students worldwide. In this article, he answers a question about why the pinky finger keeps popping up while fretting.

Here’s a question I got recently: “No matter how many times I practice, my pinky keeps popping straight up. What can I do about it?”

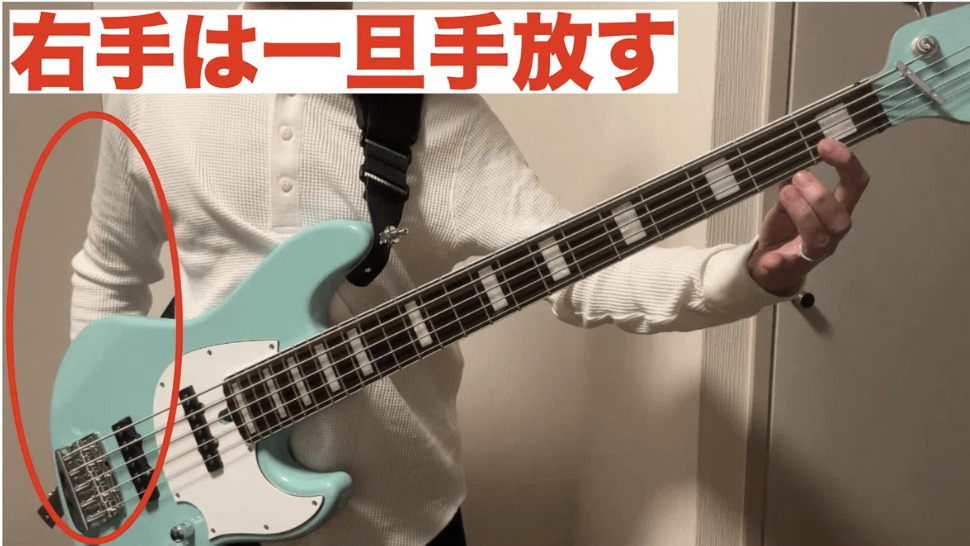
This came in through a contact form, so I can’t say for certain without actually seeing your hand in action — but here’s one thing worth trying: set your right hand aside for a moment and watch your left hand’s movement on its own.

Say you’re fretting the 3rd string with your index finger on the 1st fret, middle finger on the 2nd fret, and pinky on the 3rd fret, one after another.

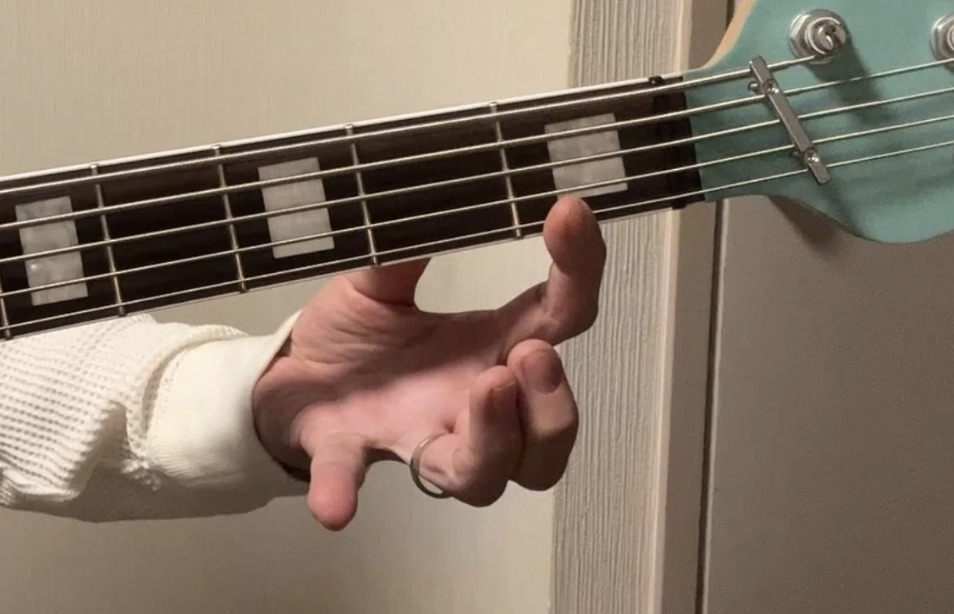
A common pattern is that the pinky pops straight up while you’re fretting with the index or middle finger.

The pinky finger popping straight up while fretting with the index finger

The pinky just isn’t a finger you move much in everyday life, so when you’re still getting used to it and you’re moving both hands at once, your brain can’t fully control what the pinky’s doing — and that’s a big part of why it pops up.

So: set your right hand aside entirely, go left-hand only, and fret the 3rd string’s 1st fret with your index, 2nd fret with your middle finger, and 3rd fret with your pinky, one after another.

While you’re fretting the 1st fret, consciously focus on keeping the pinky on the 3rd fret from lifting.

Doing this often makes the pinky noticeably easier to control than when the right hand was also in the mix.

Practicing the same fingering with the left hand only, focusing on keeping the pinky down

Adding more moving parts at once often makes it harder to control things the way you intend. So if your pinky just won’t cooperate no matter what, try isolating the movement by setting your right hand aside and checking your left hand alone.

Hopefully this helps with your daily practice.

A habit like this is hard to fully diagnose from a written description alone — a teacher watching your actual hand can usually spot the exact cause in seconds.

Want Personalized Feedback on Your Playing?

This is exactly the kind of thing that’s hard to fix alone — and where having a teacher makes all the difference.

At Line on Bass, I offer an online lesson service where you send me a video of your playing, and I give you specific, detailed feedback — every single day if you want.

Students from around the world are using this to fix exactly these kinds of issues and steadily improve their jazz bass skills.

Check Out the Lesson Service →

Posted on Leave a comment

A Bass Line Breakdown: “A Night in Tunisia” on Upright Bass

This article is written by Toru Hoshino, a jazz bassist and instructor based in Japan who teaches online lessons to students worldwide. In this article, he breaks down a bass line for the jazz standard “A Night in Tunisia,” played on upright bass.

“A Night in Tunisia” on Upright Bass

Let’s start with the performance itself:

Taking On a Genuinely Difficult Tune

This one’s on the harder side for beginners to play, but it comes up often enough at jam sessions that it’s well worth having under your fingers.

The Intro Fingering Is the Key

The intro progression — E♭7 → Dm6 → E♭7 → Dm6 — is the part to really focus on. During the melody section, both the intro and the A section largely repeat this same phrase.

I chose to start the opening E♭ note on the A string.

Starting the opening E-flat note on the A string

It’s an awkward starting position right out of the gate, but:

An alternative starting position on the D string that requires more position shifts

↑ Starting on the D string’s 1st fret like this, instead, makes the position shifts that follow much more difficult — so I chose to start on the A string’s E♭, which keeps later position changes to a minimum.

How to Keep Your Fingers From Tangling in the Intro

The intro phrase uses alternating index-and-middle-finger picking across three strings — A, D, and G.

Moving across three strings in such a short span makes it really easy for your fingers to tangle up.

If you’re tangling frequently, it’s possible you’re using a different finger each time inconsistently — so first, firmly decide which finger you’re using where.

Here’s how I approached it this time:

Note: I personally have a tendency to favor my middle finger more when alternating, so this fingering reflects that. If it doesn’t feel natural for you, go with whatever fingering actually works for your own hand.

A consistent index-and-middle-finger alternating pattern across three strings

From there, check your fingering against a metronome at a slow tempo, and gradually speed up once you’ve got it locked in.

Listen to the Masters Play It Too

Art Blakey’s recording of “A Night in Tunisia” features this same bass phrase right from the start of the tune.

Listening to the actual recording will deepen your understanding even further.

Untangling fingering like this on your own takes a lot of trial and error — a teacher can usually spot the smoother path within seconds of watching you play it.

Want Personalized Feedback on Your Playing?

This is exactly the kind of thing that’s hard to fix alone — and where having a teacher makes all the difference.

At Line on Bass, I offer an online lesson service where you send me a video of your playing, and I give you specific, detailed feedback — every single day if you want.

Students from around the world are using this to fix exactly these kinds of issues and steadily improve their jazz bass skills.

Check Out the Lesson Service →

Posted on Leave a comment

Chord Tones vs. Scales: What’s the Actual Difference?

This article is written by Toru Hoshino, a jazz bassist and instructor based in Japan who teaches online lessons to students worldwide. In this article, he explains the actual difference between chord tones and scales.

A student of mine recently watched a walking bass line video I’d sent over, and asked: “why did you use this note here?”

Specifically: in the chord “C△7,” I’d used the note A — why?

The short answer: A works perfectly fine over C△7! Let’s dig into why.

A Quick Music Theory Refresher

The question, essentially, was: over C△7, aren’t the only usable notes

C (root)
E (3rd)
G (5th)
B (7th)

…so why can other notes be used too?

These four notes are called “chord tones,” and they form the foundation for building a bass line.

But — there are usable notes beyond just the chord tones.

Notes You Can Use Beyond the Chord Tones

As it turns out, the 2nd, 4th, and 6th are also available to use.

In the key of C, specifically, that’s:

D (2nd), F (4th), A (6th)

These notes are called “tensions.”

When you add the tensions (2nd, 4th, 6th) to the chord tones (1st, 3rd, 5th, 7th)…

…you get all seven notes from the 1st through the 7th — in other words, the scale.

So the relationship is:

Chord tones + tensions = scale

The bass line I’d sent my student was built with this “scale” concept in mind — that A wasn’t a random note, it was the 6th, drawn deliberately from the broader scale rather than just the four chord tones.

If that’s piqued your curiosity, I’m genuinely glad.

Grasping the theory is one thing — actually hearing where a tension note fits naturally into your own bass line is exactly the kind of judgment a teacher can sharpen fastest.

Want Personalized Feedback on Your Playing?

This is exactly the kind of thing that’s hard to fix alone — and where having a teacher makes all the difference.

At Line on Bass, I offer an online lesson service where you send me a video of your playing, and I give you specific, detailed feedback — every single day if you want.

Students from around the world are using this to fix exactly these kinds of issues and steadily improve their jazz bass skills.

Check Out the Lesson Service →

Posted on Leave a comment

Using iReal Pro? Try These 2 Drills to Stop Losing Your Place

This article is written by Toru Hoshino, a jazz bassist and instructor based in Japan who teaches online lessons to students worldwide. In this article, he shares two drills using iReal Pro that specifically target the “losing your place” problem.

iReal Pro — a backing-track app for jazz — is something I’ve personally used for over ten years. It’s incredibly convenient, but the feedback I hear most often is:

“I can play along fine with iReal Pro, but I completely lose my place in a real session.”

To be fair, the tension level of playing relaxed at home versus improvising live with strangers is completely different, so it’s no surprise the results aren’t the same. Still, if you’re going to use a convenient tool, you might as well use it efficiently — so here are two practice methods that help.

Both of these make practicing with iReal Pro noticeably harder, but they make for genuinely great practice.

1. Turn Off the Playback Indicator

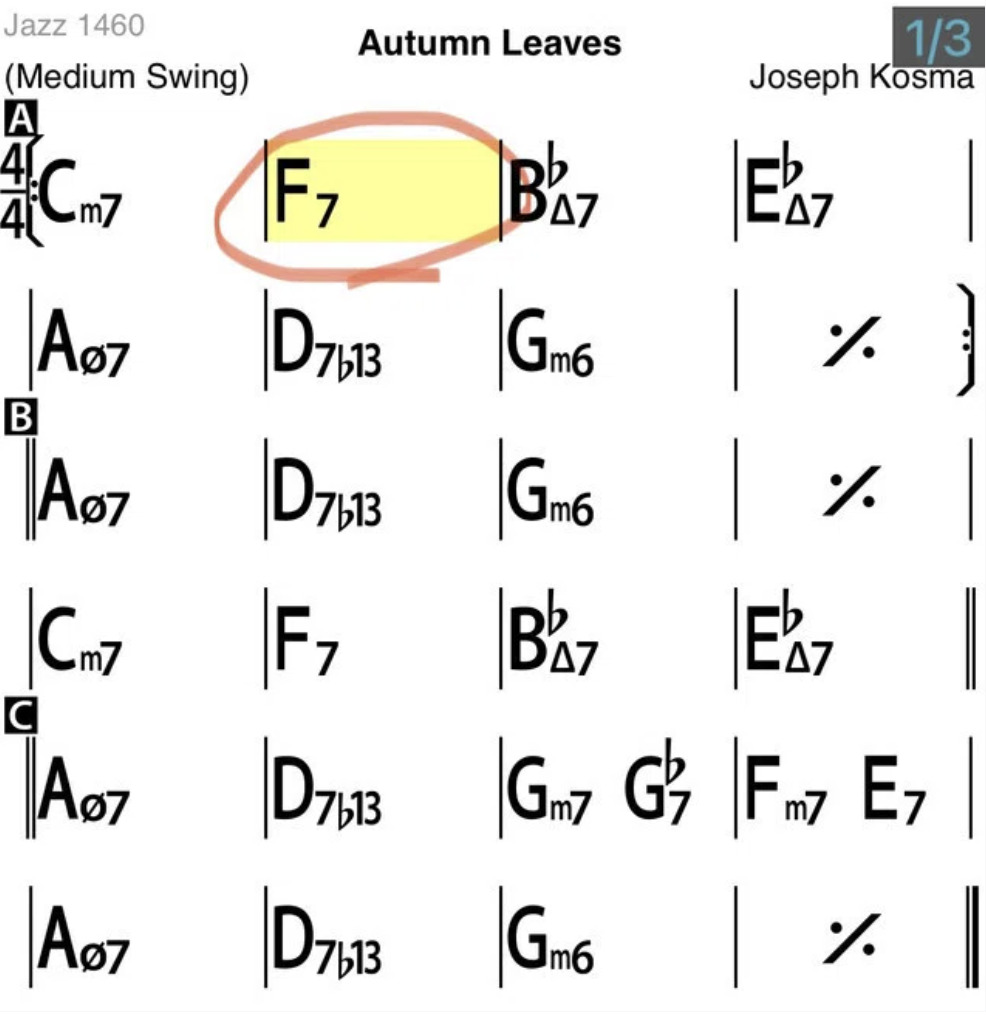
The “playback indicator” is the feature that shows you exactly which chord the song is currently on.

iReal Pro's playback indicator highlighting the current chord

Since it’s constantly showing your current position in the chart, it’s pretty hard to actually get lost. But in a real performance, you obviously don’t get that kind of helpful indicator.

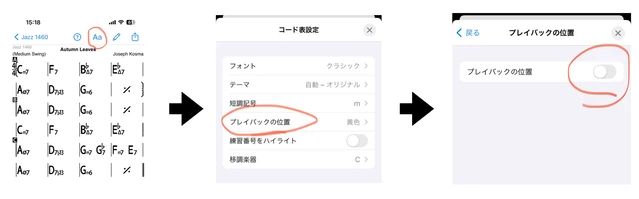
So turning the indicator off brings your practice conditions a little closer to the real thing. Open any tune, tap the letter display at the top of the screen, and turn off the “Playback Position” setting.

The setting to turn off iReal Pro's playback position indicator

This makes practicing noticeably harder, but it’ll build real skill.

2. Mute the Bass and Drums

Muting the bass and drums leaves you with just piano or guitar comping.

Practice playing your bass line or solo against just that. With no rhythm section backing you, the entire rhythmic responsibility falls on you alone — which is exactly what builds your internal sense of time.

On top of that, piano or guitar comping doesn’t always land squarely on beat 1, so just figuring out where the bar lines and beats actually are becomes its own challenge.

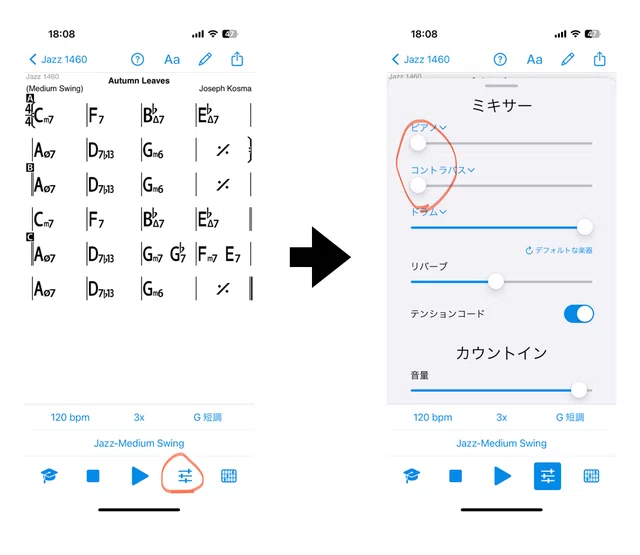
Open any tune, tap the mixer icon at the bottom of the screen, and turn off “Bass” and “Drums.”

iReal Pro's mixer screen for muting the bass and drum tracks

This makes things considerably harder too, but it’s great training.

At the end of the day, avoiding getting lost really does require real-world reps and experience — but it’s still worth squeezing every bit of value out of the tools available to you.

Drilling this kind of focus on your own is great — but knowing whether you’re actually staying locked to the time, rather than just feeling like you are, is exactly what a teacher’s ear can confirm.

Want Personalized Feedback on Your Playing?

This is exactly the kind of thing that’s hard to fix alone — and where having a teacher makes all the difference.

At Line on Bass, I offer an online lesson service where you send me a video of your playing, and I give you specific, detailed feedback — every single day if you want.

Students from around the world are using this to fix exactly these kinds of issues and steadily improve their jazz bass skills.
Check Out the Lesson Service →

Posted on Leave a comment

6 Practice Items I Actually Use

This article is written by Toru Hoshino, a jazz bassist and instructor based in Japan who teaches online lessons to students worldwide. In this article, he recommends six items that make practicing and managing your gear easier.

Here are some genuinely useful items I’ve personally used a lot for practicing bass and keeping my gear organized.

An Add-On Backpack for Your Gig Bag

My favorite find of the year: “BAG ON BAG,” an add-on bag that clips right onto a gig bag. Genuinely useful when you’ve got a lot of extra stuff to carry along with your bass or guitar — even a bandmate of mine said “maybe I should get one of these too” after seeing it.

A Wall Mount for Your Bass

Another find from this year. It installs with just a couple of small stapler-style pins, so even in a rental apartment, you can mount your bass on the wall. I’ve got three of these set up at home. The pin holes are tiny enough that they’re not an issue even when you move out.

iReal Pro

I’ve used this one for over ten years now. iReal Pro is an app that plays backing tracks for commonly played jazz tunes, and it’s incredibly useful for practicing walking bass and improvised solos. It’s paid, but it’s a one-time purchase you’ll use forever.

Fret Wraps

Another long-time staple of mine. It’s like a wristband you wrap around the nut area of an electric bass. It cuts down on open-string sustain, which is genuinely useful if you play a lot of walking bass that relies on open strings.

A Music Stand Tray

An attachment for your music stand that gives you a small surface to set things on — your phone, a metronome, a pen, all the small stuff.

https://amzn.asia/d/6g7nKhn

Compressed Air Duster

Not a music-specific item, but a standard compressed air duster. A quick spray clears dust off your pickups, which makes it a genuinely handy thing to have around.

That’s six recommended items for making your bass practice and gear management easier.

Good gear takes care of the small annoyances — but the thing that actually moves your playing forward is someone checking your progress regularly, which is exactly what a teacher provides.

Want Personalized Feedback on Your Playing?

This is exactly the kind of thing that’s hard to fix alone — and where having a teacher makes all the difference.

At Line on Bass, I offer an online lesson service where you send me a video of your playing, and I give you specific, detailed feedback — every single day if you want.

Students from around the world are using this to fix exactly these kinds of issues and steadily improve their jazz bass skills.
Check Out the Lesson Service →

Posted on Leave a comment

Stop Defaulting to “3rd, Then 5th” — Understand What Each One Actually Does

This article is written by Toru Hoshino, a jazz bassist and instructor based in Japan who teaches online lessons to students worldwide. In this article, he explains why “just default to the 3rd, then the 5th” isn’t quite the right way to think about building a bass line.

Here’s an exchange I had with a student recently. While working on building a bass line, I asked, “what were you thinking about there?” and got this answer:

“I played the root, and then just kind of used the 3rd, then the 5th…”

Using chord tones like the 3rd and 5th is genuinely important when building a bass line, so the instinct isn’t wrong. But reaching for them just “kind of” — without a reason — doesn’t feel very musical.

Ideally, you’d be thinking more like:

  • “The 3rd has this kind of color…”
  • “The 5th has this kind of color…”
  • “Which one actually fits this song?”

and choosing deliberately from there.

The Basics of the 3rd and 5th

Here’s the general rule of thumb:

  • The 5th: adds harmonic thickness to the chord. It’s the same whether the chord is major or minor (the 5th of both C major and C minor is G).
  • The 3rd: changes depending on major or minor (the 3rd of C major is E; the 3rd of C minor is E♭). Because of that, it carries much more of the chord’s emotional color — bright versus dark, and so on.

This might be hard to picture in words alone, but here’s a concrete example: when I’m playing a bossa nova bass line, I lean toward the 5th much more than the 3rd.

That’s because I found that leaning on the 3rd too much makes the note’s character too assertive — it ends up clashing with the relaxed, understated vibe that bossa nova calls for.

On the flip side, when I’m playing a jazz phrase, working the 3rd into the first beat of a bar more often gives the harmony a stronger, more assertive, cooler quality.

Being conscious of these different roles, and choosing accordingly, makes it much easier to bring real expression to both your bass lines and your solos.

Knowing the theory behind the 3rd and 5th is one thing — actually hearing which one fits a given song is exactly the kind of judgment a teacher can sharpen fast.

Want Personalized Feedback on Your Playing?

This is exactly the kind of thing that’s hard to fix alone — and where having a teacher makes all the difference.

At Line on Bass, I offer an online lesson service where you send me a video of your playing, and I give you specific, detailed feedback — every single day if you want.

Students from around the world are using this to fix exactly these kinds of issues and steadily improve their jazz bass skills.
Check Out the Lesson Service →

Posted on Leave a comment

How to Build a Bass Solo Over an F Blues Using Just the Minor Pentatonic

This article is written by Toru Hoshino, a jazz bassist and instructor based in Japan who teaches online lessons to students worldwide. In this article, he shares a simple way to build a bass solo over an F blues.

F blues is about as standard as it gets at a jam session — it’s a tune beginners run into constantly. That said, when you actually try to solo over it, you tend to run into:

  • So many chords (F7, B♭7, and more) that it’s hard to keep track
  • No clear idea of how to actually build a solo

For exactly that situation, here’s an approach I recommend: building your solo entirely around one single minor pentatonic scale.

What Is the Minor Pentatonic Scale?

In the key of F, that’s the five-note scale F-A♭-B♭-C-E♭. You can play “convincingly” over the whole blues progression with just these five notes, without having to closely track every single chord change.

This is a great approach for beginning improvisers, and it’s one I bring up constantly in my own lessons.

The reason it works is that F blues is built almost entirely from dominant 7th chords (F7, B♭7, C7) that all share a closely related blues sound — the F minor pentatonic scale lines up naturally against all of them, which is exactly why you can lean on one scale for the whole form without it sounding wrong.

Once you’re comfortable just running this one scale over the whole form, try shaping actual phrases out of it — starting and landing on different notes, adding rhythmic variety, working in some space — rather than just running up and down the scale. That’s what turns “technically correct” into an actual solo.

If you’re hoping to join a jam session someday, this is a great place to start. Once you’re comfortable with it, the same approach extends to blues progressions in other keys too.

Give a minor-pentatonic-based bass solo a try.

Getting comfortable with the scale is step one — shaping it into phrases that actually sound musical is the part a teacher can help you nail down fastest.

Want Personalized Feedback on Your Playing?

This is exactly the kind of thing that’s hard to fix alone — and where having a teacher makes all the difference.

At Line on Bass, I offer an online lesson service where you send me a video of your playing, and I give you specific, detailed feedback — every single day if you want.

Students from around the world are using this to fix exactly these kinds of issues and steadily improve their jazz bass skills.

Check Out the Lesson Service →