Posted on Leave a comment

5 Rules for Practicing Your Instrument in a Park

This article is written by Toru Hoshino, a jazz bassist and instructor based in Japan who teaches online lessons to students worldwide. In this article, he shares what three years of practicing upright bass in public parks taught him.

Sax and trumpet players, string players on violin, cello, or upright bass, singers doing vocal warmups — it’s pretty common to see musicians practicing outdoors in parks. These are all instruments that are simply too loud to practice at home without bothering the neighbors, and parks also save you the cost of renting a studio space.

Musicians are, generally speaking, always looking to save money. I practiced in parks myself for about three years, and whenever I see someone else out there gamely practicing in a park, I can’t help but slow down and take notice.

Picking the Right Park

Not every park works for instrument practice. Tiny neighborhood parks tend to carry sound straight into nearby houses, so they’re best avoided. Look for something large — the kind of big, open city park where you can find a spot far enough from foot traffic and houses that you won’t bother anyone. A few hours of research into large parks near you goes a long way.

Parks that are great for instrument practice tend to share a few things in common: they’re large enough to put real distance between you and nearby homes, they’re not packed with foot traffic on weekdays, and ideally they have some open lawn or tree cover where the sound won’t carry as far. Parks to avoid: ones where instruments are explicitly banned, ones that are constantly packed with crowds, or small neighborhood parks tucked right up against houses.

5 Rules for Practicing in a Park

1. Your Sheet Music Will Fly Away

Sudden gusts of wind will send your sheet music flying. Use clothespins to clip it down. For practicing after dark, a clip-on LED light for your music stand is also genuinely useful.

2. Set a Firm Time Limit

This matters most in summer and winter. Practicing in a park for too long without a clear cutoff is a fast track to catching a cold or, in summer, heatstroke. Personally, I never went past about 90 minutes — I’d set a timer on my phone and stop the moment my focus started to slip.

3. Plan Your Practice Routine at Home, Beforehand

Since you’ve made the effort to go outside, save any fiddly prep work — writing things out, sorting sheet music, and so on — for home ahead of time, so you can devote your outdoor time purely to actually playing.

4. Practice in the Shade, Near Trees, Whenever You Can

This protects you against sudden rain and heatstroke alike. If there’s a covered spot that won’t get in anyone’s way, make use of it.

5. Dress for the Weather — Properly

Spring and fall are easy, but summer and winter are no joke. Here’s what to keep in mind for each:

Summer:

  • Skip sandals (mosquito bites)
  • Bring bug spray
  • Wear a hat

Stick to the shade as much as you can, and keep drinking water throughout.

Winter:

  • Layer up — seriously
  • Tights under your pants
  • Two pairs of socks
  • Boots
  • A thermos of hot tea

No matter how many layers you put on, the cold seeps into your whole body after about an hour. If you absolutely have to practice for longer, bring hot tea in a thermos. I practiced through winters myself, eventually splurging on some genuinely expensive thermal tights just to make it bearable — and they were unbelievably warm and held up well over time.

A Few More Things to Keep in Mind

Keep Up with Instrument Maintenance

Humid months are hard on your instrument when you’re playing outdoors. Use a backup instrument if you have one, and if you only have your main one, stay on top of maintenance.

Avoid Cherry Blossom Season and Sports Events

Crowds and noise from games or festivals make it impossible to concentrate, and in summer you’ll sometimes run into people setting off fireworks nearby — distracting at best, and a little alarming if one heads your way.

Skip It When You’re Not Feeling Well

Summer and winter conditions outdoors will make you feel worse, not better. Stick to practicing at home during those times.

If Someone Heckles You, Just Stay Confident

I’ve never had a run-in with anyone genuinely dangerous, but I’ve definitely had drunk passersby comment on my way past — “what is that, a cello or something?” (it’s an upright bass, for the record). Once in a while a tourist mistakes it for a street performance and leaves a tip. Either way, the key is not to let any of it get to you. Don’t be shy about practicing in public, even as a beginner — there’s something genuinely great about the feeling of your sound resonating outdoors. Enjoy it.

Even with all the outdoor practice in the world, the thing that’s genuinely hard to catch on your own is what your playing actually sounds like to someone else listening — which is exactly where a teacher comes in.

Want Personalized Feedback on Your Playing?

This is exactly the kind of thing that’s hard to fix alone — and where having a teacher makes all the difference.

At Line on Bass, I offer an online lesson service where you send me a video of your playing, and I give you specific, detailed feedback — every single day if you want.

Students from around the world are using this to fix exactly these kinds of issues and steadily improve their jazz bass skills.
Check Out the Lesson Service →

Posted on Leave a comment

A Trick for Smoothly Reaching High-Position Notes in a Bass Line

This article is written by Toru Hoshino, a jazz bassist and instructor based in Japan who teaches online lessons to students worldwide. In this article, he shares a trick for reaching high-position notes smoothly in a bass line.

A Request I Hear a Lot

“I want to work high-position notes into my bass lines” is something I hear constantly. Using the higher register really does open up your lines and add to the cool factor.

At the same time, I also hear just as often: “I don’t know how to fit it in” or “I can’t transition there smoothly.”

Use an Open String to Move Smoothly

What I usually suggest in this situation is a simple method: work in an open string. Using an open string frees up your left hand for a moment, giving you the breathing room to shift into a high position.

A Concrete Example

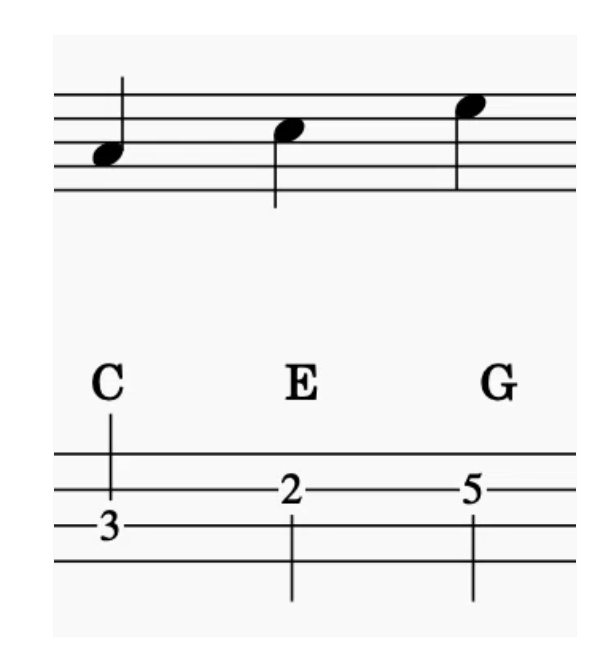
Say you’re playing “C–E–G.”

  • C (3rd string, 3rd fret)
  • E (2nd string, 2nd fret)
  • G (2nd string, 5th fret)

A standard fingering for C-E-G on the bass

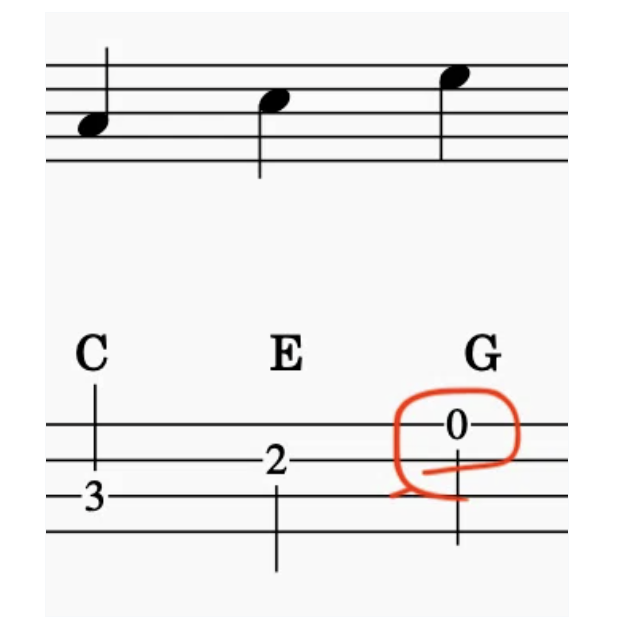
That’s the usual way to play it. But what if, instead of playing G on the 2nd string’s 5th fret, you played it as the open 1st string instead?

The same phrase with G played as an open string, freeing up the left hand

Playing that note as an open string frees up your left hand for that entire beat. You can use that moment to jump straight into a high position and land cleanly on your next note. I use this method constantly myself.

Smoothly working high-position notes into a real bass line takes more than just understanding the concept — having someone check your actual execution is where a teacher really earns their keep.

Want Personalized Feedback on Your Playing?

This is exactly the kind of thing that’s hard to fix alone — and where having a teacher makes all the difference.

At Line on Bass, I offer an online lesson service where you send me a video of your playing, and I give you specific, detailed feedback — every single day if you want.

Students from around the world are using this to fix exactly these kinds of issues and steadily improve their jazz bass skills.
Check Out the Lesson Service →

Posted on Leave a comment

Free Bass Line Sheet Music for 10 Jazz Standards (Download)

This article is written by Toru Hoshino, a jazz bassist and instructor based in Japan who teaches online lessons to students worldwide. In this article, he shares a free download of ready-to-use bass lines for ten jazz standards.

Here’s a collection of practical, usable bass lines built around well-known tunes that come up constantly at jam sessions and live gigs.

Every line here is simple enough for a beginner to use as-is, so put them to work in your walking bass practice or your next session prep.

Tunes Included

  • Blue Bossa
  • Blue Haze
  • Cantaloupe Island
  • Fly Me to the Moon
  • Isn’t She Lovely
  • Mack the Knife
  • Moon River
  • Over the Rainbow
  • Smile
  • Watermelon Man

Download

The bass lines for each tune are available as free PDFs. Download them from the link below:

👉 Download the Bass Line PDFs

Who This Is For

  • Anyone wanting to try a jam session for the first time
  • Anyone who wants a solid grip on bass lines for common session tunes
  • Anyone getting started with improvisation or walking bass

Put these to good use in your daily practice.

Having a solid bass line memorized is a great start — getting feedback on how you’re actually playing it is the next step, and that’s exactly where a teacher comes in.

Want Personalized Feedback on Your Playing?

This is exactly the kind of thing that’s hard to fix alone — and where having a teacher makes all the difference.

At Line on Bass, I offer an online lesson service where you send me a video of your playing, and I give you specific, detailed feedback — every single day if you want.

Students from around the world are using this to fix exactly these kinds of issues and steadily improve their jazz bass skills.
Check Out the Lesson Service →

Posted on Leave a comment

Should You Read Notes as Do-Re-Mi or as Letter Names?

This article is written by Toru Hoshino, a jazz bassist and instructor based in Japan who teaches online lessons to students worldwide. In this article, he answers a question from one of his jazz students about how to read note names.

Here’s a question I got from one of my jazz students, along with my answer:

“Should I think of notes by solfège — do-re-mi-fa-sol — or by letter names — C-D-E-F-G?”

My Answer: Get Comfortable Reading by Letter Names (C-D-E-F-G)

In popular music — rock, pop, jazz, and so on — you’re constantly thinking in terms of chords, so I recommend getting comfortable reading notes as letter names rather than solfège.

One big reason: when you’re writing your own phrases or analyzing a chord progression, thinking in letters links up much more intuitively with the chord symbols you’re already reading.

How to Build the Habit

To get comfortable with letter names, the key is to consciously say the note names to yourself while playing slowly during scale practice and other basics.

For example, while playing a major scale, say “C… D… E… F… G…” in your head as you go. This steadily strengthens the connection between your fingers and the note names.

It’s Fine If You Can’t Keep Up at Faster Tempos

That said, once the tempo picks up, it gets genuinely hard to consciously think “C-D-E-F-G” in your head. This happens to everyone — don’t worry about it.

I still find it hard to consciously track note names once things get fast enough myself.

Even so, practicing with letter names in mind at slower tempos strengthens the connection between phrases and chords over time, which ultimately improves how well you remember and understand phrases.

Early On, the Effort to Stay Conscious of It Matters

When you’re just starting out, consciously tracking note names while also moving your fingers can feel like a lot to juggle.

But building this habit early means that, eventually, the note name will just pop into your head the instant you look at the fretboard.

You don’t need to get there right away. Take it slow and steady.

Building a habit like this on your own can feel slow — but a teacher can usually tell you exactly which exercises will get you there fastest.

Want Personalized Feedback on Your Playing?

This is exactly the kind of thing that’s hard to fix alone — and where having a teacher makes all the difference.

At Line on Bass, I offer an online lesson service where you send me a video of your playing, and I give you specific, detailed feedback — every single day if you want.

Students from around the world are using this to fix exactly these kinds of issues and steadily improve their jazz bass skills.
Check Out the Lesson Service →

Posted on Leave a comment

How to Use Chromatic Approach Notes the Right Way in Walking Bass

This article is written by Toru Hoshino, a jazz bassist and instructor based in Japan who teaches online lessons to students worldwide. In this article, he explains how to use chromatic approach notes the right way in a walking bass line.

What Is a Chromatic Approach Note?

A chromatic approach note is a note that approaches the root of the next bar’s chord from a half step below or above, like this:

A chromatic approach note leading into the root of the next chord

Used well, it gives your bass line a smooth, flowing sound. The “forward motion” and distinctly jazz-like quality that’s unique to walking bass changes a lot depending on how you handle this one device.

A Common Mistake

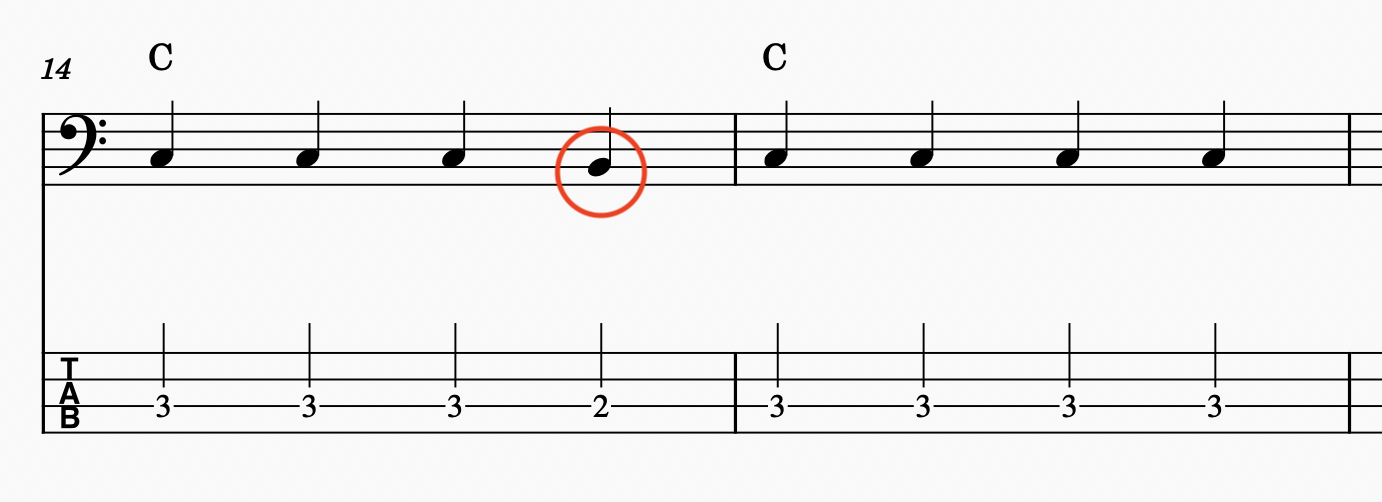
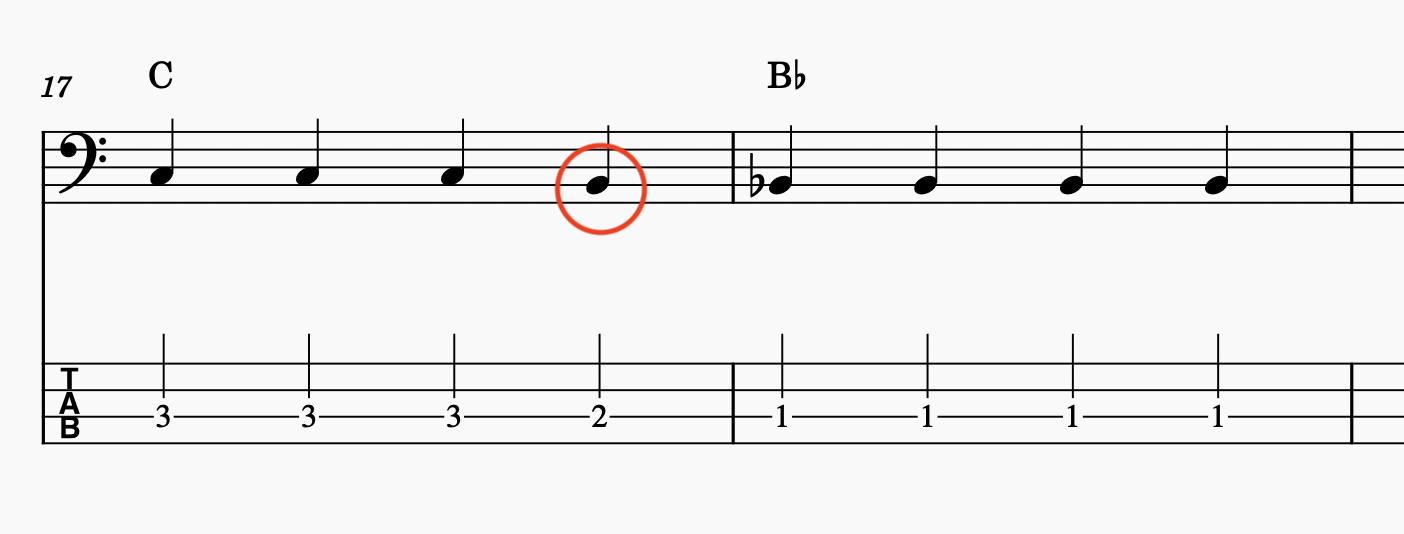
A common mistake is using a chromatic approach note even when the same chord continues for two bars in a row. For example, if a C chord lasts two bars, some players will play a “B” (a half step below) at the end of the first bar anyway.

A chromatic approach note used incorrectly when the chord doesn't actually change

At a glance this might look like “approaching the next bar by a half step,” but since the next chord is still the same C, there’s no real harmonic destination to approach. It just ends up sounding like a stray note a step down, and the line loses its sense of forward motion.

How to Use It Effectively

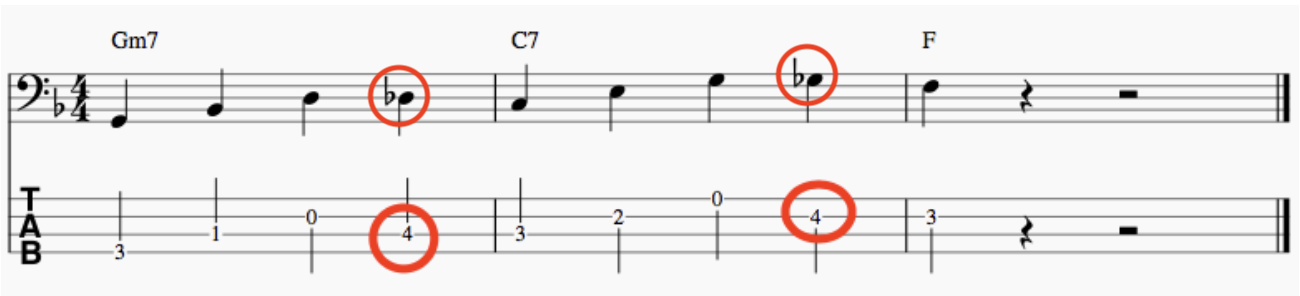
A chromatic approach note really shines specifically where the chord is actually changing. For example, with a progression like C → B♭, playing “C → B → B♭” creates a line that flows naturally into the next chord.

A chromatic approach note used effectively to lead into an actual chord change

Using it with a clear sense of where you’re heading next makes the whole line smoother and more convincing.

Summary

Chromatic approach notes can completely change your sound, just by being conscious of where and why you’re using them. Don’t just drop one in out of habit — think about which chord you’re actually moving toward. If you want your walking bass to sound more natural and more distinctly like jazz, this is well worth paying attention to.

Hearing the difference between a meaningful approach note and an aimless one takes a trained ear — and that’s exactly the kind of detail a teacher can flag immediately.

Want Personalized Feedback on Your Playing?

This is exactly the kind of thing that’s hard to fix alone — and where having a teacher makes all the difference.

At Line on Bass, I offer an online lesson service where you send me a video of your playing, and I give you specific, detailed feedback — every single day if you want.

Students from around the world are using this to fix exactly these kinds of issues and steadily improve their jazz bass skills.

Check Out the Lesson Service →

Posted on Leave a comment

What Does That “Ø” Symbol Mean? A Bassist’s Guide to the Half-Diminished Chord

This article is written by Toru Hoshino, a jazz bassist and instructor based in Japan who teaches online lessons to students worldwide. In this article, he breaks down a chord symbol that confuses a lot of newer jazz players: the half-diminished “ø.”

This one’s aimed at jazz beginners or anyone who’s just started studying music theory.

One of the most common questions I get in lessons is about this symbol:

The chord symbol A with a slashed circle (half-diminished)

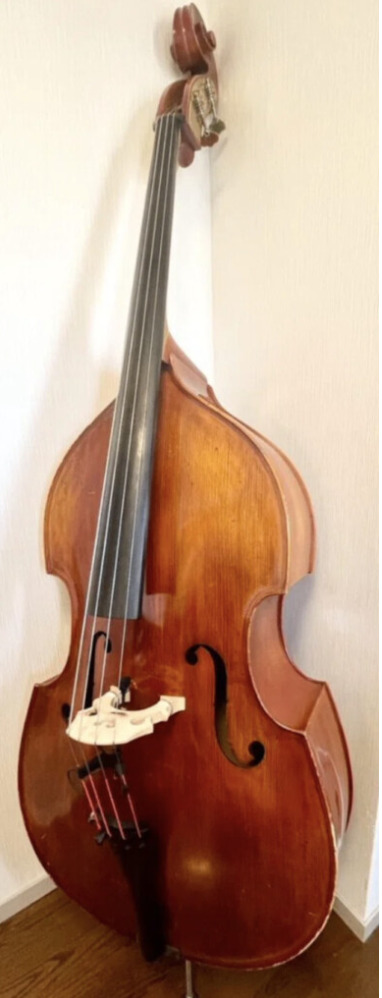
This chord — the circle with a diagonal slash through it — is read as “A minor seven flat five.”

The name’s a mouthful, but it’s also just shorthand for “Am7(♭5).”

What Is a Minor Seven Flat Five?

A minor seven flat five chord is defined by one thing: the 5th of the minor seven chord is flattened.

For example, the chord tones (root, 3rd, 5th, 7th) of Am7 are:

A (root)
C (minor 3rd)
E (5th)
G (minor 7th)

But for Am7(♭5), the chord tones are:

A (root)
C (minor 3rd)
E♭ (diminished 5th)
G (minor 7th)

So the 5th — E versus E♭ — is the difference.

This means if you want to build an eighth-note walking bass line over Am7(♭5) that uses the 5th, you need to move like this:

A bass line using the flatted fifth of Am7(b5)

and not this:

A bass line incorrectly using the natural fifth instead of the flatted fifth

Where Half-Diminished Chords Show Up in Jazz

This part gets a little more theoretical, and some unfamiliar terms may come up, but bear with me.

A very common jazz progression is the “ii-V-I”:

Bm7 → E7 → A△7

That final chord, A△7, functions as the “tonic” — the chord that creates a sense of resolution and stability.

Sometimes, depending on the tune, the tonic ends up being a minor chord instead:

Bm7 → E7 → Am7

In this case, to make the harmonic motion flow more smoothly, it’s common to flatten the 5th of that first minor chord, Bm7:

Bm7♭5 → E7 → Am7

This creates a more atmospheric, evocative minor sound, and it’s exactly the progression used in the jazz standard “Summertime,” by George Gershwin.

The chord progression of Summertime, showing the half-diminished chord (circled)

Theory like this clicks a lot faster when someone can point out exactly where it shows up in a tune you’re already working on — which is exactly what a teacher is for.

Want Personalized Feedback on Your Playing?

This is exactly the kind of thing that’s hard to fix alone — and where having a teacher makes all the difference.

At Line on Bass, I offer an online lesson service where you send me a video of your playing, and I give you specific, detailed feedback — every single day if you want.

Students from around the world are using this to fix exactly these kinds of issues and steadily improve their jazz bass skills.

Check Out the Lesson Service →

Posted on Leave a comment

Can’t Practice Upright Bass at Home? An Electric Upright Might Be the Answer

This article is written by Toru Hoshino, a jazz bassist and instructor based in Japan who teaches online lessons to students worldwide. In this article, he answers a question he gets constantly: can an electric upright bass actually substitute for upright bass practice?

“I’d love to play upright bass, but I can’t commit to buying one because of noise concerns where I live. So I’m considering an electric upright bass for home practice instead — but how different does it actually feel from a real upright? Does practicing on an electric upright really count as upright bass practice?”

This is a question I get all the time.

Right off the bat: they’re genuinely different instruments, so yes, the feel is different.

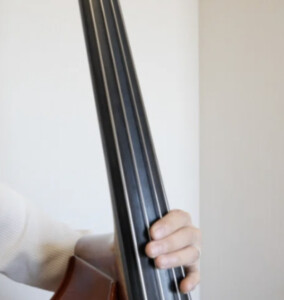
An electric upright bass

That said, your environment isn’t something you can just change overnight. So personally, I think starting with an electric upright bass is perfectly fine.

Here’s why: on upright-style instruments — both electric upright and full-size upright — there are no frets marking off the pitches under your left hand, so you can absolutely use one to build your sense of left-hand positioning, intonation, and how far apart your fingers need to stretch. You can also get a feel for playing standing up and how your right hand strikes the strings.

The big difference is that an upright bass has a large, boxy body.

An upright bass with its large body, compared to an electric upright

An electric upright doesn’t have that large boxy body, so the sensation of that resonating body — and the way the instrument actually vibrates as a result — is genuinely different between the two.

I didn’t start out by buying a real upright bass myself, either. I used an electric upright for a long time at the start.

My honest mindset going in was more like, “I want to try upright bass, but there’s no way I can handle something that huge.” I never expected to stick with it for this long, but my thinking is: start with whatever instrument lets you practice comfortably at home — including whether you’ll actually stick with it long-term — get a feel for things gradually, and once you’re genuinely committed, sort out your space and move up to a real upright bass.

Of course, some people will say, “just start on a real upright bass from day one — an electric upright won’t actually help you practice.” That’s a fair opinion too, so take mine as just one perspective among others. 🙂

Deciding which instrument and setup actually fits your situation is exactly the kind of judgment call a teacher can help you make with confidence.

Want Personalized Feedback on Your Playing?

This is exactly the kind of thing that’s hard to fix alone — and where having a teacher makes all the difference.

At Line on Bass, I offer an online lesson service where you send me a video of your playing, and I give you specific, detailed feedback — every single day if you want.

Students from around the world are using this to fix exactly these kinds of issues and steadily improve their jazz bass skills.

Check Out the Lesson Service →

Posted on Leave a comment

5 Common Questions From My Upright Bass Students, Answered

This article is written by Toru Hoshino, a jazz bassist and instructor based in Japan who teaches online lessons to students worldwide. In this article, he answers five questions he gets constantly from upright bass students.

  • Where does the left thumb go?
  • Is it okay to put position marker stickers on the fingerboard?
  • How high should the end pin be?
  • Is it okay to wrap a band around your middle and ring fingers?
  • Does the ring finger actually press the string?

Here are my answers to each — hopefully useful if you’re teaching yourself upright bass and feel like you’ve plateaued.

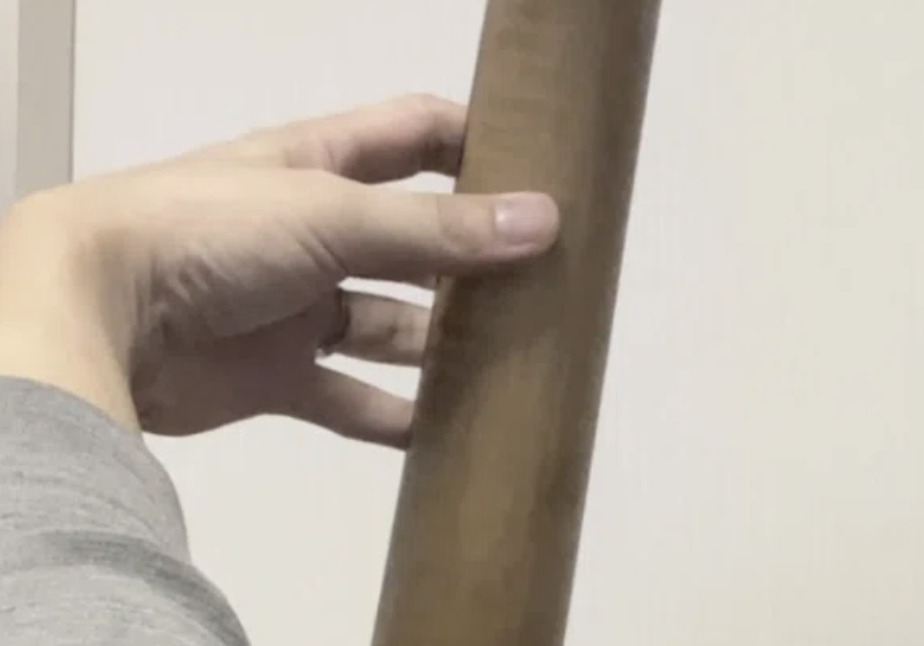
1. Where Does the Left Thumb Go?

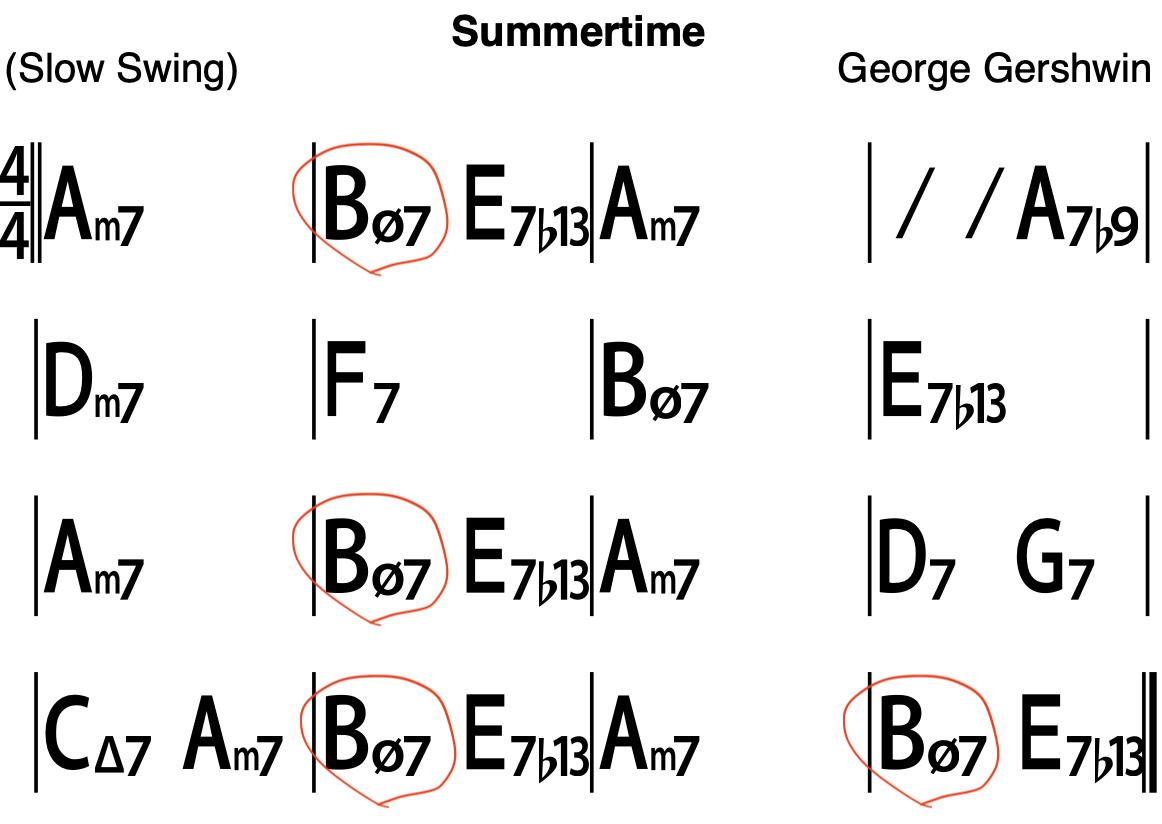
In a half-position setup (the lower-pitched position), the left thumb sits roughly between the middle and index fingers.

Left thumb placement on the back of the upright bass fingerboard

Rest it lightly around the middle of the back of the neck, and use that as the anchor point for moving your whole hand. Be careful that the thumb doesn’t drift too far toward the index-finger side — if it does, it becomes harder to transfer force through the rest of your fingers.

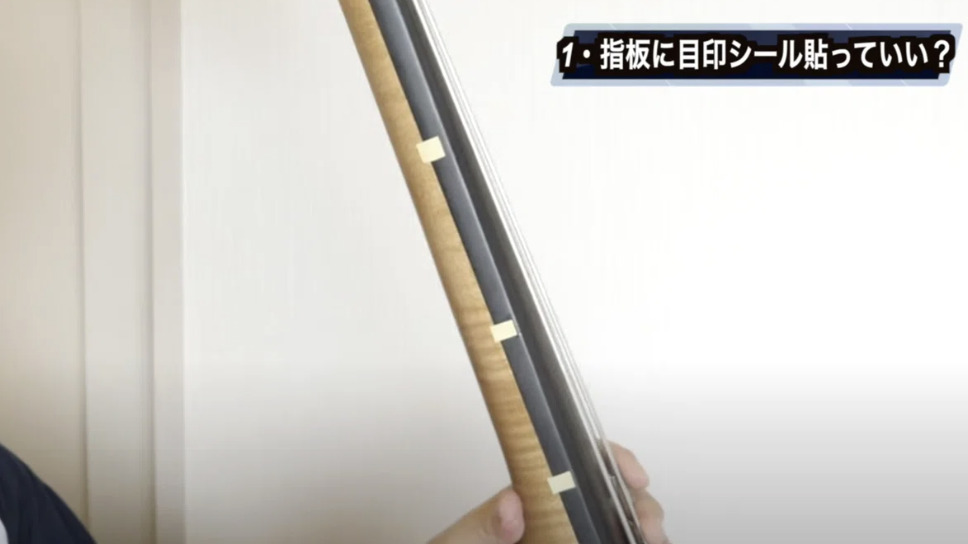
2. Is It Okay to Put Position Marker Stickers on the Fingerboard?

This comes up a lot from beginners who are struggling with intonation — “can I put marker stickers on the fingerboard?”

The answer is yes, that’s fine. I did this myself, and some method books even say “use position markers while you’re still getting used to it.”

Position marker stickers placed on an upright bass fingerboard

Just be careful of the following:

  • Don’t damage the fingerboard with a cutter or blade when applying them.
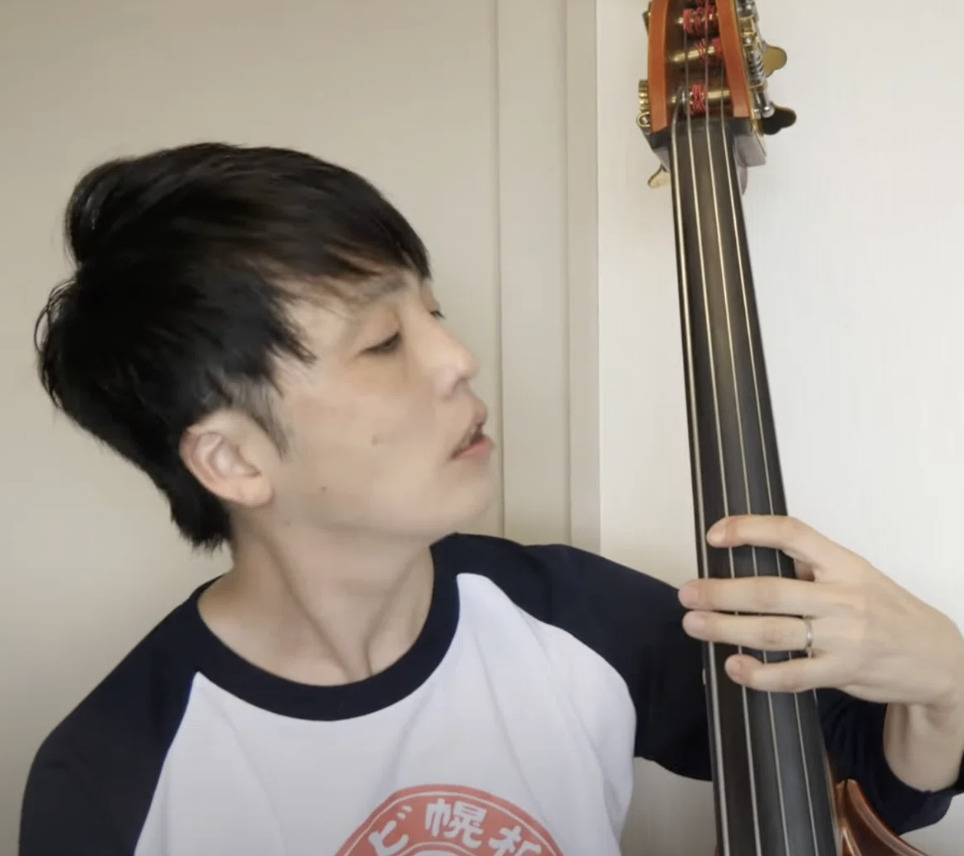
  • Don’t end up craning your neck at an extreme angle to peek at the stickers.

An exaggerated posture of leaning over to look at fingerboard stickers, which should be avoided

↑ This is leaning in way too far to check the stickers.

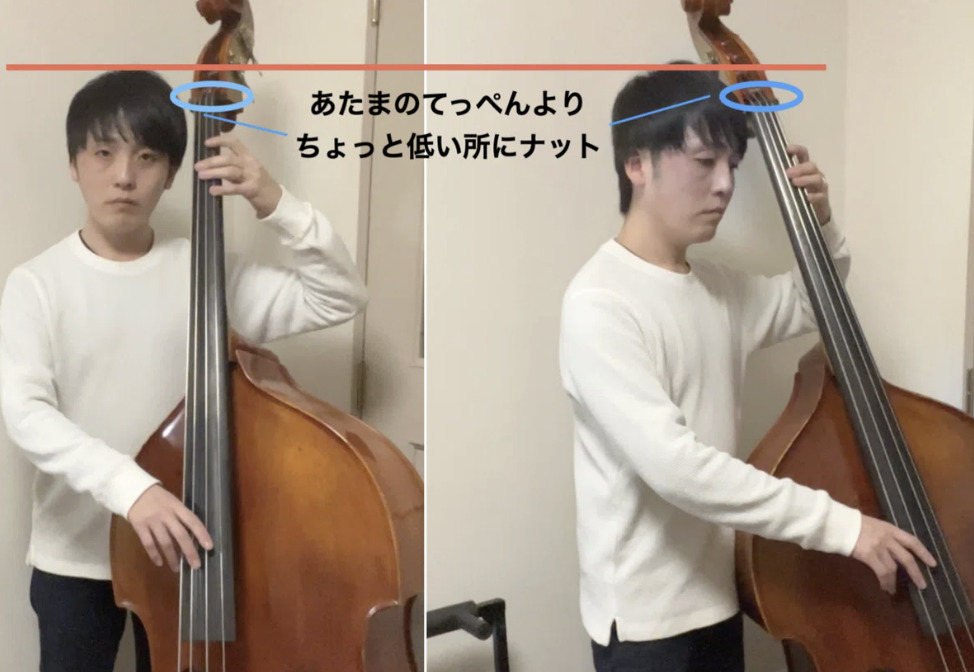
3. How High Should the End Pin Be?

End pin height varies a lot from person to person depending on height.

In my case — I’m 5’3″ (161cm) — I run the end pin fully retracted, and I also wear shoes with a bit of a thicker sole to adjust further.

A demonstration of end pin height adjustment on an upright bass

From there, a good general target is having the nut (the part supporting the strings at the top) sit roughly at forehead height.

4. Is It Okay to Wrap a Band Around Your Middle and Ring Fingers?

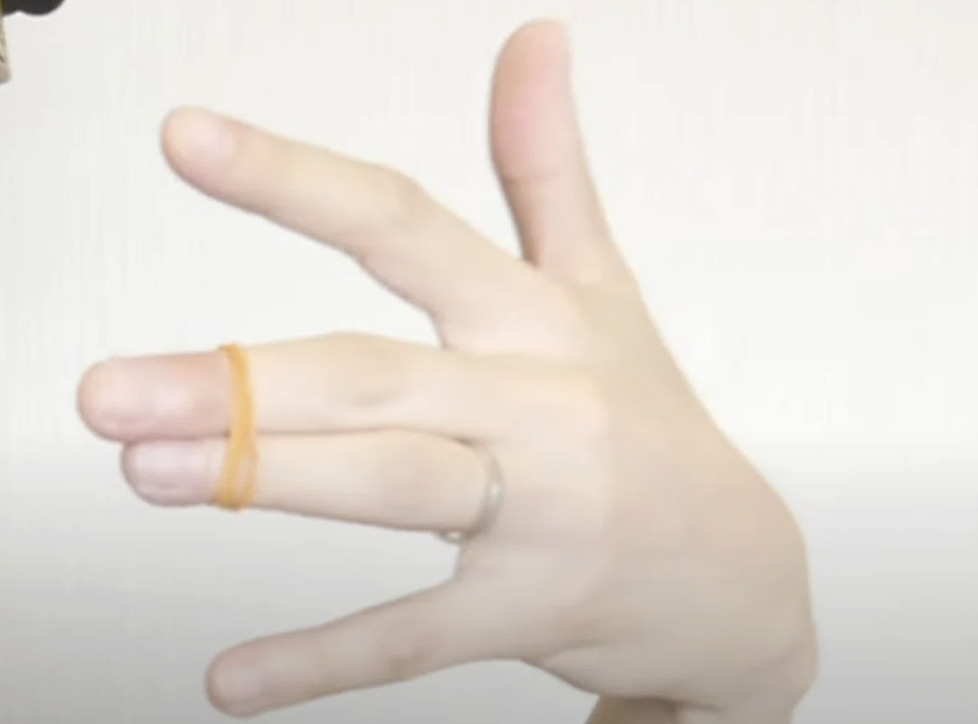
If your middle and ring finger tend to drift apart, a lot of people ask whether it’s okay to practice with a rubber band wrapped around them like this.

A rubber band wrapped around the middle and ring fingers to help keep them together

I never used one myself, but I’ve had students try it, and it didn’t seem to cause any bad habits in particular.

That said, it’s completely natural for your middle and ring finger to drift apart early on. Just keeping the conscious intention of “don’t let them drift too far apart” is usually enough on its own.

Holding onto that awareness during practice makes a noticeable difference in your stability a few months down the line.

5. Does the Ring Finger Actually Press the String?

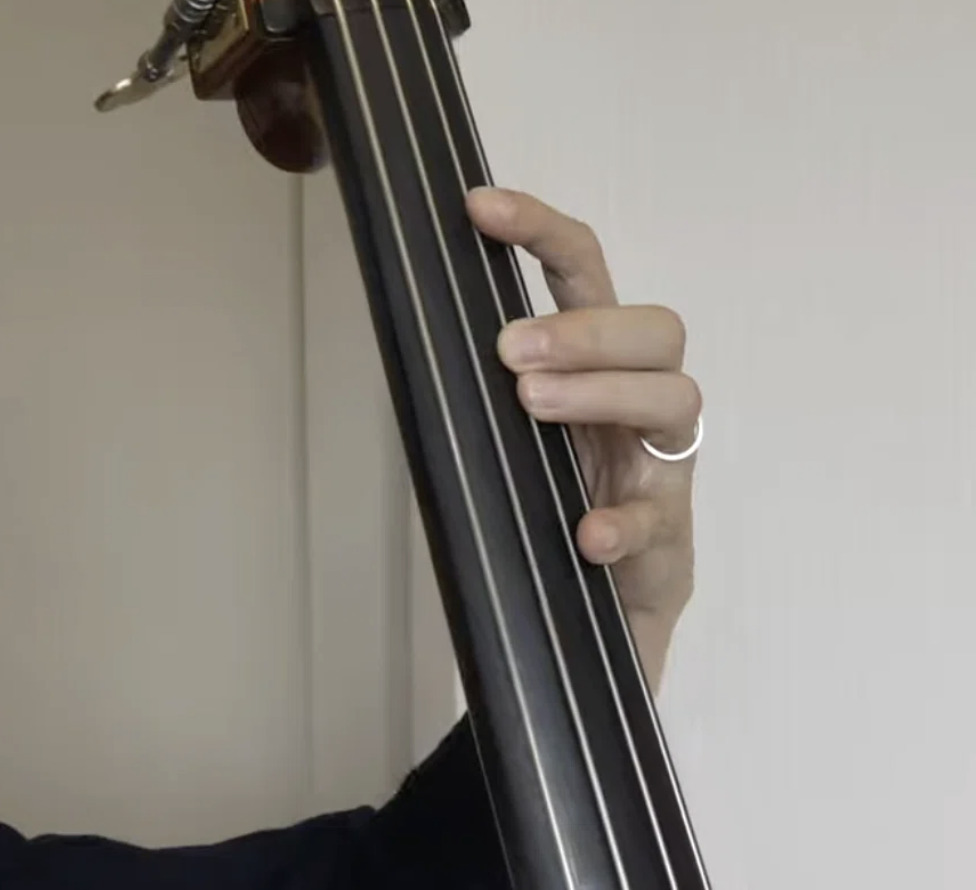
For example, when your middle finger is fretting the E note on the D string, should your ring finger be pressing down too?

The answer is: no, the ring finger doesn’t press the string. Just rest it alongside the middle finger, while the middle finger does the actual pressing.

The ring finger resting alongside the middle finger without pressing the string

These are exactly the kinds of small form details that are nearly impossible to catch on your own — and exactly where a teacher reviewing your playing makes the biggest difference.

Want Personalized Feedback on Your Playing?

This is exactly the kind of thing that’s hard to fix alone — and where having a teacher makes all the difference.

At Line on Bass, I offer an online lesson service where you send me a video of your playing, and I give you specific, detailed feedback — every single day if you want.

Students from around the world are using this to fix exactly these kinds of issues and steadily improve their jazz bass skills.
Check Out the Lesson Service →

Posted on Leave a comment

“Avoid Notes” Aren’t Forbidden — They Just Need Careful Handling

This article is written by Toru Hoshino, a jazz bassist and instructor based in Japan who teaches online lessons to students worldwide. In this article, he answers a question he gets constantly: what’s the deal with “avoid notes”?

One question I get asked a lot in lessons is about avoid notes.

For example, in a C major scale, you can use:

C D E F G A B C

Of these, the note F is the avoid note.

Wait — isn’t an avoid note supposed to be a note you’re not allowed to use?

But if F is part of the C major scale in the first place, can you use it or not? That’s exactly the part that confuses people.

Strictly speaking, the right way to think about it is:

You’re not forbidden from using it — you just need to be a little careful about how you use it.

An avoid note, fundamentally, is a note that makes it harder for the listener to feel the chord’s harmony.

A C chord has its own distinct “C chord” sound — but if you emphasize the avoid note too much, that C-chord sound gets harder to convey.

That said, using F as a decorative tone or a passing tone is completely fine. Here are some concrete examples.

A Good Way to Use an Avoid Note in a Walking Bass Line

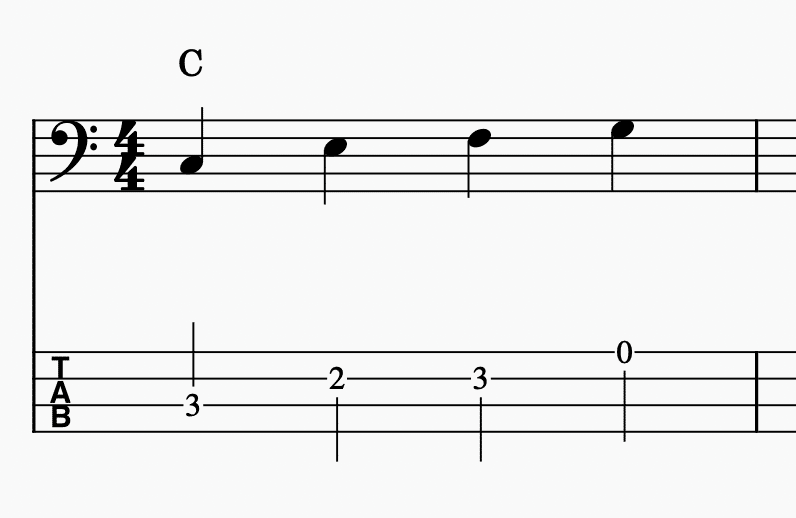
Say you’re over a C chord, playing four quarter notes in the bar:

C E F G

Used this way, as a passing tone, it works fine.

F used as a passing tone in a walking bass line over a C chord, without being emphasized

The F here isn’t being emphasized.

A Less Good Way to Use an Avoid Note in a Walking Bass Line

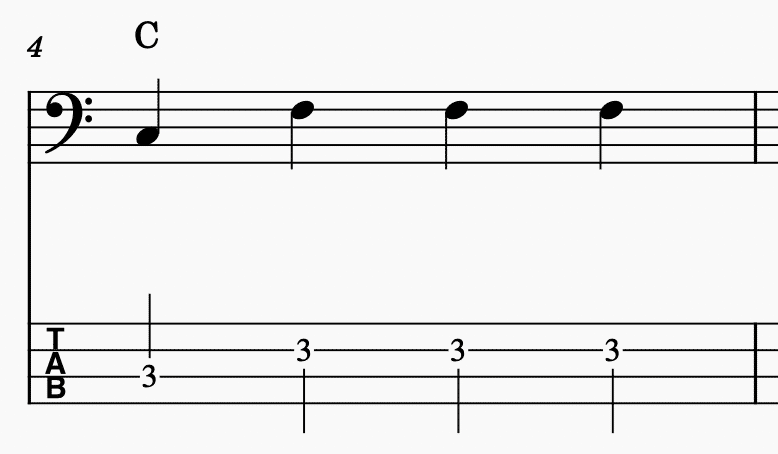
Now say you’re over the same C chord, playing four quarter notes:

C F F F

Like this — with almost no chord tones present and the F note emphasized heavily — the harmony becomes hard to read.

F overused and emphasized in a walking bass line over a C chord, making the harmony unclear

So this is exactly what people mean by “it’s not forbidden, it just needs careful handling.”

Understanding the theory behind avoid notes is one thing — actually hearing when you’re overusing one in your own lines is exactly the kind of thing a teacher catches immediately.

Want Personalized Feedback on Your Playing?

This is exactly the kind of thing that’s hard to fix alone — and where having a teacher makes all the difference.

At Line on Bass, I offer an online lesson service where you send me a video of your playing, and I give you specific, detailed feedback — every single day if you want.

Students from around the world are using this to fix exactly these kinds of issues and steadily improve their jazz bass skills.
Check Out the Lesson Service →

Posted on Leave a comment

Why Do Slash Chords Even Exist?

This article is written by Toru Hoshino, a jazz bassist and instructor based in Japan who teaches online lessons to students worldwide. In this article, he explains why slash chords exist in the first place — and what they actually do for your bass line.

Let’s talk about why slash chords even exist.

A slash chord is something like “C/E” — a chord with a slash in it. It means “play a C chord, but make the lowest note an E.”

So why bother with that? The biggest reason is to make the bass motion smoother.

Say the progression is “C → G.” The bass note jumps a full 5th, from C up to G. Depending on the song, that big a leap can sound a little abrupt — like there’s a hard cut in the line.

If you insert C/E in between, so it becomes “C → C/E → G,” the bass note instead climbs in 3rds — C, then E, then G — which flows a lot more smoothly.

The difference is bigger than it sounds: jumping straight from C to G gives you a strong, punchy sound, while climbing through C → E → G feels natural and beautiful. This is especially noticeable on ballads and slower, more atmospheric tunes — just adding that C/E in the middle can make the whole progression feel far more connected.

Understanding slash chords on paper is one thing — actually hearing where to use them in your own bass lines is exactly the kind of ear-training a teacher can speed up.

Want Personalized Feedback on Your Playing?

This is exactly the kind of thing that’s hard to fix alone — and where having a teacher makes all the difference.

At Line on Bass, I offer an online lesson service where you send me a video of your playing, and I give you specific, detailed feedback — every single day if you want.

Students from around the world are using this to fix exactly these kinds of issues and steadily improve their jazz bass skills.
Check Out the Lesson Service →