Posted on Leave a comment

OneControl Crimson Bass Preamp Review: A Compact Pedal for an Upright Bass Tone

This article is written by Toru Hoshino, a jazz bassist and instructor based in Japan who teaches online lessons to students worldwide. In this article, he reviews a compact preamp pedal that gets surprisingly close to an upright bass tone on electric bass.

Today I want to talk about a pedal that gets you closer to an upright bass sound: the OneControl Crimson Red Bass Preamp.

The video I posted reviewing this pedal got an unusually large number of views in a short time — that’s never happened to me before — so I wanted to write it up properly here as well.

A Pedal That Gets You Closer to an Upright Bass Tone: OneControl Crimson Bass Preamp

After actually using this pedal for a while, there are three things I really liked about it:

1. It suits walking bass really well
2. It doesn’t make your tone sound cheap
3. It’s tiny and easy to carry around

Let me walk through each of these, and along the way I’ll also answer some questions I got from readers and viewers after the video went up.

1. It Suits Walking Bass Really Well
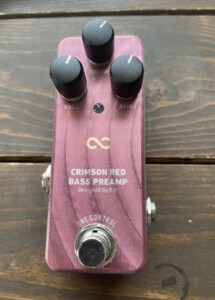
OneControl Crimson Red Bass Preamp pedal

I think this is a sound that’s genuinely well suited to walking bass.

A lot of people associate walking bass with upright bass specifically. Plenty of people play walking lines on electric bass these days too, of course — but if your strings sound too bright and modern, it can end up missing that “upright bass feel” people are often going for.

This pedal gives you a warm low end that really holds down the bottom, so the tone pairs really well with walking bass lines.

2. It Doesn’t Make Your Tone Sound Cheap

Another thing I like is that it doesn’t cheapen your sound.

I was a little worried going in that it might turn everything muddy and kill the definition in the tone. But in practice, it colors the sound without losing much of the original character.

The fact that it doesn’t sound cheap once you engage the effect is a real point in its favor.

3. It’s Tiny and Easy to Carry Around

Last point: the size.

It’s genuinely small — smaller than a smartphone.
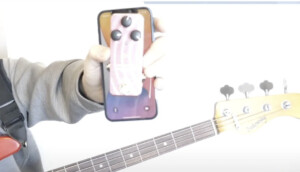
Size comparison between the pedal and a smartphone

That makes it easy to throw in a bag, and it’ll work great in a studio setting too.

It only has three knobs — VOLUME, GAIN, and BRILL — so it’s simple and easy to dial in.

That covers the review itself. Now let’s get into some questions I received from readers and viewers after the video went up.

Reader and Viewer Questions

Q: The design of the Crimson Bass Preamp I’m about to buy looks a little different from the one in your video. What’s going on there?

A: It’s probably just been redesigned since I filmed. Kaz Kawamura, the head of One Control, actually shared my video and mentioned it might be the first video out there featuring the new design — so I think the version I reviewed is the newer one, and other versions you might see online could be the earlier design.

Q: How does it sound through a silent upright bass?

A: It pairs really well with a silent upright too — you get a nice, rich low end out of it.

Q: Does it actually sound like a real upright bass?

A: Not exactly, no. An upright bass produces sound through its body, while an electric bass produces sound through an amp — so fundamentally, they’re never going to sound identical.

That said, what this pedal gives you is great in its own right. I did a quick before-and-after comparison playing through it in the video, which is worth checking out if you want to hear the difference for yourself.

So, that covers three things I really liked about this preamp pedal that gets you closer to an upright bass tone.

If you’re after that upright feel, there are other routes too — fret wraps, flatwound strings, and so on — but those change your sound pretty dramatically. A pedal like this is a much smaller commitment if you just want to dip a toe in. Worth giving a try.

Want Personalized Feedback on Your Playing?

Gear can get you part of the way to a great walking bass tone, but it’s your actual line construction and feel that does most of the work — and that’s much easier to dial in with outside feedback.

This is exactly the kind of thing that’s hard to fix alone — and where having a teacher makes all the difference.

At Line on Bass, I offer an online lesson service where you send me a video of your playing, and I give you specific, detailed feedback — every single day if you want.

Students from around the world are using this to fix exactly these kinds of issues and steadily improve their jazz bass skills.

Check Out the Lesson Service →

Posted on Leave a comment

COMFORT Strapp Bass Strap Review: Why Its Memory-Foam Padding Feels So Good

This article is written by Toru Hoshino, a jazz bassist and instructor based in Japan who teaches online lessons to students worldwide. In this article, he shares his honest review of the COMFORT Strapp bass strap, including why its memory-foam padding makes such a noticeable difference for long playing sessions.

COMFORT Strapp bass strap on a Fender-style bass

The COMFORT Strapp

Close-up of the COMFORT Strapp padding

The padding is reportedly made from the same memory-foam material used in wetsuits. It molds nicely to the shape of your shoulder.

It genuinely feels great.

COMFORT Strapp in black, viewed diagonally on a red bass

The plain black color works with any genre or style. You can adjust the length to some extent, though the one I own doesn’t extend especially long.

Strap end with two holes for adjustment

There are two adjustment holes on both the front and back ends of the strap.

My Impressions After Using It

The clerk at the shop in Shinjuku where I bought it told me:

“I use this on my five-string too. It really takes the weight off your shoulder. A lot of people who try it can’t go back to anything else.”

It almost feels like the body of the bass is floating on its own.

That might be a bit of an exaggeration, but the strain on your shoulder really is minimal. You can feel the lightness right away — this one turned out to be a great find.

My Strap Setup

I keep my strap fairly short. The shortest distance from my shoulder to the body is probably around 20 cm (about 8 inches).

Toru Hoshino playing bass with a short strap setup

I aim for a form where the strap length feels the same whether I’m sitting or standing.

Back in my rock days I wore it much lower, but with walking bass — where your hand is constantly jumping between positions — I found that a strap that’s too long puts unnecessary strain on your fretting hand, so I shortened it.

There are plenty of good-quality straps out there, but I was specifically looking for one that was both well-made and could be shortened, so this one was a great fit.

As for the end pin, I’m using a locking pin, but only on the front side.

Locking end pin on the front strap button

If you’d like to pick one up, you can find it here:

COMFORT STRAPP BASS STRAPP SHORT
https://amzn.asia/d/3tei8su

Want Personalized Feedback on Your Playing?

Getting your gear setup right — including something as simple as strap length — can make a real difference in how relaxed and accurate your playing feels, but it’s often hard to know what’s actually holding you back without another set of eyes on your technique.

This is exactly the kind of thing that’s hard to fix alone — and where having a teacher makes all the difference.

At Line on Bass, I offer an online lesson service where you send me a video of your playing, and I give you specific, detailed feedback — every single day if you want.

Students from around the world are using this to fix exactly these kinds of issues and steadily improve their jazz bass skills.

Check Out the Lesson Service →

Posted on Leave a comment

A Handy Little Tray for Your Music Stand

This article is written by Toru Hoshino, a jazz bassist and instructor based in Japan who teaches online lessons to students worldwide. In this article, he shares a little accessory tray he picked up for his music stand, and everything he ended up putting on it.

Everything I’ve Put on My Music Stand Tray

A stopwatch.

A metronome.

Rosin.

A pen.

My phone.

This setup also works fine if your phone has an AUX cable plugged in.

And a little reward for myself.

I eat it after I’m done practicing.

The Tray: A Dicon Audio MS-TRK Sheet-Music-Stand Tray

This is a small accessory tray, the Dicon Audio MS-TRK, that clips onto a folding music stand. It’s a plastic tray sized just right for the small things you need close at hand while practicing or performing — pens, a tuner, a metronome, guitar picks, maintenance gear, that kind of thing. The outer frame has a notch designed for a contact-mic tuner, so you can keep your tuner sitting level. If you use a metronome/tuner combo unit, this is a nice fit. You can also remove the outer frame if you don’t need it, and it comes with a non-slip sheet, so nothing’s at risk of sliding off. It’s a good fit for wind and string players too.

Product details
Body size: 14cm wide × 7cm deep (including mount) × 8cm tall
Tray size: 14cm wide × 4cm deep × 2cm tall (with frame attached)
Weight: approx. 60g
Includes a non-slip sheet

(Note: the music stand shown in the product photos isn’t included.)

If you just set a pen or metronome directly on a music stand, it tends to slide right off — so something like this is genuinely useful. It’s the kind of thing you’d think you could rig up yourself, but somehow never quite manage to.

This part clips onto the stand.

You don’t strictly need it, but it’s surprisingly handy once you have it. It’s unmistakably plastic, but it’s black, so it doesn’t look or feel cheap — it does the job you’d expect for the price.

Still, there’s something fun about a new piece of gear that gets you a little more fired up for practice. Hoping to bring that same energy to today’s practice session too.

Want Personalized Feedback on Your Playing?

Dialing in your practice setup is one piece of the puzzle — getting consistent feedback on your actual playing is the other, and that’s exactly the kind of thing that’s hard to do alone.

At Line on Bass, I offer an online lesson service where you send me a video of your playing, and I give you specific, detailed feedback — every single day if you want.

Students from around the world are using this to fix exactly these kinds of issues and steadily improve their jazz bass skills.

Check Out the Lesson Service →

Posted on Leave a comment

5 Key Points for Choosing a Bass Amp

This article is written by Toru Hoshino, a jazz bassist and instructor based in Japan who teaches online lessons to students worldwide. In this article, he shares 5 key points to consider when choosing a bass amp.

Finding an amp that matches your taste and playing style is genuinely tricky, but keeping the points below in mind will make it a lot easier to land on something close to your ideal amp.

A bass amp

Amp Basics

Cabinet

A bass cabinet

A large enclosure packed with speakers — about the size of a refrigerator.

Amp Head

A bass amp head

Sits on top of the cabinet — this is where you shape your tone using the knobs.

Combo Amp

A combo bass amp

A compact unit with the cabinet and amp head built into one piece.

5 Key Points to Consider When Choosing an Amp

Price

As with any product, expensive doesn’t automatically mean it’s the perfect tone for you.

Tone

Tone is one of the hardest things to pin down in words, but it helps to have a rough mental image — something like “round and warm,” “tight and punchy,” or “scooped mids.”

It also helps to have a reference artist in mind, even a vague one — “something like Nikki Sixx” or “like the bassist behind John Coltrane” — since that kind of reference makes it much easier to communicate what you want at a music shop.

The Genre You Play

“We’re a genre-bending band, man” is a nice sentiment, but in practice, genre still strongly influences which amp brands and sizes make sense.

Put simply: a 16-inch combo amp isn’t going to cut it for loud genres like hard rock or metal, and on the flip side, an 8×10 cabinet stack is way more power than you need for quieter genres like jazz or acoustic music.

Here’s my own personal association between genre and amp brands:

· Loud genres (hard rock, metal, punk) — Hartke, Ampeg, Mesa Boogie, Guyatone, Eden
· Mid-volume to acoustic (pop, funk, jazz) — Trace Elliot, Gallien-Krueger, Markbass

Where You Usually Play

The size of your typical venue matters too.

Combo amps have their limits on output. For something the size of a school AV room, a combo amp is plenty. For something the size of a gymnasium, you might need a larger cabinet setup.

Portability

Cabinet-and-head setups generally require a vehicle to transport. Combo amps, on the other hand, can often be wheeled around on a folding aluminum cart.

Bass amps have also gotten a lot more compact in recent years — brands like TC Electronic and Phil Jones Bass now make amps small enough to carry in a tote bag.

The Amp I Use

I’ve mentioned this a few times before, but I’m a longtime user of Phil Jones Bass amps.

Compact, but genuinely powerful — works great across acoustic, pop, and jazz with zero issues.

It handles upright bass without breaking up, and gives me a walking bass line with real definition.

A Phil Jones Bass amp

It even fits in a backpack, which makes it incredibly convenient.

Finding the amp that actually matches your tone and playing style is something a teacher who’s heard you play in person can speak to directly.

Want Personalized Feedback on Your Playing?

This is exactly the kind of thing that’s hard to fix alone — and where having a teacher makes all the difference.

At Line on Bass, I offer an online lesson service where you send me a video of your playing, and I give you specific, detailed feedback — every single day if you want.

Students from around the world are using this to fix exactly these kinds of issues and steadily improve their jazz bass skills.

Check Out the Lesson Service →

Posted on Leave a comment

iReal Pro: The App I Use Constantly for Bass Practice

This article is written by Toru Hoshino, a jazz bassist and instructor based in Japan who teaches online lessons to students worldwide. In this article, he recommends his favorite practice app, iReal Pro, and walks through how to use it for walking bass practice.

I love this app so much that I switched from a basic flip phone to a smartphone just so I could use it: iReal Pro.

What Is iReal Pro?

Used by everyone from total beginners to working professionals, this app is great for walking bass line practice, and just as useful if you’re into jazz, blues, improvising, or composing.

I use it constantly in my own practice too.

The iReal Pro app icon

→ Available on the App Store

Practicing Bass With iReal Pro’s Backing Tracks

Here’s an example of practicing a bass line over an iReal Pro backing track — it generates remarkably realistic drum and piano accompaniment.

It’s the ideal app for practicing bass lines you’ve written yourself.

What Makes iReal Pro So Powerful

A Huge Song Library

Over 1,300 jazz standards alone.

On top of that, you can install Latin and Brazilian standards, well-known pop and rock tunes, Stevie Wonder songs, and more, all for free (installation steps below).

Transposing on the Fly

You can transpose into any of the 12 keys.

If you’re playing with a vocalist, the default key in a songbook or chart doesn’t always work for their range. iReal Pro lets you change keys instantly and apply that directly to your practice.

Tempo Control

Any tune can be played anywhere from tempo 40 to 360.

Organizing Songs Into Folders

I keep my songs organized into folders like:

· Tunes I didn’t know at a session
· Fundamentals practice tunes
· Jazz standards worth memorizing
· Set list for an upcoming gig
· Demo songs for my next lesson

Keeping everything organized like this means I never have to wonder what to practice next.

Changing Rhythm Patterns

You can switch between swing, Latin, bossa nova, funk, rock, 3/4 time, and more — a huge range of rhythmic feels. That means you can match your practice to whatever style the tune you’re working on, or your current band, actually calls for.

How to Install It

Here’s a quick rundown of how to get set up:

1. Get the app from the App Store — it’s around $5, and genuinely worth it for years of use.

2. Open the app and tap “Import Playlist from Forum.”

3. Tap “JAZZ.”

4. Tap “JAZZ 1400 STANDARDS.”

5. Tap the blue link next to “Click on Link to import.”

6. Tap “Import Playlist.”

7. Confirm “JAZZ 1400” now appears on your main screen.

8. Open it up — you’ll find well-known standards like “Autumn Leaves” right there in the list. Tap any song title to bring up its chord chart, then hit the play button to start the backing track.

iReal Pro is a genuinely incredible training tool for the price — make it part of your daily practice routine.

The iReal Pro app icon

→ Available on the App Store

An app like this is great for solo practice — but knowing whether your bass line is actually landing well against the chords in real time is exactly where a teacher’s ear matters.

Want Personalized Feedback on Your Playing?

This is exactly the kind of thing that’s hard to fix alone — and where having a teacher makes all the difference.

At Line on Bass, I offer an online lesson service where you send me a video of your playing, and I give you specific, detailed feedback — every single day if you want.

Students from around the world are using this to fix exactly these kinds of issues and steadily improve their jazz bass skills.

Check Out the Lesson Service →

Posted on Leave a comment

A Method Book That Breaks Down Paul Chambers’ Walking Bass Lines

This article is written by Toru Hoshino, a jazz bassist and instructor based in Japan who teaches online lessons to students worldwide. In this article, he recommends a method book that breaks down the walking bass lines of jazz legend Paul Chambers.

The Method Book: “The Music of Paul Chambers”

The Music of Paul Chambers method book

This is a book that analyzes the walking bass lines played by jazz bassist Paul Chambers — one of the most influential upright bassists in jazz history, best known for his work in Miles Davis’s classic quintet.

It covers 7 real tunes, including:

“So What”
“If I Were a Bell”
“My Funny Valentine”
a 12-bar blues

For each tune, it breaks down exactly how Chambers approached the walking line in detail — plus genuinely deep-dive analysis, like the percentage of each bass line that starts from the root, the 3rd, the 5th, or a tension note.

It also includes a list of albums Chambers recorded on, along with background on his life and career.

One heads-up: it’s entirely in English, and there’s no tab notation — standard notation only.

So it’s a bit of an advanced pick, but if you’re a fan of Paul Chambers’ lines, or want to get a feel for the bass sound underneath Miles Davis’s “Kind of Blue” or “Relaxin’,” this book is well worth tracking down.

A book like this gives you the analysis — but actually absorbing that vocabulary into your own playing in real time is exactly the kind of thing a teacher can help speed up.

Want Personalized Feedback on Your Playing?

This is exactly the kind of thing that’s hard to fix alone — and where having a teacher makes all the difference.

At Line on Bass, I offer an online lesson service where you send me a video of your playing, and I give you specific, detailed feedback — every single day if you want.

Students from around the world are using this to fix exactly these kinds of issues and steadily improve their jazz bass skills.

Check Out the Lesson Service →

Posted on Leave a comment

A Method Book Worth Knowing for Authentic Latin Bass

This article is written by Toru Hoshino, a jazz bassist and instructor based in Japan who teaches online lessons to students worldwide. In this article, he recommends a method book for getting serious about Latin bass.

The Latin Bass Book

The Latin Bass Book, by Oscar Stagnaro and Chuck Sher, is a great pick if you want to get a genuinely authentic handle on Latin rhythms — tumbao, Afro-Cuban grooves, Brazilian styles, Caribbean styles, and more.

“Latin” music as it’s commonly played outside of Latin America often differs quite a bit in playing style from the real thing back home — sometimes getting good-naturedly ribbed as a watered-down, “jazz-ified” version of Latin music. Written by an actual South American bass player from Peru, this book distills genuinely authentic Latin bass playing, rather than the more familiar, simplified version most non-Latin players pick up.

Latin Tunes I’ve Played Recently at Jazz Sessions

Latin-style tunes come up often even at straight-ahead jazz sessions. Some I’ve played recently:

On Green Dolphin Street
My Little Suede Shoes
I’ll Remember April
The Night Has a Thousand Eyes
Nica’s Dream
Blue Bossa
Recuerdame

A Latin Bass Line

A common rhythmic building block is a pair of dotted quarter notes followed by a quarter note, played like this:

A Latin bass line pattern using two dotted quarter notes followed by a quarter note, with the root landing on beat 1

That said, this is exactly the kind of line that gets called the “jazz-ified” version mentioned above. In more authentic Latin playing, the root doesn’t always land on beat 1:

A more authentic Latin bass line pattern where the root does not land on beat 1

When it locks in, it sounds great — but since the root isn’t landing on beat 1, the whole groove can fall apart unless every player in the band is genuinely experienced with the style.

Because of that, the first version — with the root anchored on beat 1 — holds together more reliably and is easier to sustain through a long session. That’s the version I lean on myself most of the time at sessions, but if you want to really dig into authentic Latin bass playing, the second approach is well worth exploring.

Reading about authentic Latin phrasing is one thing — actually locking it in with a band in real time is exactly the kind of feel a teacher can help you build.

Want Personalized Feedback on Your Playing?

This is exactly the kind of thing that’s hard to fix alone — and where having a teacher makes all the difference.

At Line on Bass, I offer an online lesson service where you send me a video of your playing, and I give you specific, detailed feedback — every single day if you want.

Students from around the world are using this to fix exactly these kinds of issues and steadily improve their jazz bass skills.

Check Out the Lesson Service →

Posted on Leave a comment

How to Notate a Bass Ghost Note in MuseScore

This article is written by Toru Hoshino, a jazz bassist and instructor based in Japan who teaches online lessons to students worldwide. In this article, he shows how to notate a bass ghost note in MuseScore.

A ghost note is the muted “×”-marked note used in slap playing and plenty of other phrases. It’s quick to set up in MuseScore, so it’s well worth adding to your notation toolkit.

A ghost note marked with an x-shaped notehead in standard notation and tab
A ghost note, shown with an × notehead.

Note: these steps are based on MuseScore 3.

How to Notate a Ghost Note

1. Enter Any Note

Start by entering whatever note you want to mark as a ghost note.

2. Find “Noteheads” → “Cross” in the Palette

In the palette on the left, find the Noteheads section, and within it, the Cross notehead.

3. Drag and Drop the Cross Notehead

Drag the Cross notehead onto the note you want to mark as a ghost note.

4. Done

That’s it — your ghost note notation is complete.

Note that the ghost note will still play back at its actual written pitch in audio playback — this only changes how it’s displayed on the page, not how MuseScore plays it back.

Ghost notes come up often enough that this is well worth keeping in your back pocket.

Notating the technique is one thing — actually nailing the muted, percussive feel of a real ghost note on the instrument is exactly the kind of nuance a teacher can fine-tune by ear.

Want Personalized Feedback on Your Playing?

This is exactly the kind of thing that’s hard to fix alone — and where having a teacher makes all the difference.

At Line on Bass, I offer an online lesson service where you send me a video of your playing, and I give you specific, detailed feedback — every single day if you want.

Students from around the world are using this to fix exactly these kinds of issues and steadily improve their jazz bass skills.

Check Out the Lesson Service →

Posted on Leave a comment

Useful iReal Pro Features You Might Not Know About

This article is written by Toru Hoshino, a jazz bassist and instructor based in Japan who teaches online lessons to students worldwide. In this article, he rounds up several lesser-known but genuinely useful features of the practice app iReal Pro.

iReal Pro is a practice app loved by musicians across every genre, and as a jazz player myself, I rely on it constantly — the built-in “Jazz 1450” tune set in particular gets a lot of use in my own routine. It’s a fantastic tool for practicing tunes, but it also has a handful of useful features that don’t get talked about much. Here’s a roundup.

Useful Features You Might Not Know About

Changing the Count-In

You can start a tune with no count-in, a 4-beat count-in, or an 8-beat count-in. This is adjustable in the song settings — I personally keep mine set to an 8-count.

Starting Playback Partway Through a Tune

Press and hold on any bar to start playback from that exact point. Great for drilling a specific section.

Looping a Section

Press and hold the bar where you want the loop to start, then drag to extend the selection to where you want it to end. The app will then loop just that highlighted range — another great way to drill a tricky passage.

Estimating a Song’s Tempo

If you’re listening to a track and want a rough sense of its tempo without looking it up, you can tap along to the beat on the app’s metronome-tap feature, and it’ll estimate the BPM for you. It won’t be perfectly precise, but it’s a handy way to get in the right ballpark.

Gradually Increasing the Tempo

In a tune’s tempo settings, there’s an option to automatically speed up over the course of playback — for example, setting “+10 bpm” will play the first chorus at 100 bpm, then bump it up to 110 bpm for the second chorus, and so on. Great for building speed gradually without having to keep manually adjusting the tempo yourself.

Creating Your Own Backing Track

You can also build your own chart from scratch: open a new blank chart, enter the chords bar by bar (letters for the chord, “-” for minor, “△” for major, “%” for a repeat symbol), set up barlines, repeat signs, and endings, and give it a title, composer, rhythm style, and key. Once it’s set, the app will generate a full backing track for it — and you can apply any rhythm/genre style to it, not just jazz.

Changing the Rhythm Style

Any chart can be played back in a wide range of rhythm styles — swing, Latin, bossa nova, funk, rock, 3/4 time, and more. This lets you practice the tune you’re working on, or a tune your current band is playing, in whatever feel actually matches the gig. Jazz standards like “Fly Me to the Moon” often get arranged in a 4-beat swing, a bossa nova, or 3/4 time depending on the situation, so it’s worth experimenting with different rhythm styles for whatever tune you’re working on.

Muting the Drums and Bass

You can mute the drums and bass tracks individually, leaving just the piano or guitar comping. Since the comping often doesn’t land squarely on beat 1, this is great practice for keeping solid time on your own.

Turning Off the Playback Indicator

The moving on-screen marker that shows your current position in the chart is a great visual guide, but relying on it too heavily can mean your actual chart-reading skills don’t get the workout they need — and in a real performance, you obviously won’t have it. You can turn this indicator off in the chord chart settings, which makes for a noticeably harder but more realistic practice session.

There’s a lot more depth to get out of this app than most people realize — hopefully a few of these tips are useful for your own practice.

Squeezing every feature out of a practice app is great, but it can only take you so far — getting a teacher’s read on how your timing and chart-reading actually hold up in real time is where the rest of the progress comes from.

Want Personalized Feedback on Your Playing?

This is exactly the kind of thing that’s hard to fix alone — and where having a teacher makes all the difference.

At Line on Bass, I offer an online lesson service where you send me a video of your playing, and I give you specific, detailed feedback — every single day if you want.

Students from around the world are using this to fix exactly these kinds of issues and steadily improve their jazz bass skills.

Check Out the Lesson Service →

Posted on Leave a comment

What Changed in My Playing After Switching to 5-String Bass

This article is written by Toru Hoshino, a jazz bassist and instructor based in Japan who teaches online lessons to students worldwide. In this article, he shares what actually changed in his playing style after switching to 5-string bass.

If you’ve only ever played a 4-string bass, you’ve probably wondered what a 5-string is actually like to play — I was right there too.

I haven’t been playing 5-string for all that long myself, but it’s been about five years since I started using one regularly. And in that time, one thing about my playing style changed significantly compared to my 4-string days: my right hand.

Specifically, when finger-picking, I stopped resting my right hand on top of the pickup. That’s the single biggest change.

Back when I only played 4-string, my approach was:

Playing the 3rd/4th strings → right hand resting on the pickup

Right hand resting on the pickup while playing the lower strings

Playing the 1st/2nd strings → right hand resting on the 4th string

Right hand resting on the lower string while playing the higher strings

That was roughly my style. But since picking up the 5-string, I now keep my thumb off both the strings and the pickup entirely, resting it lightly against the strings instead.

Here’s roughly what that looks like:

A floating right-hand thumb position used on 5-string bass

The reason I landed on this form is that my old approach made muting genuinely difficult on a 5-string.

With 5 strings, resting your hand on the pickup puts you a long way from the 1st string, and there are more strings you need to mute at any given time — which meant I was constantly relying on my right thumb for muting, and before I knew it, I’d drifted away from the pickup entirely.

These days, I find myself lifting my thumb off the pickup even on 4-string basses fairly often too (depending on the phrase). But this new approach has genuinely made muting easier than it used to be.

I originally picked up the 5-string simply because more of my students were playing one, but it turned into an unexpected discovery, and I’m having a lot of fun with 5-string bass these days.

For what it’s worth, I barely ever actually play that 5th string itself!

A shift like this in your right-hand form is hard to evaluate just by feel — having a teacher watch your hand position directly is the fastest way to tell if it’s actually working for you.

Want Personalized Feedback on Your Playing?

This is exactly the kind of thing that’s hard to fix alone — and where having a teacher makes all the difference.

At Line on Bass, I offer an online lesson service where you send me a video of your playing, and I give you specific, detailed feedback — every single day if you want.

Students from around the world are using this to fix exactly these kinds of issues and steadily improve their jazz bass skills.

Check Out the Lesson Service →