Posted on Leave a comment

The Church Modes, Explained With as Little Jargon as Possible

This article is written by Toru Hoshino, a jazz bassist and instructor based in Japan who teaches online lessons to students worldwide. In this article, he explains the church modes — a set of scales genuinely useful for improvising — with as little jargon as possible.

This article is useful for:

  • Anyone unsure how to structure an improvised solo
  • Anyone wanting to learn some music theory
  • Anyone looking for fresh ideas for their solos
  • Anyone just getting started with jazz bass

What Is a Scale, Really?

A bass

If you play bass, you’ve definitely heard the word “scale” thrown around. But even players experienced enough to improvise often don’t fully understand what it actually means, so let’s start from the very basics.

A scale is just a set of pitches arranged in a fixed, repeating pattern. Take the familiar major scale, do-re-mi-fa-sol-la-ti-do: going from C on the 3rd fret of the 3rd string up to the C an octave higher, you’re moving through a fixed sequence of “whole steps” (a 2-fret gap) and “half steps” (an adjacent-fret gap).

It’s easiest to picture on a piano. The pattern looks like this:

whole – whole – half – whole – whole – whole – half

A scale built on that specific pattern is called a major scale, or an Ionian scale. We’ll use the name “Ionian” going forward.

Scales You Can Use for Improvising

There are countless types of scales out there, but here’s an especially useful set for improvising.

The C-to-C major scale we just covered — whole, whole, half, whole, whole, whole, half — starts on C. But what if you start that same set of seven white-key notes somewhere else?

Starting on D instead and going D-E-F-G-A-B-C-D gives you the pattern:

whole – half – whole – whole – whole – whole – half – whole

This scale, starting on D, is called the Dorian scale.

Starting on E instead, E-F-G-A-B-C-D-E, gives:

half – whole – whole – whole – whole – half – whole – whole

This one, starting on E, is called the Phrygian scale.

Following the same logic:

Starting on F gives the Lydian scale
Starting on G gives the Mixolydian scale
Starting on A gives the Aeolian scale
Starting on B gives the Locrian scale

These scales give you a set of usable notes for each of the seven diatonic chords built in the key of C.

The Church Modes — and a Mnemonic to Remember Them

Together, these seven scales —

Ionian
Dorian
Phrygian
Lydian
Mixolydian
Aeolian
Locrian

— are known as the church modes. A common way English-speaking musicians remember the order is the mnemonic sentence “I Don’t Particularly Like Modes A Lot” — the first letter of each word matches the first letter of each mode, in order.

Each chord in a major diatonic progression lines up with one of these church modes, and approaching your improvising through this lens opens up a lot more melodic variety than sticking to just a 3-note triad or a 5-note pentatonic scale. These are terms worth holding onto, since they’ll come up again in future lessons on improvising.

A Real Example

Take the first 4 bars of “Fly Me to the Moon” as an example for improvising. Based on the theory above, here’s how the church modes map onto those bars.

That said, just running straight up a mode from the bottom like that doesn’t actually sound very musical on its own — getting these church modes to sound genuinely “jazz” and melodic is something I’ll cover in a future lesson on improvising.

This may have gotten a little theory-heavy, but the main thing to take away is simply this: when soloing over diatonic chords, thinking in terms of church modes is one valid approach. These scale names will come up again in future lessons, so if you ever find yourself thinking “wait, what’s Dorian again?” or “what was Phrygian?”, feel free to come back and check.

Knowing the seven modes in theory is one thing — actually hearing which one to reach for in a given moment, and making it sound musical rather than just “correct,” is exactly the kind of judgment a teacher sharpens fastest.

Want Personalized Feedback on Your Playing?

This is exactly the kind of thing that’s hard to fix alone — and where having a teacher makes all the difference.

At Line on Bass, I offer an online lesson service where you send me a video of your playing, and I give you specific, detailed feedback — every single day if you want.

Students from around the world are using this to fix exactly these kinds of issues and steadily improve their jazz bass skills.

Check Out the Lesson Service →

Posted on Leave a comment

A Bluesy Minor Pentatonic Trick That Works Surprisingly Well Over “Fly Me to the Moon”

This article is written by Toru Hoshino, a jazz bassist and instructor based in Japan who teaches online lessons to students worldwide. In this article, he shares a bluesy minor pentatonic approach that works surprisingly well over “Fly Me to the Moon.”

This article is for anyone who’s thought, “I’m not sure how to actually use the minor pentatonic scale” or “I want a fresh idea for my improvised solos.” It’s a handy scale that works well over:

  • Tunes in the key of A minor
  • A Dm7 → G7 → C△7 ii-V-I progression
  • An F blues

The A Minor Pentatonic Scale

Let’s use the A minor pentatonic scale as our example here. This is the well-known shape a lot of players already learned this scale in.

To give that familiar shape a bluesier flavor, I add in the ♭5th of A minor — E♭.

I also shift the lowest note from A to E♭ on the 7th fret of the 3rd string, turning it into an inversion of the same scale.

I use this scale a lot when improvising over “Fly Me to the Moon” — and in particular, I lean heavily on emphasizing that ♭5th.

Here’s a quick demo of it in action — hopefully you can hear how it locks in with the harmony.

Why a Bluesy Minor Pentatonic Works So Well Over “Fly Me to the Moon”

The notes in this A minor pentatonic scale are:

A (root), C (m3rd), D (11th), E♭ (♭5th), E (5th), G (7th)

The reason it works so well is that these notes overlap heavily with the actual chord tones of each chord in the progression.

For Example

Am7 (Bar 1)

A (root), C (m3rd), E (5th), G (7th) are chord tones; D (11th) and E♭ (♭5th) are tensions.

Dm7 (Bar 2)

D (root), A (5th), C (♭7th) are chord tones.

G7 (Bar 3)

G (root), D (5th) are chord tones.

C△7 (Bar 4)

C (root), E (3rd), G (5th) are chord tones.

F△7 (Bar 5)

C (5th), A (3rd), E (△7th) are chord tones.

Because the scale overlaps so heavily with chord tones across the progression, even playing it fairly freely tends to land “in the pocket” sound-wise.

Using It With Restraint

That said, if you go too random with it the way the opening demo did, it stops sounding musical. So it’s worth being deliberate about leaving space and dropping in the bluesy minor pentatonic only at select moments, rather than constantly. Try working it in piece by piece, wherever it feels like it fits.

Hopefully this gives you something useful for your own improvising.

Knowing which notes overlap with the chord tones in theory is one thing — actually hearing whether your placement of them sounds musical or just random is exactly the kind of judgment a teacher sharpens fastest.

Want Personalized Feedback on Your Playing?

This is exactly the kind of thing that’s hard to fix alone — and where having a teacher makes all the difference.

At Line on Bass, I offer an online lesson service where you send me a video of your playing, and I give you specific, detailed feedback — every single day if you want.

Students from around the world are using this to fix exactly these kinds of issues and steadily improve their jazz bass skills.
Check Out the Lesson Service →

Posted on Leave a comment

One Move That Instantly Adds a Jazz Flavor to a ii-V-I Phrase

This article is written by Toru Hoshino, a jazz bassist and instructor based in Japan who teaches online lessons to students worldwide. In this article, he shares one move that instantly adds a jazz flavor to phrases over a ii-V-I progression.

The “ii-V-I” progression is one of the most common chord movements in jazz — things like:

Dm7 → G7 → C△7
Cm7 → F7 → B♭△7
Fm7 → B♭7 → E♭△7

It comes up constantly, so it’s worth having a variety of go-to moves over it. Here’s one approach that instantly gives a phrase that “jazz” quality:

  • Use the ♭9th over the dominant chord
  • Land on the 3rd over the tonic chord

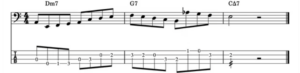
Here’s a phrase I built around exactly that idea:

A ii-V-I phrase over Dm7-G7-Cmaj7 using the b9th on the dominant and landing on the 3rd over the tonic

A Quick Word on “Dominant” and “Tonic”

Before getting into the specific notes, a quick word on “dominant” and “tonic” — these refer to a chord’s harmonic function. In a progression like Dm7 → G7 → C△7 (in the key of C), G7 is the dominant and C△7 is the tonic.

Using the ♭9th Over the Dominant

In the phrase above, the circled note is the “♭9th.”

“♭9th” sounds complicated, but it’s simply the note a half step above the chord’s root.

Working this ♭9th note into a dominant chord is what gives a phrase that distinctly “jazz” edge.

Landing on the 3rd Over the Tonic

After creating that edge over the dominant, if you then land your phrase on the 3rd of the tonic chord, the tension built up over the dominant resolves, and the phrase wraps up with a clean, pleasing harmony.

Building up your freedom to weave moves like “use the ♭9th over the dominant” and “land on the 3rd over the tonic” into your improvising is a great way to expand your vocabulary.

Hearing exactly where to place a ♭9th so it lands with intention rather than just sounding off is the kind of judgment that’s hard to self-assess — a teacher catches it instantly.

Want Personalized Feedback on Your Playing?

This is exactly the kind of thing that’s hard to fix alone — and where having a teacher makes all the difference.

At Line on Bass, I offer an online lesson service where you send me a video of your playing, and I give you specific, detailed feedback — every single day if you want.

Students from around the world are using this to fix exactly these kinds of issues and steadily improve their jazz bass skills.
Check Out the Lesson Service →

Posted on Leave a comment

Building a Bass Solo Over “Fly Me to the Moon”: 7 Things I Kept in Mind

This article is written by Toru Hoshino, a jazz bassist and instructor based in Japan who teaches online lessons to students worldwide. In this article, he breaks down seven things he kept in mind while improvising a bass solo over the chord progression of “Fly Me to the Moon.”

This article is for:

  • Bassists who aren’t sure how to actually structure an improvised solo
  • Bassists who want fresh ideas for their improvised solos
  • Bassists who are just getting started with jazz bass

Soloing Over “Fly Me to the Moon” (Performance)

Here’s the performance — give it a watch first.

What I Kept in Mind While Soloing

Here’s what I was focused on while building this solo:

  1. Not overcrowding the phrase with notes
  2. Working in triplets deliberately
  3. Leaning on chord tones with intention
  4. A go-to dominant phrase
  5. A Paul Chambers–style phrase
  6. Quoting the melody
  7. Closing it out with a walking bass line

1. Not Overcrowding the Phrase with Notes

In the A section (bars 1–8), I deliberately used a lot of rests and long tones, keeping the note density low right from the start.

If you cram in too many phrases right out of the gate, you tend to run out of ideas later on, and the solo as a whole ends up sounding flat with no dynamic shape.

So here, I deliberately kept the early note count low, to build in some light-and-shade across the whole solo.

2. Working in Triplets Deliberately

In bar 2 of the B section, I deliberately worked in an eighth-note triplet rhythm.

Triplets can feel a bit awkward fingering-wise at first, but a solo built only out of quarter notes and eighth notes tends to feel flat no matter what.

Adding triplets brings rhythmic ups and downs and real groove to a phrase, making for a much more memorable solo. I’d really encourage working them in deliberately.

3. Leaning on Chord Tones with Intention

In bars 1–4 of the A section (second time through), I set a chord tone — the root, 3rd, or 5th — on the first beat of every bar, and built each phrase so it moves toward that target note.

Doing this gives your improvisation a natural, “singing” quality. That said, staying constantly aware of chord tones throughout a performance isn’t easy.

4. A Go-To Dominant Phrase

In bar 4 of the C section, I used a stock phrase built on a dominant motion.

Specifically, over the A7 → Dm7 movement, I used C# (the major 3rd of A7) and B♭ (the altered ♭9 tension) to create that unmistakably “jazz” sound.

Phrases like this — the “go-to” ones — are a powerful weapon for instantly adding a jazz flavor to your playing.

5. A Paul Chambers–Style Phrase

In bar 5 of the A section (second time through), I took on a phrase combining triplets with wide leaps.

This phrase draws on one I picked up from jazz bass legend Paul Chambers, from his playing on his landmark album “Visitation.” It’s on the harder side, but it’s the kind of thing that genuinely pays off once you’ve got it under your fingers.

6. Quoting the Melody

In bars 5–7 of the A section (second time through), I quoted part of the tune’s actual melody.

Quoting the theme like this is a common technique, not just in jazz but in rock solos too. It makes the “oh, that’s the tune!” connection click for the listener and brings a sense of familiarity and unity to the performance.

Keeping the melody in your back pocket is a genuinely powerful tool when you’re building an improvised solo.

7. Closing It Out with a Walking Bass Line

In bars 7–8 of the C section in the second chorus, I switched into a walking bass line right from the top of bar 31, signaling clearly to the listener that the solo is wrapping up.

This approach gets used constantly at real sessions — it also makes it much easier for the next soloist to come in cleanly. It’s a closing technique well worth keeping in your back pocket.

Building a solo with this much intentional structure takes time to internalize — having someone point out exactly which of these seven elements is missing from your own playing is where a teacher’s feedback speeds things up enormously.

Want Personalized Feedback on Your Playing?

This is exactly the kind of thing that’s hard to fix alone — and where having a teacher makes all the difference.

At Line on Bass, I offer an online lesson service where you send me a video of your playing, and I give you specific, detailed feedback — every single day if you want.

Students from around the world are using this to fix exactly these kinds of issues and steadily improve their jazz bass skills.
Check Out the Lesson Service →

Posted on Leave a comment

What It Actually Takes to Play Solo Bass

This article is written by Toru Hoshino, a jazz bassist and instructor based in Japan who teaches online lessons to students worldwide. In this article, he answers a question about what actually matters most when learning solo bass.

I recently uploaded a video of myself playing the jazz standard “Summertime” as a solo bass arrangement, and it got a great response — I received several questions along the lines of “how do you actually do this?”

The single most important thing is, unsurprisingly: repetition. Honestly though, that’s true of pretty much everything, so let me also share the next thing I prioritize, which is more specific: song selection.

More specifically, I pay close attention to one particular question: can this song be played using open strings?

Why Open Strings Matter

Practicing a solo bass arrangement on upright bass

When playing solo bass, you’re typically playing the melody on the 1st and 2nd strings (D and G) while playing the bass line on the 3rd and 4th strings (E and A).

The 1st and 2nd strings inevitably need your left hand actively moving to play the melody. If the 3rd and 4th strings also require your left hand at the same time, your left-hand fingering gets overloaded, and it becomes genuinely difficult to pull off a one-person ensemble.

“Summertime” is in the key of A minor, so it can largely be played using the open 3rd string as the bass note, and the open 4th string’s E and open 2nd string’s D are also easy to use harmonically within that key.

So my recommendation, especially when starting out, is to work with keys that let you lean heavily on open strings — A minor, D minor, and similar keys. On the flip side, I don’t really recommend starting with keys loaded with key signatures, like G♭ or D♭ — your left hand ends up overworked.

Hopefully this gives you a useful way to think about taking on solo bass.

The Solo Bass Performance

Here’s my take on “Summertime.”

Picking the right key gets you most of the way there — but actually balancing melody and bass line with two independent hands is exactly where having a teacher’s ear catches what you can’t hear yourself.

Want Personalized Feedback on Your Playing?

This is exactly the kind of thing that’s hard to fix alone — and where having a teacher makes all the difference.

At Line on Bass, I offer an online lesson service where you send me a video of your playing, and I give you specific, detailed feedback — every single day if you want.

Students from around the world are using this to fix exactly these kinds of issues and steadily improve their jazz bass skills.
Check Out the Lesson Service →

Posted on Leave a comment

Using iReal Pro? Try These 2 Drills to Stop Losing Your Place

This article is written by Toru Hoshino, a jazz bassist and instructor based in Japan who teaches online lessons to students worldwide. In this article, he shares two drills using iReal Pro that specifically target the “losing your place” problem.

iReal Pro — a backing-track app for jazz — is something I’ve personally used for over ten years. It’s incredibly convenient, but the feedback I hear most often is:

“I can play along fine with iReal Pro, but I completely lose my place in a real session.”

To be fair, the tension level of playing relaxed at home versus improvising live with strangers is completely different, so it’s no surprise the results aren’t the same. Still, if you’re going to use a convenient tool, you might as well use it efficiently — so here are two practice methods that help.

Both of these make practicing with iReal Pro noticeably harder, but they make for genuinely great practice.

1. Turn Off the Playback Indicator

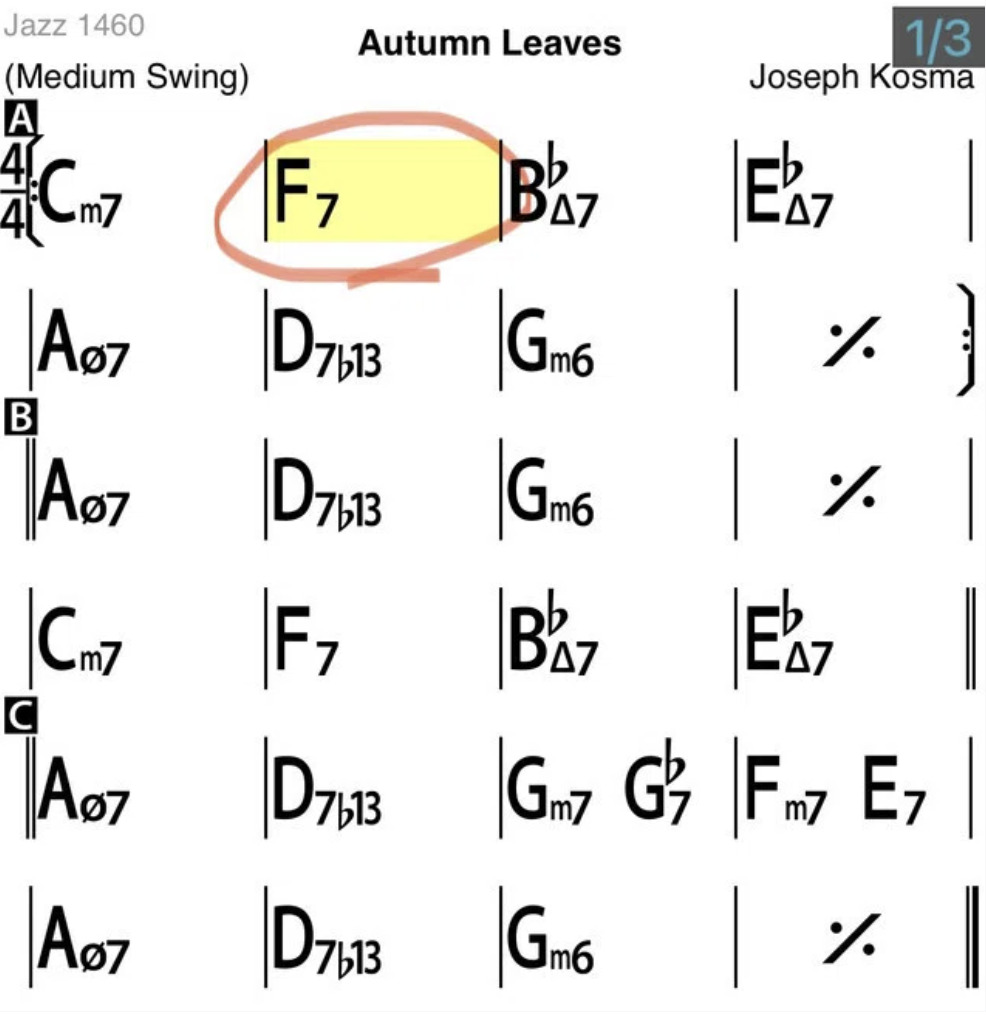
The “playback indicator” is the feature that shows you exactly which chord the song is currently on.

iReal Pro's playback indicator highlighting the current chord

Since it’s constantly showing your current position in the chart, it’s pretty hard to actually get lost. But in a real performance, you obviously don’t get that kind of helpful indicator.

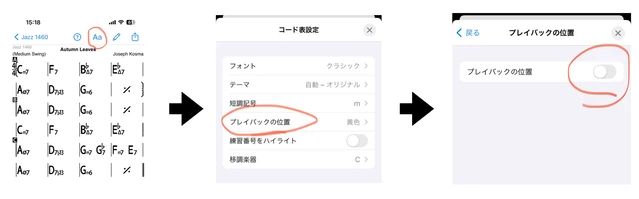
So turning the indicator off brings your practice conditions a little closer to the real thing. Open any tune, tap the letter display at the top of the screen, and turn off the “Playback Position” setting.

The setting to turn off iReal Pro's playback position indicator

This makes practicing noticeably harder, but it’ll build real skill.

2. Mute the Bass and Drums

Muting the bass and drums leaves you with just piano or guitar comping.

Practice playing your bass line or solo against just that. With no rhythm section backing you, the entire rhythmic responsibility falls on you alone — which is exactly what builds your internal sense of time.

On top of that, piano or guitar comping doesn’t always land squarely on beat 1, so just figuring out where the bar lines and beats actually are becomes its own challenge.

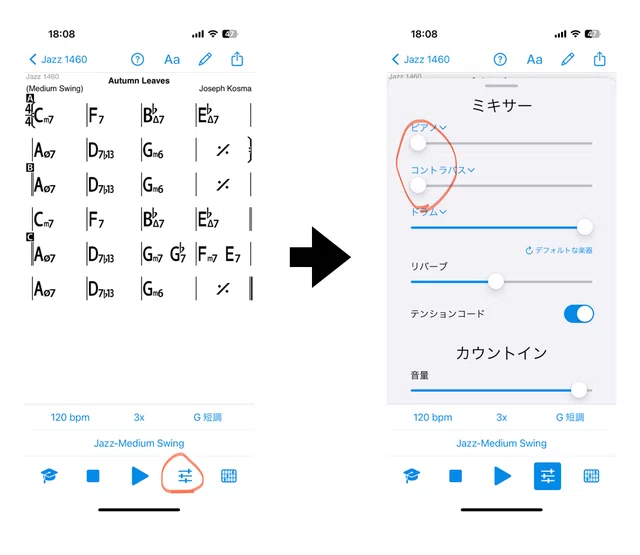
Open any tune, tap the mixer icon at the bottom of the screen, and turn off “Bass” and “Drums.”

iReal Pro's mixer screen for muting the bass and drum tracks

This makes things considerably harder too, but it’s great training.

At the end of the day, avoiding getting lost really does require real-world reps and experience — but it’s still worth squeezing every bit of value out of the tools available to you.

Drilling this kind of focus on your own is great — but knowing whether you’re actually staying locked to the time, rather than just feeling like you are, is exactly what a teacher’s ear can confirm.

Want Personalized Feedback on Your Playing?

This is exactly the kind of thing that’s hard to fix alone — and where having a teacher makes all the difference.

At Line on Bass, I offer an online lesson service where you send me a video of your playing, and I give you specific, detailed feedback — every single day if you want.

Students from around the world are using this to fix exactly these kinds of issues and steadily improve their jazz bass skills.
Check Out the Lesson Service →

Posted on Leave a comment

Chord Tones vs. Scales: What’s the Actual Difference?

This article is written by Toru Hoshino, a jazz bassist and instructor based in Japan who teaches online lessons to students worldwide. In this article, he explains the actual difference between chord tones and scales.

A student of mine recently watched a walking bass line video I’d sent over, and asked: “why did you use this note here?”

Specifically: in the chord “C△7,” I’d used the note A — why?

The short answer: A works perfectly fine over C△7! Let’s dig into why.

A Quick Music Theory Refresher

The question, essentially, was: over C△7, aren’t the only usable notes

C (root)
E (3rd)
G (5th)
B (7th)

…so why can other notes be used too?

These four notes are called “chord tones,” and they form the foundation for building a bass line.

But — there are usable notes beyond just the chord tones.

Notes You Can Use Beyond the Chord Tones

As it turns out, the 2nd, 4th, and 6th are also available to use.

In the key of C, specifically, that’s:

D (2nd), F (4th), A (6th)

These notes are called “tensions.”

When you add the tensions (2nd, 4th, 6th) to the chord tones (1st, 3rd, 5th, 7th)…

…you get all seven notes from the 1st through the 7th — in other words, the scale.

So the relationship is:

Chord tones + tensions = scale

The bass line I’d sent my student was built with this “scale” concept in mind — that A wasn’t a random note, it was the 6th, drawn deliberately from the broader scale rather than just the four chord tones.

If that’s piqued your curiosity, I’m genuinely glad.

Grasping the theory is one thing — actually hearing where a tension note fits naturally into your own bass line is exactly the kind of judgment a teacher can sharpen fastest.

Want Personalized Feedback on Your Playing?

This is exactly the kind of thing that’s hard to fix alone — and where having a teacher makes all the difference.

At Line on Bass, I offer an online lesson service where you send me a video of your playing, and I give you specific, detailed feedback — every single day if you want.

Students from around the world are using this to fix exactly these kinds of issues and steadily improve their jazz bass skills.
Check Out the Lesson Service →

Posted on Leave a comment

How to Build a Bass Solo Over an F Blues Using Just the Minor Pentatonic

This article is written by Toru Hoshino, a jazz bassist and instructor based in Japan who teaches online lessons to students worldwide. In this article, he shares a simple way to build a bass solo over an F blues.

F blues is about as standard as it gets at a jam session — it’s a tune beginners run into constantly. That said, when you actually try to solo over it, you tend to run into:

  • So many chords (F7, B♭7, and more) that it’s hard to keep track
  • No clear idea of how to actually build a solo

For exactly that situation, here’s an approach I recommend: building your solo entirely around one single minor pentatonic scale.

What Is the Minor Pentatonic Scale?

In the key of F, that’s the five-note scale F-A♭-B♭-C-E♭. You can play “convincingly” over the whole blues progression with just these five notes, without having to closely track every single chord change.

This is a great approach for beginning improvisers, and it’s one I bring up constantly in my own lessons.

The reason it works is that F blues is built almost entirely from dominant 7th chords (F7, B♭7, C7) that all share a closely related blues sound — the F minor pentatonic scale lines up naturally against all of them, which is exactly why you can lean on one scale for the whole form without it sounding wrong.

Once you’re comfortable just running this one scale over the whole form, try shaping actual phrases out of it — starting and landing on different notes, adding rhythmic variety, working in some space — rather than just running up and down the scale. That’s what turns “technically correct” into an actual solo.

If you’re hoping to join a jam session someday, this is a great place to start. Once you’re comfortable with it, the same approach extends to blues progressions in other keys too.

Give a minor-pentatonic-based bass solo a try.

Getting comfortable with the scale is step one — shaping it into phrases that actually sound musical is the part a teacher can help you nail down fastest.

Want Personalized Feedback on Your Playing?

This is exactly the kind of thing that’s hard to fix alone — and where having a teacher makes all the difference.

At Line on Bass, I offer an online lesson service where you send me a video of your playing, and I give you specific, detailed feedback — every single day if you want.

Students from around the world are using this to fix exactly these kinds of issues and steadily improve their jazz bass skills.
Check Out the Lesson Service →

Posted on Leave a comment

Want to Arrange a Pop Song as Jazz? Here’s How to Pick the Right Song

This article is written by Toru Hoshino, a jazz bassist and instructor based in Japan who teaches online lessons to students worldwide. In this article, he answers a question from a lesson: how do you pick a pop song that actually works as a jazz arrangement?

Here’s a question I got recently in a lesson:

I want to arrange a pop song as jazz — what kind of songs actually work for that?

My answer is simple, and comes down to two things:

  1. Does the song’s rhythm actually fit a swing feel?
  2. Does the chord progression include a ii-V-I?

A song that checks both boxes is a great candidate for a jazz arrangement. Let’s look at each one.

1. Does It Fit a Swing Rhythm?

The easiest way to check is to literally try singing the melody in a swing rhythm and see how it feels.

Some melodies are built on tight, even, straight-eighth-note phrasing — the kind of rhythm common in a lot of uptempo pop and electronic-influenced music. Force a swing feel onto a melody like that, and it tends to sound unstable, like the rhythm doesn’t quite know where it’s going.

Other melodies — slower ballads, or songs with a naturally loose, laid-back rhythmic feel to begin with — already have something close to a swing lilt baked in. Sing those in swing time, and the vibe holds together naturally, without losing what made the song work in the first place.

So: try singing the melody in swing time. If it still feels natural and doesn’t lose its character, that’s a great sign it’ll convert well into a jazz arrangement.

2. Does the Chord Progression Include a ii-V-I?

Here’s an example in the key of C:

  • A common pop progression: F → G → C (IV → V → I)
  • A jazz-friendly progression: Dm7 → G7 → C (ii → V → I)

If a “ii-V-I” shows up in the progression, it’s much easier to develop a convincingly jazz-sounding harmonic flow around it.

Summary

  • Try singing the song in swing time and see if the vibe still holds together
  • Check whether the chord progression includes a ii-V-I

Checking these two things will help you pick out which pop songs are actually going to convert well into a jazz arrangement.

Picking the right song is one thing — actually building a convincing jazz bass line under it is another, and that’s exactly where a teacher’s feedback speeds things up.

Want Personalized Feedback on Your Playing?

This is exactly the kind of thing that’s hard to fix alone — and where having a teacher makes all the difference.

At Line on Bass, I offer an online lesson service where you send me a video of your playing, and I give you specific, detailed feedback — every single day if you want.

Students from around the world are using this to fix exactly these kinds of issues and steadily improve their jazz bass skills.
Check Out the Lesson Service →

Posted on Leave a comment

How to Keep Pentatonic Licks From Sounding Like a Nursery Rhyme

This article is written by Toru Hoshino, a jazz bassist and instructor based in Japan who teaches online lessons to students worldwide. In this article, he answers a question about how to keep pentatonic licks from sounding like a nursery rhyme.

Today’s question:

“How do I keep my pentatonic improvising from sounding like a children’s song?”

Pentatonic scales get talked about constantly, but depending on how you use them, they really can end up sounding like a simple folk tune or nursery rhyme.

For example, take a C major pentatonic scale and play it like this:

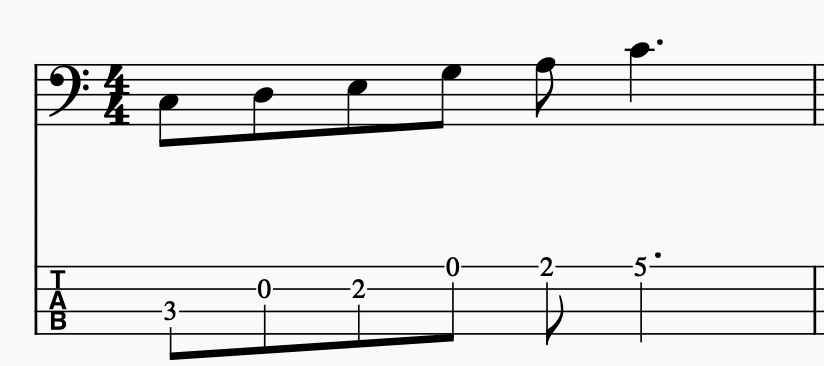
C-D-E-G-A-C (3rd string, 3rd fret up to 1st string, 5th fret)

A C major pentatonic scale played straight up the neck

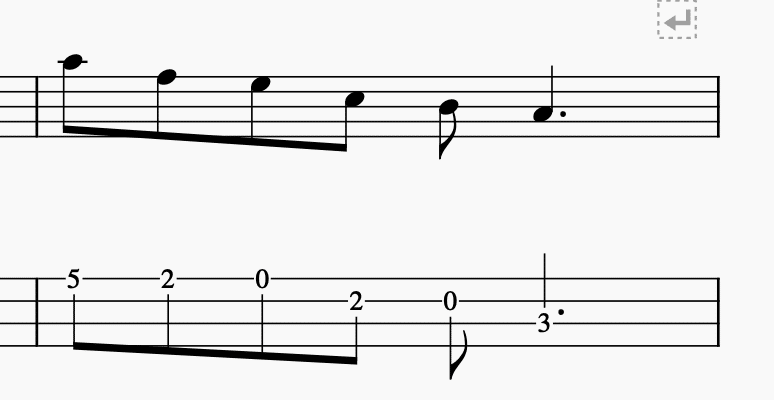
C-A-G-E-D-C (1st string, 5th fret down to 3rd string, 3rd fret)

The same pentatonic scale played straight down the neck

Try playing it straight up and down like that, with a bit of a bounce. Doesn’t it start to sound a little like a folk tune or nursery rhyme?

That’s not a coincidence — the five-note pentatonic scale really is heavily used in folk music and children’s songs, so it’s natural that it comes across that way.

That said, when you hear a great player use a pentatonic scale, it sounds completely different — genuinely cool. So with that in mind, here are three ways to dress up your pentatonic playing so it doesn’t sound naive.

How to Keep Pentatonic Licks From Sounding Like a Nursery Rhyme

1. Don’t treat the root as your anchor point
2. Start and land phrases on the 3rd or 5th
3. Work in the ♭7th or minor 3rd

1. Don’t Treat the Root as Your Anchor Point

In a C major pentatonic scale, you’ve got five notes: C-D-E-G-A.

The “straight up, straight down” patterns from earlier — C-D-E-G-A-C and C-A-G-E-D-C — both treat C, the root, as the anchor the phrase is built around.

Simply not anchoring your phrase around the root already goes a long way toward losing that nursery-rhyme quality.

So what should you do instead? Let’s get specific.

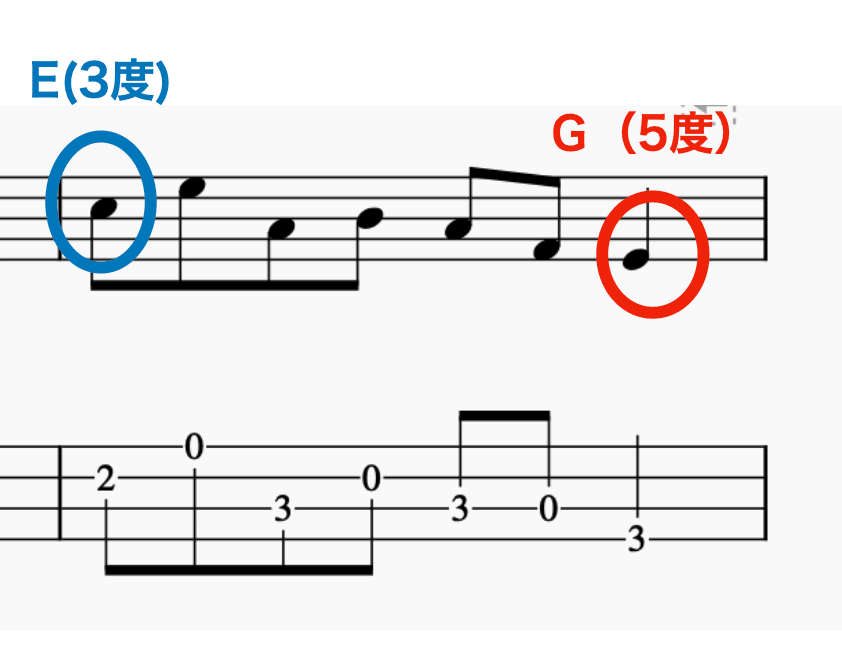
2. Start and Land Phrases on the 3rd or 5th

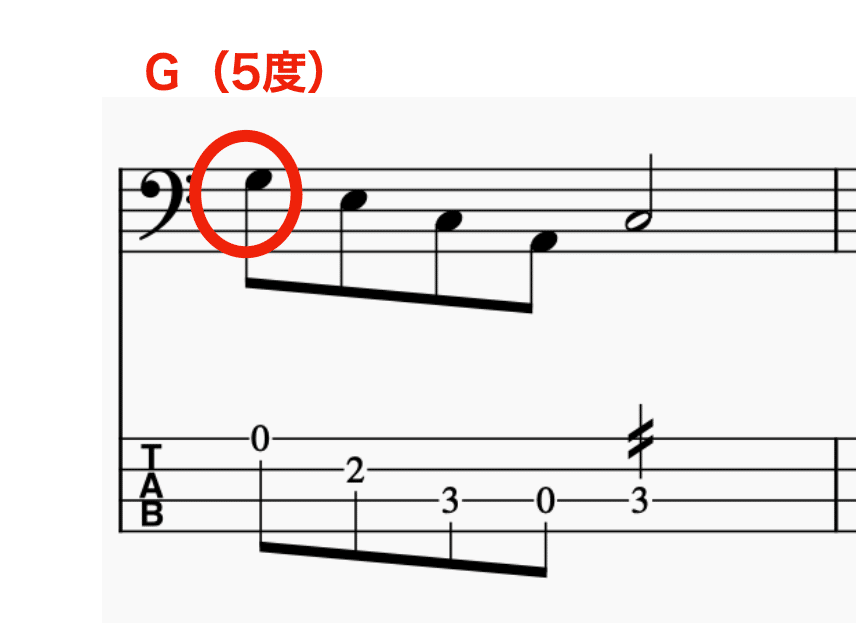
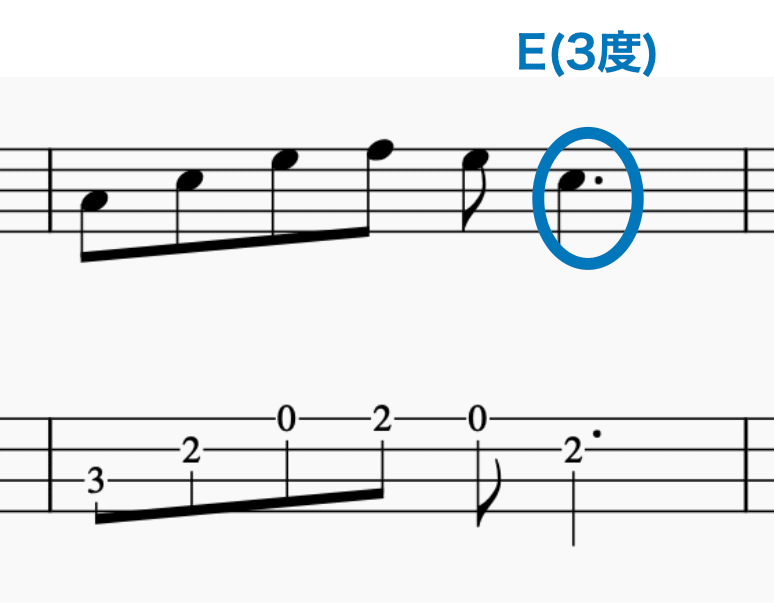
Starting and ending your phrases on the scale’s 3rd or 5th (rather than the root) tends to sound better. For example:

G-E-C-A-C… (starting the phrase on the 5th, G)

A pentatonic phrase starting on the fifth

C-E-G-A-G-E… (ending the phrase on the 3rd, E)

A pentatonic phrase ending on the third

E-G-C-D-C-A-G… (starting on the 3rd, ending on the 5th)

A pentatonic phrase starting on the third and ending on the fifth

Shaping your phrases this way takes them even further from that simple, naive sound.

3. Work in the ♭7th or Minor 3rd

This one’s a slightly more advanced technique, but working in the ♭7th or minor 3rd makes your pentatonic playing sound noticeably cooler right away.

This particular technique is a bit much to fully explain in text, so this is one case where a demonstration genuinely helps — it’s the kind of thing that’s much easier to grasp by ear once you hear exactly what those added notes do to the line.

Used well, this technique can shift the whole character of your pentatonic playing — from something that leans folk and nursery-rhyme-like, toward something that sounds more like blues or country. It’s a great way to make pentatonic playing sound genuinely cool.

Hopefully this gives you some useful ideas for keeping your pentatonic playing from sounding too simple.

Hearing exactly when a phrase tips into “nursery rhyme” territory takes a trained ear — and that’s exactly the kind of thing a teacher can flag immediately in your own playing.

Want Personalized Feedback on Your Playing?

This is exactly the kind of thing that’s hard to fix alone — and where having a teacher makes all the difference.

At Line on Bass, I offer an online lesson service where you send me a video of your playing, and I give you specific, detailed feedback — every single day if you want.

Students from around the world are using this to fix exactly these kinds of issues and steadily improve their jazz bass skills.

Check Out the Lesson Service →