This article is written by Toru Hoshino, a jazz bassist and instructor based in Japan who teaches online lessons to students worldwide. In this article, he lays out a step-by-step practice method for learning to improvise a walking bass line over an F blues, built specifically for players who can read a written bass line off a tab chart just fine, but freeze up the moment they’re given nothing but a chord chart.
You can play it fine if it’s written out in tab —
but hand you a chord chart and you’re completely lost.
If that’s you, this is a full training method for building the skill of improvising a walking bass line on the spot.
Fair warning: this is a genuinely long article. I’d recommend bookmarking it and working through it whenever you have time, rather than trying to get through it all in one sitting.
Contents
Step 1: Start With the Root
The first thing you need to be able to do is look at a chord and play that chord’s root. If you’re not confident with roots yet, make sure you’ve got that down first — if you already have, skip ahead.
Let’s actually match roots to a chart. Here’s an F blues:
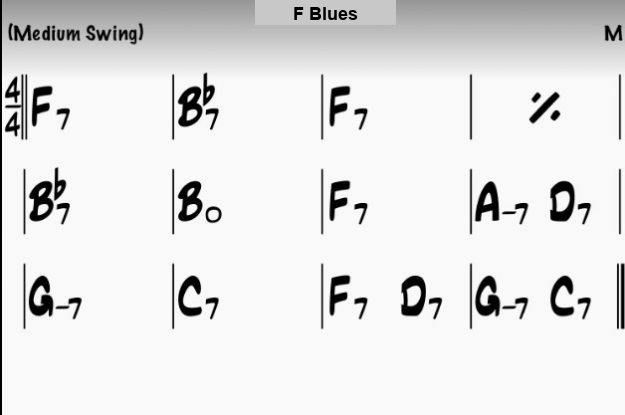
Start slow, with half notes (two notes per bar):

Once that feels comfortable, move up to quarter notes (four notes per bar):

iReal Pro is a great tool to use while practicing this.
→ Read more about how I use iReal Pro here.
Step 2: Play the Root in Different Octaves
Even when you’re only playing the root, thinking about which position to play it from widens what your bass line can do.
In the chart above, in bar 1 (F7) I’m playing the F on the 1st fret of the low E string, and in bar 2 (B♭7) I’m playing the B♭ on the 1st fret of the A string. But on the low frets alone, the F root is also available in these spots:

And the B♭ root is available here:

For Am7, you’ve also got the 5th fret of the low E string, the open A string, and the 2nd fret of the D string:

If playing only the root feels a little boring, try approaching the root from a different position on the neck. It might open up your bass line more than you’d expect.
Try Changing Up the Octave of the Root
Here’s an example. Every note here is still just the root — but simply changing the octave already shifts the feel quite a bit.

Of course, this alone still doesn’t sound very “jazz” yet — we’ll keep widening the range of approaches from here.
Step 3: Add the 5th
Once you can comfortably play the root alone, and the root moving across octaves, try adding the 5th.
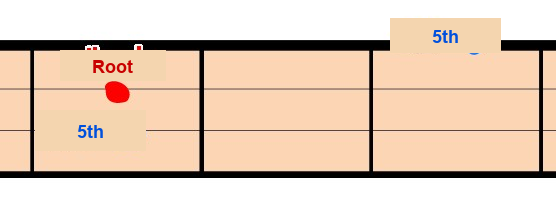
Here’s what that gives you. Just adding one note to the root, but doesn’t it already feel like there’s more motion?
Understanding the 5th, and Where to Find It
If the root is here, the 5th is the note shown in blue. If the root moves here, the 5th moves here:
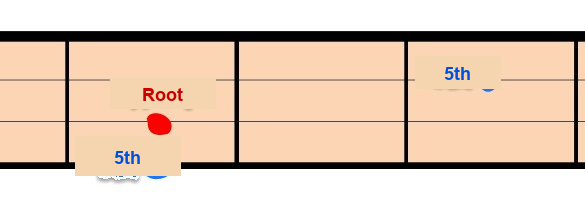
The relationship between the two is easy to remember.
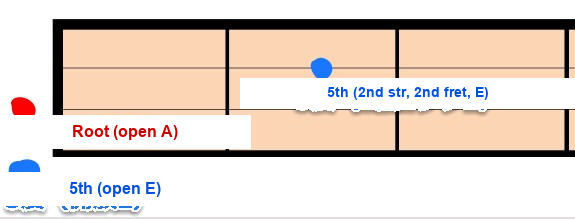
It’s a little less straightforward when open strings are involved, as shown above.
Still, when you just want some basic motion in a bass line without overthinking the theory, the 5th is a note that almost always fits comfortably.
Step 4: Root + 3rd
Here’s what that looks like:

That gives a pretty different impression from the 5th version, right?
Here’s the 3rd, relative to the chord’s root:

Just changing the octave the root sits in (Example 1), or moving where you place the quarter-note 3rd (Example 2), is enough to shift the feel on its own:
Example 1

Example 2

The 3rd Is What Gives a Chord Its Character
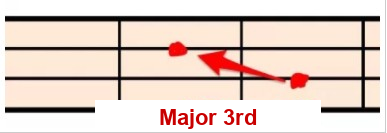
If you see a chord symbol like ●△7 or plain ●7, the 3rd is here — the major 3rd:
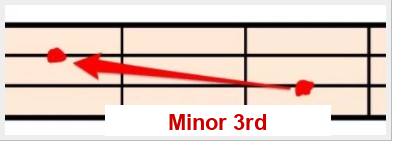
If you see ●m7, ●m7♭5, or ●dim, the 3rd is here instead — the minor 3rd:
Play both of those together with the root and you can really hear the difference in character.
With the 5th, the shape relative to the root stays the same whether the chord is major or minor:
But the 3rd shifts shape, as shown above. Major 3rds are generally described as sounding bright, and minor 3rds as sounding dark — it’s the note that conveys a chord’s emotional character.
When you’re building a walking bass line, you’ll want to be able to move freely between major and minor 3rds without having to think twice about it.
Step 5: Root + 3rd + 5th

That’s what it sounds like.
How to Practice This So Far — Part 1
You don’t need to follow this chart exactly — the goal is to use something like iReal Pro and be able to play a bass line built from the root, 3rd, and 5th at a steady tempo, on your own.
Also keep in mind that the 3rd and 5th can each be approached from above or below the root. Try mixing these up and see which combinations feel like they flow smoothly, are easy to play, and sound good to your ear.
Example 1: combining the 3rd approached from above and the 5th from above

Example 2: combining the 3rd approached from below and the 5th from below

Example 3: when a bar has two chords in it, rather than forcing in extra movement, just pick whatever’s easiest to finger

A slow tempo is fine — just experiment with different note choices.
Here are a couple of backing tracks I made for this (with a 4-count intro). Take it slow, and practice working in the octave, the 5th, and the 3rd around the root.
Tempo 60
Tempo 80
A Mindset for This Kind of Practice
This type of practice doesn’t have a clear finish line, the way nailing a transcription does — which makes it easy to lose motivation.
When you’re checking your note choices, do it without a metronome first. Once it starts to feel natural, bring in the metronome or a backing track.
This isn’t about memorizing fixed positions — it’s about training yourself to find these notes on the fly, in real time. That’s why it helps to keep visualizing where the root, 3rd, and 5th are as you play, rather than relying on muscle memory alone.
It takes real concentration, so if you do it properly, you’ll tire out fast. When you’re tired, stop. What matters is doing a little bit of this every single day.
Step 6: Root + Passing Tone

Here’s what that sounds like. Anywhere you see a “P” marked is a passing tone — “P” for “passing.”
What Is a Passing Tone?
Let’s set the 3rd and 5th aside for a moment and bring in passing tones instead. If you already know how passing tones work, feel free to skip ahead.
The basic idea: when you’re playing a steady quarter-note, four-beats-per-bar line, you place the last note of a given bar a half step above or below the root of the next bar’s chord. That’s what gives a bass line its smooth, connected feel.
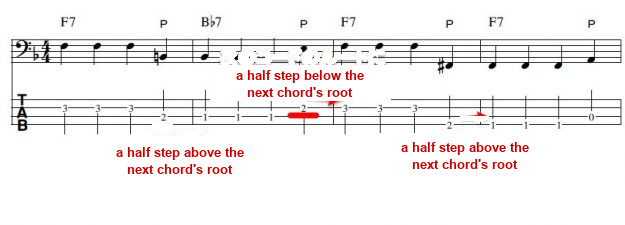
This technique shows up across all kinds of music, but it’s used especially heavily in jazz.
A Passing Tone Isn’t Always a Chord Tone
A passing tone isn’t necessarily a note from that bar’s chord scale, or even a chord tone at all — its job is purely to act as a connector between two notes.
For example, compare this version, which sticks strictly to chord tones —

— to this version. Doesn’t this one feel smoother?

I go into passing tones in a lot more depth in this article:
→ Passing Tones: A Key Building Block for Jazz Bass Lines
Step 7: A Walking Bass Line Built From Root + 3rd + 5th + Passing Tones

That’s how it comes together. I think it’s starting to sound a lot more “jazz” at this point.
(Passing tones are marked with a “P” throughout.)
Step 8: A Smoother Walking Bass Line
Building on the previous bass line, here’s a smoother version.

The Trick Behind Making the Line Smoother
I added the 7th into the mix of chord tones, on top of the root, 3rd, and 5th.
I also brought in scale tones beyond the chord tones — the 2nd, 4th, 6th, and so on — wherever they made for easier fingering, which opened things up even more.
Those are the two ideas behind this version.
Notes From the Chord Scale
Root + 3rd + 5th + 7th together are what’s called the chord tones, but thinking in terms of the full scale opens up your options even further.
For example, thinking in scale terms, here’s what you get for the F7 that comes up so often in this progression:

And for B♭, this position works well for a blues:

(Depending on the feel and tempo of the tune, positions without the red dots shown above can sometimes work too, but I won’t get into that here.)
How to Practice This So Far — Part 2
Keep chord tones as your anchor, weave in scale tones wherever they make the fingering easier, and try moving the root around to different positions as you work through the progression.
In the example chart, bars 1–2 start from the 1st fret of the low E string and move like this:

Here’s the same two bars starting instead from the 3rd fret of the A string:

In the example chart, bars 9–10 start from the open D string and move like this:

And here’s that same passage starting instead from the 3rd fret of the low E string.
The goal of this kind of practice isn’t to drill your fingers into memorizing one fixed path — it’s to train yourself to picture the next note in real time, so you can actually improvise.
It’s fine to make mistakes constantly while you practice. When you’re able to focus, work through it slowly while consciously naming each note in your head as you play it.
Step 9: A Walking Bass Line With Varied Rhythms

Once it’s not just a steady stream of quarter notes anymore, triplets and eighth notes start working as nice accents.
An example using a triplet accent:

An example using an eighth-note accent:


An example using a tied-note accent:

How to Practice This So Far — Part 3
You don’t need to follow the chart exactly — just practice deliberately placing accents where you choose.
Example using a triplet accent:

Example using an eighth-note accent:

Example using a tied-note accent:

(This one’s a bit tricky, I’ll admit ^^;)
Overdoing it can get repetitive, but if you don’t drill this in ahead of time, you won’t be able to drop an eighth-note or triplet accent exactly where you want it in the moment. Practice it deliberately, starting at a slow tempo.
Here’s a backing track at tempo 70 — feel free to use it for practice.
How to Think About Accents: Drilling vs. Real Playing
You drill accents on their own like this so they’re in your toolkit, but in actual performance, I don’t use them anywhere near this often.
There’s no fixed rule for how much you should use accents, but when a steady stream of quarter notes suddenly gets punctuated by one well-placed accent at exactly the right moment, that’s what makes a bass line sound genuinely cool.
That turned into a long one — thanks for sticking with it all the way through.
If you’ve read all the way down here, you’re clearly someone who’s genuinely interested in walking bass — and that’s exactly the kind of dedication that’s hard to keep building on without outside feedback.
Want Personalized Feedback on Your Playing?
This is exactly the kind of thing that’s hard to fix alone — and where having a teacher makes all the difference.
At Line on Bass, I offer an online lesson service where you send me a video of your playing, and I give you specific, detailed feedback — every single day if you want.
Students from around the world are using this to fix exactly these kinds of issues and steadily improve their jazz bass skills.